Spiced Applesauce Cake

IMG_9598.jpeg

I made a delicious batch of applesauce last year. Unfortunately, I don’t eat applesauce all that much, so I put it in the freezer and just haven’t taken it out! Last week, Lara decided to use some of it to make this applesauce cake from Smitten Kitchen that she has been eyeing for quite some time. Even though she didn’t make the frosting to go with it (which would be amazing, cream cheese frosting is always amazing!) the cake was so delicious that I wanted to make it again right away.

IMG_9581.jpeg

Then, a few days later, I realized that I had some yogurt in the fridge that really needed to be used. I’ve been getting raw goat’s milk from a co-worker and making it into goat’s yogurt (which is so good!). But I had a container that was getting older than I liked so I was trying to find a way to use it up…

IMG_9588.jpeg

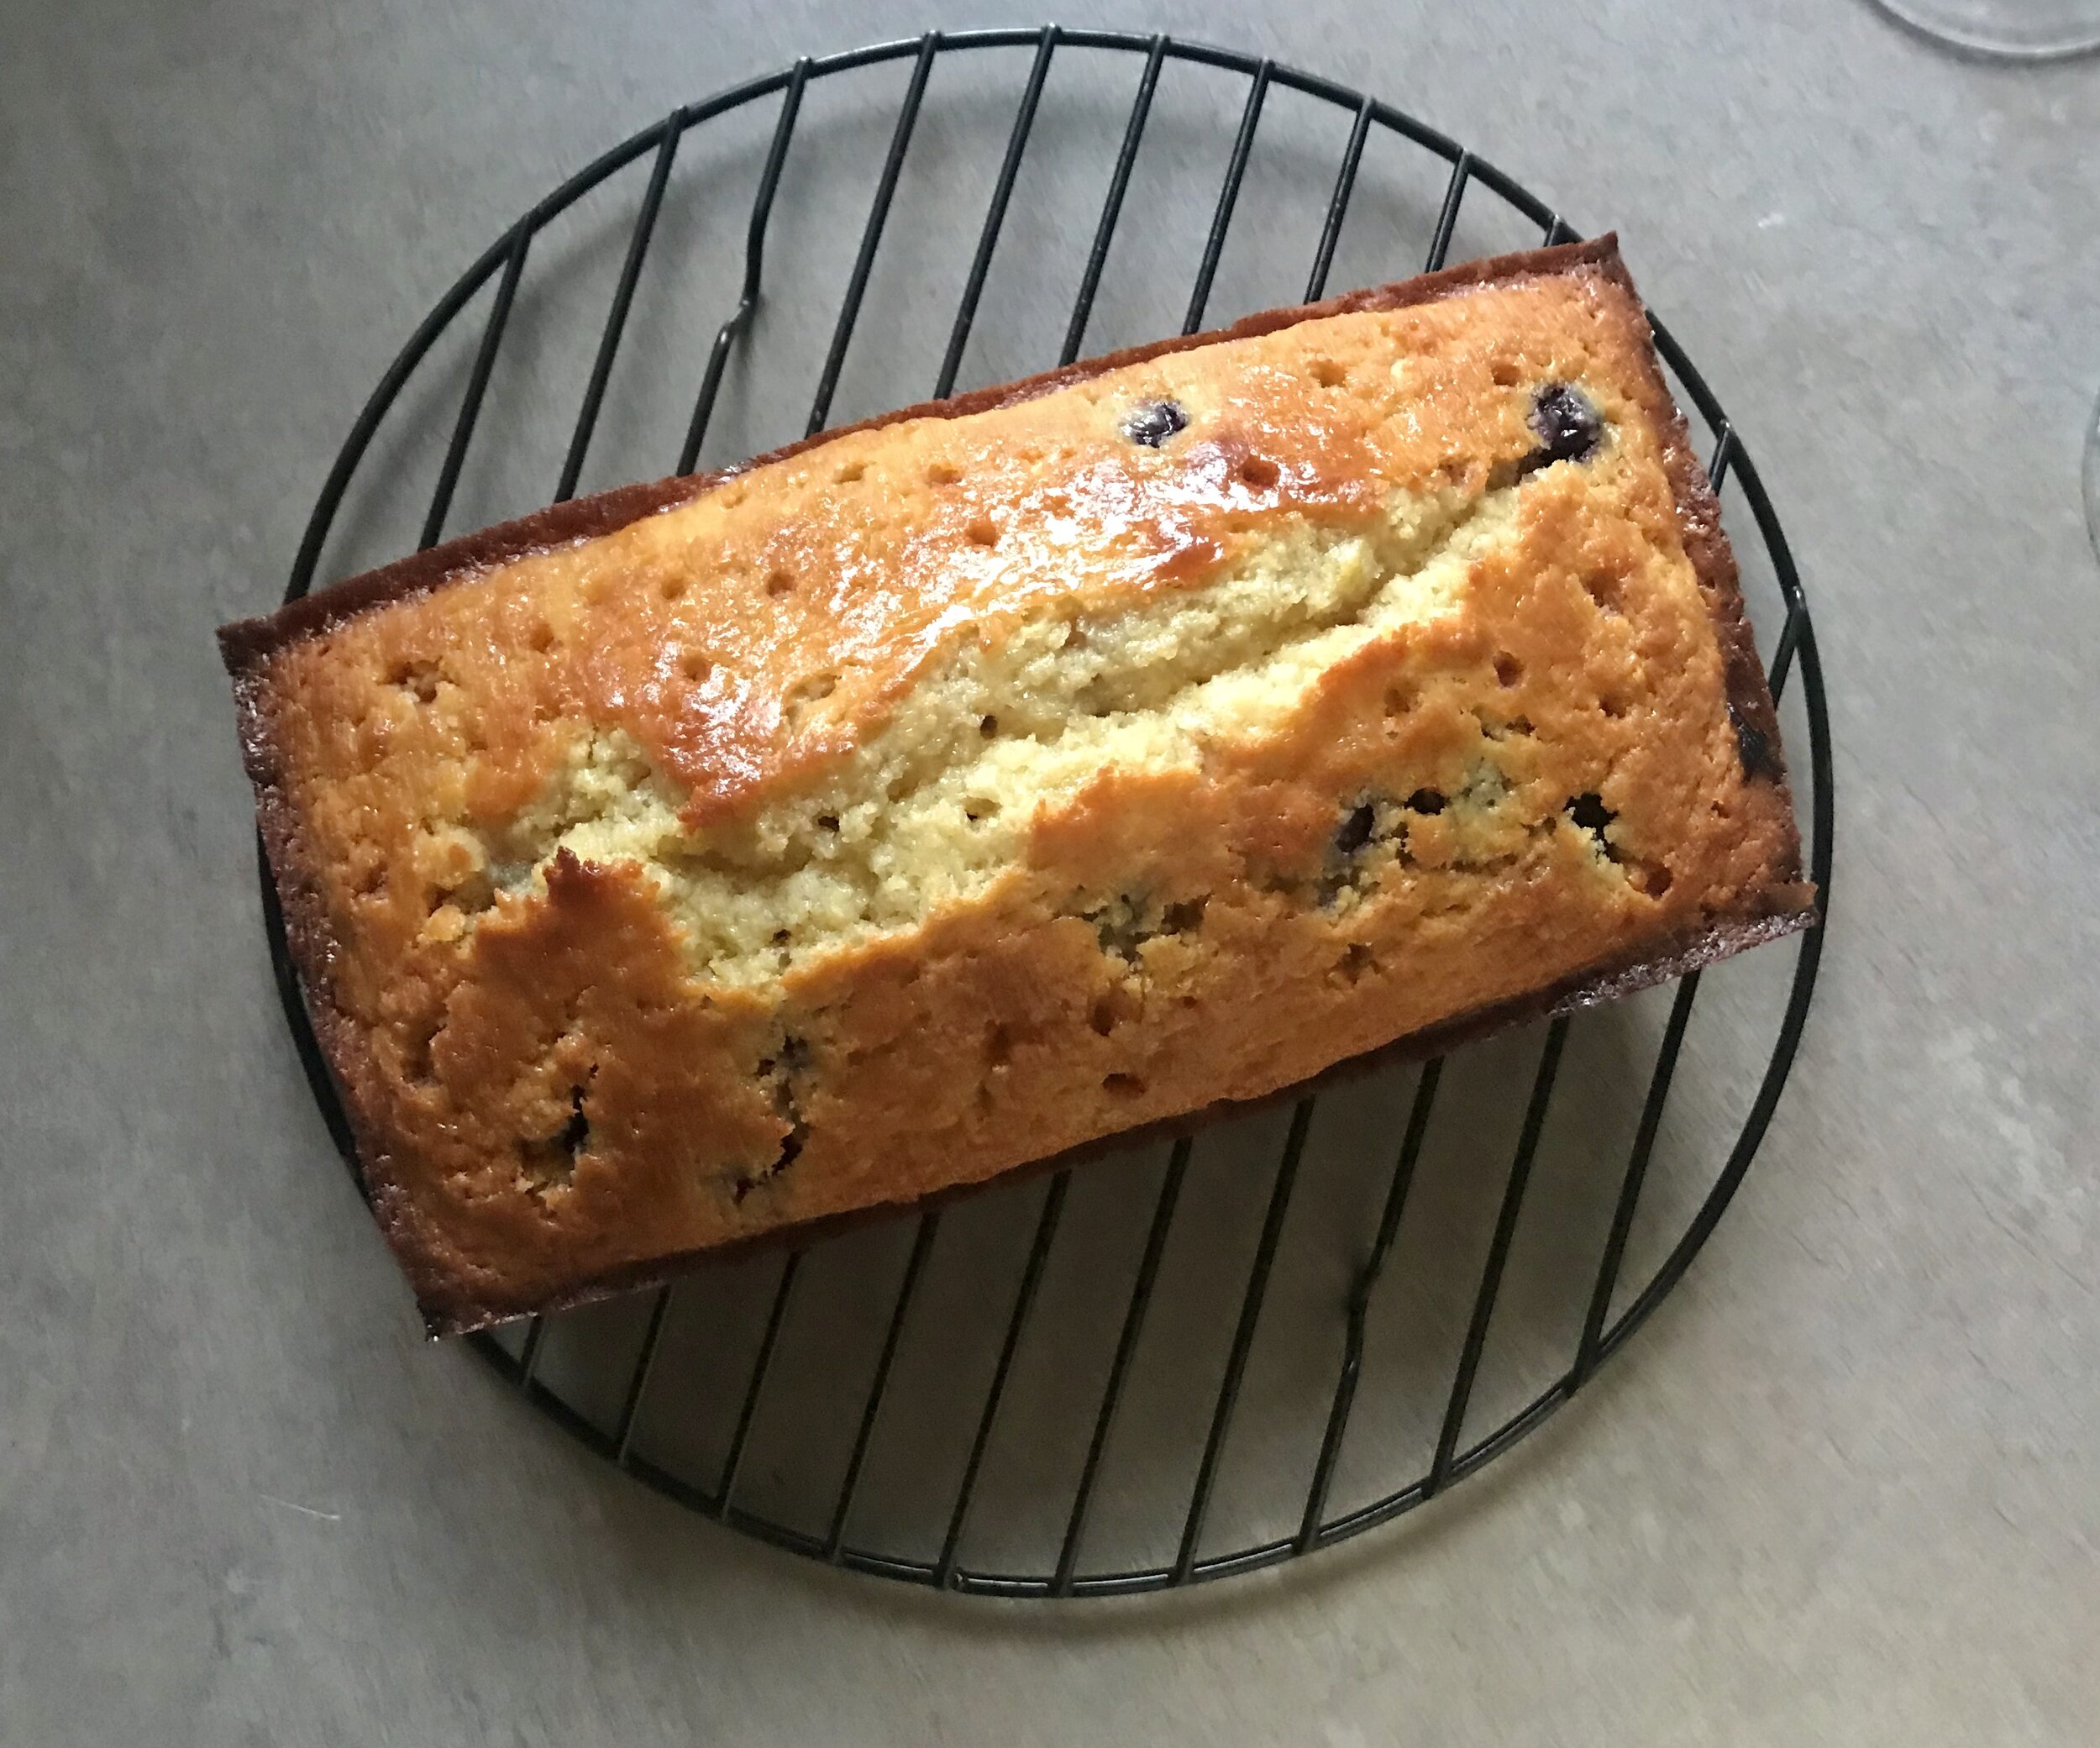
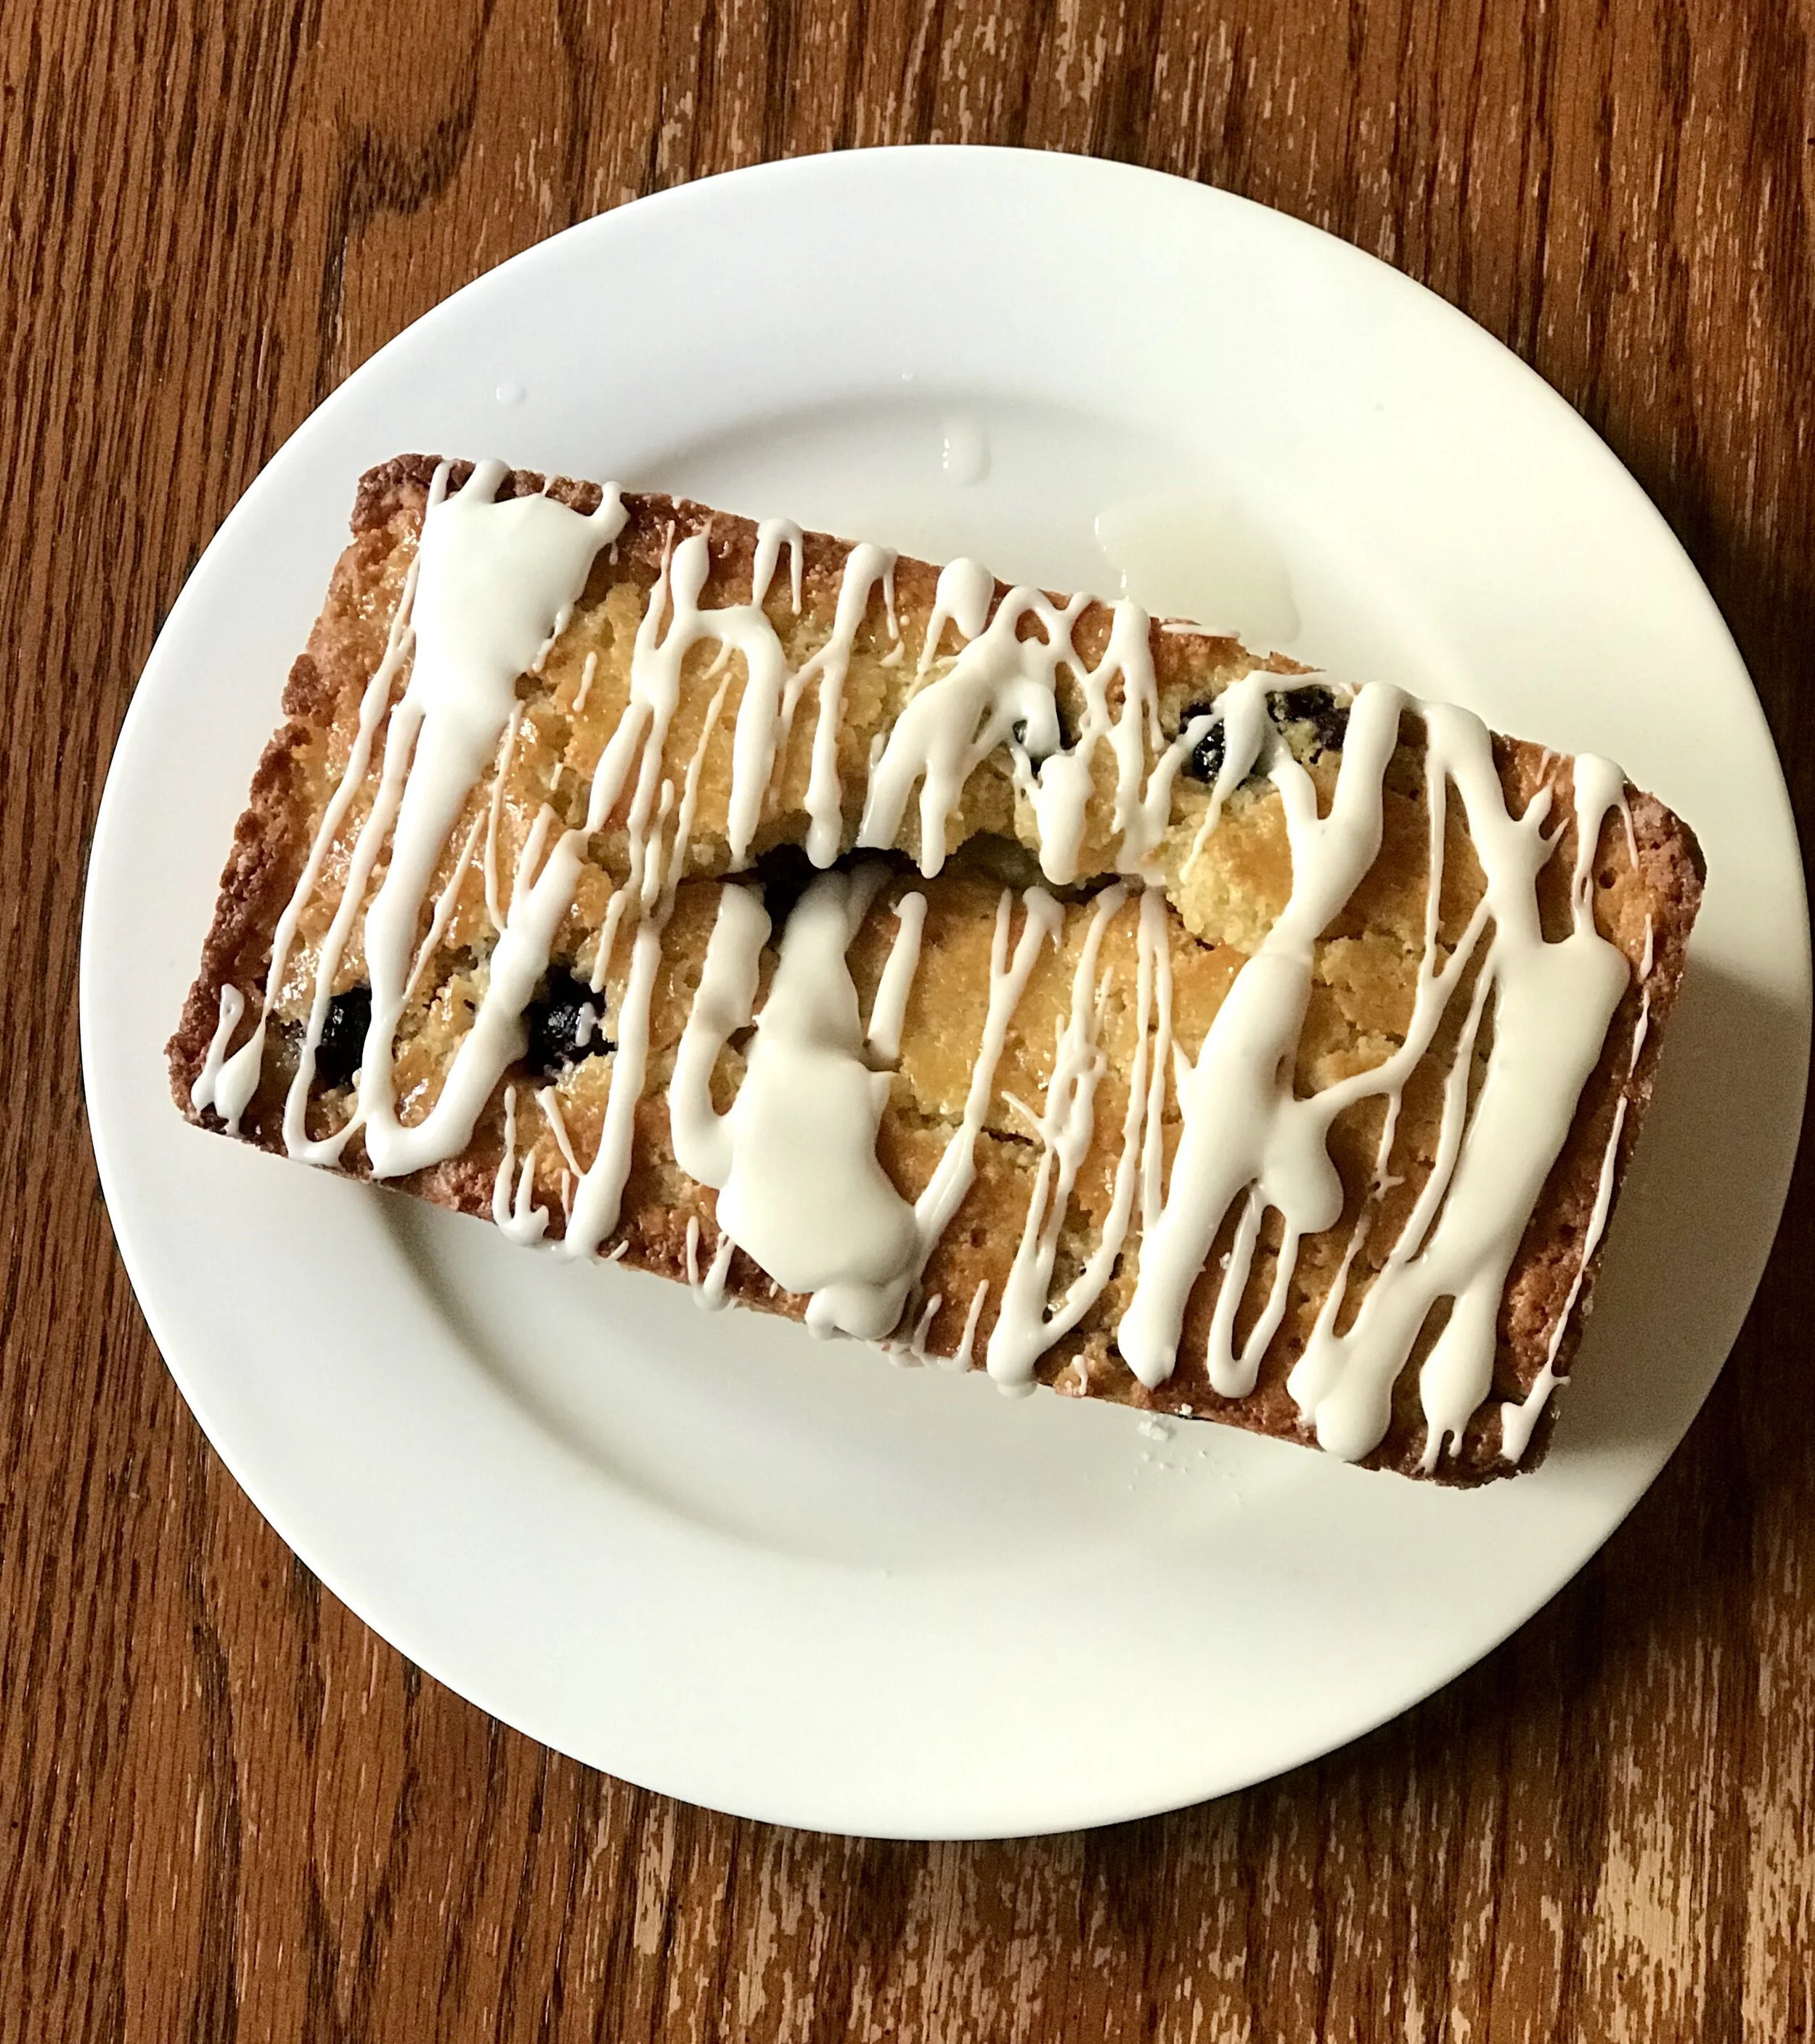
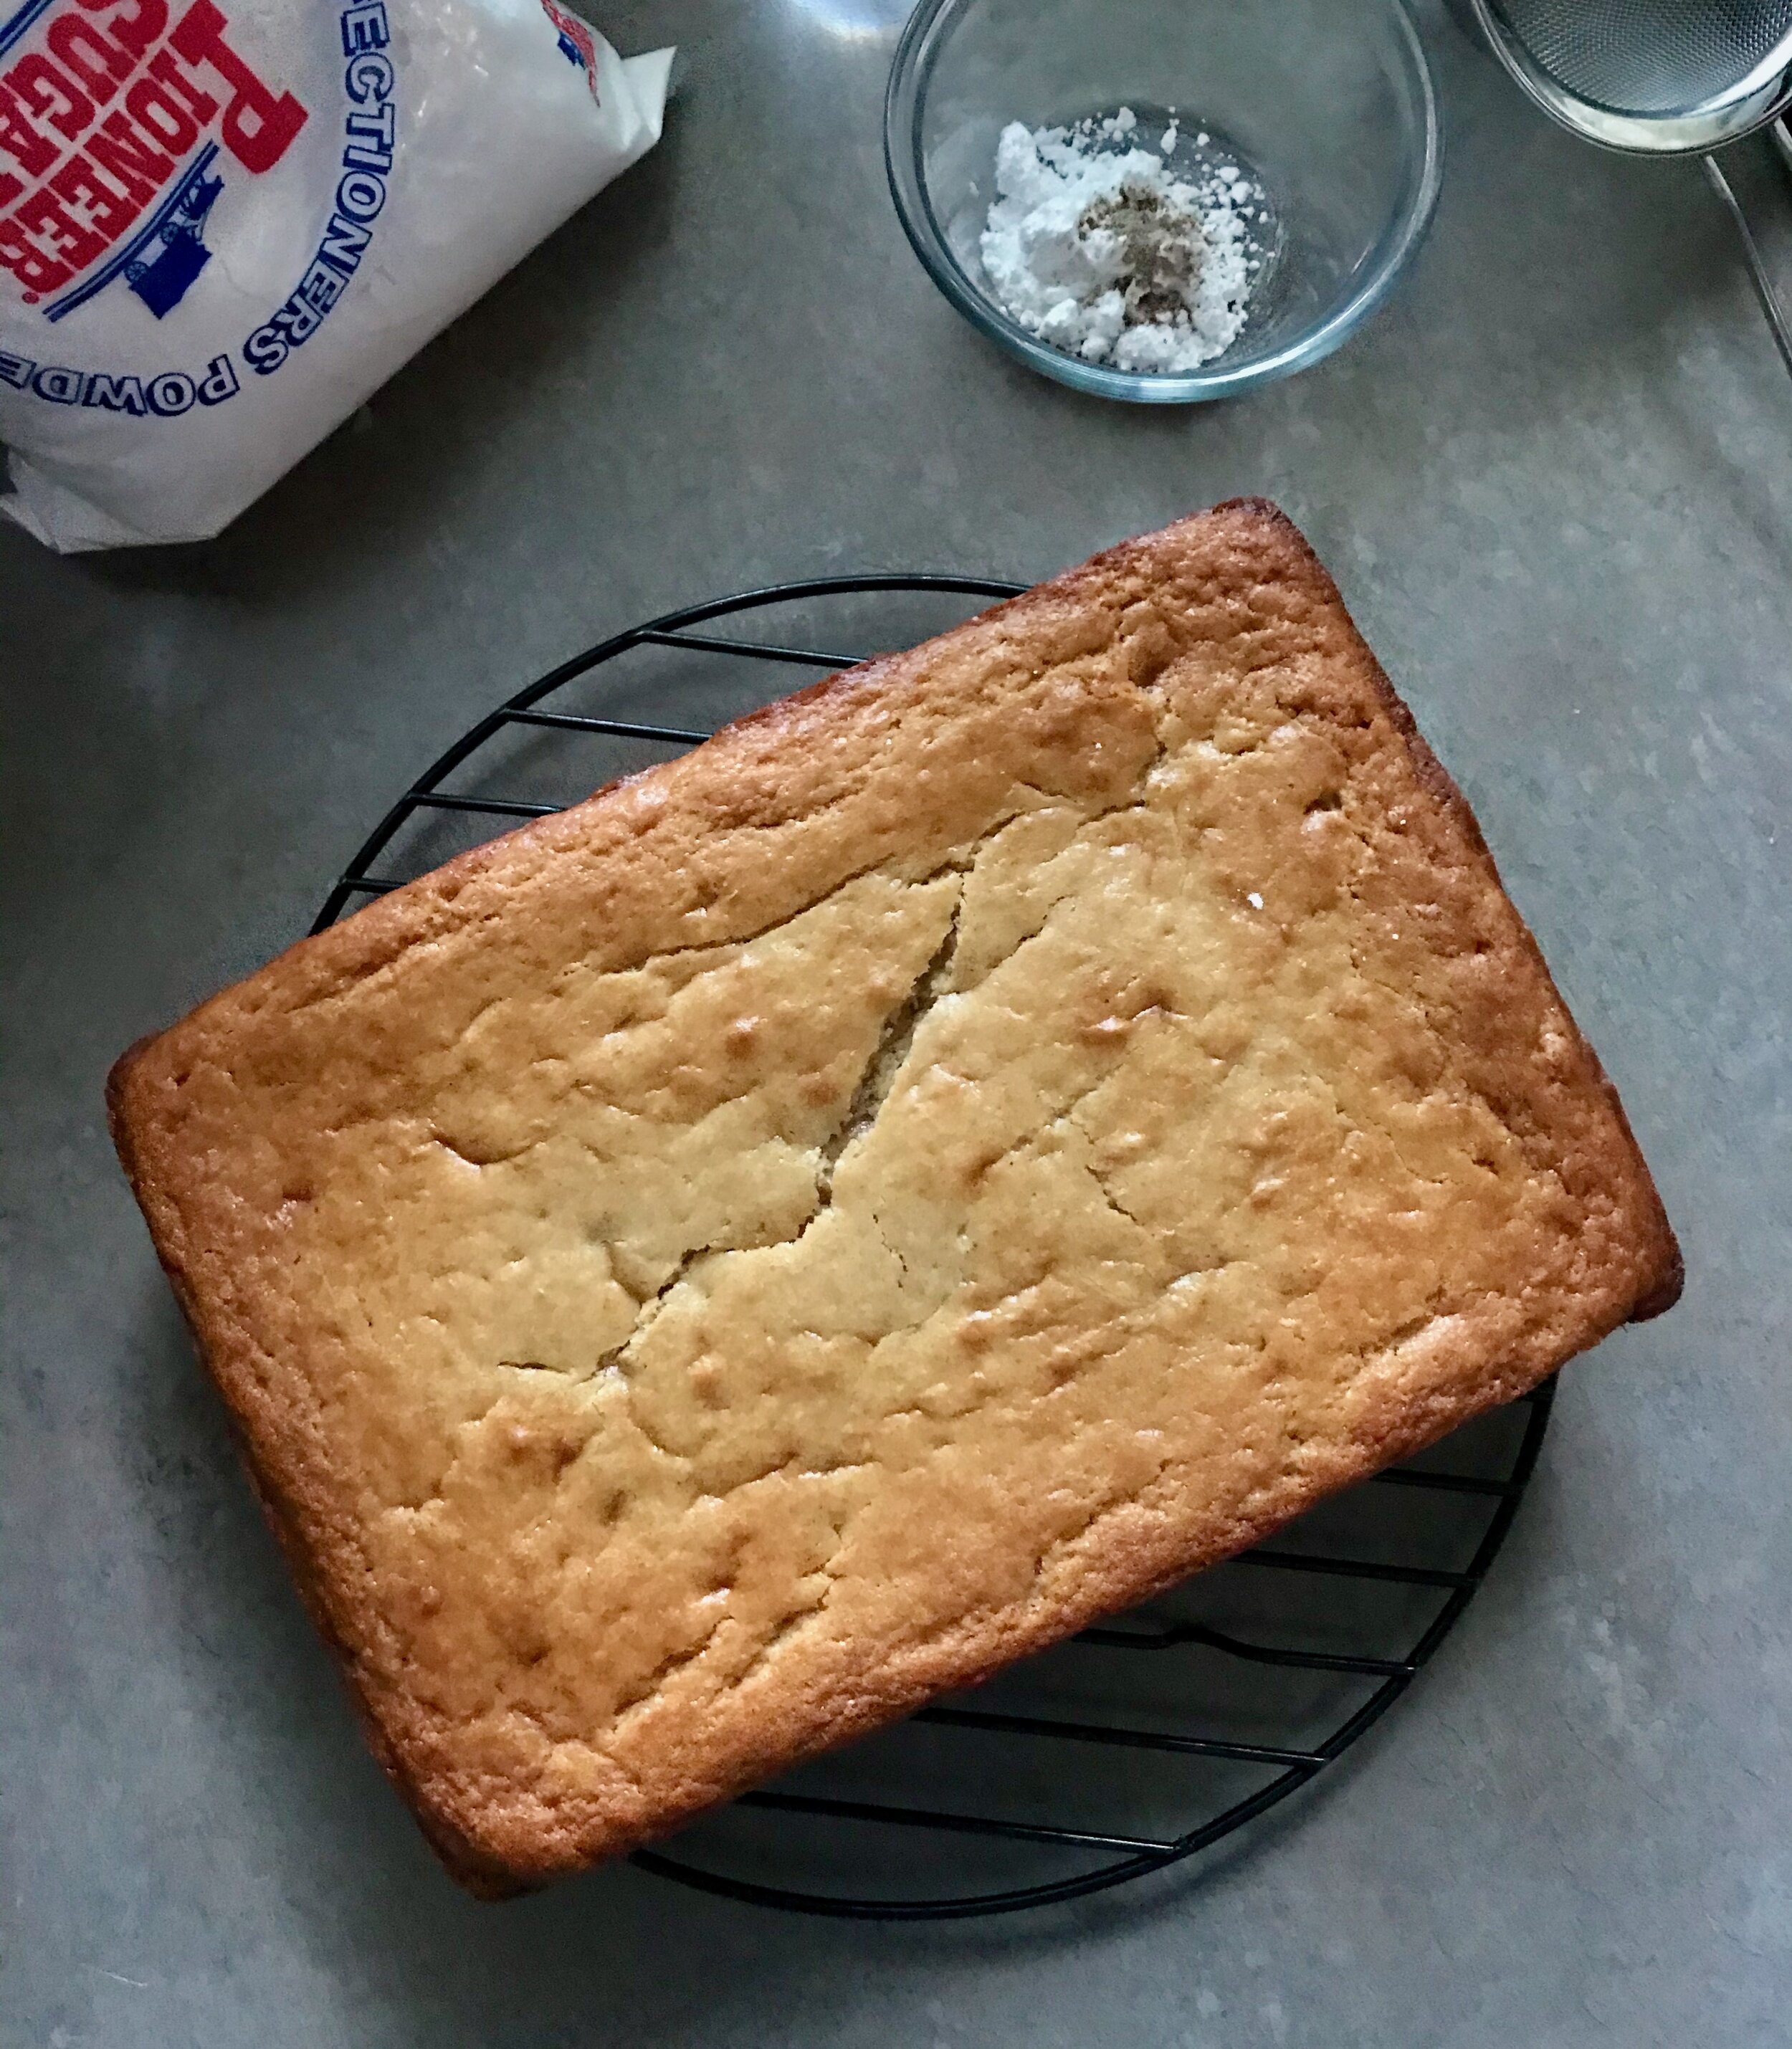
I decided to try a different take on the applesauce cake, and turn it into a yogurt cake instead! Would this work? Probably? It never hurts to try, so try I did! I kept everything the same (other than a few different spices, just for fun) other than replacing the applesauce with yogurt. The verdict? Turned out great! Yes, there is a little tang from the yogurt, but that’s not a bad thing. I do think the yogurt cake was a little more dense than the applesauce cake, but they both baked up very nicely! I would not hesitate to make either of these recipes again!

When Lara made the applesauce version she only used 3/4 cup sugar, instead of the 1 cup of sugar called for. This was perfectly fine, and I would probably do this again if using the applesauce. When I made the yogurt version I used the full cup of sugar since I was taking out all of the sugar naturally found in the applesauce.

[All the photos are of the yogurt version, I didn’t get any pics of the applesauce cake]

——————————————————————————————

IMG_9602.jpeg

Spiced Applesauce Cake
From Smitten Kitchen
Ingredients
For the cake

  • 2 cups (8 3/4 ounces or 250 grams) all-purpose flour

  • 2 teaspoons baking powder

  • 1/2 teaspoon baking soda

  • 1/2 teaspoon salt

  • 3/4 teaspoon cinnamon

  • 1/2 teaspoon ground ginger

  • 1/8 teaspoon ground cloves

  • 1 stick (4 ounces or 113 grams) unsalted butter, softened

  • 1 cup (6 7/8 ounces or 195 grams) packed light brown sugar (updated weight)

  • 1 teaspoon pure vanilla extract

  • 2 large eggs

  • 1 1/2 cups (about 13 ounces or 365 grams) unsweetened applesauce

  • 1/2 cup (about 1 3/4 ounces or 50 grams) walnuts (optional), toasted, cooled, and chopped

For the frosting

  • 5 ounces (142 grams) cream cheese, softened

  • 3 tablespoons (1 1/2 ounces or 42 grams) unsalted butter, softened

  • 1/4 teaspoon pure vanilla extract

  • 1 cup (4 ounces or 120 grams) confectioners sugar

  • 1/2 (1 teaspoon) teaspoon cinnamon

Directions
Preheat oven to 350°F with rack in middle. Butter an 8- or 9-inch square cake pan that has been lined with parchment paper.

Whisk together flour, baking powder, baking soda, salt, and spices. Beat butter, brown sugar, and vanilla with an electric mixer at high speed until pale and fluffy, 2 to 3 minutes. Add eggs one at a time, beating well after each addition, then beat in applesauce. At low speed, mix in flour mixture until just combined, then stir in walnuts (if using). The batter may look a little curdly and uneven, this is okay.

Spread batter evenly in pan and bake until golden-brown and a wooden pick inserted into center comes out clean, about 35 to 40 minutes.

Cool in pan 15 minutes. Then run a knife around edge of cake to loosen, then invert onto a plate. Reinvert cake onto a rack to cool completely.

Make frosting: Beat cream cheese, butter, and vanilla with an electric mixer at high speed until fluffy. Sift confectioners sugar and cinnamon over cream cheese mixture, then beat at medium speed until incorporated. Spread frosting over top of cooled cake.


For the Yogurt Version:
Replace all of the applesauce with 1 12/ cups (350 g) plain, whole milk or 2% yogurt (goat’s milk if you have it!). I also adjusted the spices and used 1 teaspoon cinnamon, 1/4 teaspoon cardamom, 1/8 teaspoon allspice.

Lemon-Blueberry Drizzle Cake

IMG_7553.jpg

I’ve gotten into the habit of having some kind of cake on hand at all times. While I try to eat very healthy the vast majority of the time, I like a little piece of cake at night before bed. It’s generally not huge, and I try to pick things that aren’t over-the-top decadent and rich (although from time to time this is okay!). This is one of my recent recipes. A fairly standard loaf cake. Some flour, a stick of butter, some sugar, eggs and milk, etc. The lemon blueberry combination is always a winner so this recipe sounded nice.

IMG_7559.jpg
IMG_7569.jpg

So, Lara actually made this twice within a week because the first round did not turn out well. It was under baked even though it went longer than the stated time and looked like it was done when it came out of the oven. It sunk shortly after coming out of the oven which is always sad. Also, she used an older loaf pan the first time and it just didn’t seem to bake up well in this pan. The resulting cake was somewhat disappointing visually, but don’t worry, it didn’t go to waste!

IMG_7570.jpg

We decided to try it again because I hate failing at something, especially something that should be delicious! The second round went much better! A better pan, and more close monitoring of the “done-ness”. It ended up taking an additional 11 minutes or so, a total of 61 minutes which was perfect. This second successful loaf was perfectly cooked. The edges were beautifully browned and crispy. I typically like the softer interior of cakes, but for this one the crispy outside edges are probably the best part!

Interestingly when I was looking back at this recipe to document it below I noticed something that likely explained why the original bread didn’t turn out. Lara had been looking at this recipe on William Sonoma’s Blog (found here) where it was labeled as “cake”. I found it on the Williams Sonoma’s website (found here) where it was labeled as bread. They are the same exact ingredients, BUT, on the blog it states to bake at 350 degrees for 50 minutes, and on the website it says to bake at 375 degrees for 55 minutes. A HUGE discrepancy! Lara had baked them both and did 350 degrees, and she started checking around 50 minutes. So if it’s actually supposed to be baked at 375 for 55 minutes, no wonder it was under baked the first time! Kind of an interesting accidental experiment. But thankfully baking it for 61 minutes at 350 degrees turned out to be perfect the second time around!

We like this cake, and many like it, with a dollop of plain Greek yogurt on the side. The combination of the cool tart yogurt pairs well with the creamy sweet cake.

Below are a few pictures of the original “failed cake”. As you can see, we didn’t end up getting to the final lemon glaze above, so at least you can see how it's supposed to look on this version, although without the sunken middle! :)

IMG_7383.jpg

——————————————————————————————————————————————————————————————-

Lemon Blueberry Drizzle Cake
From Williams Sonoma
Ingredients
For the cake:

  • 1 1/2 cups (7 1/2 oz./235 g) plus 1 tsp. all-purpose flour

  • 1 tsp. baking powder

  • 1/2 tsp. kosher salt

  • 8 Tbs. (1 stick) (4 oz./125 g) unsalted butter

  • 3/4 cup (6 oz./185 g) granulated sugar

  • 1 Tbs. finely grated lemon zest

  • 3 eggs

  • 1/2 cup (4 fl. oz./125 ml) whole milk

  • 1 tsp. vanilla extract 1 cup (4 oz./125 g) blueberries

For the syrup

  • 3 Tbs. fresh lemon juice

  • 3 Tbs. granulated sugar

For the glaze:

  • 1/2 cup (2 oz./60 g) confectioners’ sugar

  • 3 tsp. fresh lemon juice

Directions
Preheat an oven to 375°F (190°C). Butter and flour a 9-by-5-inch loaf pan. Sift the flour, the baking powder, and salt into a bowl. Set aside

In the bowl of a stand mixer, beat the butter, sugar, and lemon zest on medium-high speed until lightened. Add the eggs one at a time, beating well after each addition. Add the milk and vanilla and stir until blended. Add the dry ingredients and stir just until blended.

In a small bowl, toss the blueberries with the 1 tsp. flour. Gently fold into the batter. Scrape the batter into the prepared pan. Bake until the cake is golden brown and a toothpick inserted into the center comes out clean, about 55 minutes (mine took 61 minutes when baked at 350 degrees, see above). Let the cake cool in the pan on a wire rack for a few minutes, then turn out onto the rack to cool while you make the syrup.

To make the syrup, in a small saucepan over medium heat, simmer the lemon juice and granulated sugar until syrupy, about 2 minutes. Using a long wooden skewer, pierce the sides and bottom of the warm cake at least 1 inch (2.5 cm) deep all over. Brush the cake generously with the syrup.

To make the glaze, in a small bowl, stir together the confectioners’ sugar and lemon juice until smooth. When the cake is completely cool, turn it right side up and drizzle the glaze over the top.

French Apple Tart

I had the opportunity to celebrate my very first friendsgiving this weekend and I had such a good time! Any excuse to get together with friends and celebrate is a good idea in my book. I got together at my friend Lindsay's condo to eat good food, have great conversation, and just enjoy being together before the busyness of the holiday season really picks up steam. We had a lovely meal, the main event being one of my all-time favorites, roasted chicken with clementines and fennel. Of course I had to make a dessert, and I decided to try my hand at a simple and elegant French Apple Tart. seasonal and beautiful in an understated way. It was the perfect way to end such a wonderful meal. 

IMG_1720.jpg

Of course I had to use local Jonagold apples from my favorite stand at the farmers market and they were perfect. The whole thing came together quite easily, and was fun to arrange. I made a frangipane to place under the apples which I think was a nice touch, but you can certainly make this without. Whatever you decide, apples, butter and sugar are always going to be a winning combination. 

 
IMG_1707.jpg
 
 
friendsgiving.jpg
 

French Apple Tart
Adapted from Alexandra Cooks
Ingredients
Pate Brisee

  • 1 1/4 cups flour
  • 1 tablespoon sugar (optional)
  • 8 tbsp. unsalted butter, cubed and chilled, divided
  • 1/2 tsp. table salt
  • 3-4 tablespoons ice water

Tart

  • 5 to 7 apples, peeled, cored, and halved (I used jonagold, but really any apple will do)
  • 2-4 tablespoons sugar
  • 4 tablespoons butter

Frangipane

  • 3/4 cup almonds
  • 2 tablespoons sugar
  • pinch salt
  • 2 tablespoons butter at room temperature
  • 1 small egg
  • 2 teaspoons vanilla, rum, brandy or bourbon

For finishing:

  • Whipped cream or vanilla ice cream, for serving

Instructions
Making the pastry: Combine flour, sugar, 8 tbsp. butter, sugar and salt in a food processor and pulse until pea­-size crumbles form, about 10 pulses. Drizzle in 3 tbsp. ice­-cold water and pulse until dough is moistened, about 3 to 4 pulses. (Do not pulse so much that the dough forms a mass — It will clump together when you form it into a disk.) Add more water if needed, but use as little as possible, just until the dough is just coming together. If you add too much water it will be tough and will shrink when baking. Transfer dough to a work surface and form into a flat disk; wrap it in plastic and refrigerate at least 1 hour, and up to three days. When ready to use, transfer dough to a lightly floured work surface. Using a rolling pin, flatten dough into a 13″ circle and then transfer to a tart pan with a removable bottom; trim edges; chill for at least 1 hour.

Meanwhile make frangipane: add all ingredients to a food processor and process until comes together into a smooth mass. This may take a little time and require some scraping down the sides of the food processor from time to time. Be patient and it will eventually come together. 

When ready to bake; heat oven to 375º. Spread a thin layer (about 2 tablespoons) of frangipane across the bottom surface of your tart shell. Working with one apple half at a time, thinly slice into sections, keeping slices together. Press sliced apple half gently to fan it out; repeat with remaining apple halves. Place 1 fanned apple half on outer edge of the tart dough, pointing inward; repeat with 7 more apple halves (or as many as you are able to fit — with a smaller tart pan, you won't be able to fit as many). Separate remaining apple slices. Starting where the apple halves touch and working your way in, layer apples to create a tight rose pattern. Fill in any gaps with remaining apple.

Sprinkle with sugar and dot with remaining 4 tablespoons butter. Place in the oven (I recommend placing a baking sheet lined with aluminum foil underneath the tart to catch any dripping butter that may otherwise fall to the bottom of the oven and burn) and bake until golden brown, about 70 minutes. Let cool completely before removing from pan and carefully transferring to serving platter. 

Baklawa

I'm officially back! After hundreds of hours of studying and thousands of practice questions over the course of the past 5 weeks I finally took my boards this past Wednesday. It is such a relief to be finished. This test has been in the back of my mind since last September and it is so wonderful to finally be free of that constant worry. 

So let's celebrate! How about some baklava? I've always liked baklawa, but I really learned to love it when I lived in Dearborn, MI for two years. In case you didn't know, Dearborn has a huge Middle Eastern population which, happily for me, meant some absolutely wonderful Middle Eastern bakeries. I was spoiled with some of the best baklawa you'll ever find. But trust me, this homemade version is pretty close to being just as good. It's flakey, buttery and sweet. If you've ever wanted to try making baklawa I highly recommend it. It's totally worth it!

I always thought that baklawa would be complicated to make, and although the recipe looks fairly long with a couple of different steps, it was surprisingly not as difficult as I thought it would be. The original recipe called for clarified butter, but I really didn't feel like dealing with that so I just used plain melted butter and it seemed to turn out just fine. I happened to have some mini cupcake liners and they turned out to be the perfect thing for the individual pieces of baklawa. It is really quite sticky, so having the liners to separate each piece was very helpful, but I would guess some wax paper would work well too, even if it wouldn't be quite as cute.

The recipe makes quite a lot of baklawa, it's so rich that you don't need a big piece. I think it would be great to take to a party, definitely something different and plenty to go around!

Baklawa

Adapted from 

Rose Water & Orange Blossoms

Ingredients

  • 1 lb. box phyllo dough, room temperature
  • 6 oz. (¾ cup) butter, melted 
  • 1 ½ cups sugar
  • ¾ cup water
  • 1 T lemon juice
  • 3 cups walnuts, toasted
  • 1/3 cup sugar

Directions

Thaw the phyllo:

Refrigerate the frozen phyllo overnight, then bring to room temperature. Do not cut open the packages of phyllo until just before you are ready to assemble the baklawa.

Make the simple syrup: 

In a small saucepan, combine sugar, water and lemon juice and bring to a boil over medium high heat. Reduce heat to low and simmer for 10 minutes. Pour into a heatproof container and cool completely. It is essential that the syrup be at room temperature when you pour it over the hot pastry after it comes out of the oven.

Make the sugared nuts:

The nuts can be coarsely chopped in the food processor using pulses, but be careful not to go too far. Some nut-dust is unavoidable, but it is better to have a few nuts that need to be broken by hand than to process too much, which will produce nuts that are too finely chopped. Combine the toasted chopped walnuts and sugar stirring until all of the nuts are coated and appear damp.

Assemble the baklawa:

Preheat the oven to 325 degrees.

Open the phyllo and unroll it on top of the plastic it is packaged in. Keep the phyllo covered with a towel.

The size of the pan you use does not matter, but the pan should be metal (ideally not dark). For a 9”x13”x2” pan, trim the phyllo to fit. If you have the smaller box of phyllo, the two packages inside will need one inch trimmed off of the long side. If you have the larger box of phyllo, the one package of phyllo will need to be cut in half and trimmed to fit the pan. It’s better to leave the phyllo a little larger than the pan because it will shrink when it bakes.

Brush the bottom of the pan with melted butter. Lay one stack of 20 phyllo leaves in the pan. Spread the nuts over the phyllo in one even layer. Lay the second stack of 20 leaves over the nuts, taking care that the top layer is a sheet that is not torn. Take a layer from the center of the leaves for the top layer if necessary.

Brush the top layer with melted butter. Using the tip of a very sharp chef’s knife, cut the baklawa into diamonds by cutting six rows (5 cuts) lengthwise and ten rows (9 cuts) crosswise on the diagonal. Lightly score the top with your knife so you can see where the cuts will be.

Use your dominant hand to cut and the other hand to hold the top layers of phyllo down while cutting, and be sure to cut all the way through to the bottom of the pan. This is essential so that the butter will seep through all layers. The knife is held almost perpendicular to the pastry, cutting straight down into the phyllo and nuts. The top layer will lift and and fold, but just lay the phyllo back down where it belongs and move on. The sharper your knife, the easier the cutting will be.

Pour the melted butter over the baklawa evenly. Allow the butter to settle in, about 5 minutes. Bake on the oven shelf second from the top until deep golden brown, 50-60 minutes. Rotate the baklawa halfway through baking.

Remove from the oven and immediately pour the 1 cup of the cooled syrup evenly over the baklawa. Let the rest sit, uncovered, for several hours or overnight to allow the syrup to absorb. Cut and serve from the pan as needed, keeping the baklawa lightly, not tightly, covered with plastic wrap or waxed paper. The baklawa will keep, in the pan, for two weeks.

Banket: A New Favorite

Growing up in West Michigan in a family that is very proud of their Dutch heritage means that I grew up eating my fair share of Dutch goodies; boterkoek, Jan Hagels, oliebollen and windmill cookies to name a few. They're all delicious, but in my opinion there is nothing better than a stick of homemade banket, especially during the holidays. I've shared a banket recipe on the site before which was very good, but I was never completely satisfied with it, especially with the filling. I don't like my banket filling to be too dry, and while the previous recipe was delicious, the filling was just too dry for my taste, I wanted something else. 

This Christmas I decided to go on a search to see if I could find the banket recipe I've been hoping for. There are not the many banket recipes out there, so it took a bit of searching, but I finally came up with a recipe from The Lilypad Cottage that looked like it could be the one. It came together pretty easily so I was very hopeful when I put the first batch into the oven. I have to say, they turned out just about perfectly. Exactly what I was hoping for. A light, and flaky buttery crust wrapped around the perfect almond paste filling. I think I found it!

This recipe is a two day affair, or a long one day affair. The dough and filling need to chill up pretty firm before you use them. Another thing I love about banket is that it is so easy to freeze. I just shape it up and pop the unbaked rolls into the freezer for a few hours. Then I wrap them in plastic and keep in a bag in the freezer until I need them. You don't even have to thaw before baking. Just unwrap, place on a cookie sheet and bake from frozen. They might take a few extra minutes from frozen but other than that you can't even tell. Super easy!

Banket
Adapted from The Lily Pad Cottage
Ingredients
Dough

  • 4 cups flour

  • ¼ cup sugar

  • 1 teaspoon salt

  • ½ teaspoon baking powder

  • 1 pound cold butter, cut into small pieces

  • scant 1 cup cold water

Filling

  • 1 pound of almond paste

  • 2 eggs

  • 2 cups sugar

  • 1 teaspoon vanilla

To Finish

  • 1-2 Egg yolks

Directions
For the dough, mix together the flour, sugar, salt and baking powder. Add the pieces of cold butter and cut into the flour mixture with a pastry blender (you can also use two forks or even your fingers, but work fast, you don't want the butter to get too warm) until the butter is about pea sized. Make a well in the middle and add cold water, mix until a shaggy dough is formed, don’t over mix. Wrap in plastic and refrigerate overnight.

For the filling, break up almond paste in a bowl. Add eggs, sugar, and vanilla. Mix well. Cover bowl with plastic wrap and refrigerate overnight.

The next day cut divide both the dough and the filling into 8 equal portions, use a scale if you have it.

Take one piece of dough and roll out into a long, thin rectangle, approximately 13x4 inches. Place one piece of filling on the rolled out dough, spreading it along the length of dough, a little closer to one side, forming an even line. Roll up the long way, folding the ends under. Pinch together slightly so the filling doesn’t ooze out.

Dock the rolls with a fork, brush with egg yolks.

At this point you can stick the pans in your freezer until the Banket is frozen hard. Then you can wrap them up and bake off as needed.

Bake at 400 degrees for 25-30 minutes (I do about 30 minutes when baking from frozen) until golden brown. Let cool before slicing into 1-2 inch pieces, enjoy!

Tiramisu

I don't know about you, but when I think of Italian desserts the first thing that pops into my mind is tiramisu. I actually made this tiramisu last summer, and just never had the chance to post it. I decided that this was the week to fix that problem.  Booze soaked lady fingers, coffee, mascarpone, heavy cream and a dusting of cocoa, delicious! I can't say that I'm much of a tiramisu connoisseur, but that doesn't really matter, all I know is that this tiramisu was so yummy! Cream and rich and full of flavor. If you are looking to make an impressive Italian dessert for a crowd, this is sure to fit the bill.

Just to warn you, this recipe makes a huge batch of tiramisu. It is quite rich so you don't really need a lot of it at once, not that I will judge you if you do! You do need to make it ahead of time so that it has time to chill in the fridge for at least 6 hours. This makes it a really easy dessert to serve to guest then, you don't have to do anything except cut it up when you are ready to serve. 

The whole process is quite simple, but it is a little time consuming. There are a lot of steps with making the custard, soaking the lady fingers and then layering everything together but none of it is technically difficult, plus there is a lot of opportunity for snooping! 

This is a fantastic dessert for crowd. If you happen to have some left (I had plenty leftover) I found that it froze quite well. I cut it up and threw it in the freezer. When you want a little snack all you have to do is pull it out. You can eat it straight from the freezer which I found turned it into kind of like an ice cream sandwich, or you can let it warm up a little bit and it will be as good as new! However you like it, enjoy!

Tiramisu

From America's Test Kitchen

Ingredients

  • 2-1/2 cups strong brewed coffee, room temperature
  • 1-1/2 Tablespoons instant espresso granules
  • 9 tablespoons dark rum (I used Kahlua, I didn't have any dark rum)
  • 6 large egg yolks
  • 2/3 cup sugar
  • 1/4 teaspoon table salt
  • 1-1/2 pounds mascarpone
  • 3/4 cup cold heavy cream
  • 14 ounces (42 to 60, depending on size) dried ladyfingers (savoiardi)
  • 3-1/2 Tablespoons cocoa, preferably Dutch-processed
  • 1/4 cup grated semisweet or bittersweet chocolate (optional)

Directions

Stir coffee, espresso, and 5 tablespoons rum in a wide bowl or baking dish until espresso dissolves; set aside.

In bowl of standing mixer fitted with whisk attachment, beat yolks at low speed until just combined. Add sugar and salt and beat at medium-high speed until pale yellow, 1-1/2 to 2 minutes, scraping down bowl with rubber spatula once or twice. Add remaining 4 tablespoons rum and beat at medium speed until just combined, 20 to 30 seconds; scrape bowl. Add mascarpone and beat at medium speed until no lumps remain, 30 to 45 seconds, scraping down bowl once or twice. Transfer mixture to large bowl and set aside.

In now-empty mixer bowl (no need to clean bowl), beat cream at medium speed until frothy, 1 to 1-1/2 minutes. Increase speed to high and continue to beat until cream holds stiff peaks, 1 to 1-1/2 minutes longer. Using rubber spatula, fold one-third of whipped cream into mascarpone mixture to lighten, then gently fold in remaining whipped cream until no white streaks remain. Set mascarpone mixture aside.

Working one at a time, drop half of ladyfingers into coffee mixture, roll, remove and transfer to 13 by 9-inch glass or ceramic baking dish. (Do not submerge ladyfingers in coffee mixture; entire process should take no longer than 2 to 3 seconds for each cookie.) Arrange soaked cookies in single layer in baking dish, breaking or trimming ladyfingers as needed to fit neatly into dish.

Spread half of mascarpone mixture over ladyfingers; use rubber spatula to spread mixture to sides and into corners of dish and smooth surface. Place 2 tablespoons cocoa in fine-mesh strainer and dust cocoa over mascarpone.

Repeat dipping and arrangement of ladyfingers; spread remaining mascarpone mixture over ladyfingers and dust with remaining 1-1/2 tablespoons cocoa. Wipe edges of dish with dry paper towel. Cover with plastic wrap and refrigerate 6 to 24 hours. Sprinkle with grated chocolate, if using; cut into pieces and serve chilled.

Pink Cake Pops

At the end of this past summer, a friend an neighbor of mine approached Lara and I and asked us if we would be willing to make her cake pops for her wedding which was going to be in October. We said yes and were very excited to help her our. After making cupcakes for my cousin's wedding in May I felt prepared to try something new for another wedding. There was only one slight problem with all of this though, I had never made cake pops before. I wasn't too worried about it, I knew I could figure it out, but there was still some apprehension about the whole process. After doing a test run in August on cake pop making, I felt ready to go and just had to wait until October. In the end the whole process went very smoothly, and the cake pops turned out great. Congratulations Stacey!

In case you don't know, cake pops are basically cake that you destroy and then mush up with frosting, form into balls, place on a stick and dip into chocolate. It's not a complicated process, but it is time consuming and somewhat labor intense, well at least when you are making over 200 at one time it is! The nice thing about cake pops is that they keep very well for at least a week or two meaning you can make them ahead and not worry too much about them losing quality. Because they are full of frosting they are super moist, and once you dip them in the chocolate this moistness kind of gets sealed in, they don't dry out or loose flavor very quickly. This was nice for me because I didn't have to make them all in the one or two nights before the wedding, I actually started about two weeks before the wedding and was done several days before they were needed. This took some stress off of me which was very nice.

When it was all said and done I think I ended up with about 220 cake pops. There was a little bit of a learning curve with how to dip them in the chocolate, my first few weren't so pretty, but by the end I was a pro at it. Stacey wanted white cake with pink white chocolate and pink sanding sugar, all of which I ordered online. I really had no idea how much of the chocolate or the sugar I would need. In the end I used about 6 pounds of the white chocolate and 2 pounds of sanding sugar total, and this was for cake pops that were 30 grams each.

To be honest, I never could have done this all alone. Having a built in baking partner at home was a must for this project. Trying to study the anatomy of the head and neck and make 200 cake pops all alone would have been difficult. But with a partner, it wasn't so bad at all! Thanks Lara, we make a good team!

After dipping, letting the chocolate dry

All lined up, ready to wrap

200 cake pops later

Cake pops, the perfect wedding favor

Simple White Cake
Adapted from Annie Eats
Ingredients

  • 1 cup whole milk, divided
  • 6 large egg whites
  • 1 tbsp. vanilla extract
  • 2¾ cups (11 oz.) cake flour, sifted
  • 1½ cups (10.5 oz) sugar
  • 1 tbsp. plus 1 tsp. baking powder
  • ¾ tsp. salt
  • 12 tbsp. (¾ cup) butter, at room temperature

Directions
Preheat the oven to 350˚ F. In a liquid measuring cup, combine ¼ cup of the whole milk, egg whites,  and vanilla extract. Whisk to blend. In the bowl of an electric mixer, combine the cake flour, sugar, baking powder, and salt. Mix briefly on low speed to combine, about 30 seconds.

Add in the butter and mix on low speed until the mixture resembles wet sand, about 30 seconds. Mix in the remaining ¾ cup of milk, then increase the speed to medium and beat for about 90 seconds more. 

With the mixture on low speed, add the egg white mixture in three additions, mixing for about 20 seconds after each addition. Scrape down the bowl as needed.

Pour the batter into a greased 9x13-inch pan. Bake, rotating the pan halfway through, until a toothpick inserted in the center comes out clean, about 20 minutes.

Oven S'mores

It's been a little while since I've posted, but that is because I've been having fun vacationing. After spending some time up in Traverse City, I had a week off and then it was off to Grand Haven for a week of camping. My family and I have been doing this for about 15 years now, and it has been a great tradition. I love having nothing to do for a week except read a good book, lay on the beach, and eat good food over a campfire. With camping still on my mind, I thought I'd share these homemade oven s'mores. They're more of an idea than an actual recipe, but regardless, they are delicious. If you don't have the ability, or the time, or the inclination to start a fire, but you are still craving a good ole s'more, these will definitely hit the spot.

I've always liked eating s'mores while camping, but I have to admit that they have never been my favorite. The only reason I would make them is because they are fun to make and eat, and it's just what you do when camping. After discovering the joy that is a homemade graham crackers however, my thoughts about s'mores changed. I knew that they would make the absolute best s'mores ever, and I was sure right. Even when just using an oven instead of a campfire, these s'mores were lightyears ahead of their store-bought counterparts.

All you have to do for these mind blowing s'mores is to lay out 2 graham crackers upside down on a cookie sheet. Top one of them with a bit of marshmallow, and the other with some chocolate chips. Stick them under the broiler for a few minutes until the marshmallows poof up and turn a beautiful caramel color. Make sure to keep an eye on them when they are in the oven, because marshmallows can go up in flames rather quickly.

As soon as they come out of the oven, take both graham crackers and smoosh them together nice and tightly. Then just set them back on the cookie sheet and let them cool a bit. As they cool they will stick together nicely and make it easy to transport and eat these little yummies. At this point the s'mores are ready to eat. But I went a step further of course and decided to add a bit more chocolate. I just melted down some chocolate chips and dipped one end of each s'more in the chocolate. This extra bit of chocolate was probably my favorite part of the whole thing, I would highly recommend this extra step.

This is all there is too it, nothing too difficult. If you don't have any homemade graham crackers, store bought would also work fine. These little desserts are just a fun way to make sure you get your sugar for the day. Cute and also delicious.

And don't worry, when camping this week I got to make a s'more over the campfire on a homemade graham cracker. It was... To. Die. For. I want to go back to Grand Haven just for the s'mores!

Lay everything out

Ready for the oven

Mmmm...

Toasty!

Squeeze it all together 

And top it all off with some extra chocolate

Grab a napkin and dig in!