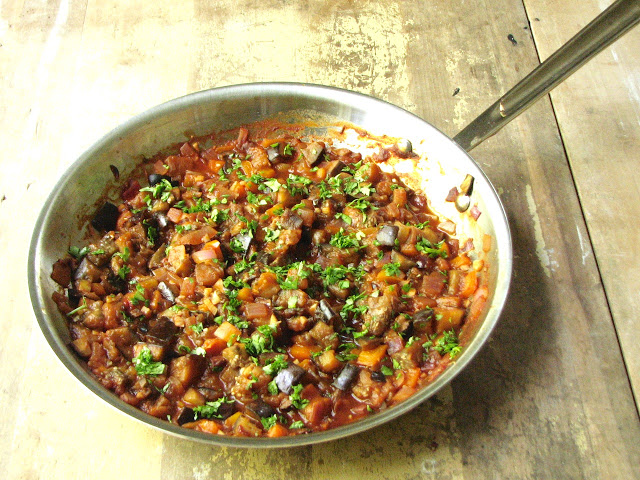
Caponata

I buy almost all of my produce at the farmers market during the summer. I love my Saturday mornings at the market, walking up and down the long row of produce, flowers, baked goods, meats and cheeses and anything else that might be there, deciding what I must have for the coming week. However, I was at the grocery store to pick up a few things the other day and I made the requisite trip through the produce section, just in case. There I found a single eggplant, forlornly sitting on the "seconds" shelf. One pretty nice sized eggplant for sale for 60 cents. I couldn't just leave it there, it looked absolutely fine still, nice and firm with no obvious bad spots at all. So into my cart it went. I didn't know what I was going to do with it, but I knew I could figure that out quite quickly once I got home. 

After a quick search online, it became obvious to me what I should make, caponata. This is not something I had made before, but I had a couple of recipes pinned, and had just watched an episode of the Barefoot Contessa where she served caponata on an antipasto platter. So after I looked through a couple of recipes, I went to work creating my very own caponata using the ingredients I had in the fridge. In the end it turned out absolutely delicious! While I don't know what a good Italian would say about my caponata, in the end I don't really care. I loved it, and when cooking for yourself that's really all that matters. 

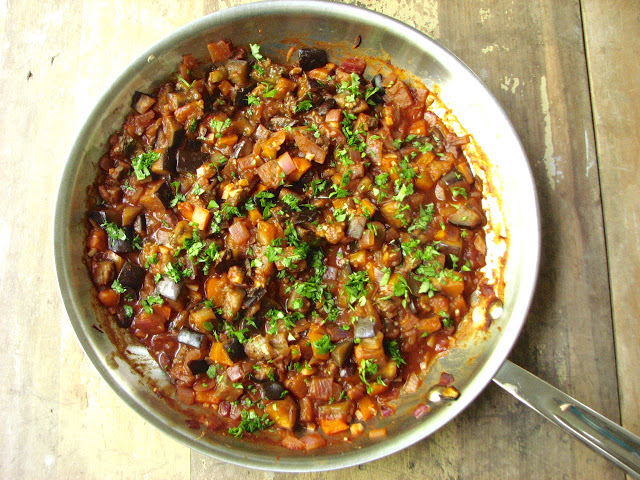
I wasn't sure what caponata was exactly when I decided to make it, so I did a little online research. It is apparently a sweet and sour Sicilian eggplant dish typically served as an appetizer or side, but can make a wonderful vegetarian main dish as well. (If I'm getting any of this wrong, please let me know!) Along with what is in my version, most of the recipes I looked at had celery and capers, neither of which I had, so I went without. I also threw in some cilantro which I'm sure is not Italian at all, but I had some in the fridge and I love it so in it went. If I'd had parsley I would have added that, but not this time! I'm sure I missed other "essential" elements of a traditional caponata as well, but again I don't really care as long as my tastebuds are satisfied!

Caponata

From Jana

Ingredients

  • 1-2 tablespoons olive oil
  • 1 eggplant (about 1 pound) cut into 1/2 inch dice
  • 1/2 sweet bell pepper cut into 1/2 inch dice
  • 1/2 red onion cut into 1/4 inch dice
  • 3-4 cloves garlic, minced
  • 2 tablespoons tomato paste
  • 6-8 olives, coarsely chopped
  • 1 cup chicken stock
  • 1-2 tablespoons cider vinegar
  • 1-2 teaspoons sugar
  • 1/4 teaspoon cayenne
  • Salt, to taste
  • Cilantro, to finish

Directions

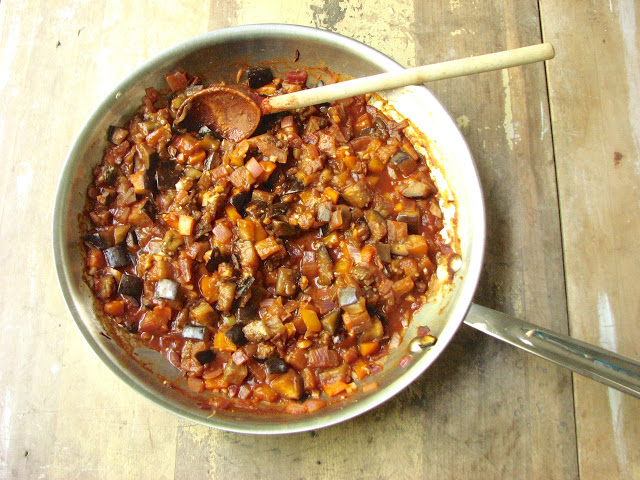
Heat olive oil in a large skillet over medium low heat. Add the eggplant, bell pepper, and red onion. Saute for 8-10 minutes, until everything is starting to wilt an brown just a little. 

Add the garlic and cook for about 1 minute until fragrant. Then add the tomato paste and let it caramelize for 1-2 minutes before stirring into the vegetable mixture. Add the olives and stir again. 

Pour in the chicken stock and cider vinegar and stir it all to combine. Taste the mixture and then add the sugar, cayenne and salt to taste. Let the caponata bubble away over medium low heat until thickened and everything is cooked through. 

At the end of cooking add in the cilantro for a fresh finish. 

Rosemary Onion Focaccia

The idea of focaccia always sounds so appealing to me, a flatbread rich with olive oil and topped with any number of delicious things. It's really like a pizza in disguise, dressed a little differently so you can eat several slices without feeling too guilty. In the past however, I've attempted to make focaccia a couple of different times and have never been very successful at it. It's always been, well, just okay. But I want more than okay, I know it can be so much more than that. With this recipe I've found my stride, I have found a focaccia that is well beyond okay. This bread was soft and light, tender and rich, topped with just a few simple accompaniments. It really was what I've been looking for. I can't wait to play around with different toppings and flavors. With this focaccia as a base I know they will all be great!

This recipe was very simple, and pretty quick as yeasted bread goes. Knead everything together and let it rise for about an hour. I was in a little bit of a hurry and only let it rise for about 45 minutes and it didn't seem to matter at all. Then all you have to do is press it into your pan and let it sit for only about 20 minutes. While it's resting you can get your toppings together. I went simple this time with some thinly sliced onion, rosemary, a sprinkling of pecorino and some sea salt, but there are so many options when it comes to focaccia, you can really do whatever you want. After the 20 minutes rest, just top it off and stick it in the oven. In another 20 minutes you'll have a beautiful golden brown round of rich, savory bread. You really can't go wrong.

Rosemary Onion Focaccia

Adapted From 

Food and Wine

Ingredients

  • 1 1/4 cup all purpose flour
  • 1 1/2 tsp instant yeast
  • 1/2 teaspoon kosher salt
  • 1/2 cup warm water
  • 1/2 teaspoon honey
  • 1/4 cup extra virgin olive oil, divided
  • Thinly sliced sweet onion
  • Roughly chopped rosemary
  • Grated pecorino or parmesan cheese
  • Sea salt

Directions

In the bowl of a stand mixer fitted with the dough hook, combine the flour, yeast and salt. Add the water, honey and 2 tablespoons of the olive oil. Knead the dough on medium speed until smooth and supple, 5-6 minutes. Place the dough in a well oiled bowl, cover with plastic wrap and let rest for about 1 hour. 

Transfer the dough to a well oiled 9-inch cake pan, pressing it down to fit and dimpling it all over with your fingers. Drizzle the dough with 1 tablespoon of olive oil and let rise until puffed, about 20 minutes. Sprinkle the dough to taste with the thinly sliced onion, rosemary, cheese and salt. Drizzle the remaining 1 tablespoon of olive oil over the focaccia. Bake for 18-20 minutes at 450 degrees until golden brown. Transfer to wire rack to cool. 

Ciabatta

Sometimes all I want is a good sandwich. Versatile and delicious, I could probably eat a sandwich every day. And we all know (I hope) that a good sandwich demands excellent bread. Sub-par, stale grocery store bread just doesn't do it for me anymore. I need something better. For me, that means I have two options; head to the bakery (which, trust me, I do a lot!) or make some of my own. One of these options is more convenient and, let's be honest, probably better, but the other option is super cheap, absolutely delicious, and extremely satisfying. Pulling warm loaves of homemade bread out of my oven only 4 ingredients later is one of my favorite ways to spend an afternoon. I highly recommend it!

This recipe is easy, and simple, although it does take some advanced planning and to be honest, some practice (at least for me). It turned out 3 beautiful loaves of ciabatta that were perfect for my sandwich craving. 

Ciabatta
From The Bread Baker's Apprentice by Peter Reinhart
Ingredients
Poolish

  • 2 1/2 cups (11.25 ounces) bread flour

  • 1 1/2 cups (12 ounces) water, at room temperature

  • 1/4 teaspoon instant yeast

Dough

  • 3 1/4 cups (22.75 ounces) poolish

  • 3 cups (13 1/2 ounces) unbleached bread flour

  • 1 3/4 teaspoon salt

  • 1 1/2 teaspoon instant yeast

  • 6 tablespoons to 3/4 cup (3 to 6 ounces) water, lukewarm

Directions
For the Poolish: stir together the flour, water and yeast until all the flour is moistened. It will be soft and sticky, like very thick pancake batter. Cover the bowl with plastic and let sit at room temperature for 3 to 4 hours, until bubbly and foamy, then place in the refrigerator where it will keep for up to 3 days.

For the ciabatta: remove the poolish from the refrigerator 1 hour before starting. Stir together flour, salt and yeast in the bowl of a stand mixer fitter with the paddle attachment. Add the poolish and 6 tablespoons of the water and mix on low speed until the ingredients form a sticky ball, adding additional water as needed. Increase the speed to medium and mix for 5 to 7 minutes or until the dough is smooth and sticky. Switch to the dough hook and mix for 2 more minutes. The dough should clear the sides of the bowl but still stick to the bottom. You may need to add additional flour, but don't add too much, the final dough should be quite soft and sticky.

Spray about an 8-inch square part of your counter with cooking spray. Using a dough scraper, transfer the dough to the counter. Dust the top of the dough liberally with flour, patting it into a rectangle. Wait 2 minutes for the dough to relax. Coat your hands with flour, lift the dough from each end, stretching it to twice its size. Fold the dough over onto itself, like folding a letter, returning it to its originally shape. Dust the top of the dough with flour, and loosely cover with oiled plastic wrap.

Let rest for 30 minutes. The repeat the stretch and fold as above. Dust with flour and cover with plastic again. Let the dough ferment and rise on the counter for 1 1/2 to 2 hours. It should swell, but won't necessarily double in size.

Set up a couch with a cotton dish towel, sprayed with oil and generously floured. Carefully remove the plastic wrap from the dough. Using a pastry scraper, divide the dough into 3 rectangles, making sure not to degas the dough. Sprinkle the dough generously with flour and use the scraper to gently lift each piece from the counter and lay it on the floured cloth, folding each piece of dough from left to rich, letter-style, into an oblong about 6 inches long. Bunch the cloth between the pieces to provide a wall.

Proof for 45 to 60 minutes at room temperature, or until the dough has noticeably swelled. Meanwhile, place a baking stone in the oven and preheat to 500 degrees, placing an old heavy duty sheet on the lower rack.

When the dough is ready, gently transfer each piece of dough to a 9x12-inch piece of parchment paper, lifting from each end and gently tugging the dough out to just smaller than the piece of parchment. Slide the dough, parchment and all, onto the preheated baking stone. Pour one cup of hot water into the sheet pan and close the door. After 30 seconds, open the door and spray the sides of the oven with water from a spray can. Repeat twice more at 30 second intervals. After the last spray, turn the oven temperature down to 450 degrees and bake for 10 minutes. Rotate the loaves 180 degrees and continue baking for 5-10 minutes, or until done, the bread should register 205 degrees in the center and be golden brown. Allow loaves to cool at least 45 minutes before slicing and serving.

Tiramisu

I don't know about you, but when I think of Italian desserts the first thing that pops into my mind is tiramisu. I actually made this tiramisu last summer, and just never had the chance to post it. I decided that this was the week to fix that problem.  Booze soaked lady fingers, coffee, mascarpone, heavy cream and a dusting of cocoa, delicious! I can't say that I'm much of a tiramisu connoisseur, but that doesn't really matter, all I know is that this tiramisu was so yummy! Cream and rich and full of flavor. If you are looking to make an impressive Italian dessert for a crowd, this is sure to fit the bill.

Just to warn you, this recipe makes a huge batch of tiramisu. It is quite rich so you don't really need a lot of it at once, not that I will judge you if you do! You do need to make it ahead of time so that it has time to chill in the fridge for at least 6 hours. This makes it a really easy dessert to serve to guest then, you don't have to do anything except cut it up when you are ready to serve. 

The whole process is quite simple, but it is a little time consuming. There are a lot of steps with making the custard, soaking the lady fingers and then layering everything together but none of it is technically difficult, plus there is a lot of opportunity for snooping! 

This is a fantastic dessert for crowd. If you happen to have some left (I had plenty leftover) I found that it froze quite well. I cut it up and threw it in the freezer. When you want a little snack all you have to do is pull it out. You can eat it straight from the freezer which I found turned it into kind of like an ice cream sandwich, or you can let it warm up a little bit and it will be as good as new! However you like it, enjoy!

Tiramisu

From America's Test Kitchen

Ingredients

  • 2-1/2 cups strong brewed coffee, room temperature
  • 1-1/2 Tablespoons instant espresso granules
  • 9 tablespoons dark rum (I used Kahlua, I didn't have any dark rum)
  • 6 large egg yolks
  • 2/3 cup sugar
  • 1/4 teaspoon table salt
  • 1-1/2 pounds mascarpone
  • 3/4 cup cold heavy cream
  • 14 ounces (42 to 60, depending on size) dried ladyfingers (savoiardi)
  • 3-1/2 Tablespoons cocoa, preferably Dutch-processed
  • 1/4 cup grated semisweet or bittersweet chocolate (optional)

Directions

Stir coffee, espresso, and 5 tablespoons rum in a wide bowl or baking dish until espresso dissolves; set aside.

In bowl of standing mixer fitted with whisk attachment, beat yolks at low speed until just combined. Add sugar and salt and beat at medium-high speed until pale yellow, 1-1/2 to 2 minutes, scraping down bowl with rubber spatula once or twice. Add remaining 4 tablespoons rum and beat at medium speed until just combined, 20 to 30 seconds; scrape bowl. Add mascarpone and beat at medium speed until no lumps remain, 30 to 45 seconds, scraping down bowl once or twice. Transfer mixture to large bowl and set aside.

In now-empty mixer bowl (no need to clean bowl), beat cream at medium speed until frothy, 1 to 1-1/2 minutes. Increase speed to high and continue to beat until cream holds stiff peaks, 1 to 1-1/2 minutes longer. Using rubber spatula, fold one-third of whipped cream into mascarpone mixture to lighten, then gently fold in remaining whipped cream until no white streaks remain. Set mascarpone mixture aside.

Working one at a time, drop half of ladyfingers into coffee mixture, roll, remove and transfer to 13 by 9-inch glass or ceramic baking dish. (Do not submerge ladyfingers in coffee mixture; entire process should take no longer than 2 to 3 seconds for each cookie.) Arrange soaked cookies in single layer in baking dish, breaking or trimming ladyfingers as needed to fit neatly into dish.

Spread half of mascarpone mixture over ladyfingers; use rubber spatula to spread mixture to sides and into corners of dish and smooth surface. Place 2 tablespoons cocoa in fine-mesh strainer and dust cocoa over mascarpone.

Repeat dipping and arrangement of ladyfingers; spread remaining mascarpone mixture over ladyfingers and dust with remaining 1-1/2 tablespoons cocoa. Wipe edges of dish with dry paper towel. Cover with plastic wrap and refrigerate 6 to 24 hours. Sprinkle with grated chocolate, if using; cut into pieces and serve chilled.

Three Cheese Ravioli

Ravioli -- thin sheets of pasta encasing spoonfuls of deliciously creamy, cheesy filling, perfumed with fragrant basil; what's not to love? I've made homemade pasta several times now, but I've always cut it up into thin, flat sheets. It was time to try something a little more involved and attempt a filled pasta. Of course ravioli was the first thing that came to mind, it seems to be the most popular (or at least most common) form of filled pasta. Rolling all the dough by hand took some time, but I was in no hurry, and the finished product was definitely worth it. I thought they looked like little edible pillows, perfect for pulling out of the freezer when I don't have a lot of time for dinner.

I found a very simple pasta dough recipe online and whipped it together, I don't know how it compares with other pasta dough recipes, all I know is that it seemed to do the job and was quite tasty. For the filling I just made up a cheesy mixture of ricotta, parmesan and mozzarella along with some chopped basil, salt and pepper, and then added an egg to hold it all together a little better. It's hard to go wrong with these ingredients, just eyeball it and taste as you go and it should turn out delicious.

I ended up making a triple batch of the dough and ended up with about 36 ravioli. I ate a few for dinner and then froze the rest of them on floured cookie sheets before bagging them up for later. It has been so great to be able to open up my freezer, pull out a few homemade ravioli, and drop them into boiling water. Heat up some leftover tomato sauce for a few minutes and you've got dinner.

Making homemade ravioli was a fun way to spend an afternoon, and the end result was tasty and convenient. This is a project I will for sure do again when I have a couple of free hours. It's a great accomplishment.

Starting to roll out the dough

Hope you have a lot of muscle

There are many methods for making ravioli,

I did it by cutting out circles with a cookie cutter

Getting a little silly in the kitchen

Lots of little circles

Grab your filling

Scoop a small spoonful into the center of a round of dough

Cover it with a second circle of dough

Use the tines of a fork to seal in the filling

Lay them out in a single layer as you go

Boil up some water and heat your sauce

Drop the ravioli into the salted water

In they go!

Let them cook up in the water for a little bit

Once they start to float they are done, it only takes a few minutes

I laid them out on a paper towel for a minute because

I don't like when my ravioli is all watery

Top with tomato sauce and parmesan cheese

Enjoy!

Basic Pasta Dough
From Allrecipes
Ingredients

  • 1 egg, beaten
  • 1/2 teaspoon salt
  • 1 cup all-purpose flour
  • 2 tablespoons water

Directions
In a medium sized bowl, combine flour and salt. Make a well in the flour, add the slightly beaten egg, and mix. Mixture should form a stiff dough. If needed, stir in 1 to 2 tablespoons water.

On a lightly floured surface, knead dough for about 3 to 4 minutes. With a pasta machine or by hand roll dough out to desired thinness. Use machine or knife to cut into strips of desired width.

Struffoli

At Christmas last year my mom saw an episode of Giada at Home in which Giada made struffoli for dessert. My mom thought it looked so fun and interesting and she really wanted to make it for Christmas, but we never got around to it, other things got in the way and when Christmas was over, we hadn't made the struffoli. This Christmas, I was randomly watching the food network and what should I see, the Giada Christmas episode in which she makes struffoli! I thought it looked fun and make and delicious and knew that this year we had to try it out.

According to Wikipedia, "struffoli is a Neapolitan dish made of deep fried balls of dough about the size of marbles. Struffoli are crunchy on the outside and light inside. They are mixed with honey and other sweet things." This is a winning combo in my book. Fried dough covered in sweetness, sign me up!

Making the struffoli turned out to be a lot of fun and really not that much work. Forming all the little balls of dough took a little time, but it really wasn't that bad. The dough came together quickly and the little doughnuts fried up in just a few minutes. I heated my oil while I was forming all the balls of dough, and it was just about ready when I finished with the dough. The glaze was quick and easy, and forming the wreath wasn't bad at all, but it was sure nice to have two people working on it. This is definitely a recipe to do with others. It's fun to do while talking and laughing with friends or family. 

The finished project turned out really well, but I don't think it was perfect. I omitted the hazelnuts in the recipe because I didn't have any, but I would like try it with the hazelnuts sometime. A lot of my glaze kind of pooled under the wreath once it had cooled which didn't seem quite right, but it still tasted very nice. The mini doughnuts seemed a little dry, but I may have fried them too long, I don't have a ton of experience frying. Regardless of this, I would definitely try this again. I thought it was a fun Christmas treat that is easy to pick at throughout the night. You can take just one or two little balls and pop them in your mouth. A fun finger food dessert. 

Although struffoli is traditionally served at Christmas and Easter, I think this would be fun any time of year. You could mold it into different shapes depending on the season or holiday, and you could decorate it with different colored sprinkles. Right now I'm thinking a football shaped struffoli with colors in your team's colors for the Superbowl would be a lot of fun, or how about a heart for Valentines Day? The possibilities are endless!

The dough, ready to cut up 

Form the dough into ropes and them cut the 

ropes into tiny little chunks, they 

can be smaller than you think

Getting there!

Frying them all up

Place on paper towels to drain, then throw

them in a bowl

Grease a cup and get your serving plate ready

Ready to assemble

Take the little doughnuts

And cover them with the glaze

Then start shaping it around the glass

Once cooled, remove the glass, dust with powdered sugar and cover it with sprinkles, Enjoy!

Struffoli
From The Food Network
Ingredients

  • 2 cups flour, plus extra for dusting 
  • 1 large lemon, zested (about 2 teaspoons) 
  • 1/2 large orange, zested (about 2 teaspoons) 
  • 3 tablespoons sugar 
  • 1/2 teaspoon fine sea salt 
  • 1/4 teaspoon baking powder 
  • 1/2 stick (2 ounces) unsalted butter, cut into 1/2-inch pieces, at room temperature 
  • 3 large eggs 
  • 1 tablespoon white wine, such as pinot grigio 
  • 1 teaspoon pure vanilla extract 
  • Canola oil, for frying 
  • 1 cup honey 
  • 1/2 cup sugar 
  • 1 tablespoon lemon juice 
  • 1 1/2 cups hazelnuts, toasted (I didn't use) 
  • Vegetable oil cooking spray 
  • Sugar sprinkles, for decoration 
  • Powdered sugar, for dusting 

Directions
For the dough: In the bowl of a food processor, pulse together 2 cups of flour, lemon zest, orange zest, sugar, salt, and baking powder. Add the butter and pulse until the mixture resembles a coarse meal. Add the eggs, wine, and vanilla. Pulse until the mixture forms into a ball. Wrap the dough in plastic wrap and refrigerate for 30 minutes.

Cut the dough into 4 equal-sized pieces. On a lightly floured surface, roll out each piece into 1/2 inch thick logs and cut into equal sized half inch pieces. Roll each piece of dough into a small ball about the size of a hazelnut. Lightly dredge the dough balls in flour, shaking off any excess In a large heavy bottomed saucepan, pour enough oil to fill the pan about a third of the way. Heat over medium heat until a deep frying thermometer inserted in the oil reaches 375 degrees F. (If you don't have a thermometer, a cube of bread will brown in about 3 minutes). In batches, fry the dough until lightly golden, about 2 to 3 minutes. Transfer to a paper bowl lined plate to drain. 

In a large saucepan, combine the honey, sugar, and lemon juice over medium heat. Bring to a boil and cook, stirring occasionally, until the sugar is dissolved, about 3 minutes. Remove the pan from the heat. Add the fried dough and hazelnuts and stir until coated in the honey mixture. Allow the mixture to cool in the pan for 2 minutes.

Spray the outside of a small, straight-sided water glass with vegetable oil cooking spray and place in the center of a round platter. Using a large spoon or damp hands, arrange the struffoli and hazelnuts around the glass to form a wreath shape. Drizzle any remaining honey mixture over the struffoli. Allow to set for 2 hours (can be made 1 day in advance). Decorate with sprinkles and dust with powdered sugar, if using. Remove the glass from the center of the platter and serve.

Almond White Chocolate Biscotti

While I'm usually more of a soft and chewy cookie kind of girl, there are times when a crunchy and hard cookie is just what I need. This was the case not too long ago, and so I decided it was time to make some biscotti. Biscotti, that twice baked, crisp and crumbly cookie that is perfect for dipping in coffee, hot chocolate, or my personal favorite, milk. There are so many options when it comes to biscotti; they can be sweet or savory, filled with chocolate or nuts, dried fruit or cheese, really anything you can think of. I of course favor the sweet version, and this time I went with white chocolate and almonds, mostly because I had both of those things in the house. It was a delicious combination though, one I would make again. Because you bake biscotti twice, the whole process can take a while, but you are left with a lot of cookies in the end, and they last for a long time. If you don't think you like biscotti because you've only ever bought it pre-packaged at a coffee shop or at the store, try making it at home before you write it off completely; you might be surprised at how delicious it can be!

Cooled, drizzled and ready to eat

Slivered almonds, ready to go

White chocolate, chopped

Dry ingredients 

Add the beautiful eggs...

...and the butter, and start stirring

Once it starts to combine a little, use you hands to 

knead the dough until it all comes together

Done

Divide the dough in three balls

Shape them into 14 inch logs

Place the logs on a couple of cookie sheets

and flatten them slightly

First bake

Gotta let them cool for about 20 minutes

Then slice up into 1/2 inch cookies

Cutting on the diagonal 

Then place back on the cookie sheets to be baked again

Ready to go

Second bake

Beautiful golden brown

Drizzle with white chocolate and they're ready to eat

Almond White Chocolate Biscotti
From: Ultimate Italian, a Better Homes and Gardens Special Interest Publication
Ingredients

  • 2 3/4 cups all purpose flour 
  • 1 1/2 cups sugar 
  • 1 1/2 teaspoons baking powder 
  • 1 teaspoon salt 
  • 1/2 cup chopped almonds 
  • 1/2 cup finely chopped white chocolate 
  • 2 eggs 
  • 2 egg yolks 
  • 6 tablespoons butter, melted 

Directions
Preheat oven to 325. Lightly grease two cookie sheets; set aside. In a large bowl, combine flour, sugar, baking powder salt, almonds and chocolate. Make a well in the center of the flour mixture. Place eggs and egg yolks in the well and stir into the flour mixture. Add butter; stir until combined. (Dough will be crumbly.) Use your hands to knead dough until it comes together.

Divide dough into three equal portions. (If necessary, wrap dough in plastic wrap and let rest for 5 to 10 minutes or until evenly moistened.) On a lightly floured surface, shape each portion into a 14 inch long log, pinching dough as you roll, if necessary. Place logs about 3 inches apart on prepared cookie sheets; flatten logs slightly until about 1 1/2 inches wide. Bake about 25 minutes or until firm and light brown. Transfer cookie sheets to wire racks. Cool for 15 minutes.

Transfer logs to cutting board. Use a serrated knife to cut each log diagonally into 1/2 inch slices. Place slices, cut sides down, on cookie sheets. Bake for 10 minutes. Turn slices over Bake for 10 to 15 minutes more or until crisp, golden and dry. Cool.

Drizzle additional melted whit chocolate over cooled biscotti if desired.