Chocolate Truffles

Making homemade chocolate truffles has been in my mind for over a year now, but for some reason I just never got around to just making them. A few weeks ago however, I buckled down and decided I had to just do it. Now, finally having completed my truffle making task, I'm asking myself what took so long? They turned out wonderfully, creamy and decadent, dark and rich. You also get a lot of truffles out of one batch which is really nice. I'm definitely not going to let it take as long to make them a second time.

I like my chocolate dark, so I used a nice mix of different kinds of dark chocolate that I've been accumulating to make truffles with. I thought they turned out perfectly, intensely dark, almost to the point of being bitter but not quite. If you don't like your chocolate quite so dark, go with something a little sweeter. Since truffles are mostly chocolate, use really good chocolate to make them. The better the chocolate the better the truffle.

The process was not difficult at all, but it definitely takes some time. You have to make the ganache, let it set for several hours, and then roll out each individual chocolate. I found it very rewarding, but I wouldn't try it if you're in a hurry. You can make the ganache a day or two ahead though and let it sit in the fridge until you are ready to shape the truffles. That's what I did and it worked out perfectly. Now having one batch of truffles under my belt, I'm ready to start experimenting with different toppings and different flavors, the possibilities are endless.

My mix of dark chocolate

Pretty, I almost didn't want to melt it

Break it all up in a bowl for microwaving

Nice and melted

Add the cream mixture

Let it sit covered for a few minutes

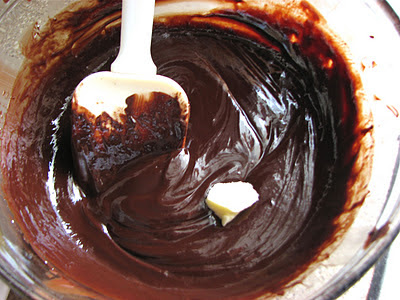
Then start stirring in the butter

Glossy and beautiful

Pour the ganache into the prepared pan

Then give it a few hours to set, first at room 

temperature and then in the fridge

When ready, remove from the pan

Time to create

Cut it up into 64 pieces

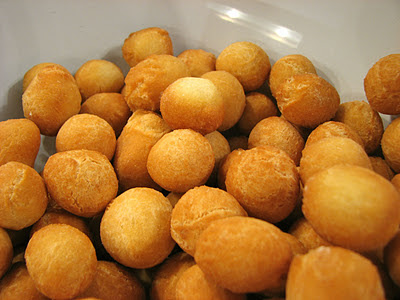
I could eat it as is

Roll each piece into a smooth ball,

yes it is kind of messy

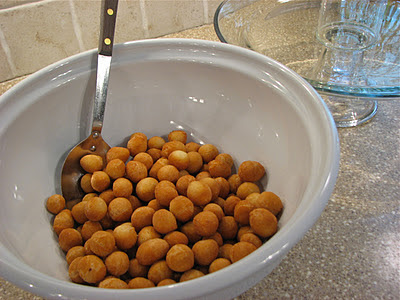
Drop each truffle in the cocoa coating

and roll to coat

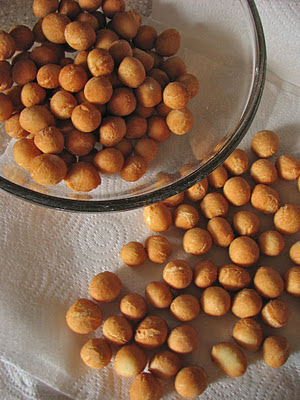
That's it, time to enjoy!

Chocolate Truffles
Adapted from Cook's Illustrated
Ingredients
Ganache

  • 12 ounces dark chocolate, chopped 
  • 1/2 cup heavy cream 
  • 2 tablespoons light corn syrup 
  • 1/2 teaspoon vanilla 
  • 1/4 teaspoon salt 
  • 2 tablespoons butter, softened and cut into pieces 

Coating

  • 1/2 cup Dutch-processed cocoa 
  • 1/4 cup powdered sugar 

Directions
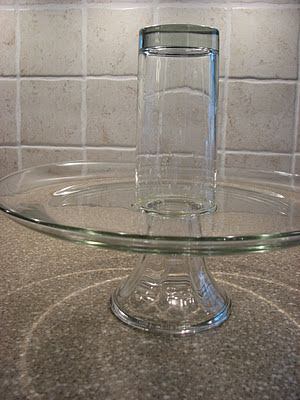
Start by making a parchment sling for an 8-inch square baking dish. Cut two strips of parchment paper as wide as the pan but long enough to hang over the edge. Lay them perpendicular in the pan so the bottom and sides are covered and the parchment hangs over all of the edges. This makes it easier to remove the ganache later.

Next make the ganache. First, microwave the chocolate for about 3-4 minutes on 50% power until mostly melted but a few small pieces remain. Then microwave the cream until warm, about 30 seconds. Add the corn syrup, vanilla and salt and pour the mixture over the chocolate. Cover the bowl with plastic wrap and let it sit for 3 minutes until it's nice and steamy, then remove the plastic and stir it all together with a wooden spoon. Finally, add the butter, one piece at a time, stirring until fulling incorporated and silky smooth.

Transfer the ganache to the prepared pan and let it sit at room temperature for at least 2 hours before covering and refrigerating until firm, at least 2 more hours.

While waiting for the ganache to firm up make the coating. Sift together the cocoa and powdered sugar twice into a small bowl using a fine mesh strainer.

Using the parchment paper as handles, life the ganache out of the pan. Cut the block of chocolate into 64 pieces, if it's really hard and starts cracking, let it sit out for a few minutes before continuing. Roll each piece into a round ball. I found that pressing the edges of each square into a more rounded shape with the tips of my fingers first made it easier to roll each piece into a nice ball with the palms of my hands. Drop the balls into the bowl of cocoa topping and roll them around to completely coat. Store the truffles in an airtight container in the fridge.

Vanilla Madeleines

Until not that long ago, I'd never heard of a madeleine, but once I saw them and learned what they were I knew I had to try them. If you know me at all then you know that I love cake, it is probably my all time favorite dessert (although that's a very difficult thing to pick), so I knew I would love madeleines, how could I not? In case you are wondering, madeleines are little mini sponge cakes that are baked in special shell shaped molds. Because I didn't own a madeleine pan, I was never abel to give them a try, but thankfully this Christmas I received a madeleine pan from my sister-in-law (thanks Lindsey)!

After receiving my madeleine pan, I went online and just picked a recipe. I just wanted something plain and simple for my first try. This recipe sounded promising, no special add ins or funky ingredients, so I whipped it together in just a few minutes. They really were simple to make, and were ready to eat in less than half an hour, that's a win in my book.

So the verdict? I really do love madeleines, I knew I would but now it's official! They are light and fresh, a bite size cake, the perfect way to satisfy my cake craving without the labor involved in making an entire cake. I don't know how my madeleines compare with a 'true' madeleine but I don't really care. They were delicious which is all that really matters. Now I can't wait to try lots of different variations, this is only the beginning.

The new pan

Beating together the eggs and sugar 

Sift in the flour

Fold in the butter and zest

Fill the molds up

All done!

Sugared and ready to eat

Vanilla Madeleines
Adapted from All Recipes
Ingredients

  • 2 eggs
  • 3/4 teaspoon vanilla extract
  • 1/8 teaspoon salt
  • 1/3 cup white sugar
  • 1/2 cup all-purpose flour
  • 1 tablespoon lemon or orange zest (optional)
  • 1/4 cup butter
  • Powdered sugar for dusting

Directions
Preheat oven to 375 degrees. Butter and flour madeleine molds; set aside.

Melt butter and let cool to room temperature. In a small mixing bowl, beat eggs, vanilla and salt at high speed until light. Beating constantly, gradually add sugar; and continue beating at high speed until mixture is thick and pale and ribbons form in bowl when beaters are lifted, 5 to 10 minutes.

Sift flour into egg mixture 1/3 at a time, gently folding after each addition. Add zest and pour melted butter around edge of batter. Quickly but gently fold butter into batter. Spoon batter into molds; it will mound slightly above tops.

Bake 8-10 minutes, or until cakes are golden and the tops spring back when gently pressed with your fingertip.

Use the tip of the knife to loosen madeleines from pan; invert onto rack. Immediately sprinkle warm cookies with powdered sugar. Madeleines are best eaten the day they're baked. Leftover madeleines are wonderful when dunked into coffee or tea. 

Yields 16-18 madeleines

Struffoli

At Christmas last year my mom saw an episode of Giada at Home in which Giada made struffoli for dessert. My mom thought it looked so fun and interesting and she really wanted to make it for Christmas, but we never got around to it, other things got in the way and when Christmas was over, we hadn't made the struffoli. This Christmas, I was randomly watching the food network and what should I see, the Giada Christmas episode in which she makes struffoli! I thought it looked fun and make and delicious and knew that this year we had to try it out.

According to Wikipedia, "struffoli is a Neapolitan dish made of deep fried balls of dough about the size of marbles. Struffoli are crunchy on the outside and light inside. They are mixed with honey and other sweet things." This is a winning combo in my book. Fried dough covered in sweetness, sign me up!

Making the struffoli turned out to be a lot of fun and really not that much work. Forming all the little balls of dough took a little time, but it really wasn't that bad. The dough came together quickly and the little doughnuts fried up in just a few minutes. I heated my oil while I was forming all the balls of dough, and it was just about ready when I finished with the dough. The glaze was quick and easy, and forming the wreath wasn't bad at all, but it was sure nice to have two people working on it. This is definitely a recipe to do with others. It's fun to do while talking and laughing with friends or family. 

The finished project turned out really well, but I don't think it was perfect. I omitted the hazelnuts in the recipe because I didn't have any, but I would like try it with the hazelnuts sometime. A lot of my glaze kind of pooled under the wreath once it had cooled which didn't seem quite right, but it still tasted very nice. The mini doughnuts seemed a little dry, but I may have fried them too long, I don't have a ton of experience frying. Regardless of this, I would definitely try this again. I thought it was a fun Christmas treat that is easy to pick at throughout the night. You can take just one or two little balls and pop them in your mouth. A fun finger food dessert. 

Although struffoli is traditionally served at Christmas and Easter, I think this would be fun any time of year. You could mold it into different shapes depending on the season or holiday, and you could decorate it with different colored sprinkles. Right now I'm thinking a football shaped struffoli with colors in your team's colors for the Superbowl would be a lot of fun, or how about a heart for Valentines Day? The possibilities are endless!

The dough, ready to cut up 

Form the dough into ropes and them cut the 

ropes into tiny little chunks, they 

can be smaller than you think

Getting there!

Frying them all up

Place on paper towels to drain, then throw

them in a bowl

Grease a cup and get your serving plate ready

Ready to assemble

Take the little doughnuts

And cover them with the glaze

Then start shaping it around the glass

Once cooled, remove the glass, dust with powdered sugar and cover it with sprinkles, Enjoy!

Struffoli
From The Food Network
Ingredients

  • 2 cups flour, plus extra for dusting 
  • 1 large lemon, zested (about 2 teaspoons) 
  • 1/2 large orange, zested (about 2 teaspoons) 
  • 3 tablespoons sugar 
  • 1/2 teaspoon fine sea salt 
  • 1/4 teaspoon baking powder 
  • 1/2 stick (2 ounces) unsalted butter, cut into 1/2-inch pieces, at room temperature 
  • 3 large eggs 
  • 1 tablespoon white wine, such as pinot grigio 
  • 1 teaspoon pure vanilla extract 
  • Canola oil, for frying 
  • 1 cup honey 
  • 1/2 cup sugar 
  • 1 tablespoon lemon juice 
  • 1 1/2 cups hazelnuts, toasted (I didn't use) 
  • Vegetable oil cooking spray 
  • Sugar sprinkles, for decoration 
  • Powdered sugar, for dusting 

Directions
For the dough: In the bowl of a food processor, pulse together 2 cups of flour, lemon zest, orange zest, sugar, salt, and baking powder. Add the butter and pulse until the mixture resembles a coarse meal. Add the eggs, wine, and vanilla. Pulse until the mixture forms into a ball. Wrap the dough in plastic wrap and refrigerate for 30 minutes.

Cut the dough into 4 equal-sized pieces. On a lightly floured surface, roll out each piece into 1/2 inch thick logs and cut into equal sized half inch pieces. Roll each piece of dough into a small ball about the size of a hazelnut. Lightly dredge the dough balls in flour, shaking off any excess In a large heavy bottomed saucepan, pour enough oil to fill the pan about a third of the way. Heat over medium heat until a deep frying thermometer inserted in the oil reaches 375 degrees F. (If you don't have a thermometer, a cube of bread will brown in about 3 minutes). In batches, fry the dough until lightly golden, about 2 to 3 minutes. Transfer to a paper bowl lined plate to drain. 

In a large saucepan, combine the honey, sugar, and lemon juice over medium heat. Bring to a boil and cook, stirring occasionally, until the sugar is dissolved, about 3 minutes. Remove the pan from the heat. Add the fried dough and hazelnuts and stir until coated in the honey mixture. Allow the mixture to cool in the pan for 2 minutes.

Spray the outside of a small, straight-sided water glass with vegetable oil cooking spray and place in the center of a round platter. Using a large spoon or damp hands, arrange the struffoli and hazelnuts around the glass to form a wreath shape. Drizzle any remaining honey mixture over the struffoli. Allow to set for 2 hours (can be made 1 day in advance). Decorate with sprinkles and dust with powdered sugar, if using. Remove the glass from the center of the platter and serve.

Banket

My family and I are Dutch through and through, and proud of it. Growing up in West Michigan I didn't think anything of it, most of my classmates and friends growing up were Dutch, that's just how things are here. However, since moving to Detroit for school I realized that there really aren't that many Dutch people around. There are a few cities spread throughout the country with a substantial Dutch population, but other than that, there really aren't that many of us around.

I love having this background, learning about my heritage, playing Dutch bingo whenever you hear a Dutch name. There is one thing about being Dutch that I don't love though; I'm not a big fan of the cuisine. Now there may be some fabulous Dutch recipes out there, maybe I just haven't been exposed to the delicacies of the Netherlands, but as far as I know, Dutch food isn't all that exciting. There are a couple of dishes however that I absolutely love. Since it's Christmas I had to share this one. Banket is the quintessential Dutch Christmas treat (at least in West Michigan, I have absolutely no idea how much of it they actually eat in the Netherlands).

Banket is basically a flaky, buttery pastry wrapped around a filling of almond paste, eggs and sugar. I love the crackly, golden brown crust, the way the pastry almost shatters when you cut it, spreading pieces of crust everywhere. The almond paste filling is sweet and delicious. Almond at Christmas is the best. 

This is actually the third year I've made banket. The past two years I tried using my Grandma's recipe, but the instructions were so vague I didn't really know what I was doing and the proportions of ingredients seemed just a little off. It still turned out quite tasty, it just never really looked like banket. This year it turned out beautifully, I was pleased, but it wasn't quite how I like it. The crust was perfect, but I like the filling to be a little looser. I may try adding more egg and cutting back on the cornstarch, I don't think my grandma had that in her recipe. My dad also told me that the crust needs to be darker (that's how his mom did it). I may use a whole egg or just an egg yolk for the egg wash and try baking it a little longer. 

In my opinion, it isn't Christmas without banket. Now that I have a success under my belt I will have to attempt to perfect the recipe for the coming years. Even though this recipe isn't perfect in my option, it makes a wonderful pastry that I would be pleased to serve at my table, and I will this weekend!

The dough, ready to go

Split it in half and roll each half out between

two sheets of plastic wrap

Cut each half in half lengthwise

Look at the chunks of butter!

Chunks of cold butter = flaky dough

Put a quarter of the filling on each piece of dough

The best part!

Roll each piece up, sealing the edges tightly

All filled and rolled, excited to eat!

Take each stick...

...and polk some holes down the top

Then brush with the egg wash

And bake!

Golden brown and delicious

The inside, I like the dough and filling to be more distinct

Cut it up into little bites

Enjoy!

Check out another great banket recipe  HERE!!

Banket
From Eet Smakelijk
Ingredients

  • 1 cup almond paste (NOT almond pie filling and NOT marzipan) 
  • 1 cup sugar 
  • 1 egg 
  • 1 egg, separated 
  • 1/4 cup cornstarch 
  • 2 cups flour 
  • 1 cup butter 
  • 1/4 cup water 

Directions
Let paste, sugar, egg, egg yolk and cornstarch stand in bowl for 30 minutes. Preheat oven to 400 degrees. Blend flour, butter and water in bowl like a pie crust. Add more water if necessary. Dough may be refrigerated overnight if desired.

When ready to prepare, divide dough into 2 equal parts. Roll each part of floured board to 8x13-inch rectangle. Cut lengthwise into 2 equal strips (4 strips, each 4x13-inches in all).

Prepare the filling by mixing the almond paste, sugar, eggs and cornstarch. Divide the filling into four equal portions and place one portion along the length of each piece of dough. Fold over the ends and then the long sides, moistening one side with water to seal before pressing together.

Place with seam side down on cookie sheet. Prick holes on top for air. Beat egg white and brush the top of the rolls. Bake for 14 minutes. Reduce head to 325 degrees and bake for an additional 20 minutes or until light brown.

Simple Vanilla Pudding

I love sugar, any kind will do, as long as it is sweet, I am happy. I try to keep this love of sweets in check most of the time because it is true, the more sugar you eat, the more sugar you crave, I've found this out the hard way. My strategy for not eating too much sugar throughout the day is to treat myself to a little sweet every night. By sweet I'm not talking a massive dessert, but instead just a little something to satisfy my sweet tooth after dinner and before I go to bed. This can be anything from a chocolate chip cookie, to a piece of dark chocolate, half a banana drizzled with chocolate or a handful of toffee peanuts, really just about anything that makes my mouth happy for the night. The other day while looking in the fridge I noticed a leftover egg yolk staring at me and I decided that it was time to make some pudding.

I've been wanting to make pudding for a while now, but haven't gotten around to doing it. When I saw that forlorn egg yolk in my fridge I quickly googled 'simple pudding recipe' and this one popped up. It was perfect, calling for one egg yolk and just over a cup of milk. Add a little sugar, vanilla and cornstarch and I had the perfect evening snack.

Since I have very little experience with puddings, I really have no idea how this compares with any other pudding out there. It was not very rich since I just used 2% milk and there wasn't much sugar either, but that was perfect for me this time. I wanted something light and simple and that's just what I got. It was a cinch to whip together, and the perfect thing to satisfy my sweet tooth this time.

All you need to start: milk, eggs, sugar, 

salt and cornstarch

Whisk a little milk with the egg yolk

Whisking it all together

Covered and ready to chill for a while in the fridge

Grab a spoon and dig in

Simple Vanilla Pudding
From Heart of Light
Ingredients

  • 1 1/3 cup milk, divided 
  • 1 egg yolk
  • 3 tablespoons sugar
  • 1 tablespoon corn starch
  • 1/8 tsp salt
  • 2 tsp vanilla extract

Directions
Heat 1 cup of milk in a small saucepan.

Meanwhile, whisk together the extra 1/3 cup milk and the egg yolk.

In a heatproof bowl, whisk together the cornstarch, sugar and salt and then add the milk/egg mixture in a slow stream, whisking so clumps don't form.

Slowly pour the hot milk into the mixture, whisking the entire time.

Pour the mixture back into the saucepan and cook for a few minutes, until thick and bubbling.

Stir in the vanilla and eat warm or let it cool and set up in the fridge.