Simple Winter Mushrooms

I never really cared all that much for mushrooms. I think it was just the texture thing and the fact that they are a fungus. I mean really, who thinks that eating a fungus sounds appetizing? They are just kind of weird. That said however, in the past year or two, mushrooms have been growing on me. They can really add some nice flavor to different dishes, and can add meatiness to an otherwise umami-less meal. The more I use mushrooms, the more I like them. A few weeks ago I was at Eastern Market in Detroit on Saturday morning, picking up some vegetables to use over the next week. I got sidetracked when I walked by the guy selling mushrooms and saw these beauties. I knew I had to try them, even at twenty bucks a pound. I snatched up a quarter pound and took them home, not having any idea of what I was going to do with them.

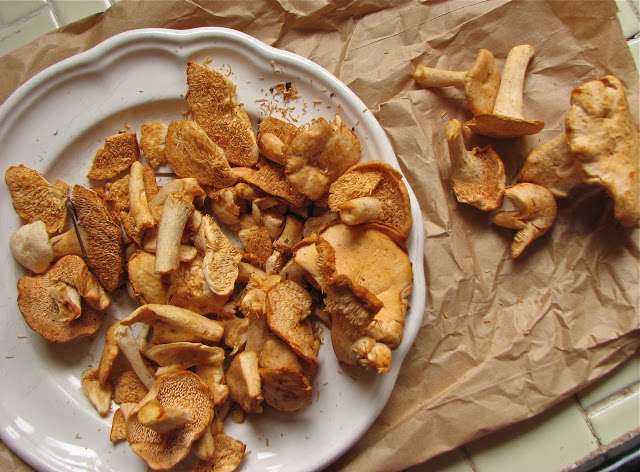
I don't remember everything the mushroom man told me, but I believe these are winter chanterelles (if I'm wrong please let me know, I really know next to nothing about mushroom varieties). I just thought they were so pretty; the golden color and the slender elegance of the stems just made me want to eat them right there. I asked the mushroom man what to do with them, and he said all they need is a few minutes in a pan with butter, that sounded good to me.

After spending a few minutes online, I decided that I was just going to use butter and a little of the thyme that I had in my fridge. There is really no recipe for this, all I did was melt a nob of butter in my pan, threw in the thyme leaves and let the butter cook for a little while until it was starting to brown slightly, then in when the mushrooms. Sauté those up for 3-4 minutes and you're done, that's it. It couldn't be simpler, and the aroma in the kitchen was buttery and delicious. The results were outstanding. My very first thought upon taking a bite was, meaty. The mushrooms were so meaty and hearty, it was hard to believe they are a fungus, it was almost like eating a piece of meat. They were buttery (obviously) and full of flavor. There was nothing bland about these mushrooms. Adding the little bit of thyme really complemented the natural flavors, it was the perfect combo.

Although I probably won't buy these little guys again very often (too expensive), I will definitely make them again. So simple and so delicious. This experience has really made me excited to try other kinds of mushrooms, and to use mushrooms in new and different ways. They really are a unique and interesting food that I want to get more comfortable using and better at preparing in delicious ways.

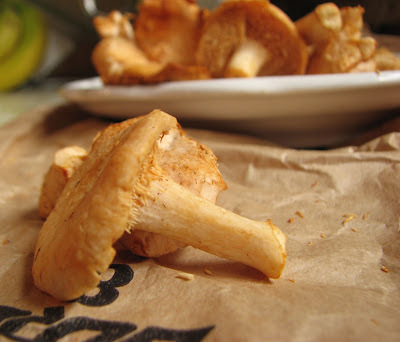
 Delicate and beautiful
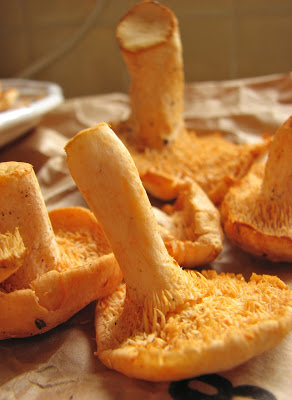
 A mushroom forest!

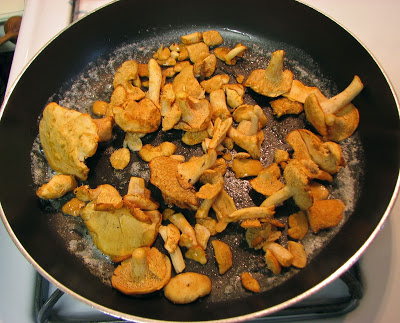
 Into the pan with the butter and thyme

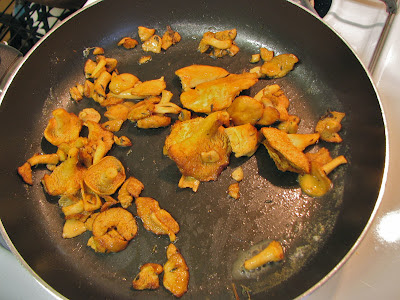
 Saute for a few minutes

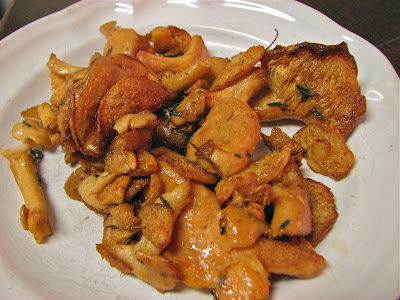
Plate them up, add a little salt, and dig in

Bagels

In case you haven't noticed, I have a rather large sweet tooth and enjoy having a nice sweet for breakfast on a regular basis. Hence, a lot of my baking tends to lean towards the sugar filled finished product. This does not mean however, that I always need to have something sweet in the morning, this recipe proves that. I've been wanting to make both bagels and English muffins for some time now, and I can finally cross one of those off my baking to-do list. Who doesn't love a fat, chewy bagel, covered in butter, cream cheese or my personal favorite, topped with a couple of slices of swiss cheese and then toasted in the toaster oven. Savory and delicious and oh so delectable, even if they aren't loaded with sugar.

These bagels were fun to make, but they definitely aren't quick to put together. They take two days to complete, with most of the work done on day 1. Making the dough, letting it rise, and shaping are all done on this first day, and then the shaped bagels are left to sit in the fridge overnight and develop a lot of yummy flavor. Day two is just for boiling and baking, the fun part!

I ended up making 10 bagels from this recipe but the recipe says it makes 12 large or 24 mini bagels, so you can really make however many you want. However many you end up making, you won't be disappointed. These bagels ended up full off flavor, chewy and not at all dry; they toasted up beautifully and were perfect for breakfast, finished off with your favorite topping. I would for sure make these again, they really were wonderful. As fresh as you'll find anywhere, and just as good, if not better.

Getting the sponge ready

Mix it together and let it do its magic for 2 hours

2 hours later, nice and poofy

Add in the rest of the dough ingredients

Knead it up until smooth

Divide the dough

Shape into bagels, aren't they cute?

Into the fridge for an overnight retard

The next day, time to boil

All done swimming and ready for the oven

Out of the oven and ready to eat!

Yum, ready for toasting and buttering

Bagels
From The Bread Baker's Apprentice by Peter Reinhart
Ingredients
Sponge

  • 1 teaspoon instant yeast 
  • 4 cups bread flour 
  • 2 1/2 cups water 

Dough

  • 1/2 teaspoon instant yeast 
  • 3 3/4 cups bread flour 
  • 2 3/4 teaspoons salt 
  • 2 teaspoons malt powder or 1 tablespoon brown sugar 

To Finish

  • 1 tablespoon baking soda 
  • cornmeal for dusting 
  • Any toppings of your choosing (sesame seeds, poppy seeds, kosher salt etc.) 

Directions
Start by making the sponge: mix together the yeast and flour in the bowl of a stand mixer. Add the water and stir only until it forms a smooth batter (like pancake batter). Cover the bowl and let sit for about 2 hours at room temperature until the mixture is bubbly and foamy and swells to about double the original size.

Make the dough: int eh same bowl, add the additional yeast to the sponge and stir to combine. Add 3 cups of flour and all of the salt and malt or brown sugar. Mix on low speed until the ingredients form a ball, all the while mixing in the additional 3/4 cup of flour.

Knead the dough for about 6 minutes in the mixer until firm and stiff but still pliable and smooth with no traces of flour remaining. Add more water or flour as needed. The dough should be satiny and pliable but not tacky. Immediately divide the dough into equal size pieces and form them into rolls. Cover the rolls and allow them to rest for about 20 minutes.

Line 2 sheet pans with parchment and mist with oil. Shape the bagels either by poking a hole in the dough and rotating you thumb around inside the hole to widen it to about 2 1/2 inches in diameter (try to stretch the dough as evenly as possible) or by rolling the dough into a 8 inch rope and wrapping the rope around the palm of your hand, overlapping the ends and pressing the ends into the counter, rocking your hand back and forth to seal.

Place each shaped bagel onto the parchment lined pans. Mist them lightly with oil and cover with plastic wrap. Let the pans sit at room temperature for about 20 minutes.

Use the float test to see if the bagels are ready to go into the fridge to be retarded. Fill a bowl with cool water. Drop the bagels into the water. If they float within 10 seconds they are ready for the fridge. If they don't float, return the bagel to the pan, dry it off, and check again in 10 to 20 minutes. Once the bagels pass the float test place the covered pans in the fridge overnight (or up to 2 days).

The next day, or whenever you are ready to make the bagels, preheat the oven to 500 degrees. Bring a large pot of water to boil and add the baking soda. Remove the bagels from the fridge and gently drop them into the water, don't overcrowd the pot. After 1 minute, turn them over and boil for another minute (if you like really chewy bagels, let them boil for 2 minutes a side). While the bagels are boiling, sprinkle cornmeal on the parchment paper. Return the boiled bagels to the cornmeal lined parchment paper and repeat with remaining bagels. If you want to top your bagels, do so right after they come out of the water.

When all the bagels have been boiled, place the pans in the middle of the oven and bake for 5 minutes. Rotate the pans and switch shelves and lower the oven to 450 degrees and continue baking for about 5 minutes, or a little longer if you prefer them darker.

Remove pans from oven and let bagels rest for at least 15 minutes before serving.

Chocolate Chip Muffins

Sometimes it's best to just keep things simple. A bag of chocolate chips and a quick batter, mix them together and what do you get, only these amazing chocolate chip muffins! I love muffins for breakfast and I love them to include chocolate so these are perfect. They remind me of chocolate chip cookies in muffin form so I like to call them incognito chocolate chip cookies. Nothing out of the ordinary in this recipe, except for perhaps how good the finished product is. If you don't know what to have for breakfast tomorrow, don't blame me.

Honestly, this recipe takes about five seconds to put together. You get to melt the butter, and since it calls for a whole bag of chocolate chips, you don't even have to measure them out. I love it when that happens. Wet ingredients, dry ingredients, chocolate chips, mix them all together and pop them in the oven. In just a few minutes you have hot, fluffy muffins, loaded with chocolate and ready to devour.

Everything's all set

Add the wet to the dry

Mix it up, but not all the way

Add the chocolate!

Finish combining (don't over mix)

Into the muffin cups

A few more chippers on top for good measure

They're ready!

Chocolate Chip Muffins
From: Blogchef.net
Ingredients

  • 2 cups all purpose flour
  • 1/3 cup white sugar
  • 1/3 cup light brown sugar
  • 2 teaspoons baking powder
  • ½ teaspoon salt
  • 2/3 cup milk
  • ½ cup butter (melted and cooled)
  • 2 eggs (lightly beaten)
  • 1 teaspoon vanilla extract
  • 1 (11 ½ ounce) package milk chocolate chips

Directions
Preheat the oven to 400 degrees. Line muffin tins with liners. In a large bowl mix together flour, white sugar, brown sugar, baking powder and salt.

In another bowl stir together eggs, milk, butter and vanilla until well blended. Make a well in the center of the dry ingredients. Pour the milk mixture into the well and stir until well combined. Lightly stir in chocolate chips.

Spoon batter into muffins cups or tins. Place into the oven and bake for 15-20 minutes or until a toothpick comes out clean. Remove from the oven and allow to cool for 5 minutes.

Classic White Bread

While I love baking anything and everything, there will always be a special place in my heart for a simple loaf of soft white bread. There is almost nothing better than a slice of fresh from the oven, still warm, homemade bread slathered in salted butter. The yeasty flavor mixes with the heavenly aroma still emanating from the oven to produce the bliss that is freshly baked bread. I've made several different white bread recipes over the past few years and while I don't vividly remember them all, I know this one is right up there at the top of the list. Buttery, light and tender, this bread is ready for anything: sandwiches, toast, or a simple afternoon snack with some almond butter, really whatever you can think of, it's up to you.

This recipe was straightforward without any unusual ingredients. The basic cast of flour, salt and yeast along with some milk, some butter, an egg, and a hint of sweetness via the addition of a little sugar. That's how I like my bread, simple but with a little enrichment to really take it over the top. To finish it all off I brushed the loaves with melted butter when they came out of the oven (instead of the egg wash suggested) to produce a soft and buttery crust, yum!

I didn't have the size bread pans the recipe calls for (something I've since remedied) but it didn't seem to matter one bit. The loaves didn't get as tall as they would have in a slightly smaller pan but they still turned out beautifully. I've been eating this bread daily in the days since making it and I absolutely love it. Last night it made the best Texas toast, and this morning it was perfect slathered in homemade jam. I can't wait to find out what it will be good for next; whatever that is I know it will be delicious.

Start mixing it all together

 When smooth and supple, place in an 

oiled bowl to rise

 Doubled and ready to shape

 Cut the dough in half

 Shape into two nice loaves

 Nicely risen and ready to hit the oven

 Straight from the oven, golden and beautiful

 Pull out of the loaf pans and let cool on wire racks

 Slice it up, making sure you have a nice snack

along the way

Ready for anything

Classic White Bread
From The Bread Baker's Apprentice by Peter Reinhart
Ingredients

  • 4¼ cups (19 ounces) unbleached bread flour
  • 1½ teaspoons (.38 ounces) salt
  • 3 tablespoons (1.5 ounces) sugar
  • 2 teaspoons (.22 ounce) instant yeast
  • 1 large (1.65 ounces) egg, slightly beaten, at room temperature
  • ¼ cup (2 ounces) butter, margarine, or shortening, at room temperature, or vegetable oil
  • 1½ cups (12 ounces) buttermilk or whole milk, at room temperature
  • 1 egg, whisked with 1 teaspoon water until frothy, for egg wash (optional)
  • sesame or poppy seeds for garnish (optional)

Directions
Mix together the flour, salt, sugar, and yeast in a 4-quart bowl (or in the bowl of an electric mixer). Pour in the egg, butter, and milk and mix with a large metal spoon (or on low speed of the electric mixer with the paddle attachment) until all the flour is absorbed and the dough forms a ball. If the dough seems very stiff and dry, trickle in more milk until the dough is soft and supple.

Sprinkle flour on the counter, transfer the dough to the counter, and begin kneading (or mix on medium speed with the dough hook), adding more flour, if necessary, to create a dough that is soft, supple, and tacky but not sticky. Continue kneading (or mixing) for 6 to 8 minutes. (In the electric mixer, the dough should clear the sides of the bowl but stick ever to slightly to the bottom.) The dough should pass the windowpane test and register 80° F. Lightly oil a large bowl and transfer the dough to the bowl, rolling it to coat it with oil. Cover the bowl with plastic wrap.

Ferment at room temperature for 1½ to 2 hours, or until the dough doubles in size (the length of time will depend on the room temperature).

Remove the fermented dough from the bowl and divide it in half for sandwich loaves, into eighteen 2-ounce pieces for dinner rolls, or twelve 3-ounce pieces for burger or hot dog buns. Shape the pieces into boules for loaves or tight rounds for dinner rolls or buns. Mist the dough lightly with spray oil and cover with a towel or plastic wrap. Allow to rest for about 20 minutes.

For loaves, shape as shown on page 81. Lightly oil two 8½ by 4½-inch loaf pans and place the loaves in the pans. For rolls and buns, line 2 sheet pans with baking parchment. Rolls require no further shaping. For hamburger buns, gently press down on the rolls to form the desired shape. For hot dog buns, shape as shown on page 80, although without tapering the ends. Transfer the rolls or buns to the sheet pans.

Mist the tops of the dough with spray oil and loosely cover with plastic wrap or a towel. Proof the dough at room temperature for 60 to 90 minutes, or until it nearly doubles in size.

Preheat the oven to 350° F for loaves or 400° F for roll and buns. Brush the rolls or buns with the egg wash and garnish with poppy or sesame seeds. Sandwich loaves also may be washed and garnished, or score them down the center and rub a little vegetable oil in the slit.

Bake the rolls or buns for approximately 15 minutes, or until they are golden brown and register just above 180° F in the center. Bake loaves for 35 to 45 minutes, rotating 180 degrees halfway through for even baking, if needed. The tops should be golden brown and the sides, when removed from the pan, should also be golden. The internal temperature of the loaves should be close to 190° F, and the loaves should sound hollow when thumped on the bottom.

When the loaves have finished baking, remove them immediately from the pans and cool on a wire rack for at least 1 hour before slicing or serving. Rolls should cool for at least 15 minutes on a rack before serving.

Barbecue Chicken Pizza

Homemade pizza has become one of my go-to dinners. All I have to do is whip up a quick batch of my favorite pizza dough, throw whatever I have on hand on top of one of the crusts and slide it into the oven, right onto my awesome pizza stone. I've found that this is a great way to use up leftovers. Almost anything you can think of can be turned into a pizza. I love the versatility and creativity a blank crusts offers, just let your imagination run wild.

The key to really good homemade pizza is a super hot oven and cooking surface. A baking stone is your best bet, it will produce pizza with the crispest, most professional tasting crust. If you don't have one, an upside down cookie sheet will do, but it won't get as hot as the stone will. Also, when it's time to heat up your oven, crank it up as high as it will possibly go, usually 500 or 550, and let your stone heat up for at least 30 minutes, or an hour if you have the time. The hotter the better for pizza. Trust me, this will take your pizza to a whole new level.

This week I made barbecue chicken wraps and had some leftover sauce and chicken so what was the first thing I thought of; barbecue chicken pizza of course! I used the leftover barbecue sauce for the base. I used a recipe from Tyler Florence for the sauce, I've made it several times and love how easy and delicious it turns out, thick and sweet. I just topped this canvas with the leftover chicken, onions, peppers and cheese. It couldn't get much easier, or much more delicious. Homemade pizza really is one of my all time favorite dinners, it's almost impossible to mess it up so there are no excuses not to try it for yourself.

Dough, ready to go

Sauce it up

Topping time

Finished with some cheese

Slide the whole thing from the 

pizza peel into the oven

In just a few minutes, you're ready to eat!

Perfect Pizza Dough
Adapted from Annie's Eats, originally from Baking Illustrated
Ingredients

  • 4 cups (22 ounces) bread flour, plus more for dusting 
  • 2 1/4 teaspoons instant yeast 
  • 1 1/2 teaspoons salt 
  • 1 3/4 cup water, at room temperature 
  • 2 tablespoons extra-virgin olive oil 

Directions
In the bowl of a stand mixer fitted with the paddle attachment, combine the bread flour, yeast and salt, mixing briefly to blend. Add the water and olive oil. Mix until a cohesive dough is formed. Switch to the dough hook. Knead on low speed until smooth and elastic, about 5 minutes. Transfer to a lightly oiled bowl, turning once to coat. Cover with plastic wrap and let rise until doubled in size, 1½-2 hours.

Transfer the dough to a lightly floured work surface. Divide the dough into four equal pieces. Form each piece of dough into a smooth, round ball. If using immediately, cover with a damp cloth. Let the dough relax for at least 10 minutes but no longer than 30 minutes. You can also refrigerate or freeze any dough you don't want to use. Just place each piece in a greased plastic bag and put in the fridge for a couple of days or freeze for a couple of weeks/months. When you want to make pizza, thaw overnight in the fridge (if frozen). Take the dough out of the fridge about an hour before you want to make pizza and let come to room temperature before proceeding.

To bake, preheat the oven and pizza stone to 500˚ F for at least 30 minutes. Transfer the dough to your pizza peel or shaping surface, lightly sprinkled with cornmeal. Shape the dough with lightly floured hands. Brush the outer edge lightly with olive oil. Top as desired. Slide into the oven and bake until the crust is golden brown, and cheese is bubbling, 8-12 minutes. (If you don't have a pizza stone, use a heavy duty cookie sheet placed upside down in the oven. You can shape the pizza directly on parchment paper and slide the whole thing, parchment paper and all, into the oven on top of the upside down cookie sheet.)

Barbecue Sauce
From: Tyler Florence
Ingredients

  • 1 slice bacon 
  • 1 bunch fresh thyme 
  • Extra-virgin olive oil 
  • 1/2 onion, chopped 
  • 2 garlic cloves, chopped 
  • 2 cups ketchup 
  • 1/4 cup brown sugar 
  • 1/4 cup molasses 
  • 2 tablespoons red or white wine vinegar 
  • 1 tablespoon dry mustard 
  • 1 teaspoon ground cumin 
  • 1 teaspoon paprika or smoked paprika if available 
  • Freshly ground black pepper 

Directions
Wrap the bacon around the bunch of thyme and tie with kitchen twine so you have a nice bundle. Heat about 2 tablespoons of oil in a large saucepan over medium heat. Add the thyme and cook slowly 3 to 4 minutes to render the bacon fat and give the sauce a nice smoky taste. Add the onion and garlic and cook slowly without coloring for 5 minutes. Add the remaining ingredients, give the sauce a stir, and turn the heat down to low. Cook slowly for 20 minutes to meld the flavors.

Chocolate Truffles

Making homemade chocolate truffles has been in my mind for over a year now, but for some reason I just never got around to just making them. A few weeks ago however, I buckled down and decided I had to just do it. Now, finally having completed my truffle making task, I'm asking myself what took so long? They turned out wonderfully, creamy and decadent, dark and rich. You also get a lot of truffles out of one batch which is really nice. I'm definitely not going to let it take as long to make them a second time.

I like my chocolate dark, so I used a nice mix of different kinds of dark chocolate that I've been accumulating to make truffles with. I thought they turned out perfectly, intensely dark, almost to the point of being bitter but not quite. If you don't like your chocolate quite so dark, go with something a little sweeter. Since truffles are mostly chocolate, use really good chocolate to make them. The better the chocolate the better the truffle.

The process was not difficult at all, but it definitely takes some time. You have to make the ganache, let it set for several hours, and then roll out each individual chocolate. I found it very rewarding, but I wouldn't try it if you're in a hurry. You can make the ganache a day or two ahead though and let it sit in the fridge until you are ready to shape the truffles. That's what I did and it worked out perfectly. Now having one batch of truffles under my belt, I'm ready to start experimenting with different toppings and different flavors, the possibilities are endless.

My mix of dark chocolate

Pretty, I almost didn't want to melt it

Break it all up in a bowl for microwaving

Nice and melted

Add the cream mixture

Let it sit covered for a few minutes

Then start stirring in the butter

Glossy and beautiful

Pour the ganache into the prepared pan

Then give it a few hours to set, first at room 

temperature and then in the fridge

When ready, remove from the pan

Time to create

Cut it up into 64 pieces

I could eat it as is

Roll each piece into a smooth ball,

yes it is kind of messy

Drop each truffle in the cocoa coating

and roll to coat

That's it, time to enjoy!

Chocolate Truffles
Adapted from Cook's Illustrated
Ingredients
Ganache

  • 12 ounces dark chocolate, chopped 
  • 1/2 cup heavy cream 
  • 2 tablespoons light corn syrup 
  • 1/2 teaspoon vanilla 
  • 1/4 teaspoon salt 
  • 2 tablespoons butter, softened and cut into pieces 

Coating

  • 1/2 cup Dutch-processed cocoa 
  • 1/4 cup powdered sugar 

Directions
Start by making a parchment sling for an 8-inch square baking dish. Cut two strips of parchment paper as wide as the pan but long enough to hang over the edge. Lay them perpendicular in the pan so the bottom and sides are covered and the parchment hangs over all of the edges. This makes it easier to remove the ganache later.

Next make the ganache. First, microwave the chocolate for about 3-4 minutes on 50% power until mostly melted but a few small pieces remain. Then microwave the cream until warm, about 30 seconds. Add the corn syrup, vanilla and salt and pour the mixture over the chocolate. Cover the bowl with plastic wrap and let it sit for 3 minutes until it's nice and steamy, then remove the plastic and stir it all together with a wooden spoon. Finally, add the butter, one piece at a time, stirring until fulling incorporated and silky smooth.

Transfer the ganache to the prepared pan and let it sit at room temperature for at least 2 hours before covering and refrigerating until firm, at least 2 more hours.

While waiting for the ganache to firm up make the coating. Sift together the cocoa and powdered sugar twice into a small bowl using a fine mesh strainer.

Using the parchment paper as handles, life the ganache out of the pan. Cut the block of chocolate into 64 pieces, if it's really hard and starts cracking, let it sit out for a few minutes before continuing. Roll each piece into a round ball. I found that pressing the edges of each square into a more rounded shape with the tips of my fingers first made it easier to roll each piece into a nice ball with the palms of my hands. Drop the balls into the bowl of cocoa topping and roll them around to completely coat. Store the truffles in an airtight container in the fridge.

Vanilla Madeleines

Until not that long ago, I'd never heard of a madeleine, but once I saw them and learned what they were I knew I had to try them. If you know me at all then you know that I love cake, it is probably my all time favorite dessert (although that's a very difficult thing to pick), so I knew I would love madeleines, how could I not? In case you are wondering, madeleines are little mini sponge cakes that are baked in special shell shaped molds. Because I didn't own a madeleine pan, I was never abel to give them a try, but thankfully this Christmas I received a madeleine pan from my sister-in-law (thanks Lindsey)!

After receiving my madeleine pan, I went online and just picked a recipe. I just wanted something plain and simple for my first try. This recipe sounded promising, no special add ins or funky ingredients, so I whipped it together in just a few minutes. They really were simple to make, and were ready to eat in less than half an hour, that's a win in my book.

So the verdict? I really do love madeleines, I knew I would but now it's official! They are light and fresh, a bite size cake, the perfect way to satisfy my cake craving without the labor involved in making an entire cake. I don't know how my madeleines compare with a 'true' madeleine but I don't really care. They were delicious which is all that really matters. Now I can't wait to try lots of different variations, this is only the beginning.

The new pan

Beating together the eggs and sugar 

Sift in the flour

Fold in the butter and zest

Fill the molds up

All done!

Sugared and ready to eat

Vanilla Madeleines
Adapted from All Recipes
Ingredients

  • 2 eggs
  • 3/4 teaspoon vanilla extract
  • 1/8 teaspoon salt
  • 1/3 cup white sugar
  • 1/2 cup all-purpose flour
  • 1 tablespoon lemon or orange zest (optional)
  • 1/4 cup butter
  • Powdered sugar for dusting

Directions
Preheat oven to 375 degrees. Butter and flour madeleine molds; set aside.

Melt butter and let cool to room temperature. In a small mixing bowl, beat eggs, vanilla and salt at high speed until light. Beating constantly, gradually add sugar; and continue beating at high speed until mixture is thick and pale and ribbons form in bowl when beaters are lifted, 5 to 10 minutes.

Sift flour into egg mixture 1/3 at a time, gently folding after each addition. Add zest and pour melted butter around edge of batter. Quickly but gently fold butter into batter. Spoon batter into molds; it will mound slightly above tops.

Bake 8-10 minutes, or until cakes are golden and the tops spring back when gently pressed with your fingertip.

Use the tip of the knife to loosen madeleines from pan; invert onto rack. Immediately sprinkle warm cookies with powdered sugar. Madeleines are best eaten the day they're baked. Leftover madeleines are wonderful when dunked into coffee or tea. 

Yields 16-18 madeleines

Homemade Caramel Corn

If you're looking for a nice homemade food gift that is cheap, easy, and makes a huge amount, I have your answer right here: Caramel Corn. I made caramel corn this past Christmas when getting together with friends. It was a huge hit. Everyone loved the buttery, sweet and crunchy treat. Be forewarned however, this caramel corn is highly addictive and it is way too easy to eat. 

Basically this recipe is just butter and brown sugar poured over popped corn. A little corn syrup, salt and vanilla help out, and then there is the baking soda that makes the whole topping foamy and fun. Try it out and you'll know what I mean. This really is one of the easiest snacks to make. I just saw a bag of gourmet popcorn at the store for about 8 bucks. Never again, not when you can do it yourself so easily and deliciously. It won't disappoint, I promise. 

Pop up some popcorn however you'd like

Then grab the butter,

the brown sugar,

and the corn syrup

Heat it all up together

Then add the baking soda and vanilla

Pour over the pop corn

Stir it all up into one sticky mess;

now you can eat it as is... 

...or spread it out onto a greased cookie sheet

and bake it up

Ready to devour

Caramel Corn
From: Our Best Bites
Ingredients

  • 12 C popped popcorn (about 1/2 C kernels)
  • 1 C brown sugar
  • 1/4 C white Karo syrup
  • 1/2 t salt 
  • 1 stick real butter
  • 1/2 t baking soda
  • 1 t vanilla

Directions
Pop popcorn and place in a very large bowl; set aside. Place brown sugar, Karo syrup, salt, and butter in a saucepan. Heat over medium heat until the butter has melted and the mixture is nice and bubbly. 

Remove the caramel from the heat and add baking soda and vanilla, it will get all bubbly and foamy.

Pour the mixture over the popped corn and stir very well until all of the popcorn is covered. 

At this point you can leave it as is for some nice, chewy caramel corn or you can bake it up to make it nice and crunchy. For crunchy caramel corn, bake on an oiled cookie sheet at 225 degrees for about an hour, stirring every 15 minutes, or until it reaches your desired level of crunch.