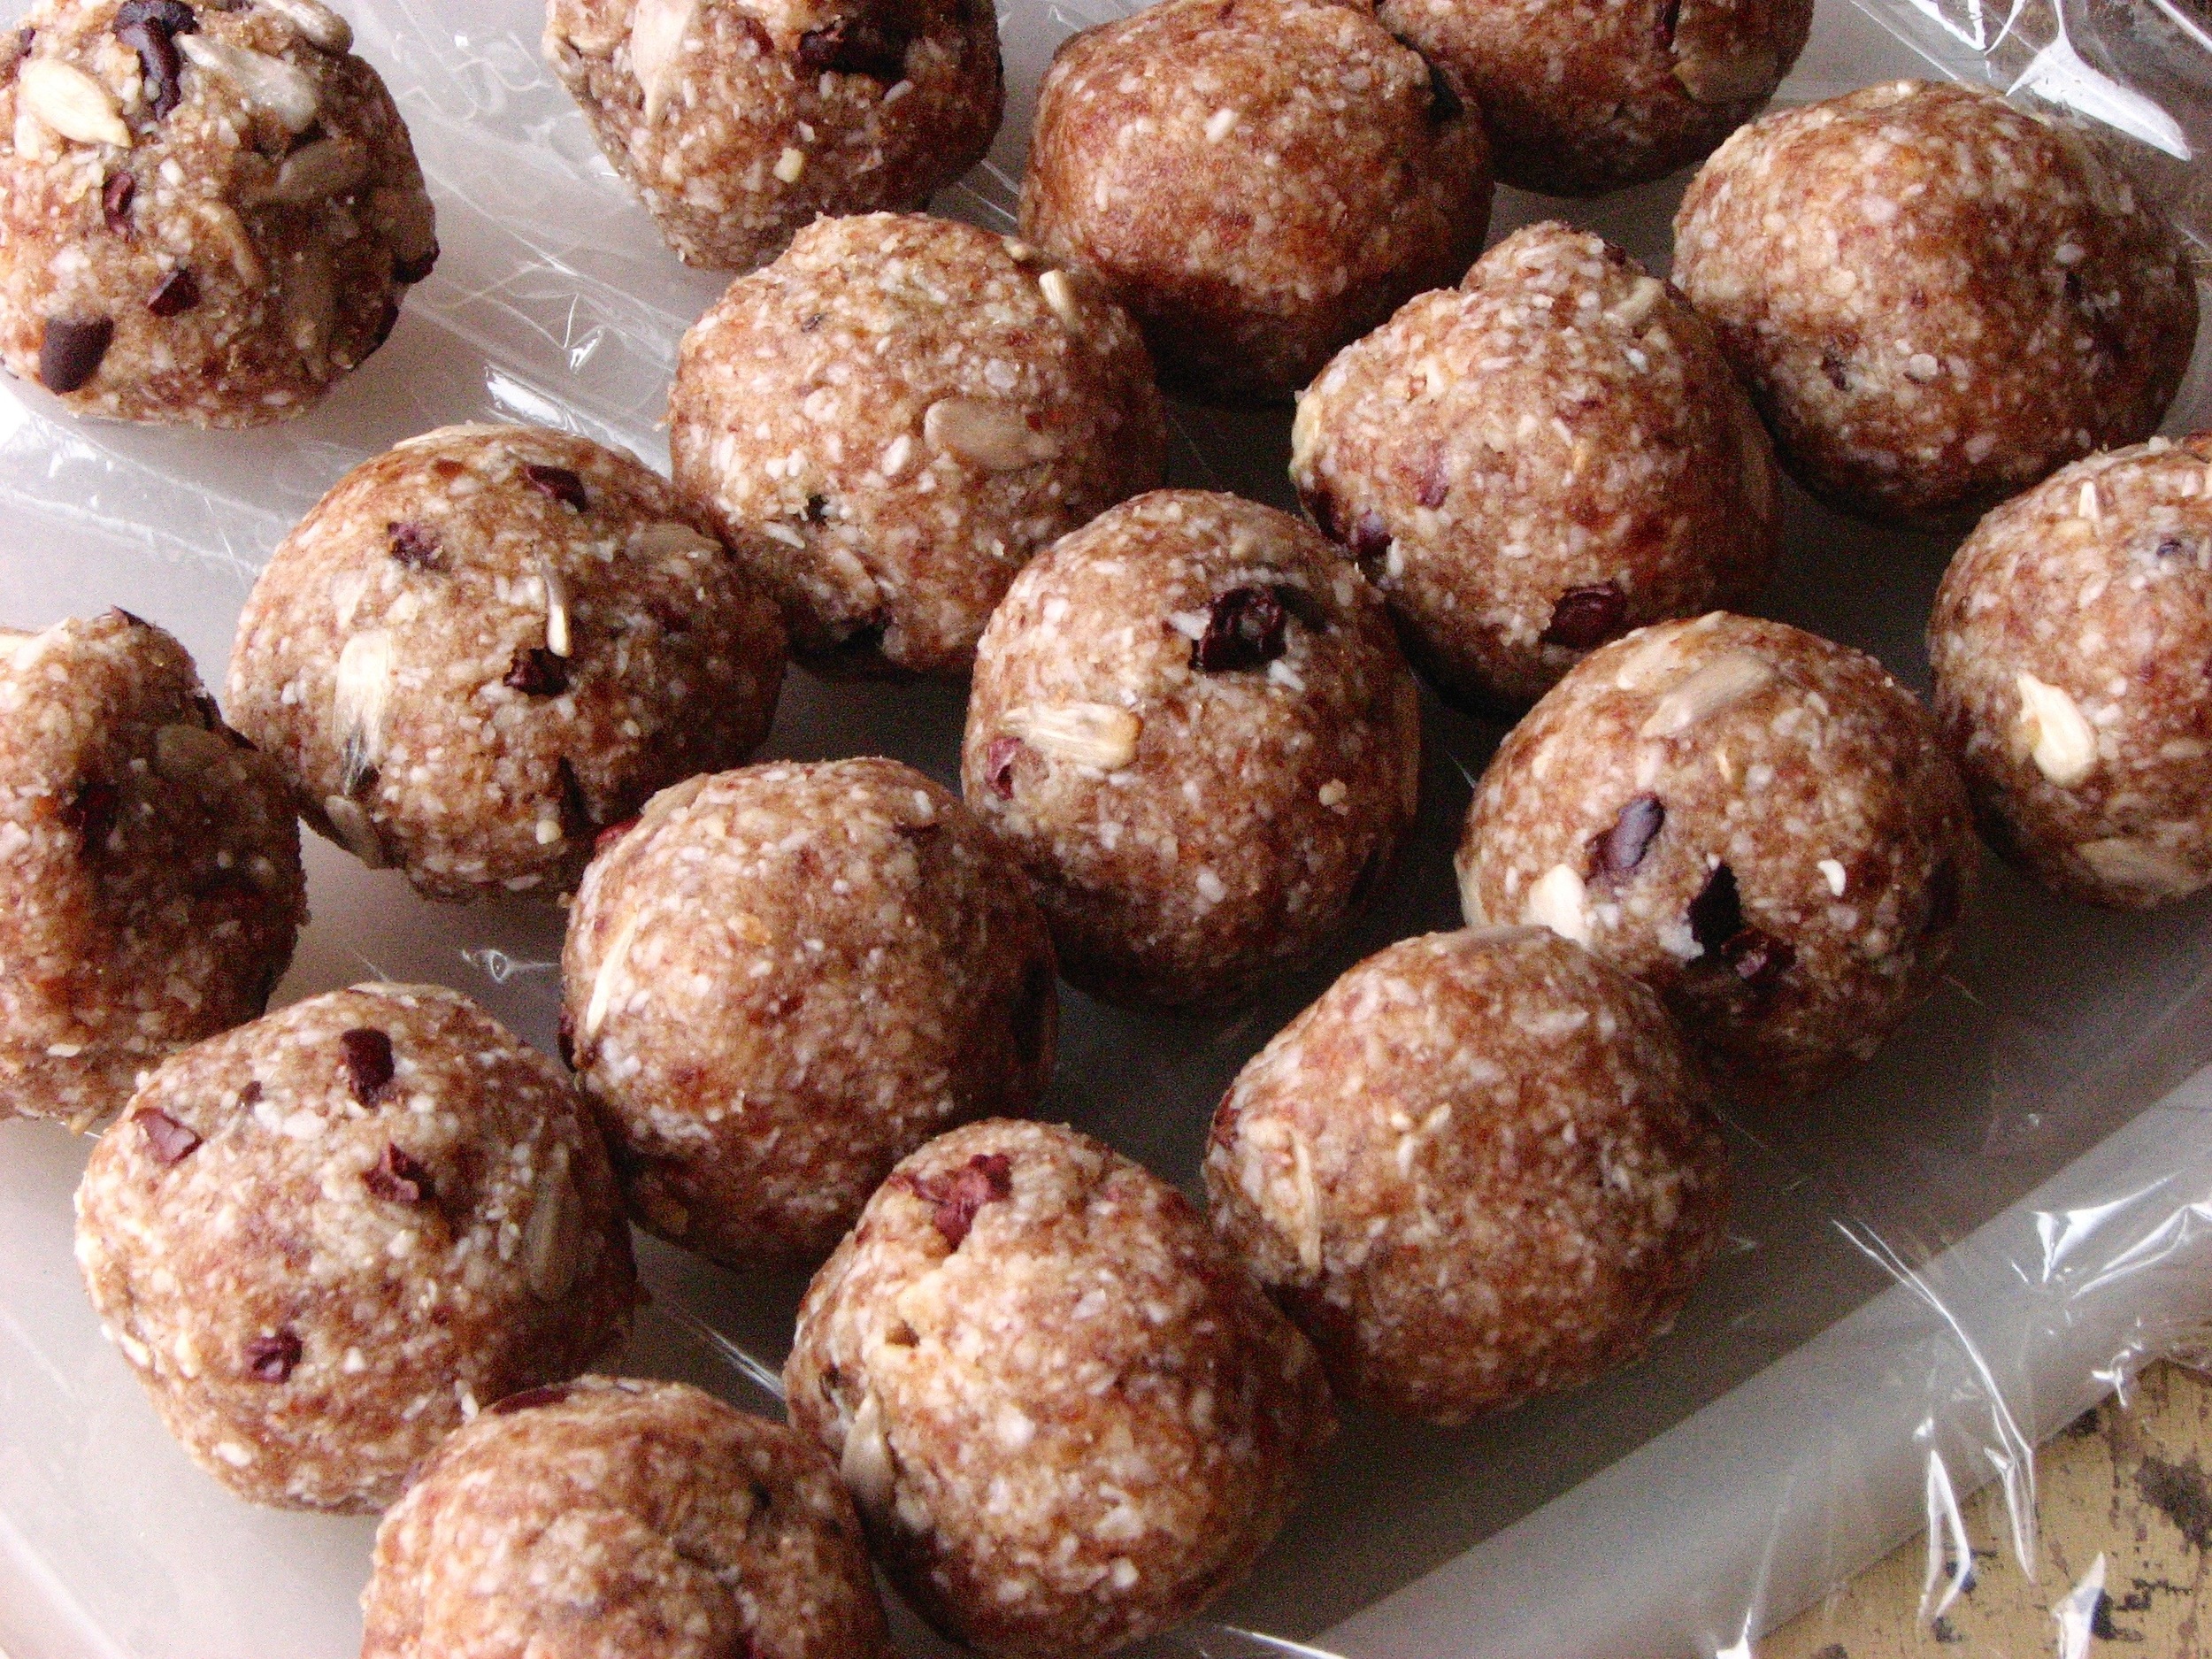
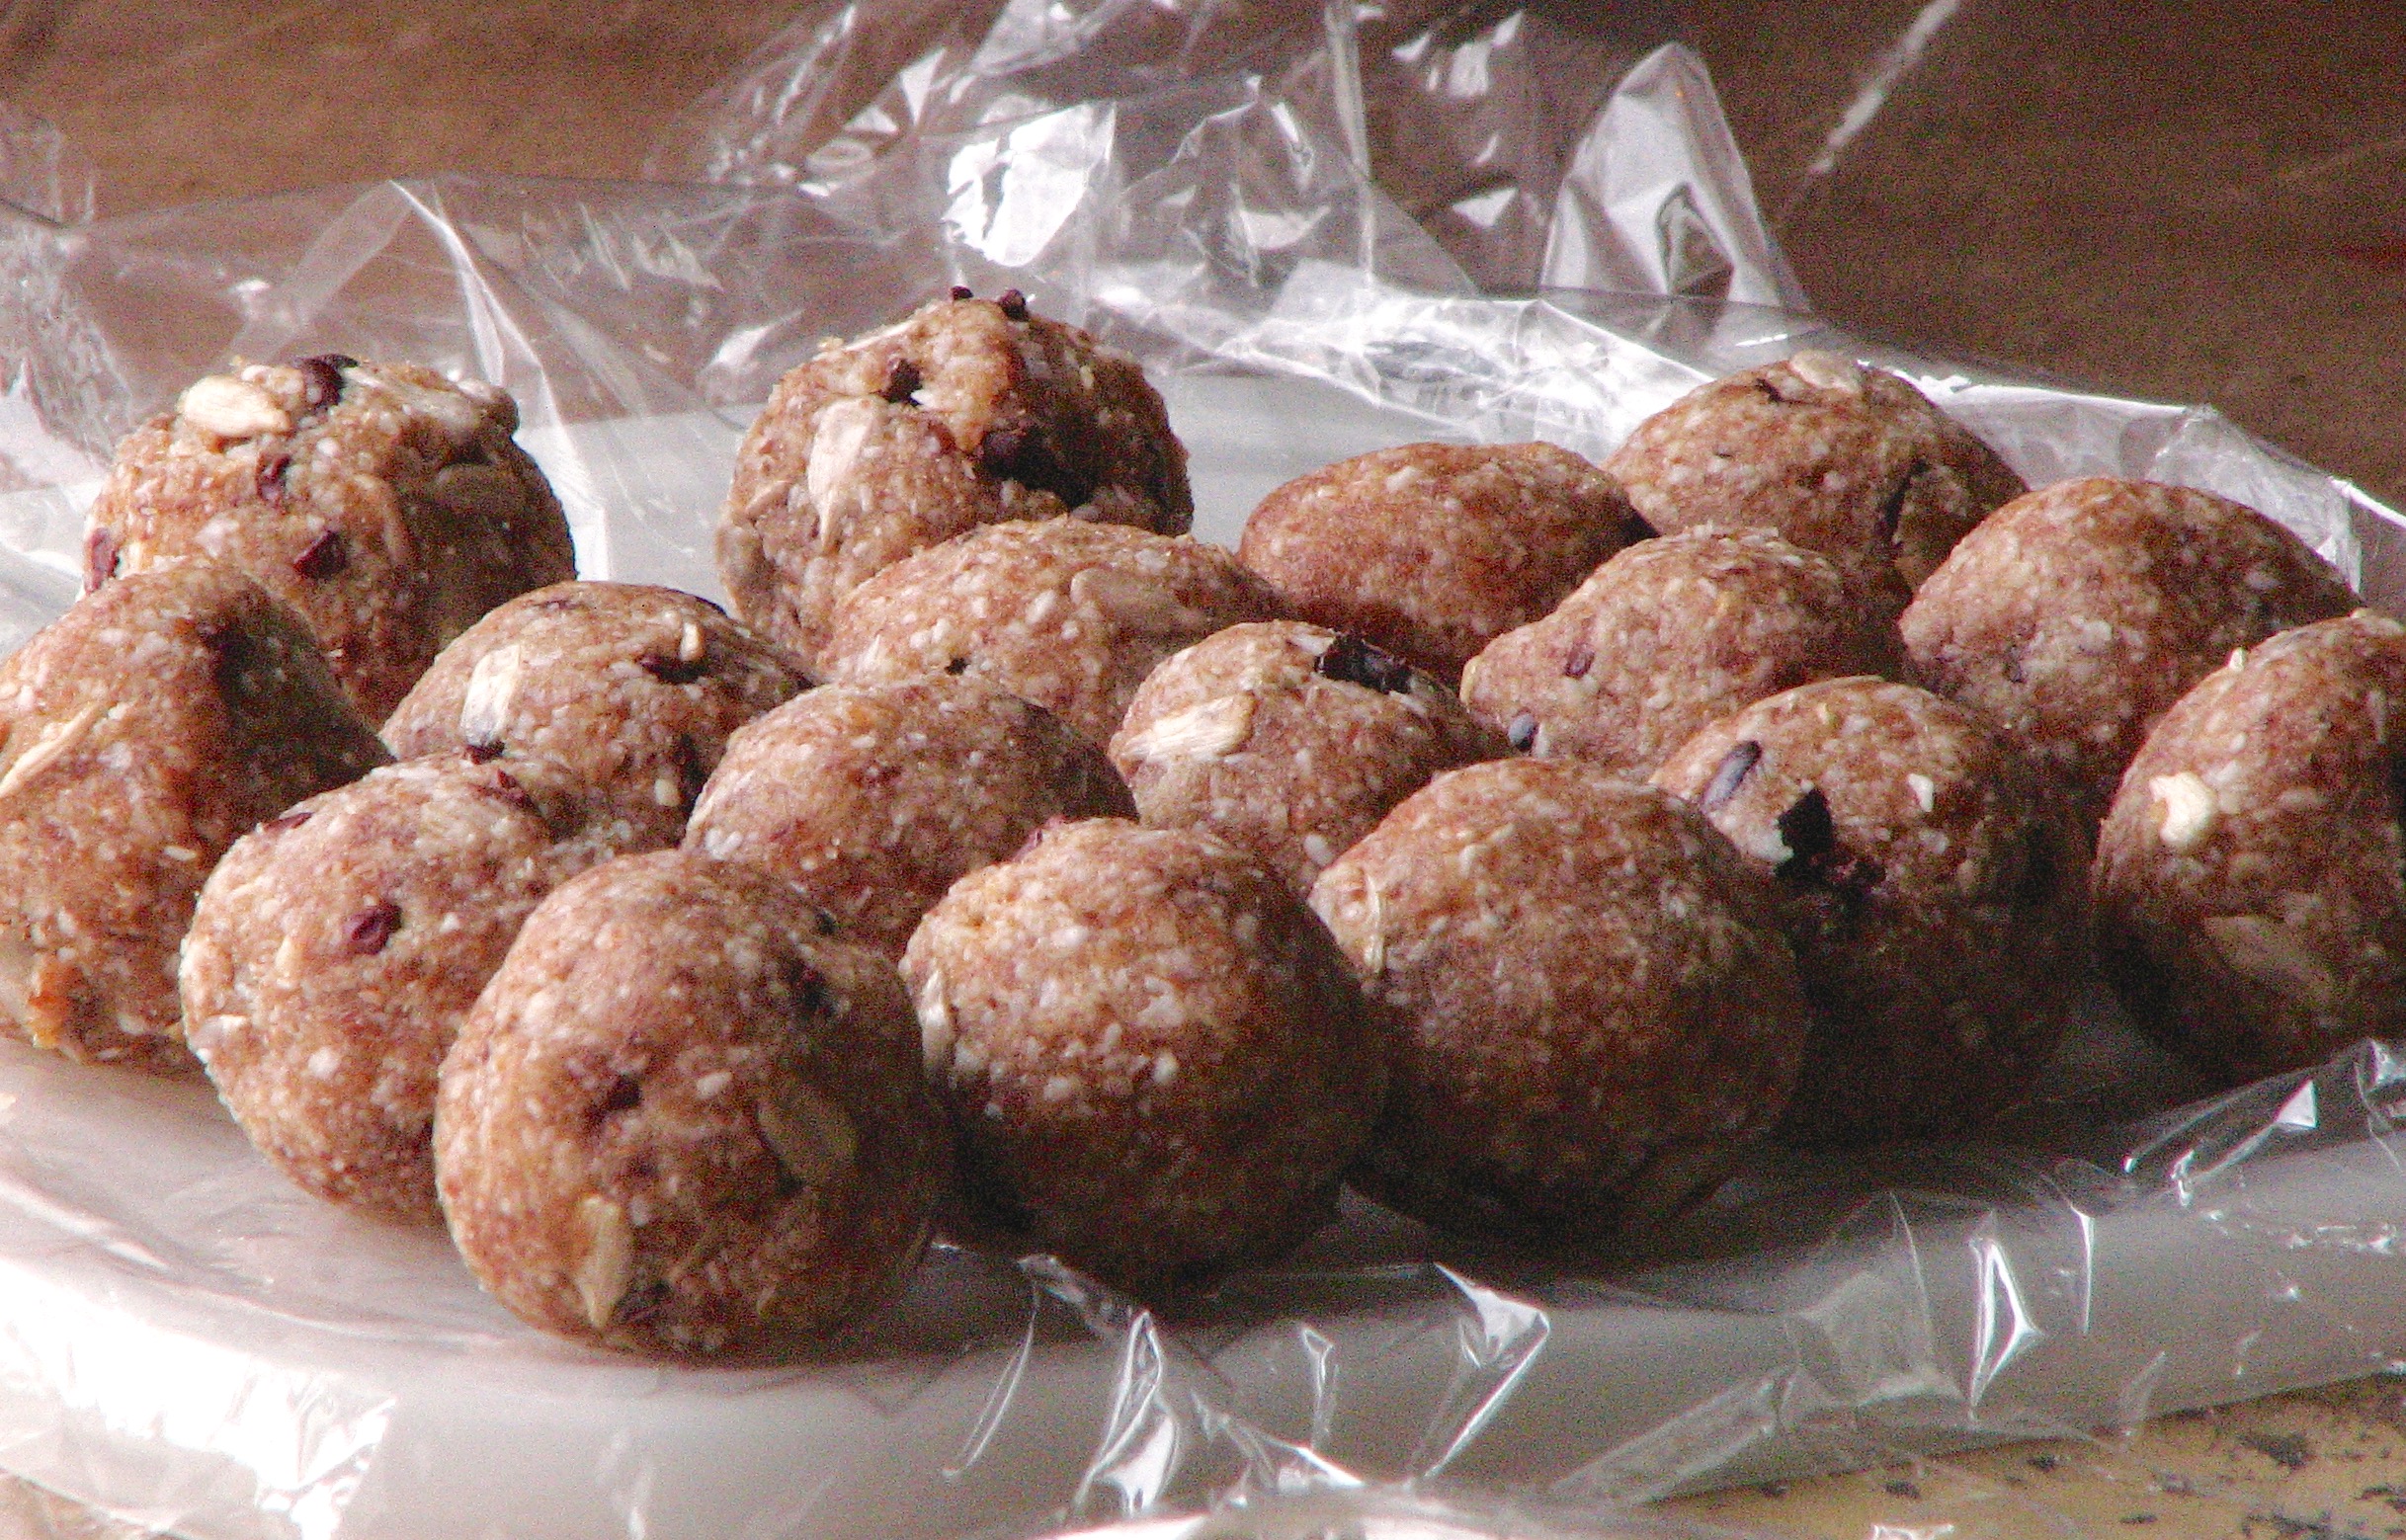
Fudgy Chocolate Chunk Protein Bars

I'm not a big fan of trying to rebrand food as something it's not. I understand the reasoning, but I still don't like it. Vegan cheese is not cheese, almond milk is not milk, and a turkey bacon is not bacon. It's not that I have anything against these foods and don't necessarily have a problem eating most of them, I just don't like how they're named something they actually aren't. Instead of always trying to replace a food product with something else, why not instead try to come up with something different, and better!

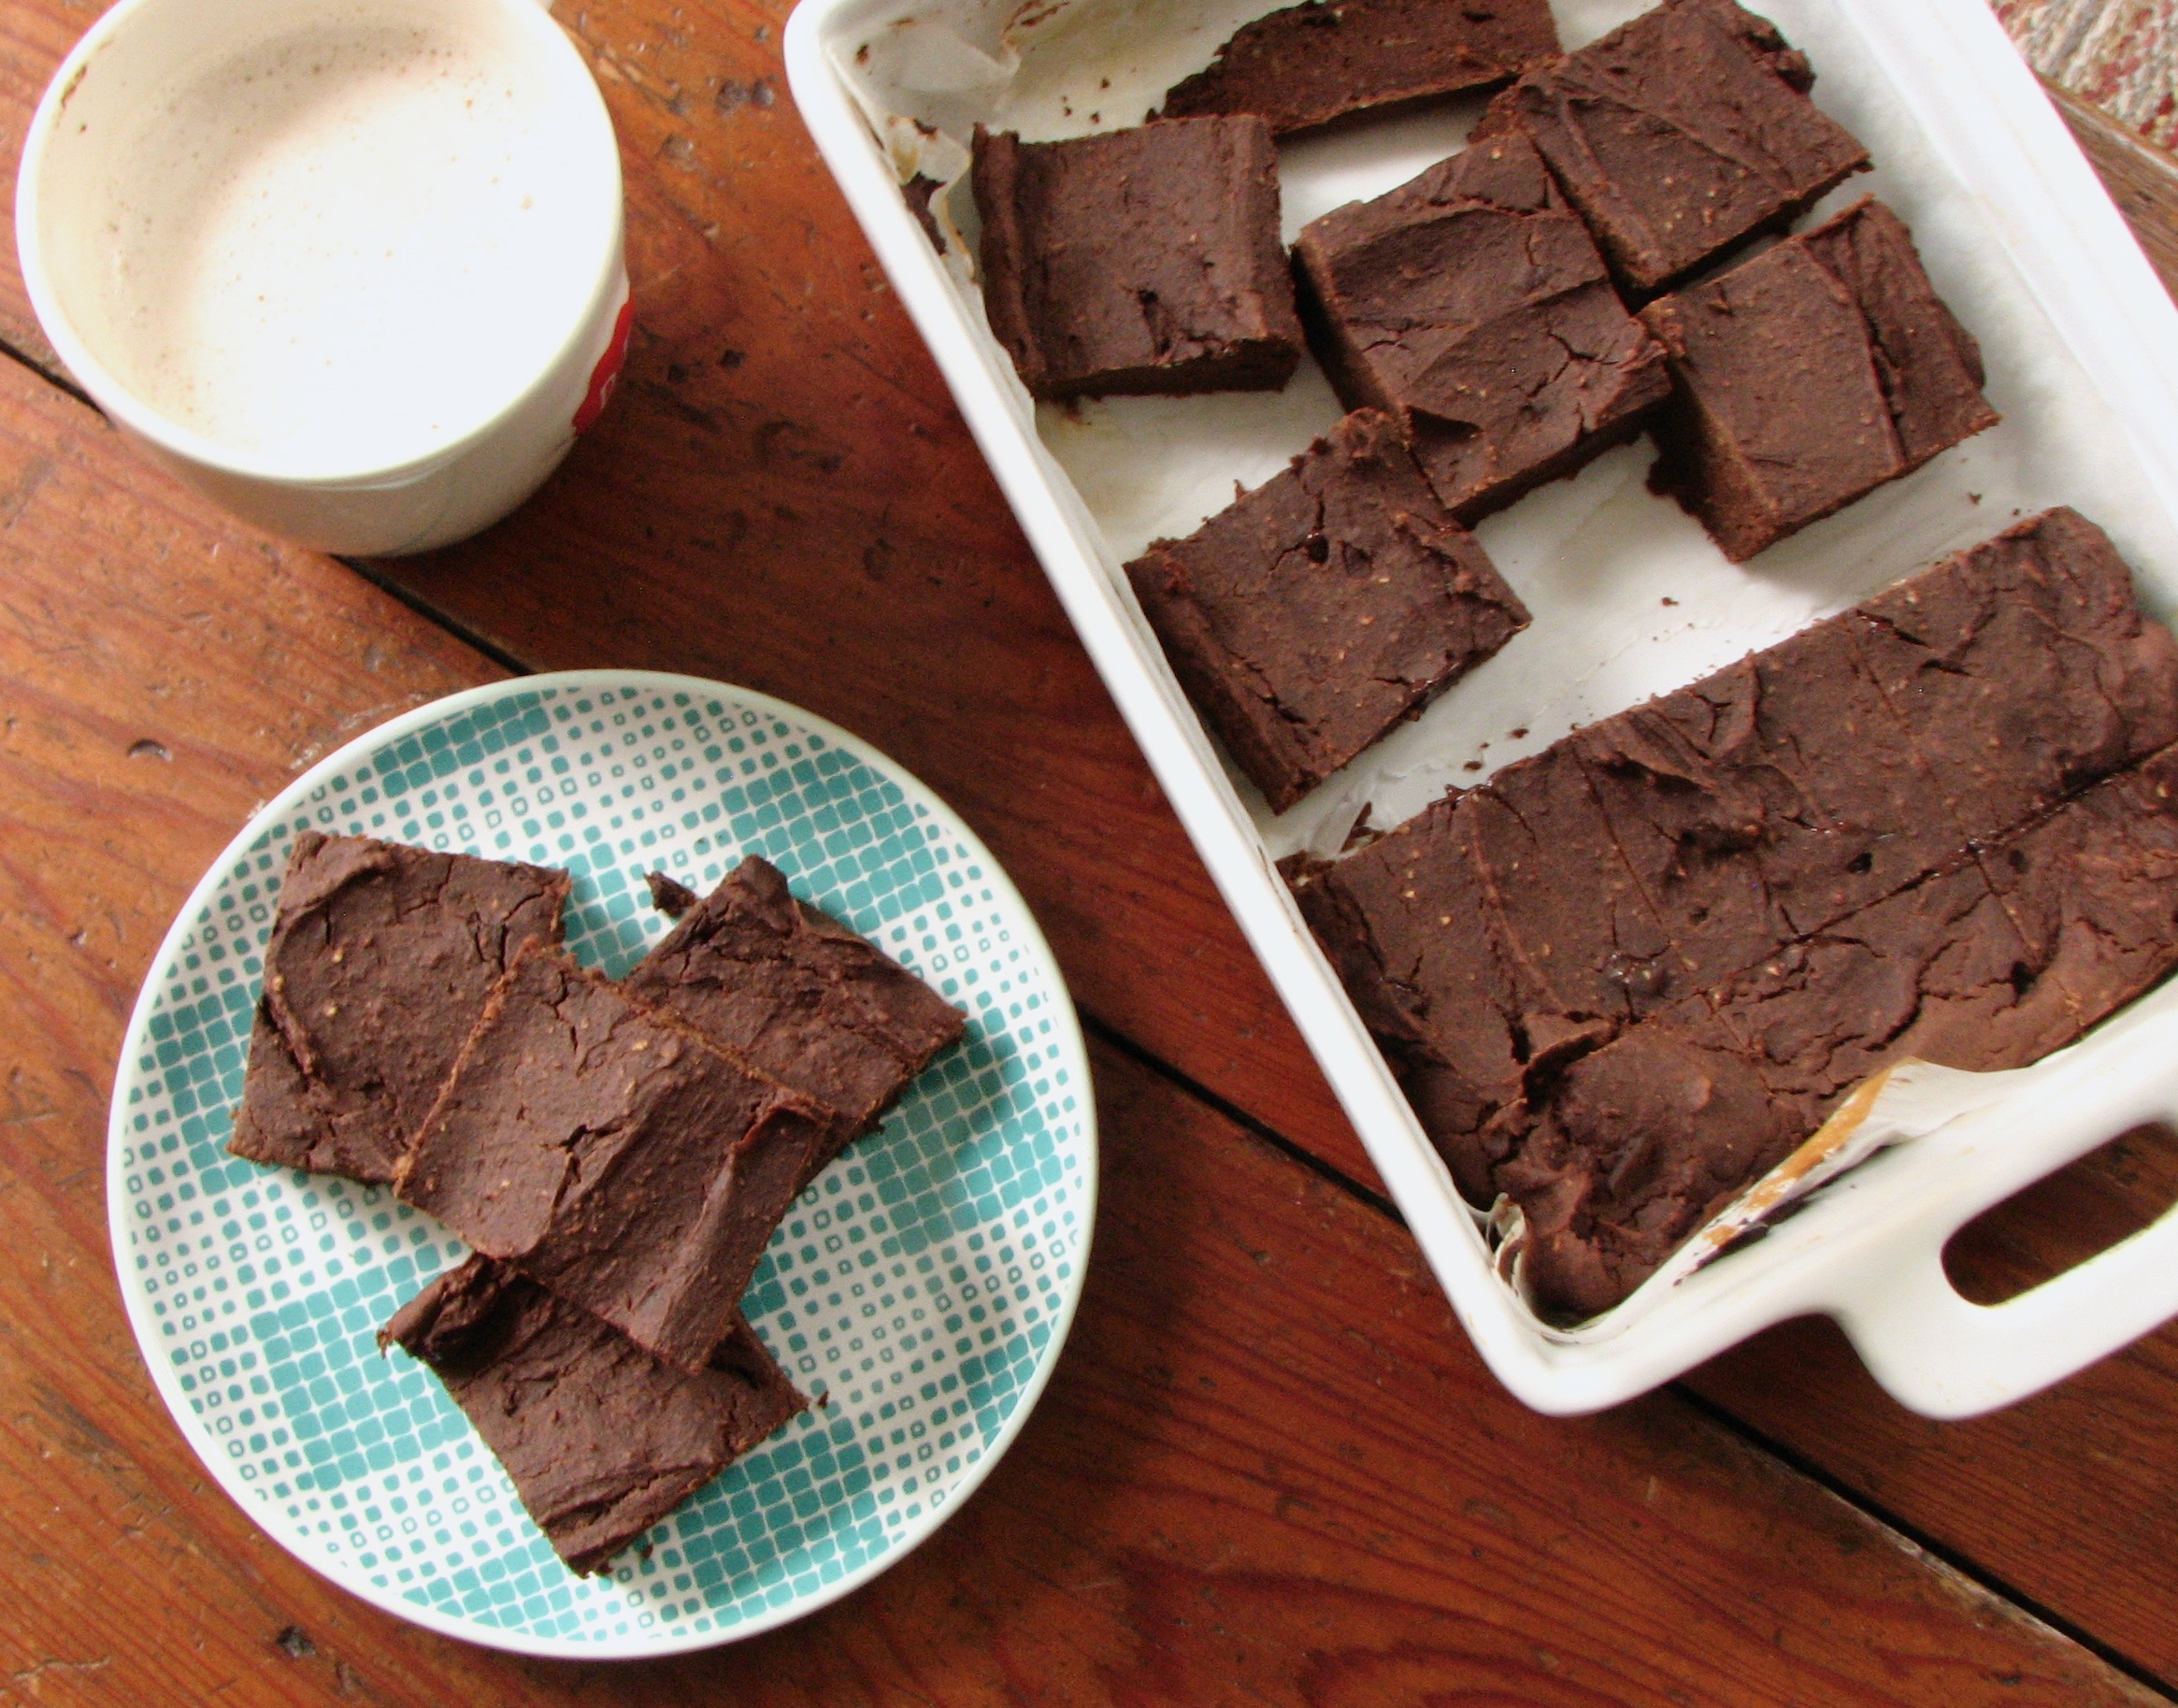
Black bean brownies are another thing that I just can't get into saying. I just don't think a baked good full of black beans is a brownie. To me a brownie is chocolate, butter, eggs and sugar with just a little flour. It's a magical combination, and no recipe with beans is going to be comparable, unless of course the ratio is so out of wack that there are hardly any black beans in it anyway and then what's the point? But this does not mean I'm against what most people try to brand as "black bean brownies". I'm intrigued by anything that claims to be nutritious AND delicious. I'd just like to propose that instead of calling these concoctions "brownies", that we step back and just call them "bars" instead. A bar can be made out of anything, including beans!

I searched the internet high and low and came back with dozens of black bean brownie recipes. There were several that I was considering trying when I just decided to make up my own! That way I had complete control over what went in it, and I could make it to my taste. I wanted to make something less dessert-y and more of a snack I could feel pretty good eating in the afternoon when I suddenly realize that I didn't eat enough for lunch and dinner is still hours away! These bars were the result. I would especially not call these a brownie because they are not sweet enough. I didn't want them to be super sweet, just enough sugar to make them taste nice, but not like a rich dessert. So be warned if you want to try them that they will not be sweet. 

In the end I was very pleased with how they turned out. They are dense and fudge, yet a little dry in texture. They hold together very well and are a great on-the-go snack. They are chocolate-y enough to feel like a treat without being so rich as to seem like dessert. And as for any bean flavor, nope! You really can't tastes beans at all. I cooked my beans from dry, so I can't say how canned black beans would taste in this recipe, but I imagine they would be just fine. Overall, a good snack, satisfying and nutritious. 


Chocolate Chunk Protein Bars
Created by Delectably Mine
Ingredients

  • 1 1/2 cups (12 ounces) pureed black beans
  • 1/4 cup (64 grams) almond butter
  • 2 eggs
  • 1/2 cup (40 grams) cocoa powder
  • 6 medjool dates (110 grams)
  • 1/4 teaspoon vanilla
  • 2 tablespoons (42 grams) honey
  • 1/4 teaspoon kosher salt
  • A couple dashes of cinnamon and/or cardamom
  • 1/4 cup (30 grams) chocolate chunks

Directions
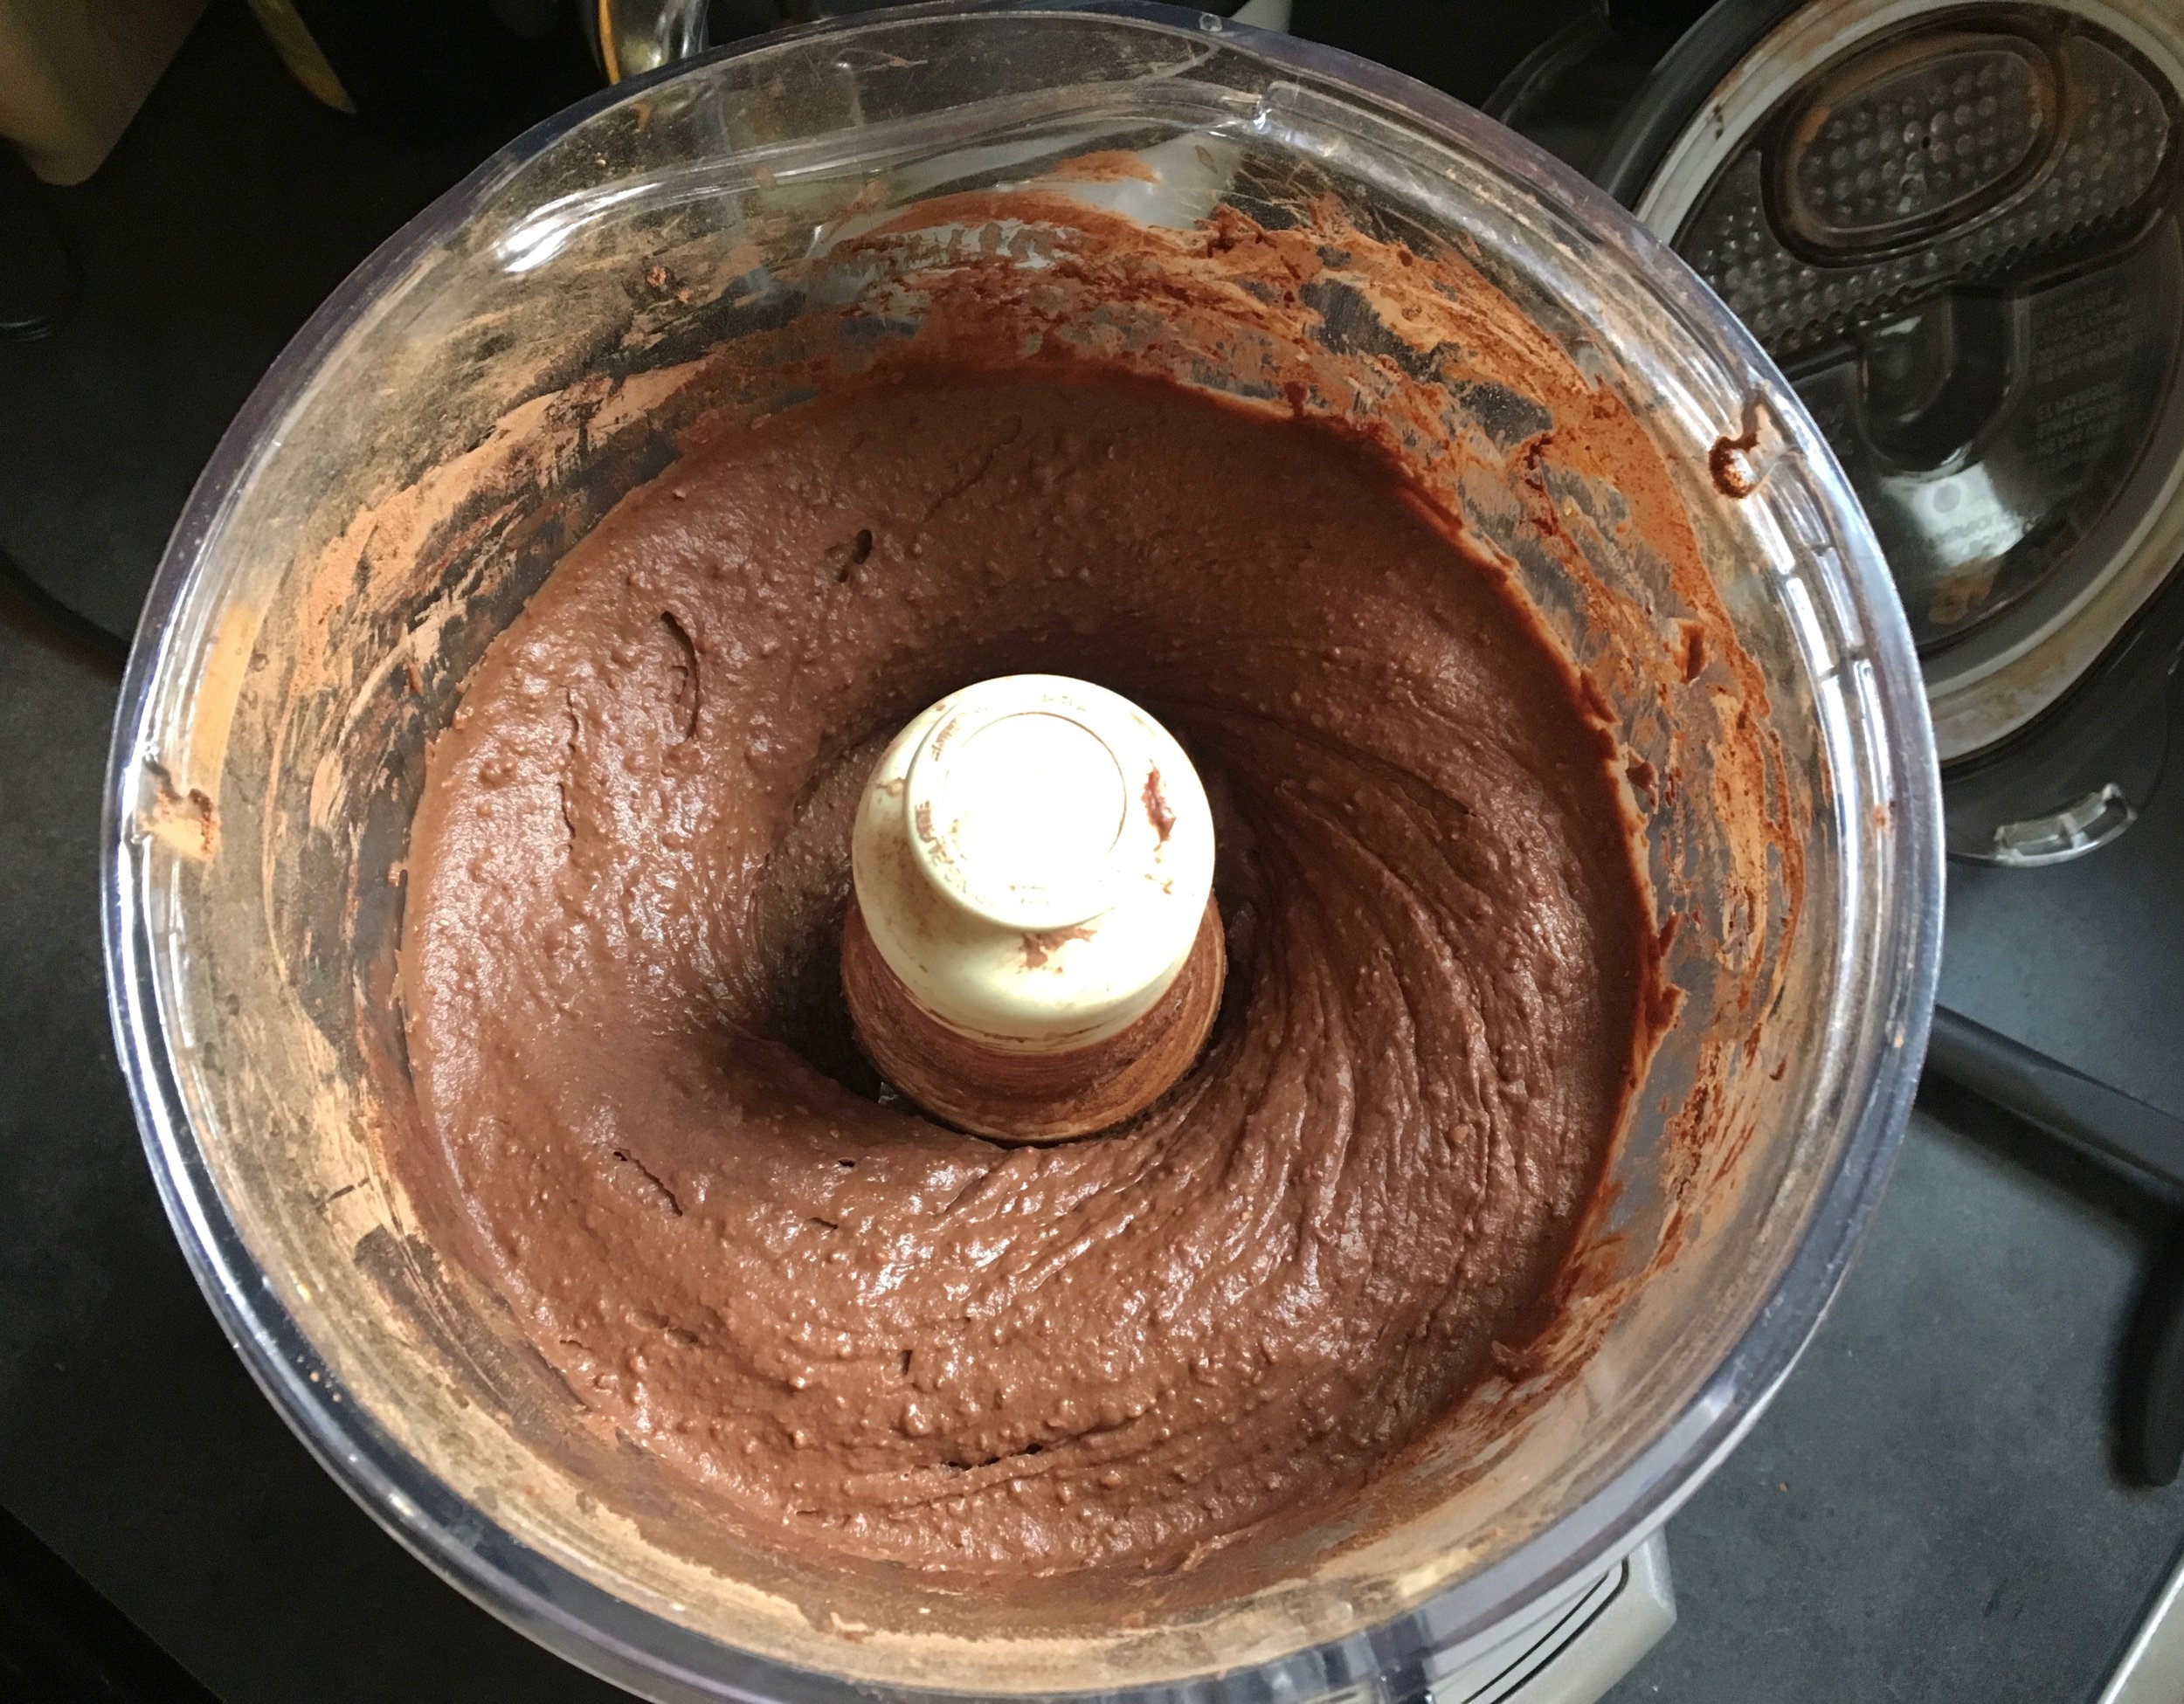
Preheat the oven to 350 degrees. In the bowl of a food processor place the beans and almond butter. Process until smooth. Add the eggs and process until well combined. Add the remainder of the ingredients (except the chocolate chunks), and process until smooth and uniform. Remove the blade and stir in the chocolate chunks by hand.

Transfer the batter (it will be very thick) to a greased and lined 9x9 inch pan. Smooth the batter into an even layer. Place in preheated oven and baked for 35-40 minutes. Let cool completely in the pan until cutting into bars. 

Spiced Oat Cookies with Chocolate and Fruit

Cookies are the best. They're always a hit, they're easy to make, the options are endless, and did I mention, they're delicious! I'm always on the lookout for a new cookie to try even though I have plenty of good recipes in the archives. You never know when you'll stumble upon the best recipe ever. Recently I came across this recipe for Cardamom-Spice Oat Cookies from King Arthur Flour and they looked just different enough and tasty enough to try. 

Don't ask me how, but I managed to completely forget to add the cardamom to the cardamom-spice cookies so they became just plain "spiced" cookies, but that didn't seem to matter too much in the end. The final cookie was fantastic! Visually beautiful with a wonderful texture, slightly crisp on the edges yet nice and chewy in the center. I've had some trouble with oatmeal cookies in the past always being too soft for my liking but these were perfect. They baked up well, spread perfectly, not too flat, not too round, a smashing success. 

When I started to make these cookies I realized that my brown sugar was as hard as a rock and I didn't feel like dealing with trying to soften it up, so I just replaced it with white sugar and it was fine. I threw in some chocolate and dried fruit, prunes were what I had so in they went! Any dried fruit would do, I'm partial to chocolate cherry myself, but really anything will work. 

I halved the original recipe and didn't want to halve an egg so I just skipped it and added a little 1/2 and 1/2 for fat and liquid. Necessary? Probably not, but they turned out great, so whatever! I ended up getting 8 nice sized cookies out of this recipe, each cookie was about 50-55 grams of dough. I thought they were a perfect size in the end, not too big and not too small. All around delicious!


Spiced Oat Cookies with Chocolate and Fruit
Adapted from King Arthur Flour
Ingredients

  • 5/8 cup (75 grams) all purpose flour
  • 3/4 cup (60 grams) old fashioned oats
  • 1/4 teaspoon baking soda
  • 3/8 teaspoon salt
  • 1/2 teaspoon cinnamon
  • 1/8 teaspoon ginger
  • 1/8 teaspoon allspice
  • 1/4 cup (70 grams) butter
  • 1/3 cup (70 grams) granulated sugar
  • 1 tablespoon (20 grams) maple syrup
  • 1/4 teaspoon vanilla
  • 1 tablespoon (15 grams) half and half
  • 1/4 cup (28 grams) chocolate chips
  • 1/4 cup (28 grams) prunes, chopped into bite-sized pieces

Directions
Line a baking sheets with parchment paper. In a medium bowl, whisk together the flour, oats, baking soda, salt, and spices. Set aside.

In a large mixing bowl, beat the butter, sugar, and syrup together on medium-high speed until light and fluffy. Scrape down the sides and bottom of the bowl. Add the vanilla and half and half and beat at medium speed until smooth. Scrape the bowl once again.

Add the dry mixture and mix at low speed until just combined. Scrape the bowl and mix once more for 30 seconds. Add the chocolate and fruit and mix until well blended.

Place the dough and refrigerate at least a couple of hours, or overnight. When ready to bake, scoop out pin pong-sized balls of dough (I did 50 grams of dough each), and place on parchment-lined baking sheets. Place in a preheated 350°F oven and bake for 18-20 minutes, until just golden at the edges and have set in the center. Remove from the oven and cool on the pan for 5-10 minutes before transferring cookies to a wire rack to cool completely. 

Yields: approximately 8 large cookies
Nutrition: approximately 180 calories per cookie

Pumpkin Morning Glory Bread

Happy Sunday!! Need something for the week? I did. Carrots, pumpkin, warm spices, and toasty walnuts all come together in this fresh and fragrant quick bread. Two vegetables in one loaf and you wouldn't even know it. A little oil for richness, and a little molasses for subtle sweetness, it's the perfect combination. I've been wanted to make a morning glory bread or muffin for a while now but I never seemed to have carrots at the right time. Yesterday however, everything came together at the perfect moment to bring me this lovely loaf. I'm halfway through a two week stretch of nights, and this little bread is going to help get me through the final week. Having this to look forward to in the mornings at the end of a long night is going to be the perfect way to end the shift.

I found a nice looking recipe for a morning glory loaf of my pinterest board that has been hanging around for a while, but of course had to make a few adjustments based on my preferences and what I had around. The only thing I was missing that I didn't have anything to substitute for was dried fruit, raisins, or cranberries as the original recipe called for. That's pretty traditional in morning glory muffins but I just had to do without this time. I had all of the other important things though; carrots, coconut, walnuts. The original recipe called for applesauce, but I used pumpkin instead which worked like a charm, and then I threw in a few pumpkin seeds too since it seemed fitting. 

The recipe called for maple syrup as the sweetener, but since I was running a little low I decided to go with molasses instead. Baking up, this bread smelled amazing! Like gingerbread due to the molasses and spices. But don't worry, the finished product doesn't really taste like gingerbread, it's just fragrant with spices and a hint of rich molasses flavor. Each slice is soft and light and moist. Perfect on it's own, or jazz it up with a pat of real butter, or your favorite nut butter. Breakfast is served. 


Pumpkin Morning Glory Loaf
Heavily adapted from Wholehearted Eats
Ingredients

  • 1 1/2 cups (180 grams) spelt (or whole wheat) flour
  • 1 teaspoon baking powder
  • 1 teaspoon baking soda
  • 1 1/2 teaspoons cinnamon
  • 1/4 teaspoon ginger
  • 1/8 teaspoon allspice
  • 1/2 teaspoon salt
  • 1/2 cup + 2 tablespoons (150 grams) pumpkin puree
  • 2 eggs
  • 2 tablespoons (28 grams) vegetable oil
  • 1/4 cup (84 grams) molasses (or maple syrup)
  • 2 tablespoons (25 grams) granulated sugar
  • 1 cup (115 grams) grated carrots, about 2 medium carrots
  • 1/4 cup (25 grams) coconut
  • 1/2 cup (50 grams) walnuts
  • 1/4 cup (25 grams) raw pumpkin seeds
  • Turbinado sugar for topping, optional

Directions
Line a 8 1/2 x 4 1/2 inch loaf pan with parchment paper and spray with cooking spray. Set aside. 

In a bowl combine the flour, baking powder, soda, spices and salt. In another bowl combine egg, oil, pumpkin, molasses, and sugar. Whisk to combine. Add the wet ingredients to the dry and mix until halfway combined.

Stir in the carrot, coconut, walnuts, and pumpkin seeds and mix just until combined.

Pour the batter into a parchment lined pan. Sprinkle the top with some extra pumpkin seeds and turbinado sugar, and bake in a preheated 350 degree oven for 40-45 minutes, until a toothpick inserted into the center comes out with just a few moist crumbs. Cool completely on a wire rack before slicing. 

Yields: 10-12 slices


Carrot and Lentil Salad with Chickpeas and Feta

We had a potluck at work this past week which always gets me excited. The instant I hear about a potluck my mind goes into overdrive coming up with different options for what I might take. The first question is always, should I bring something savory or something sweet? My mind was filled with cupcakes, cookies, whoopie pies and macaroons, cinnamon rolls and brownies, but in the end I went with something savory this time. Since you never know what's going to show up at a potluck, it's always a good idea to bring something that you really like and wouldn't mind eating for lunch if the rest of the options are less than stellar. 

After a lot of thinking I decided to go with a lentil salad. Healthy, easy, and perfect to make ahead. In fact, this type of salad is actually better made ahead so it has time to sit overnight and let the flavors meld. A mix of both lentils and chickpeas sounded perfect along with some lightly roasted carrots, finished with feta and lots of lemon and herbs. Light and fresh and delicious. A definite winner and something to make again and again! 

For the carrots, I used my new gadget that I got for Christmas, a spiralizer! I have been eying them for so long, and this year my sister-in-law gave me one and it's been a lot of fun experimenting with. It was quick and easy to slice these carrots up into thin ribbons. I then roasted them for a short time to soften them up a bit, but not too long so that they started falling apart. It worked out really well for this salad. If you don't have a spiralizer you could either slice the carrots into thin matchsticks by hand, or do what I would do in that case and cut them into chunks and just roast for a lot longer until nice and tender. This would also work well in this salad. 

Don't skimp on the lemon and parsley, they're both key to a well balanced and fresh final product. It would be a little flat without them. And the feta, oh the feta, I could could add feta to just about everything I eat and be happy. It really makes this salad, and turns it into a full meal. Enjoy!


Carrot and Lentil Salad with Chickpeas and Feta
From Delectably Mine
Ingredients

  • 1 cup (200 grams) dried chickpeas
  • 1 cup (180 grams) dried green lentils
  • 4 large carrots, spiralized 
  • 1 green onion, sliced thin
  • 1/4 red onion, sliced thin
  • 1 lemon, zested and juiced
  • 1/3-1/2 cup olive oil
  • 3 cloves garlic, minced
  • 1 teaspoon cumin
  • 1/2 teaspoon coriander
  • 1/4 teaspoon sweet paprika
  • 1/4 teaspoon smoked paprika
  • 1/8 teaspoon cayenne
  • 1/4 teaspoon cinnamon
  • 1/8 teaspoon allspice
  • 1/8 teaspoon ginger
  • 1-2 teaspoons honey
  • 4 ounces feta cheese
  • 1/2 cup chopped parsley

Directions: 
Cook both the lentils and the chickpeas in boiling water until tender. Drain and place in a large bowl.

While the legumes are cooking, preheat the oven to 425 degrees. Toss the carrots with a little olive oil and salt and roast for approximately 15 minutes until tender, yet still retain some bite and texture. Add the carrots to the bowl with the chickpeas and lentils. Add the green onion, red onion, lemon juice and lemon zest. Give everything a quick toss to combine. 

Preheat a small saucepan over medium-low heat. Add the olive oil and swirl around the pan. Add the garlic and let it cook for a minute or two until just starting to take on a little color. Watch it closely so it does not burn. Add the spices to the garlic oil and let them toast for 30-60 seconds until nice and fragrant. Remove pan from heat. 

Pour the oil and spice mixture over the salad, add the honey, and toss until everything is well combined. Let the salad cool slightly and then finish with the feta and parsley, tossing once again to combine everything. Can eat warm or at room temperature. The flavors improve as they sit so this is a good dish to make the night before and pull out of the fridge when ready. Let come to room temperature before eating. 


Simple Buttermilk Cornbread

Yesterday was an absolutely amazing day here in west Michigan, almost 60 degrees and sunny in January - what?? Crazy, but simply wonderful! It felt like late spring which I am a big fan of. I took a walk with a light jacket and sunglasses and loved every minute of it! However, this is definitely NOT normal for late January and today it's back to reality. Wet, cloudy and cold. Sigh. 

One of my favorite parts of winter are all the stews and soups and braises that are the perfect thing for cold, damp days such as today. I think my favorite of all is a thick and jammy chili with ground beef and beans, peppers and spices and lots of tomato. Mmmm. I don't like my chili thin and soupy, I want it nice and thick, sweet and spicy and covered in melted cheddar cheese! And what is chili without cornbread? Sad is what it is. There is no question in my book that when chili is on the menu, cornbread is going in the oven.

I have several cornbread recipes on this site already and I love them all. Recently however I was looking for a very simple cornbread recipe that wasn't quite as rich and sweet as most of these other recipes. Just a good, basic cornbread that was full of corn flavor and more rustic than some. More on the "Southern cornbread" side of things. This recipe that I adapted from Bon Appetit was perfect. A little richness from the buttermilk and egg with a little bit of butter, and just a hint of sweetness from one tablespoon of brown sugar. This is a chili lover's cornbread for sure. 

I adapted the original recipe to fit a 6-inch cake pan. This is the perfect size for me when I'm baking for myself, but if you want to use a standard pan check out the original recipe. I used locally ground coarse cornmeal in my bread which is sweet and slightly crunchy and delicious. I highly recommend seeking out some good quality cornmeal, it's worth the effort. Now head into the kitchen and get that chili started, you have cornbread to make!


Simple Buttermilk Cornbread
Adapted from Bon Appetit
Ingredients

  • 1 1/2 tablespoons unsalted butter, melted and cooled
  • 2/3 cup (80 grams) all-purpose flour
  • 2/3 cup (105 grams) stone-ground cornmeal
  • 1 tablespoons (12 grams) brown sugar
  • 1 1/2 teaspoons baking powder
  • 1/2 teaspoon kosher salt
  • 3/8 teaspoon baking soda
  • 1 large egg, beaten 
  • 3/4 cup buttermilk

Directions
Preheat oven to 350°. Butter 6-inch round pan. Whisk flour, cornmeal, sugar, baking powder, salt, and baking soda in a large bowl. Whisk together egg, and buttermilk in a medium bowl. Whisk egg mixture into dry ingredients until just combined (batter will be slightly lumpy). Mix in butter.

Scrape batter into baking dish and bake cornbread until a tester inserted into the center comes out clean, 25–30 minutes.

Sourdough English Muffins

Growing up I loved Thomas' English Muffins. Who can resist those nooks and crannies - so good! I loved spread butter on a hot, freshly toasted muffin and watch it melt into little pools of goodness. More recently I decided that it was time for me to create my own version, a better version; fresher, cleaner ingredients, more flavor. You get the idea. I wanted to make a sourdough version so I could use my sourdough starter, and to add even more flavor. After a couple attempts I think I've nailed it. These sourdough English muffins are amazing; super soft and delicious. No, they don't have quite as many nooks and crannies as the Thomas', but honestly I don't miss them. These are just too good, fresh, soft, light and airy. Perfect for a breakfast sandwich topped with eggs, meat and cheese, or a little simpler with just a good pat of butter, some peanut butter, or some nice melty cheese. I'm never going back to the store-bought version again.

These little muffins are really simple to make, but they do take a little time with the shaping of the individual buns, the rising, the grilling and the final baking. I don't have enough griddle space to grill them all at once so it takes a couple batches. Trust me, it's worth the time. You can make these guys as big or small as you want. I like my English muffins nice and thick so that's how I shape them, but you can also shape them a little thinner and wider in diameter depending on your preference and what you want to do with them. This recipe does not use English muffin rings. I didn't have any, so I looked for a recipe for a thicker dough so that I didn't have to go buy a new tool. I'm guessing that with a wetter dough, and the help of these rings you would probably have more luck creating those yummy nooks and crannies, but honestly I don't even care. These will work just perfectly for me!


Sourdough English Muffins
Adapted from King Arthur Flour
Ingredients

  • 1 tablespoon (12 grams) brown sugar
  • 3/4 cup (6 ounces) warm water
  • 1/4 cup (2 ounces) whole milk
  • 1 1/4 teaspoons instant yeast
  • 1/2 cup (120 grams) sourdough starter, fed or unfed; fed will give a more vigorous rise
  • 2 1/2 cups (300 grams) all purpose flour
  • 1 cup (120 grams) whole wheat flour
  • 2 tablespoons butter
  • 1 1/2 teaspoons salt
  • 1/8 teaspoon citric acid, optional; for enhanced sour flavor
  • Cornmeal, for coating

Directions
Combine all of the dough ingredients, except the cornmeal, in a large bowl. Mix and knead — by hand, electric mixer, or bread machine — to form a smooth dough. The dough should be soft and elastic, but not particularly sticky; add additional flour if necessary.

Place the dough in a lightly greased bowl, cover, and set it aside to rise for about 1 1/2 hours, until it's noticeably puffy. Alternatively, for most pronounced sour flavor, cover the bowl, and immediately place it in the refrigerator (without rising first). Let the dough chill for 24 hours; this will develop its flavor.

Gently deflate the dough, turn it out onto a lightly floured work surface, cover it, and let it sit for a few minutes, to relax the gluten. Divide the dough into 12 equal sized pieces. Shape each piece into a round ball, then flatten each ball into a 2 inch round. 

Place the rounds, evenly spaced, onto cornmeal- or semolina-sprinkled baking sheets. Sprinkle them with additional cornmeal or semolina, cover with plastic wrap, and let them rise until light and puffy, about 45 to 60 minutes. If the dough has been refrigerated overnight, the rise time will closer to 2 hours.

Carefully transfer the rounds (as many as a time that will fit without crowding) right-side up to a large electric griddle preheated to 350°F, or to an un-greased frying pan that has been preheated over medium-low heat.

Cook the muffins for about 6-8 minutes on each side. The edges may feel a bit soft. Transfer the muffins to a baking sheet and place in a preheated 350 degree oven for about 8-10 minutes to finish cooking through. 

Yield: 12 English muffins.

Coconut Cocoa Nib Bites

If you're looking for a quick and healthy snack, look no further. There are so many recipes out there for snack bites or energy balls or whatever you want to call them. These coconut cocoa nib bites are just one iteration, and a tasty one at that! I love the sweetness from the dates mixed with the bitter funk of the cocoa nibs and the chew from the coconut. Everything goes into the food processor and processed until it all comes together. Then just shape into balls and store in the fridge or freezer. Pop one out when you need a little snack. Sweet and hearty and something you can feel good about eating!

As with most recipes like this, these bites are endlessly versatile. You can use your favorite mix ins and flavorings. No almonds? Try peanuts. No dates? I think prunes would work quite well! No cocoa nibs, try some finely chopped chocolate.  Whatever sounds good to you can probably end up working out wonderfully!


Coconut Cocoa Nib Bites
Adapted from OH, Babycakes
Ingredients

  • 3 ounces coconut
  • 1/2 cup (2 1/4 ounces) raw almonds
  • Pinch salt
  • 8 medjool dates or 15-18 deglet noor dates (approximately 4 ounces)
  • 3 tablespoons water
  • 2-4 tablespoons (1/2 ounce) cocoa nibs
  • 3/4 ounce sunflower seeds

Directions
In a food processor fitted with the S blade, blend the coconut, almonds, and salt into a fine meal. Add the dates and pulse for 30-45 seconds. Add the water; pulse until combined. 

Transfer the mixture to a small mixing bowl, stir in the sunflower seeds and cacao nibs. Form the mixture into small, bite sized balls. Freeze for 30 minutes on a cookie sheet, then transfer to an air tight container or bag and store in the freezer.

Christmas Cookies 2016

Although they were a little late this year, I made sure to decorate my yearly batch of Christmas cookies. I whipped these together with my sister, and we went with a couple simple designs that would be simple to create; some cute little snowmen, and some festive gloves. I wanted to do mittens, but we didn't have a mitten cookie cutter, just a glove, so that's the route we went. Decorating Christmas cookies has become one of my favorite Christmas traditions so I was glad that we were able to find the time to do it again this year!


I had a great time the rest of my Christmas; going to the IMAX with my whole family to see Star Wars on the
big screen was tons of fun. 


And our family Christmas party is one of my favorite times of the year. We've made it a tradition to have homemade pizza for our get together. It's fun, casual and delicious. We've done personal pizzas in the past, but this year I just made two big pizzas that we all shared. They turned out delicious!


Try out this delicious homemade French onion dip from How Sweet Eats


Merry Christmas and a blessed New Year to everyone out there! I hope your Christmas season was as wonderful as mine!