Roasted Chicken with Clementines and Fennel

For Easter last week, my sister Lara and I decided to break from tradition and try something new. Instead of serving ham or lamb with potatoes and a basic vegetable, we chose to go with an Israeli inspired feast. I mentioned previously that this past Christmas my sister-in-law gave me the cookbook Jerusalem by Yotam Ottolenghi and Sami Tamimi. Now that I've made a handful of recipes from this book I can say with confidence that it is a great cookbook, I love it. Everything I've made has been absolutely fantastic. 

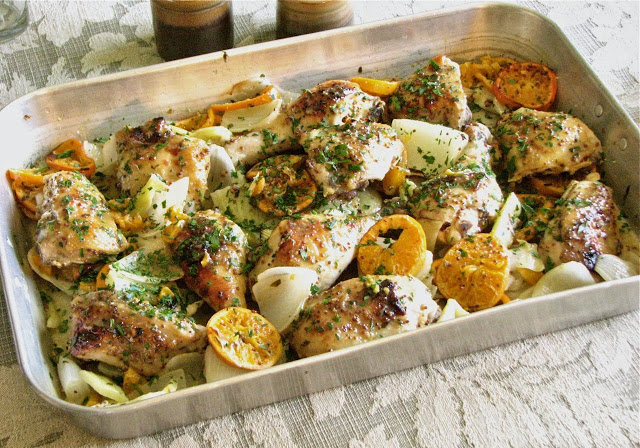
We decided on the recipe for Roasted Chicken with Clementines and Arak for our main dish. The photo in the cookbook was mouth watering, and the ingredients didn't look too exotic so I thought it wouldn't be too scary for the less adventurous eaters in my family.  The end result was outstanding, the flavors of fennel and clementine shined through in perfect balance in this beautiful and colorful dish. 

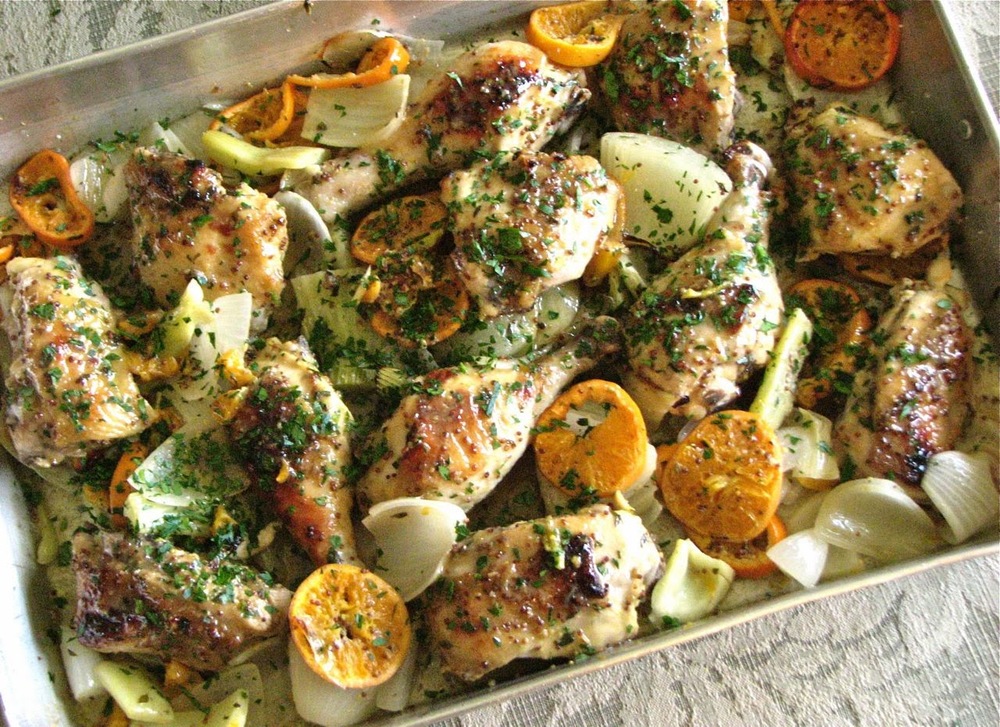
This recipe really couldn't be simpler. Mix together a few simple ingredients and let marinate in the fridge overnight. The next day the work is minimal. Just throw it all in a big roasting pan and stick it in the oven. That's it. So easy and so good. 

Once it comes out of the oven pour all the cooking liquid into a pan and reduce to make a nice flavorful sauce. Pour it over the cooked chicken and serve! You won't be disappointed. 

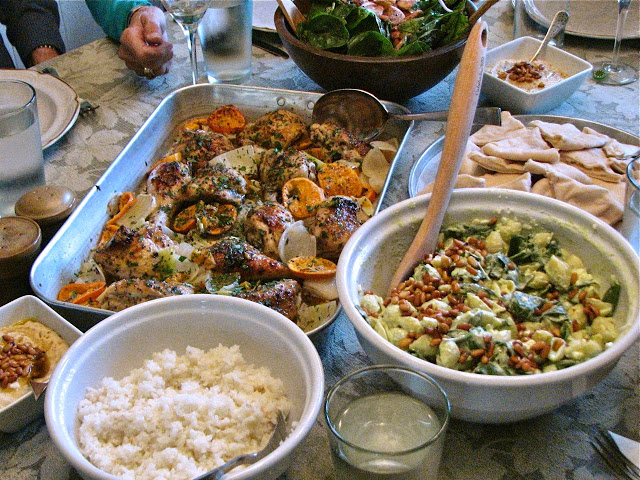
And here's the entire feast. I thought it was an absolutely fantastic meal. Along with the chicken the rest of the menu included: 

Fresh homemade pita
Homemade hummus
Spinach salad with prunes and almonds
Yogurt pasta salad with basil, pine nuts and feta
Simple rice pilaf
Clementine and almond syrup cake

Roasted Chicken with Clementines and Fennel
Slightly adapted from Jerusalem by Yottam Ottolenchi and Sami Tamimi
Ingredients

  • 6 1/2 tablespoons dry white wine (or Arak, Ouzo or Pernod if you have it, I didn't)
  • 1/4 cup olive oil
  • 3 tablespoons freshly squeezed orange juice
  • 3 tablespoons freshly squeezed lemon juice
  • 2 tablespoons grainy mustard
  • 3 tablespoons light brown sugar or honey
  • 2 1/2 teaspoons salt
  • 1 1/2 teaspoons black pepper
  • 1 medium fennel bulb, cut into chunks
  • 1 or 2 medium onions cut into chunks
  • 3 pounds bone-in, skin-on chicken pieces (I used thighs and legs)
  • 4 clementines (14 oz), unpeeled, sliced thin
  • a few sprigs of thyme
  • 1-2 teaspoons fennel seeds, lightly crushed 
  • Chopped flat-leaf parsley, to garnish

Directions
In a large mixing bowl whisk together the wine, olive oil, orange juice, lemon juice mustard, sugar, salt and pepper. Add the fennel, onion, chicken, clementines, thyme and fennel seeds. Stir well with your hands, then leave to marinate in the fridge for a few hours or overnight (you can also skip the marinating step if you are pressed for time).

When ready to roast, preheat the oven to 475 degrees. Transfer the chicken and its marinade to a baking sheet large enough to accommodate everything in a single layer. Place the chicken skin side up. Roast the chicken for 35 to 45 minutes, until colored and cooked through. 

Life the chicken, fennel and clementines from the pan and arrange on a serving plate; cover and keep warm. Pour the cooking liquid into a small saucepan, place over medium-high heat, bring to a boil, then simmer until the sauce is reduced by one third, so you are left with about 1/3 cup. Pour the hot sauce over the chicken, garnish with parsley and serve. 

Simple French Bread

Bread is always a crowd pleaser at my house, especially soft white bread still warm from the oven, smeared with salted butter. While I love hearty whole wheat loaves and crusty sourdough, sometimes a simple loaf of soft white bread is just what a meal needs. This bread is everything that it should be; soft and tender and delicious, you really can't go wrong. 

The instructions for this bread are a little different than most. There is a little kneading, and then 6 cycles of a 10 minute rest followed by 10 seconds of stirring. Very different than most breads I make, but it seemed to work just fine. Then just shape, let rise, and bake! 

Simple French Bread

From 

Mel's Kitchen Cafe

Ingredients

  • 2 1/4 cups warm water
  • 2 tablespoons sugar
  • 1 tablespoon instant yeast
  • 1 tablespoon salt
  • 2 tablespoons oil
  • 5 1/2 - 6 cups flour

Directions

In a large bowl or in the bowl of a stand mixer fitted with the dough hook, combine the water sugar and yeast. . Add the salt, oil and 3 cups of flour and mix. Add in 2 1/2 to 3 more cups of flour gradually. The dough should clean off the sides of the bowl and not be too sticky but it should still be soft. Knead for 2-3 minutes until the dough is smooth and soft.

Leave the dough in the mixer to rest for 10 minutes and then stir it down (turn on your mixer for 10 seconds or use a wooden spoon to stir down the dough) and then allow to rest another 10 minutes. Repeat for a total of 5 times. Then turn the dough onto a lightly greased surface and divide into two equal parts. Roll each part into a 9X13-inch rectangle. Roll the dough up starting from the long edge and pinch the seam to seal. Arrange seam side down on a large baking sheet lined with parchment paper. Repeat with the second part of dough. Place it on the baking sheet leaving room for both loaves (or use a second baking sheet for the second loaf). Cover with greased plastic wrap and let the loaves rise until doubled in size. 

With a very sharp knife cut 3 or 4 gashes at an angle on the top of each loaf. Bake at 375 degrees F for 25-30 minutes until golden brown and baked through.

Mini Spinach, Onion and Prosciutto Quiche

I love quiche. It is so versatile and delicious. Flaky, buttery crust filled with endless options. Veggies, meats, cheeses, herbs, or spices in any combination. You can really let your imagination go wild. I randomly had some leftover prosciutto and gruyere and decided that some mini quiche would be the perfect place to use it up. Along with a little diced onion an some spinach, it really was a wonderful combination. 

I just thought it would be fun to make some mini quiche, but this would be equally as good as a regular size quiche. Whatever you do, I highly recommend making your own pie dough. It really is so much better than anything you can get at the store. 

Spinach, Onion and Prosciutto Quiche

Ingredients

  • 1/2 small onion, minced
  • 2 eggs
  • 2/3 cup milk
  • 4 ounces frozen spinach, thawed and very well dried
  • A couple slices of prosciutto
  • 2 ounces Gruyere (or your favorite cheese)

Directions

In a small sauté pan with a little olive oil in it, cook the onion for a few minutes until it begins to soften and become translucent. Set aside. Mix together the eggs and milk, seasoning with salt and pepper to taste. Evenly divide the prosciutto, spinach, onions and cheese between the prepared tarts. Pour the custard into the individual tarts, being careful not to overfill. Bake the mini quiches for 15-20 minutes at 375 degrees, or until the custard is just set. 

Pate Brisee

Ingredients

  • 2 1/2 cups all purpose flour
  • 1 teaspoon salt
  • 2 sticks (1 cup) unsalted butter, cold, cut into small pieces
  • 1/4 cup ice water, plus more if needed

Directions

In the bowl of a food processor, combine flour and salt; pulse to combine. Add the butter and pulse until mixture resembles coarse crumbs with some larger pieces remaining, about 10 seconds. (To mix by hand, combine dry ingredients in a large mixing bowl, then cut in butter with a pastry blender or two fork.)

With the machine running, add the ice water through the feed tube in a slow, steady stream, just until the dough holds together with out being wet or sticky. Do not process more than 30 seconds. Test by squeezing a small amount of the dough together; if it is still to crumbly, add a bit more water, 1 tablespoon at a time.

Turn out the dough onto a clean work surface. Divide in half, and place each half on a piece of plastic wrap. Shape into flattened disks. Wrap in plastic, and refrigerate at least 1 hour, or overnight. The dough can be frozen for up to 1 month; thaw overnight in the refrigerator before using.

When ready to use, roll dough out to 1/4 inch thick. Press gently into tart pans, making sure not to stretch the dough. Place pans in the freezer to chill for at least 15 minutes.

Remove tarts from freezer, and blind bake for 15-20 min at 375 degrees. Remove weights and bake about 5 minutes longer, until crust is lightly browned. 

Cherry Almond Buttermilk Bread

I seem to be posting a lot of buttermilk recipes lately. Too much buttermilk, what a happy problem to have. I found this recipe for basic buttermilk quick bread with variations on The Kitchn and wanted to give it a try. Since I had a couple of jars of canned cherries in the basement I decided to throw those in along with a little almond extract. I would have added some chopped almonds too but I didn't have any. Add a simple glaze to the top and you're done, quick and easy. This bread is nice for a quick snack, or along with your breakfast. It's not rich or super sweet, but sometimes that's okay. 

Like I said, this bread is definitely bread, it is not cake masquerading under the title of bread. It's heartier less sweet than cake and a lot of quick breads. Sometimes this is perfect, just what I need. I liked the addition of cherries and a glaze to add some sweetness, but you can also make the bread savory too and add in herbs and cheeses, peppers or onions, just about whatever you can think of. Check out the link for some ideas. It's a nice, versatile recipe to have on hand in case you need it.

Cherry Almond Buttermilk Bread

Adapted from 

The Kitchn

Ingredients

For the Bread

  • 2 cups all-purpose flour
  • 1/2 cup white sugar
  • 1 1/2 teaspoons baking powder
  • 1/2 teaspoon baking soda
  • 1 teaspoon salt
  • 1 cup buttermilk
  • 1 large egg
  • 1/4 cup vegetable oil
  • 1 teaspoon almond extract
  • 1 jar of canned cherries, drained, mixed with a tablespoon or two of flour

For the Glaze

  • 1/2 cup powdered sugar
  • a couple teaspoons cherry juice (or water)

Directions

Heat the oven to 350°F. Grease or spray with nonstick cooking spray a standard 9x5 loaf pan.

Whisk together the flour, sugar, baking powder, baking soda, and salt in a medium mixing bowl. In a separate bowl whisk together buttermilk, egg and vegetable oil.

Pour the liquid ingredients over the dry ingredients. Gently stir and fold the ingredients until all the flour has been incorporated and a shaggy, wet batter is formed, adding in the cherries towards the end of mixing. Be careful not to over-mix.

Scrape the batter into the prepared pan and pat it into the corners. Bake for 45-50 minutes. When finished, the loaf should be domed and golden, and a toothpick inserted into the center should come out clean. Let the loaf cool in the pan for 15 minutes before removing and slicing.

Wrap baked loaves tightly in plastic wrap and store at room temperature. Baked loaves can also be wrapped in plastic and aluminum foil and frozen for up to three months.

Double Chocolate Buttermilk Muffins

Any time some chocolate can find it's way into my breakfast I know it's going to be a good day. These muffins are a delicious way to ensure a great day ahead. They are easy to make, and use simple ingredients that I always have on hand. There is plenty of chocolate flavor from the cocoa powder and chocolate chips, and buttermilk and melted butter add tenderness and lots of yummy flavor (and yea for melted butter! It makes everything just that much easier!). Unlike some other chocolate muffins I have made, these don't have chocolate melted into the batter, but it doesn't seem to matter, they have tons of flavor even without that, and it saves on doing that one extra step. If you're looking for a chocolate pick me up for breakfast, look no further and head into the kitchen. 

Double Chocolate Buttermilk Muffins
Adapted from Hummingbird High
Ingredients

  • 2 cups plus 2 tablespoons all-purpose flour
  • 3/4 cup unsweetened natural cocoa powder
  • 1 tablespoon baking powder
  • 1/2 teaspoon baking soda
  • 1/4 teaspoon salt
  • 2 large eggs
  • 1 1/4 cups granulated sugar
  • 1 cup buttermilk
  • 1/2 cup (1 stick) unsalted butter, melted and cooled
  • 1 teaspoon vanilla extract
  • 6 ounces dark chocolate chunks or chips

Directions
Preheat the oven to 400 (F) and prepare muffin tins with muffin liners.

In a medium bowl, whisk together 2 cups plus 2 tablespoons all-purpose flour, 3/4 cup unsweetened natural cocoa powder, 1 tablespoon baking powder, 1/2 teaspoon baking soda, and 1/4 teaspoon salt until combined. Set aside.

In a large bowl, whisk together 2 large eggs and 1 1/4 cups granulated sugar until a pale yellow. Add 1 cup buttermilk, 1/2 cup melted unsalted butter and 1 teaspoon vanilla extract and whisk until just combined. 

Sprinkle the dry ingredients evenly onto the surface of the wet ingredients. Use a rubber spatula to fold until combined, with one or two flour streaks left in the batter. Add the chocolate chunks, reserving a few for the top if desired, and fold into the batter until just combined. Do not overmix.

Divide the batter between the muffin tins, filling them about 2/3s of the way full. Sprinkle the tops of each muffin with the remaining chocolate pieces. 

Bake in the preheated oven for 16 to 18 minutes or until the tops look set and a skewer inserted into the center of a muffin comes out almost clean. Allow the muffins to cool in the tin on a wire rack for 10 minutes, before turning out onto the wire rack to cool completely.

Perfect Roast Chicken

Some days all I want for dinner is a simple roasted chicken. Roasting a chicken is easy, delicious and so satisfying. Opening the oven door and pulling out the finished product, drinking in the smells of a perfectly cooked chicken mixing with lemon, garlic and wine, it doesn't get much better than that. For this recipe you roast the chicken atop a delicious bed of carrots, onion and fennel with thyme, so you don't even have to worry about making a side dish, it's built in! The only other thing you might need is a loaf of fresh bread with salted butter and your meal is complete. Simple, elegant, and wonderful. 

There's a little prep work involved in this meal, but nothing overly difficult or time consuming. A few vegetables to cut up and some chicken prep but that's about it. You can cut the vegetables a day or two in advance if you are thinking ahead to really streamline this meal. I think the whole head of garlic along with fresh lemon and thyme are the perfect trio to stuff the chicken with. Some of my absolute favorite flavors. The whole thing is just a beautiful combination, and a tasty one too!

Perfect Roast Chicken

Adapted from the 

Food Network

Ingredients

  • 1 (5 to 6 pound) roasting chicken
  • Kosher salt
  • Freshly ground black pepper
  • 1 large bunch fresh thyme, plus 20 sprigs
  • 1 lemon, halved
  • 1 head garlic, cut in half crosswise
  • 2 tablespoons (1/4 stick) butter, melted
  • 1 large yellow onion, thickly sliced
  • 4 carrots cut into 2-inch chunks
  • 1 bulb of fennel, tops removed, and cut into wedges
  • Olive oil
  • White wine (if desired)

Directions

Preheat the oven to 425 degrees F.

Remove the chicken giblets. Remove any excess fat and leftover pin feathers and pat the outside completely dry. Liberally salt and pepper the inside of the chicken. Stuff the cavity with the bunch of thyme, both halves of lemon, and all the garlic. Brush the outside of the chicken with the butter and sprinkle again with salt and pepper. Tie the legs together with kitchen string and tuck the wing tips under the body of the chicken. Place the onions, carrots, and fennel in a roasting pan. Toss with salt, pepper, 20 sprigs of thyme, and olive oil. Spread around the bottom of the roasting pan and place the chicken on top. Pour a little of the white wine into the bottom of the pan if desired. 

Roast the chicken for 1 1/4 - 1 1/2 hours, or until the juices run clear when you cut between a leg and thigh. Remove the chicken and vegetables to a platter and cover with aluminum foil for about 20 minutes. Slice the chicken onto a platter and serve it with the vegetables.

Soft Flour Tortillas

I have now past the point of no return. I have finally found the perfect homemade tortilla recipe, I will never buy tortillas from the grocery store again. For the past year or two I have been wanting to be able to find a good tortilla recipe. Have you ever looked at the ingredient list on a package of flour tortillas? If not, let me warn you now, it's not a pretty sight. Knowing that fantastically fresh and delicious tortillas can be made with just 5 ingredients (one of which is water), it disturbs me when I see the list of 20+ ingredients on the packages at the store, most of which I can hardly pronounce. This recipe makes it possible to never again pick up one of those packages of chemicals again. 

Ever since I found this recipe a few months ago, I've probably made it at least once, if not twice a week, ever since. It is just so good and easy. There are so many things you can fill tortillas will; some of my favorite ideas are eggs and cheese, sweet potato black bean, hummus and veggies, not to mention the basic seasoned ground beef with cheese, sour cream and salsa. I really think you can put anything at all in a tortilla, and it seems to always taste good! So grab your rolling pin and get to work, be creative, and have some fun! 

Soft Flour Tortilla

From 

King Arthur Flour

Ingredients

  • 2 1/2 cups All-Purpose Flour, plus additional as needed
  • 1 teaspoon baking powder
  • 1/2 teaspoon salt
  • 1/4 cup lard (traditional); or butter, shortening, or vegetable oil
  • 7/8 to 1 cup hot tap water (about 110°F to 120°F)

Directions

To make the dough: In a medium-sized bowl, whisk together the flour, baking powder, and salt. Add the lard (or butter, shortening or oil). Use your fingers or a pastry blender to work the fat into the flour until it disappears (I used vegetable oil which didn't completely disappear, but left small lumps of fat; this didn't seem to have any effect on the finished product so don't worry). Coating most of the flour with fat inhibits gluten formation, making the tortillas easier to roll out.

Pour in the lesser amount of hot water, and stir briskly with a fork or whisk to bring the dough together into a shaggy mass. Stir in additional water as needed to bring the dough together.

Turn the dough out onto a lightly floured counter and knead briefly, just until the dough forms a ball. If the dough is very sticky, gradually add a bit more flour.

Divide the dough into 8 pieces. Round the pieces into balls, flatten slightly, and allow them to rest, covered, for about 30 minutes. If you wish, coat each ball lightly in oil before covering; this ensures the dough doesn't dry out.

While the dough rests, preheat an ungreased cast iron griddle or skillet over medium high heat, about 400°F.

Working with one piece of dough at a time, roll into a round about 8" in diameter. Keep the remaining dough covered while you work. Fry the tortilla in the ungreased pan for about 30 seconds on each side. Wrap the tortilla in a clean cloth when it comes off the griddle, to keep it pliable. Repeat with the remaining dough balls.

Cinnamon Swirl Loaf

In high school I worked in food service at a retirement home, serving food to the residents, as well as prepping for meals and cleaning up. Certain foods will forever be linked in my mind to this experience, one of them being cinnamon toast. Cinnamon toast was a resident favorite for breakfast, and to this day, every time I smell the toasting of cinnamon bread it brings me back to those days. 

This recipe produces bread that is far superior to that served in the retirement home, but it still gives off that same wonderful sugary-cinnamony smell as it toasts up to golden perfection in the toaster. Smeared with some butter and sprinkled with a little more cinnamon, because why not, this bread is a wonderful way to start the day. 

The only problem I had with this bread was while it was baking. Partway through I smelled some burning and realized that some of the sugar had leaked out of the bread and had fallen to the floor of the oven where it was burning. Not the best smell. A few moments later, this blob of burning sugar then burst into flames! It wasn't too bad, and quickly died out, but I just want to warn you that this could happen. It's probably a good idea to put a baking sheet (lined with foil for easy clean up) under the loaf pan while it is baking. I also recommend covering this bread with foil halfway through, or even earlier, to prevent it from getting too brown. But however it comes out, it makes great cinnamon toast!

Cinnamon Swirl Loaf

Adapted From Martha Stewart's Baking Handbook

Ingredients:

For the dough:

  • 17 ounces (3¼ cups) all-purpose flour
  • 1 1/4 teaspoons instant yeast
  • ¼ cup sugar
  • 1¼ teaspoons coarse salt
  • 1½ teaspoons ground cinnamon
  • 1 large egg
  • 4 tablespoons unsalted butter, at room temperature
  • 1 cup warm milk 

For the filling:

  • ¾ cup sugar
  • 1 tablespoons ground cinnamon
  • 2 tablespoons water
  • 1 egg, lightly beaten

Directions:

In the bowl of a stand mixer fitted with the dough hook, combine the flour, yeast, sugar, salt and cinnamon. Give a quick mix with a wooden spoon to combine. Add in the egg, butter, and warm milk and again mix briefly, until a shaggy dough forms. Knead with the dough hook (or by hand) on low speed until the dough is mostly smooth and clears the sides of the bowl, 5-6 minutes until the dough is smooth and supple. 

Transfer the dough to a lightly oiled bowl, turning once to coat. Cover the bowl with plastic wrap or a clean kitchen towel and let rise in a warm place until doubled in bulk, about 1 hour.

Turn the dough out onto a lightly floured work surface. Pat into a round. Fold the bottom third of the dough up and fold the top third down, like a business-letter. Then fold the right and left sides into the center in thirds, forming a rectangle. Press down to seal. Return to the bowl, cover and let rise again until doubled, about 40 minutes.

Generously butter a 9 by 5-inch loaf pan. To make the filling, combine the sugar, cinnamon and water in a small bowl and whisk until well combined. 

Return the dough to a lightly floured work surface. Roll the dough into a 10 by 12-inch rectangle. Brush lightly with the beaten egg. Sprinkle with the cinnamon-sugar mixture, leaving a thin border around the edges. Fold in the edges of the long sides of the dough about 1 inch.

Beginning with one of the short ends, roll the dough up into a tight spiral log, gently pressing as you go. Pinch the seam shut, and place the loaf seam side-down in the prepared baking pan. Cover loosely with plastic wrap or a clean towel and let rise until the dough rises just above the edge of the pan, about 30 minutes.

Meanwhile, preheat the oven to 425˚ F. When the loaf has risen, brush the top of the loaf lightly with the remaining beaten egg. Bake, rotating the pan halfway through, until the loaf is golden brown, about 45 minutes. If the surface seems to be browning too quickly, tent loosely with foil. Cool in the pan 5 minutes, then turn the loaf out and transfer to a wire rack to cool completely before slicing.