Almond Paste Cake

I've said it many times, but I'll say it again, I love cake. There is a cake for any and every occasion. It amazes me how many people tell me that they don't really like cake. I think they just haven't been eating the right ones. There are so many different options: a towering triple layered birthday cake, a simple French yogurt cakesbundt cakes, breakfast cakespeach cakessour cherry coffee cakes and  cupcakes, just to name a few! How can you say you don't like cake when there are so many different options to choose from? 

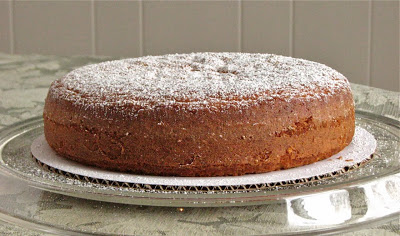
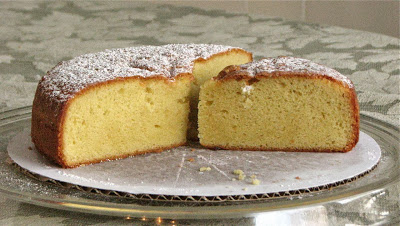
Well, if you're still unconvinced, here is another cake to try and change your mind. This is one of my favorite cakes. Not only is it super rich and buttery, but it is full of delicious almond flavor. Half a pound of almond paste goes directly into this cake, and if that's not enough for you, don't forget to add the almond extract too. I love anything almond flavored and this cake delivers. Sprinkle with powdered sugar for a simple finish, or add a dollop of whipped cream and some berries for a something special. However you eat it you won't be disappointed. 

I think of this cake as an almond pound cake. It has a fine, dense crumb, and is buttery and rich with two sticks of butter and 6 eggs to go along with the half a pound of almond paste. The instructions call for it to be made in a food processor which is always how I've done it. They do say you can use a stand mixer if you don't have a food processor, but I've never tried that. I'm sure it would work just fine though. If anyone tries it, let me know how it goes!

Almond Paste Cake

From 

David Lebovitz

Ingredients

  • 1 1/3 cups (265g) sugar
  • 8 ounces (225g) almond paste
  • 3/4, plus 1/4 cup (140g total) flour
  • 1 cup (8 ounces, 225g) unsalted butter, at room temperature, cubed
  • 1 1/2 teaspoons baking powder
  • 3/4 teaspoon salt
  • 1 teaspoon vanilla extract
  • 1 teaspoon almond extract
  • 6 large eggs, at room temperature

Directions

Preheat the oven to 325ºF (162ºC). Grease a 9x2-inch cake or spring form pan with butter (the cake rises quite a bit, so make sure your pan is tall enough), dust it with flour and tap out any excess. Line the bottom of the pan with a round of parchment paper.

In the bowl of a food processor, grind the sugar, almond paste, and 1/4 cup (35g) of flour until the almond paste is finely ground and the mixture resembles sand.

In a small bowl, whisk together the remaining 3/4 cup (105g) of flour, baking powder, and salt.

Once the almond paste is completely broken up, add the cubes of butter and the vanilla and almond extracts, then process until the batter is very smooth and fluffy.

Add the eggs one at a time, processing a bit before the next addition. (You may wish to open the machine and scrape the sides down to make sure the eggs are getting fully incorporated.)

After you add all the eggs, the mixture may look curdled. Don’t worry; it’ll come back together after the next step.

Add half the flour mixture and pulse the machine a few times, then add the rest, pulsing the machine until the drying ingredients are just incorporated, but do not overmix. (You can also transfer the batter to a bowl and mix the dry ingredients in, which ensures the dry ingredients get incorporated evenly and you don’t overbeat it.)

Scrape the batter into the prepared cake pan and bake the cake for 45-60 minutes, or until the top is deep brown and feels set when you press in the center.

Remove the cake from the oven and run a sharp or serrated knife around the perimeter, loosing the cake from the sides of the pan. Let the cake cool completely in the pan.

Once cool, tap the cake out of the pan, remove the parchment paper, and set on a cake plate until ready to serve.

Note

: This cake is best made in the food processor, but if using a stand mixture, use the paddle attachment and let the mixer run until the almond paste is finely broken up. 

Perfect Pumpkin Muffins

This past Christmas, my sister Lara and I received a couple of wonderful cookbooks. I got Jerusalem, by Yotam Ottolenghi and Sami Tamimi which I had first checked out from the library and loved. Lara got Sarabeth's Bakery by Sarabeth Levine which she has been eyeing for some time now, and finally owns. We dug into Sarabeth's Bakery first. It was so difficult trying to decide what to make. Everything sounds so good and looks beautiful. We finally decided on our first recipe, these perfect pumpkin muffins. 

These muffins are pretty close to perfect. They came out of the oven looking absolutely gorgeous. Tall and domed as every muffin should be. Even with an entire can of pumpkin puree, these muffins actually aren't overly pumpkin-y. They are actually quite mild, and not overly sweet, exactly what I need on some days. But if you're feeling a little extra indulgent, I think a handful or two of mini chocolate chips would be an excellent addition, that's what I'm going to try next!

In the cookbook, it says this recipe will yield 12-14 muffins. Well, I got 24 out of it. They weren't huge, but they were the perfect size for me. I didn't have to bake them as long either, so if you make them smaller make sure to keep an eye on them so they don't over-bake. 

Like I above, these muffins aren't overly sweet, they are definitely muffins, not cupcakes, which is how I like it. The batter is super thick which helps them bake up beautifully domed and craggily. In fact, after they were baked I could still see where each individual scoop of batter was placed in the muffin tins, the batter is that thick. So if you want beautifully domed muffins, make sure not to smooth out the batter after you fill the tins, keep the scoops nice and rounded (this is where a cookie scoop comes in handy) because this is how they will bake up.

Perfect Pumpkin Muffins

Adapted from:

Sarabeth’s Bakery: From My Hands to Yours

Ingredients

  • Softened unsalted butter, for the pan
  • 3 2/3 cups pastry flour, sifted (I used about 17 ounces all purpose flour with a few tablespoons cornstarch)
  • 1 tablespoon plus 1 teaspoon baking powder
  • 1 teaspoon ground cinnamon
  • ¼ teaspoon ground ginger
  • ¼ teaspoon freshly grated nutmeg
  • ¼ teaspoon fine sea salt
  • 8 tablespoons (1 stick) unsalted butter, chilled and cut into ½-inch cubes
  • 1 1/3 cups superfine sugar (I used 10 ounces granulated sugar that I processed in my NutriBullet)
  • 4 large eggs, at room temperature, beaten
  • One 15-ounce can solid-pack pumpkin

Directions

Position a rack in the center of the oven and preheat to 400°F. Brush the insides of 12 to 14 muffin cups with softened butter, then brush the top of the pan.

Sift the flour, baking powder, cinnamon, ginger, nutmeg, and salt together into a medium bowl. Beat the butter in the bowl of a heavy-duty stand mixer fitted with the paddle attachment on high speed until creamy, about I minute. Gradually beat in the sugar and continue beating, scraping the sides of the bowl often with a silicone spatula, until the mixture is very light in color and texture, about 5 minutes. Gradually beat in the eggs. Reduce the mixture speed to low. Beat in the pumpkin; the mixture may look curdled. In thirds, beat in the flour mixture, scraping down the sides of the bowl often, and mix until smooth. 

Using a 2½ inch-diameter ice-cream scoop, portion the batter, rounded side up, into the prepared cups. 

Bake for 10 minutes. Reduce the oven temperature to 375°F and continue baking until the tops of the muffins are golden brown and a wire tester inserted into the center of the muffin comes out clean, about 15 minutes more.

Cool in the pan for 10 minutes. Remove the muffins from the pan and cool completely.

Bakers Note: If you use generous scoops of batter, the yield will be 12 muffins. For smaller muffins, use 7 muffin cups in each of 2 muffin pans. Distribute the batter in a random pattern (not in rows) in each pan so the muffins bake evenly. 

Clementine Brown Rice Salad with Edamame and Cranberries

In the winter I can sometimes find it difficult to come up with a good, fresh salad that incorporates seasonal ingredients. It's not like summer when all it takes are a few garden fresh tomatoes and a handful of basal to call it good. But, although it takes a little more thought in the winter, beautiful salads made with in season produce can be done. Take this salad for instance, it uses a lot of things that you may just have stored in your cupboard or freezer; dried cranberries, edamame, brown rice, and slivered almonds. Add to this some fresh, sweet and juicy clementines, a few thinly sliced green onions and some feta cheese and you have the perfect combination for a hearty winter salad, great as a flavorful side or a light main coarse, whichever you prefer. Either way you won't be disappointed.

The combination of all the different ingredients in this salad are just perfect. Sweetness from the clementines, tartness from the cranberries, crunch from the almonds and creaminess from the edamame. It is also a beautiful salad, full of all the different colors. The clementine juice and honey in the dressing give it just the right amount of sweetness mixed with the acidity from the lemon juice and vinegar. I really do love this salad. The perfect way to add freshness to those gloomy winter days. 

Clementine Brown Rice Salad with Edamame and Cranberries

Ingredients

For the Salad

  • 1 cup brown rice*
  • 1 cup frozen, shelled edamame beans
  • 4 clementines
  • 3 green onions
  • 1 cup of sliced or slivered almonds, toasted
  • 3/4 cup dried cranberries
  • 1/2 cup feta cheese

For the Dressing

  • 2 tablespoons white wine vinegar
  • 2 tablespoons honey
  • 2 tablespoons olive oil
  • 2 teaspoons fresh lemon juice
  • 2 tablespoons fresh squeezed clementine juice
  • Salt & pepper to taste

Directions

Cook rice according to package directions*. Set aside to cool while you prepare the rest of the salad. (Brown rice can also be prepared a day ahead and stored in the fridge until needed.) 

Fill a small pot with two inches of water. Bring to a boil, add edamame and cook for about 3 minutes or until tender. Drain and set aside. 

Peal clementines, tear into segments and place in a large bowl. Thinly slice the green onion and add to the bowl. Add in the brown rice, edamame, toasted almonds and cranberries. Mix all together. 

In a small bowl, whisk together all of the dressing ingredients and pour over the salad. Mix it until everything is well incorporated. Add in the feta cheese and give it another  mix.

*Check out 

this

 post for my all time favorite, super easy method for making brown rice that turns out perfectly every time!

Cranberry Orange Biscotti

One of my absolute favorite times of the day is coffee time. I try my very best to make sure I get to enjoy a cup of something warm and comforting at least once during the day. This is especially important right now when the temperature is barely making it into the teens, and just looking outside makes me cold. While I have no problem just drinking a lone cup of coffee, sometimes it seems like I just need a little bite of something to go with it. Biscotti are one of the best ways to satisfy this sweet craving. I stumbled across this cranberry orange biscotti recipe earlier this winter and decided that it sounded perfect for the cold, snowy days ahead. I was right, the tartness of the cranberries pairs perfectly with the creamy sweetness of the white chocolate and the bright freshness of the orange. I wouldn't change a thing in this winter treat. 

If you've never made biscotti before, I highly recommend it. It really isn't difficult at all, and they are just so cute when you're finished. It seems like every recipe bakes up a little differently, some spread a lot during the first bake, while some don't spread at all. And after the first bake, before cutting up the individual cookies, it always looks so strange and I wonder how it will turn out. But it always does, and I'm never disappointed. 

Cranberry-Orange Biscotti
From Tutti Dolci
Ingredients
Cookie

  • 3/4 cup sugar
  • 1/2 cup unsalted butter, melted
  • Zest of 1 orange
  • 1 1/2 Tbsp orange juice
  • 1 1/2 Tbsp brandy
  • 3 large eggs
  • 2 3/4 cups flour
  • 1 1/2 tsp baking powder
  • 1/4 tsp salt
  • 2/3 cup dried cranberries

Topping

  • 4 ounces white chocolate, chopped
  • 1/4 cup dried cranberries, chopped

Directions
Combine sugar, butter, orange zest, orange juice, and brandy in a large bowl, stirring until smooth. Whisk in eggs one at a time. Stir in flour, baking powder, and salt until incorporated; fold in cranberries. Cover dough and chill for 30 minutes.

Preheat oven to 350°F and line a large baking sheet with parchment paper. Using moistened hands, shape dough into 2 (10-by-4-inch) loaves on prepared baking sheet. Bake for 22 minutes or until pale golden. Transfer loaves to a wire rack and cool for 15 minutes.

Using a serrated knife, cut loaves into 1/2-inch slices. Place slices cut side down on baking sheet; bake 9 minutes. Turn slices over and bake for 9 minutes more or until golden. Cool completely on wire racks.

Line a rimmed baking sheet with parchment paper. Place chopped chocolate in a double boiler or in a heat-proof bowl over a saucepan of gently simmering water. Slowly melt the chocolate, stirring occasionally until glossy and smooth. Use a fork to drizzle chocolate over biscotti and top with cranberries; chill in the refrigerator for 15 minutes to set chocolate. Store at room temperature in an airtight container up to a week.

Banket: A New Favorite

Growing up in West Michigan in a family that is very proud of their Dutch heritage means that I grew up eating my fair share of Dutch goodies; boterkoek, Jan Hagels, oliebollen and windmill cookies to name a few. They're all delicious, but in my opinion there is nothing better than a stick of homemade banket, especially during the holidays. I've shared a banket recipe on the site before which was very good, but I was never completely satisfied with it, especially with the filling. I don't like my banket filling to be too dry, and while the previous recipe was delicious, the filling was just too dry for my taste, I wanted something else. 

This Christmas I decided to go on a search to see if I could find the banket recipe I've been hoping for. There are not the many banket recipes out there, so it took a bit of searching, but I finally came up with a recipe from The Lilypad Cottage that looked like it could be the one. It came together pretty easily so I was very hopeful when I put the first batch into the oven. I have to say, they turned out just about perfectly. Exactly what I was hoping for. A light, and flaky buttery crust wrapped around the perfect almond paste filling. I think I found it!

This recipe is a two day affair, or a long one day affair. The dough and filling need to chill up pretty firm before you use them. Another thing I love about banket is that it is so easy to freeze. I just shape it up and pop the unbaked rolls into the freezer for a few hours. Then I wrap them in plastic and keep in a bag in the freezer until I need them. You don't even have to thaw before baking. Just unwrap, place on a cookie sheet and bake from frozen. They might take a few extra minutes from frozen but other than that you can't even tell. Super easy!

Banket
Adapted from The Lily Pad Cottage
Ingredients
Dough

  • 4 cups flour

  • ¼ cup sugar

  • 1 teaspoon salt

  • ½ teaspoon baking powder

  • 1 pound cold butter, cut into small pieces

  • scant 1 cup cold water

Filling

  • 1 pound of almond paste

  • 2 eggs

  • 2 cups sugar

  • 1 teaspoon vanilla

To Finish

  • 1-2 Egg yolks

Directions
For the dough, mix together the flour, sugar, salt and baking powder. Add the pieces of cold butter and cut into the flour mixture with a pastry blender (you can also use two forks or even your fingers, but work fast, you don't want the butter to get too warm) until the butter is about pea sized. Make a well in the middle and add cold water, mix until a shaggy dough is formed, don’t over mix. Wrap in plastic and refrigerate overnight.

For the filling, break up almond paste in a bowl. Add eggs, sugar, and vanilla. Mix well. Cover bowl with plastic wrap and refrigerate overnight.

The next day cut divide both the dough and the filling into 8 equal portions, use a scale if you have it.

Take one piece of dough and roll out into a long, thin rectangle, approximately 13x4 inches. Place one piece of filling on the rolled out dough, spreading it along the length of dough, a little closer to one side, forming an even line. Roll up the long way, folding the ends under. Pinch together slightly so the filling doesn’t ooze out.

Dock the rolls with a fork, brush with egg yolks.

At this point you can stick the pans in your freezer until the Banket is frozen hard. Then you can wrap them up and bake off as needed.

Bake at 400 degrees for 25-30 minutes (I do about 30 minutes when baking from frozen) until golden brown. Let cool before slicing into 1-2 inch pieces, enjoy!

Peppermint-Chocolate Chip Shortbread

Who doesn't love shortbread? It's just butter and sugar held together with some flour, how can you go wrong? Any excuse to eat butter is okay with me! I was at my favorite bakery a few weeks ago and they had bags of peppermint shortbread for sale. The cookies were calling to me, but I knew I could make the same thing at home so I resisted and went home to search the internet for a recipe. I found the perfect recipe in multiple places online. It originally called for espresso powder, so I just replaced that with some peppermint extract and my peppermint shortbread craving was satisfied. Combining the buttery goodness of shortbread with some chocolate, and then throwing in a little peppermint extract results in the perfect cookie. 

One of my favorite parts of this recipe was the method for rolling out the shortbread. When you first make the dough you throw it into a gallon size plastic bag and then roll it out to an even thickness right inside the bag. After a couple hours in the fridge all you have to do is cut the dough out of the bag and cut the cookies into whatever size and shape you want. Transfer to cookie sheet and bake. Super easy!

Peppermint-Chocolate Chip Shortbread

Adapted From 

Use Real Butter

Ingredients

  • 2 sticks (8 ounces) butter, at room temperature

  • 2/3 cup confectioners’ sugar

  • 1/2 teaspoon vanilla extract

  • 1/4 teaspoon peppermint extract

  • 2 cups all-purpose flour

  • 3/4 cup mini chocolate chips

  • Confectioners’ sugar, for dusting (optional)

Directions

Working with a stand mixer, preferably fitted with a paddle attachment, or with a hand mixer in a large bowl, beat the butter and confectioners’ sugar together on medium speed for about 3 minutes, until the mixture is very smooth. Beat in the vanilla and peppermint extracts, then reduce the mixer speed to low and add the flour, mixing only until it disappears into the dough. Don’t work the dough much once the flour is incorporated. Fold in the chopped chocolate with a sturdy rubber spatula.

Using the spatula, transfer the soft, sticky dough to a gallon-size zipper-lock plastic bag. Put the bag on a flat surface, leaving the top open, and roll the dough into a 9 x 10 1/2 inch rectangle that’s 1/4 inch thick. As you roll, turn the bag occasionally and lift the plastic from the dough so it doesn’t cause creases. When you get the right size and thickness, seal the bag, pressing out as much air as possible, and refrigerate the dough for at least 2 hours, or for up to 2 days.

Position the racks to divide the oven into thirds and preheat the oven to 325 degrees F. Line two baking sheets with parchment or silicone mats.

Put the plastic bag on a cutting board and slit it open. Turn the firm dough out onto the board (discard the bag) and, using a ruler as a guide and a sharp knife, cut the dough into little squares or rectangles. Transfer the squares to the baking sheets and carefully prick each one twice with a fork, gently pushing the tines through the cookies until they hit the sheet.

Bake for 18 to 20 minutes, rotating the sheets from top to bottom and front to back at the midway point. The shortbreads will be very pale–they shouldn’t take on much color. Transfer the cookies to a rack.

If you’d like, dust the cookies with confectioners’ sugar while they are still hot. Cool the cookies to room temperature before serving.

Chewy Molasses Cookies

After days of snow, freezing temperatures, and sub-zero wind chills, there is nothing better than curling up inside on the couch with a cup of coffee, a good book, and a couple of cookies. These chewy molasses cookies are buttery, filled with warm spices and coated with coarse sugar for a crunchy finish. They are the perfect accompaniment for that warm cup of coffee. 

With molasses cookies it always seems like you never know exactly what you are going to get. Will they be too molasses-y? Too spicy? Too hard? Not tasty? Well, set all your fears aside with this recipe. They are the perfect mix. Buttery and sweet with the perfect amount of spice, baked until just barely cooked through leaves them perfectly chewy and soft. A delicious cookie to see you through those cold winter days. 

I actually made these cookies twice in about a week. They turned out absolutely delicious both times, however, while the first batch turned out a little poofy as you can see in the pictures, my second batch turned out incredibly flat, they spread out completely while baking. I don't know what the difference was, I can't think of anything I did differently between the two batches. But both batches were still wonderful though, thank goodness. So however they turn out for you, I am sure they will still be delicious.

UPDATE (12/17/14): I added an extra 1/4 cup of flour and really chilled the dough well before baking and the cookies baked up a lot more poofy!

Chewy Molasses Cookies
Adapted from Heart of Gold
Ingredients

  • 2 cups all-purpose flour (UPDATE: add an extra 1/4 cup flour to help make the cookies nice and poofy and less likely to spread)

  • 2 teaspoons baking soda

  • 2 teaspoon ground cinnamon

  • 1 teaspoon ground ginger

  • 1⁄2 teaspoon salt

  • 1 large egg

  • 1⁄2 cup (1 stick) unsalted butter, melted

  • 1⁄3 cup granulated sugar

  • 1⁄3 cup mild-flavored (light) or robust-flavored (dark) molasses

  • 1⁄4 cup (packed) dark brown sugar

  • Coarse sanding or raw sugar (for rolling)

Directions
Place racks in lower and upper thirds of oven; preheat to 375°. Whisk flour, baking soda, cinnamon, ginger, and salt in a small bowl. Combine egg and butter and beat together with a mixer for 4-5 minutes, until light and fluffy. Add granulated sugar, molasses, and brown sugar and beat for 2-3 minutes more. Mix in dry ingredients just to combine. Chill dough for 20-30 minutes, or longer, until firm enough to handle. 

Place sanding sugar in a shallow bowl. Scoop out dough by the tablespoonful and roll into balls. Roll in sugar and place on 2 parchment-lined baking sheets, spacing 2” apart.

Bake cookies, rotating baking sheets halfway through, until cookies are puffed, cracked, and just set around edges (overbaked cookies won’t be chewy), 8–10 minutes. Transfer to wire racks and let cool.

Homemade Marshmallows

A couple of summers ago I made a batch of homemade marshmallows that were really quite tasty, but the texture wasn't what I had been hoping for. They had been incredibly soft, delicious but soft. I had been hoping to be able to roast them over the campfire for a s'more, but there was not way they were going to not immediately melt off the stick and into the fire. But recently I've been wanting to try them again. Not because I'm a marshmallow fanatic, but just because I thought it would be kind of fun to try again. Since it was Christmas I thought that they would also make a fun gift, alongside my favorite homemade hot chocolate mix. A couple of soft and creamy homemade marshmallows floating on top of a mug of rich, decadent hot chocolate sounded divine. 

I searched around for a recipe that sounded good to me and settled on this one from King Arthur Flour. The recipe stated that these marshmallows were more on the 'stiffer' side which was exactly what I was looking for. So I whipped a batch together and was extremely pleased as to how they turned out, stiff, yet still creamy and soft, just not oozingly soft which I did not want. They were exactly what I was looking for. And I have to admit, I did try some of the leftovers in a mug of hot chocolate, for quality control of course, and it was an outstanding combination. With a recipe like this, I may have to make marshmallows more often. 

This recipe really couldn't be easier. It does require a candy thermometer and an electric mixer, but all the steps are very simple. I'm definitely not a candy maker, and they still turned out great. You will also need a package of unflavored gelatin, not something I normally have lying around, but easy enough to get your hands on. Other than that all you need is some sugars; granulated sugar and light corn syrup. Throw in whatever flavor you want after that (I stuck with straight vanilla for a classic taste, but I think some peppermint extract would be wonderful). That's it. Heat it up, mix it together and let it cool. Then you can cut it into whatever size or shape you want. A fun project for the holidays, or really any time of year!

Homemade Marshmallows 
From King Arthur Flour
Ingredients

  • 3 packages (1/4-ounce each) unflavored gelatin

  • 1 cup (8 ounces) cool water, divided

  • 1 1/2 cups (10 1/2 ounces) granulated sugar

  • 1 cup (11 ounces) light corn syrup

  • 1/8 teaspoon salt

  • 1 tablespoon (1/2 ounce) vanilla extract

  • Confectioners' sugar, to sprinkle on top

Directions
Combine the gelatin and 1/2 cup cool water in the bowl of an electric mixer fitted with the whisk attachment. Combine the sugar, corn syrup, salt, and 1/2 cup cool water in a small, deep saucepan. Cook the mixture over medium heat, stirring, until the sugar dissolves. Raise the heat to high and cook, without stirring, until the syrup reaches 240°F on a candy thermometer. Remove from the heat.

With mixer on low speed, slowly pour the sugar syrup into the softened gelatin. Increase the speed to high, and whip until the mixture is very thick and fluffy, and has cooled to lukewarm, 3 to 10 minutes (depending on the mixer and attachment you use; a stand mixer using the whisk attachment will work more quickly than a hand mixer equipped with beaters). The mixture should be cool enough that you can spread it into the pan without burning your fingers, about 95°F. Add vanilla towards the end of the mixing time.

Spread the marshmallow mixture into a greased 9" x 13" pan (glass or ceramic is best). Use your wet hands to smooth and flatten the marshmallows. Sprinkle confectioners' sugar over the top, and let sit for several hours (or overnight) before cutting. Use a greased knife or cookie cutters to make squares or other shapes. Yield: about 100 1" squares.