Honey Mustard Chicken

Easy, quick and delicious, a perfect combo when it comes to a weeknight meal. This honey mustard chicken is all of that. It only takes a few ingredients, a little bit of prep work and some time in the oven and you have a tasty, satisfying meal that I think just about anyone would enjoy. I don't know about you, but sometimes I want a hearty, filling meal that doesn't take a couple hours to put together, uses what I have in the kitchen and is still full of flavor. I stumbled across this recipe last week and realized that I had chicken in the freezer and some leftover rosemary in the fridge. Since I always have onions, honey and both kinds of mustard on hand I knew I just had to try this. It was a definite do over, a great recipe to hang on to for those days when you don't have the time for much else.

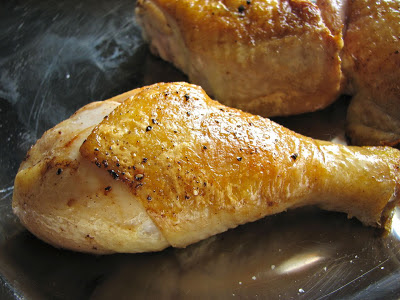
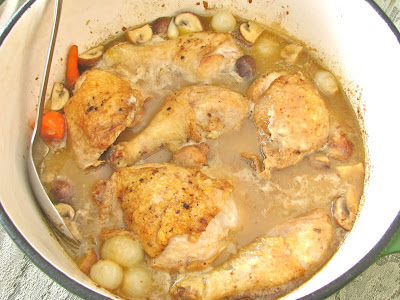
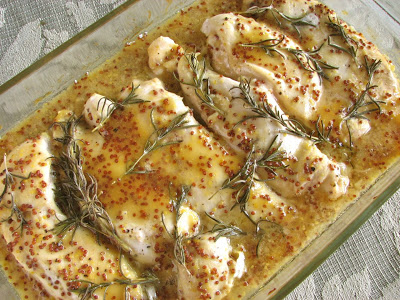
While you could make this recipe without the whole grain mustard, I don't think I would want to, just because it looks so pretty with the little mustard seeds all over the chicken. The combo of whole grain mustard, Dijon mustard, and plenty of honey make for a delicious sauce that gets even better as the juice from the chicken mixes in during baking. The rosemary is beautiful and delicious, but you could probably try thyme too, I think it would work just as well. Other then that there is not much to say. It is a straightforward recipe that turns out a delicious pan of flavorful chicken.

Baked Honey Mustard Chicken
Adapted From: Good Life Eats
Ingredients

  • 3 tablespoons grainy, course mustard

  • 3 tablespoons smooth Dijon mustard

  • 1/4 cup honey

  • 1 teaspoons extra virgin olive oil

  • 1 sweet onion, sliced thin

  • 2 cloves garlic, minced

  • About 2 pounds boneless skinless chicken breasts or tenderloins

  • salt and pepper

  • 4 small sprigs of fresh rosemary

Directions
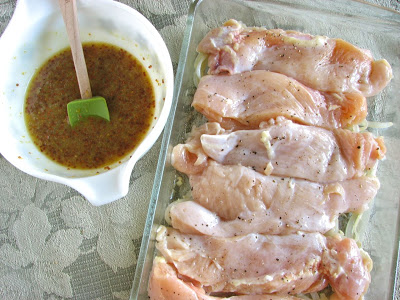
In a small bowl, combine the mustards, honey, and the olive oil.

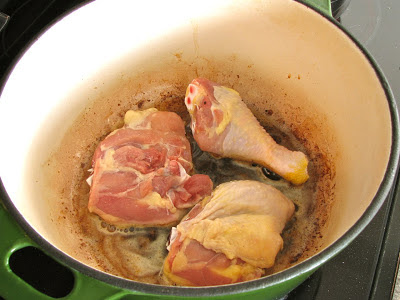
Sauté onion over medium heat until golden and tender, 5-10 minutes. Add the garlic and sauté for an additional 1 - 2 minutes, until fragrant.

Transfer onion mixture to a baking dish. Place the chicken on top of the onion and garlic mixture. Salt and pepper the tops of the chicken according to your personal preference.

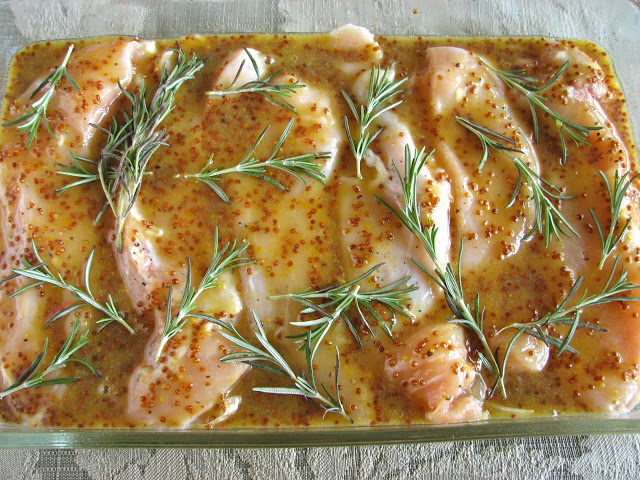
Pour the honey mustard mixture on top of the chicken. Arrange the rosemary sprigs around the chicken in the pan.

Bake the chicken covered at 400 degrees F for 20 minutes. Then remove the cover, baste the chicken with the sauce, and continue to cook for an additional 5-10 minutes uncovered, until the chicken registers 160 degrees on an instant read thermometer.

Chocolate Chip Oat Cookies

I think I've said it before, but I'll say it again, chocolate chip cookies are one of my all time favorites. I'm always on the lookout for a good chocolate chip cookie recipe. I have several great recipes in my recipe book, but there is always room for one more, right? Choosing a favorite recipe would be impossible, they are all delicious in their own way. When I saw this recipe from Rebecca LaMalfa, an executive sous chef in Chicago, I just had to give it a try. This is her version of the classic, inspired by her mom's recipe. It's a pretty basic recipe, with one small twist, old-fashioned oats that you grind up in the food processor that give the cookies a slightly different flavor and texture than regular chocolate chip cookies. They turned out delicious, the perfect recipe to try when you want the classic, with a twist!

In this recipe, she calls for you to make 12 large cookies. These would be absolutely huge, like what you get at the bakery or coffee shop. Since I don't need cookies even close to that large, I cut back on their size as I shaped them. I think I baked them for slightly less time then, but I don't exactly remember how long. If you end up making smaller cookies, set your timer for a little less time and go from there until they are done to your liking. Whatever size you decide upon, they will be wonderful and soft. There are no slightly crispy edges here, just all soft and chewy, perfect to sink your teeth into.

Chocolate Chip Oat Cookies

From 

Rebecca LaMalfa

 via Tasting Table

Ingredients

  • 2½ cups old-fashioned rolled oats
  • 2 cups all-purpose flour
  • 1 teaspoon baking soda
  • 1/2 teaspoon baking powder
  • 1/2 teaspoons kosher salt
  • 2 sticks unsalted butter (at room temperature)
  • 1 cup light brown sugar (lightly packed)
  • 1/2 cup granulated sugar
  • 2 large eggs
  • 1 teaspoon vanilla extract
  • 2 cups semisweet chocolate chips

Directions

Preheat the oven to 350°. Line a rimmed baking sheet with parchment paper and set aside.

To the bowl of a food processor, add the old-fashioned rolled oats. Pulse the oats until semi-fine--there should be a few larger bits, but most of the oats will be finely ground, about twelve 1-second pulses. Add the oats to a large mixing bowl. 

Set a fine-mesh sieve over the bowl, and to it add the all-purpose flour, baking soda and baking powder Sift the flour mixture over the oats. To the flour mixture add the kosher salt and use the whisk to combine the dry ingredients.

To the bowl of a stand mixer fitted with the paddle attachment, add the butter, light brown sugar and granulated sugar. Beat the mixture on medium-low speed until combined. Increase the speed to medium-high and beat until airy and pale in color, about 2 minutes. 

Reduce the mixer speed to medium-low and add one egg. Once the egg is well incorporated, stop the mixer and use a rubber spatula to scrape down the bottom and sides of the bowl. Turn the mixer back on to medium-low and add the remaining egg.

Once the egg is incorporated, add the vanilla extract. Beat on medium speed until well combined. Reduce the mixer speed to low and add the flour-oat mixture. Once the flour-oat mixture is mostly combined, add the semisweet chocolate chips. Mix just to combine the chips. Turn off the mixer and scrape down the bottom and sides of the bowl.

Use a large spoon to divide the cookie dough into 12 pieces about the size of a golf ball, rolling the dough in your hands to make a well-formed ball. Set the cookies about 2 inches apart on the parchment-paper-lined baking sheet and bake for 6 minutes. Rotate the baking sheet and bake until golden-brown around the edges and still soft in the center, about 6 minutes longer.

Remove the baking sheet from the oven and let the cookies cool on the baking sheet until set, about 5 minutes. Use a metal spatula to transfer the cookies to the wire rack to cool completely. Repeat with the remaining cookie dough. The cookies keep for up to 3 days stored at room temperature in an airtight container. (The cookie-dough balls can also be frozen on a baking sheet, then transferred to a resealable freezer bag and frozen for up to 3 months before baking.)

Fudgy Brownies with Cream Cheese Frosting

I don't know about you, but one of my go-to desserts when I don't have a lot of time is a delicious pan of rich, chocolatey brownies. Not just any brownies though, I need my brownies to be fudgy and full of chocolate flavor. No longer will I make brownies that are full of cocoa powder, without any chocolate in sight. No, I need there to be lots of melted chocolate to go along with the butter and sugar and eggs. These brownies have just that. With half a pound of melted chocolate for a 9x9 inch pan of brownies, these are definitely chocolatey! They are perfect with just a dusting of powdered sugar on top, but if you're feeling adventurous, try frosting them to put them over the top. Peanut butter frosting, mocha frosting, ganache, or like I did this time, cream cheese frosting. They will all be fantastic because of the delicious brownie at the base.

Not only are these brownies delicious, they are also super easy. All you have to do is melt the butter and chocolate in a pan on the stove (or the microwave works too), let it cool for a minute or two, and add in the rest of the ingredients. Mix it all up, pour it in the pan, and bake. Super simple, but oh so yummy! 

Fudgy Brownies

Adapted from 

Hidden Ponies

Ingredients

  • ½ cup butter
  • 1⅓ cups (8 oz) good chocolate
  • 1 cup sugar
  • ½ tsp salt
  • 3 eggs
  • 1 tsp vanilla
  • ¾ cup flour
  • ½ teaspooon espresso powder (optional)

Directions

Preheat oven to 350 degrees. Spray a 9-inch square or round pan thoroughly with nonstick cooking spray.

Place butter and semi-sweet chocolate in a large microwave-safe bowl and microwave for 1 minute, then in additional 30 second increments if necessary until chocolate is mostly melted. Stir to melt chocolate completely.

Whisk sugar, salt, and eggs into chocolate mixture just until combined (don’t overbeat, or the brownie will rise too high and then fall).

With a wooden spoon, stir in flour until no streaks remain.

Pour batter into prepared pan and bake for 25-30 minutes (until center is just barely set and toothpick comes out with a few crumbs sticking to it). Do not overbake. 

Chocolate Chip Cream Scones

This semester my sister Lara and I started a new weekly tradition. Once a week, usually Wednesday or Thursday mornings, we head over to our favorite local bakery, Wealthy Street Bakery, where we split a pastry and enjoy a cup of super dark coffee with plenty of half and half. It has probably become my favorite time of the week! Each week it can be difficult to decide what to get to eat, the options are all so good. There are muffins, scones, croissants danishes, cinnamon rolls, breakfast cookies, babka and bread pudding to name just a few! There is absolutely no way I can name a favorite breakfast treat, but I do have to say that I absolutely love the flavor and texture of their scones. They are so light and soft, yet slightly crisp, light but not overly delicate. In the last few months I have been on the search for a scone recipe that may somewhat compare to these little beauties. Here is one attempt at this difficult and important challenge.

I decided to start by trying Martha Stewart's scones from her Baking Handbook, which is a wonderful cookbook and has never let me down. This was no exception. These scones turned out delicious, with a great texture and were beautiful too. I have been enjoying them all week with a smile on my face.

With that said, these scones were not exactly like the scones from Wealthy Street. They are not quite as tender, and just a little too crunchy. Instead of being lightly crisp on the outside, they are slightly firmer, not quite as light. I fixed this a little by turning the temperature of the oven down partway through baking which worked very well, but they were still a little harder than I want. Still delicious of course, but not the texture I am looking for. However, the flavor is excellent and the scone overall is fantastic. Definitely something I can make again (after I find the copycat recipe I want so badly!). Give these scones a try, they really will make your breakfast extra special.

Look at the height of that scone

Sugary and crunchy top, beautiful 

golden brown

Chocolate Chip Cream Scones

Adapted From: Martha Stewart's Baking Handbook

Ingredients

  • 2 1/4 cups flour
  • 1 tablespoon granulated sugar
  • 1 tablespoon baking powder
  • 1/2 teaspoon baking soda
  • 1/2 teaspoon salt
  • 1 stick butter, cold, cut into small pieces
  • 1/2 cup mini chocolate chips
  • 1 cup heavy cream, plus more if needed
  • 1 egg yolk
  • sanding sugar for sprinkling

Directions

In a bowl, whisk together the flour, sugar, baking powder, baking soda and salt. Using pastry blender, cut in the butter until mixture resembles coarse crumbs with a few larger clumps remaining. Mix in chocolate chips

Make a well in the center of the dry ingredients. Pour the cream into the flour mixture. Slowly draw the dry ingredients over the cream, gradually gathering and combining the dough until just coming together. If it is too dry, add more cream, 1 tablespoon at a time.

Turn the dough onto a lightly floured surface. With lightly floured hands press and pat the dough into a circle, about 1 1/2 to 2 inches tall. Using a sharp knife, cut the circle into 8 wedges. Place the wedges on a parchment lined baking sheet; cover with plastic and freeze until very firm, at least 2 hours, or overnight. (At this point you can freeze the unbaked scones in a resealable plastic bag until ready to bake, up to 3 weeks.)

Preheat the oven to 375 degrees. In a small bowl, lightly beat egg yolk with a couple tablespoons of cream or milk; brush over the tops of the scones and sprinkle generously with sanding sugar, if using. Bake for 15 minutes. Rotate the baking sheet, reduce the heat to 325 degrees and continue baking for 15 to 20 more minutes. Transfer to a wire rack to cool. Serve warm, or at room temperature. 

Peanut Butter Chocolate Chip Banana Muffins

As you may have noticed, I really love muffins. A few weeks ago, I went online to look up a new bakery/restaurant I'd heard of. When browsing their menu one particular thing jumped out at me; peanut butter chocolate chip banana muffins. Do you ever get that? One thing just catches your eye and sounds so delicious that you feel like you have to try it? I don't know what it was about this combination that made me want desperately to try it, it was just the right thing at that moment. I of course went straight to the internet to try to come up with a recipe that sounded as yummy as these did.

When I saw this recipe it sounded perfect. They were described as somewhat healthy, yet not so much that they tasted healthy, and not too dense, but more cake-like. That's a wonderful combination if you ask me. They turned out wonderfully, just what I was looking for. Both the flavor of the peanut butter and the banana really comes out and complement each other very well. Add a little chocolate to this combination and you have a winner!

There is no oil or butter in this recipe, the fat comes from the peanut butter and Greek yogurt. I know sometimes quick breads without oil or butter can have a funky texture, or baked up dry or dense, but these didn't have any problems. They are moist and light and full of flavor. I really like the addition of a little cinnamon and just a dash of both cloves and allspice. These spices all add a subtle flavor to the finished muffins that is detectable but hard to place. The muffin base itself is not very sweet, but that's okay, and with the addition of the chocolate chips you don't even notice. All in all, a very nice muffin to enjoy for breakfast, or as a mid afternoon snack.

Peanut Butter Chocolate Chip Banana Muffins
From The Craving Chronicles
Ingredients

  • 1 1/2 cups (8 ounces) flour
  • 1/4 teaspoon salt
  • 1 1/2 teaspoons baking powder
  • 1/2 teaspoon baking soda
  • 1/2 teaspoon cinnamon
  • dash cloves
  • dash allspice
  • 2 very ripe medium bananas
  • 1/4 cup brown sugar
  • 3/4 cup (about 6 ounces) Greek yogurt
  • 2 Tablespoons milk
  • 1 egg
  • 1/2 cup peanut butter
  • 1/2 teaspoons vanilla extract
  • 3/4 cup mini chocolate chips 

Directions
Preheat oven to 375°F. Line a 12-cup muffin tin with papers.

Whisk together flour, salt, baking powder, baking soda, and spices in a small bowl. In a large bowl, mash together bananas and brown sugar with a fork. Add yogurt, milk, egg, peanut butter and vanilla. Whisk to combine (may be lumpy). Add flour and stir until just combined. Don’t over mix! (Batter will be thick.) Fold in chocolate chips.

Scoop batter into prepared muffin cups, filling each cup about 3/4 full. (Scoop any remaining batter into lined mini muffin cups.) Bake at 375°F for 15-18 minutes (10 minutes for minis) or until a toothpick comes out clean.

Cool completely on a wire rack. Store in an airtight container at room temperature.

Chicken Braised with Bacon, Onions and Riesling

Sometimes a nice simple, yet elegant chicken dish just sounds like the perfect thing, this was the case last week Sunday. While searching through my many recipe ideas I stumbled over this lovely looking dish. Chicken, wine and a few vegetables, put them all together in one pot and braise. Half an hour later you have a pot full of tender chicken floating in a flavorful sauce surrounded by tender vegetables. Add a salad and some nice crusty bread to soak up all of that delicious sauce and you have a winner. So simple yet so good!

The only thing I change in this recipe was adding a package of mushrooms. I love mushrooms in just about everything and I thought that adding mushrooms to this dish would be perfect, and I think I was right. It was just the right touch. Other than that I pretty much stuck to the recipe. There was one sad moment at the end of dinner when I realized that the 4 thick and smokey slices of bacon and the fresh thyme I bought especially for this meal were still sitting on the counter in their bowls, I completely forgot to add them in at the end! I was so disappointed, I'm sure they would have just elevated this dish all the way to the very top. But alas, it was not to be this time. I guess I'll just have to try it again sometime.

Browning the chicken

Such a pretty sight

Dig in!

Chicken Braised with Bacon, Onions and Riesling

Adapted from 

Williams Sonoma

Ingredients:

  • 12 red or white boiling onions 
  • 1 chicken, about 4 lb, or 3 chicken quarters
  • 1 1/2 teaspoon kosher salt, plus more, to taste 
  • 1/2 teaspoon freshly ground pepper, plus more, to taste 
  • 4 thick-cut bacon slices 
  • 12 small carrots or 3 or 4 large carrots cut into 1 inch chunks
  • 1/2 a large onion, minced 
  • 10 ounce package of mushrooms, quartered
  • 2 Tablespoons brandy 
  • 2 cups Riesling 
  • 3 Tablespoons unsalted butter, at room temperature 
  • 3 Tablespoons all-purpose flour 
  • 1 1/2 teaspoons chopped fresh thyme 

Directions:

Bring a saucepan of lightly salted water to a boil over high heat. Add the onions and cook until the skins loosen, about 2 minutes. Drain the onions and rinse under cold running water. Slip off and discard the skins.

Cut the chicken into 9 pieces, then season with the 1 1/2 tsp. salt and the 1/2 tsp. pepper.

In a Dutch oven over medium heat, fry the bacon until crisp and browned, about 8 minutes. Transfer the bacon to paper towels to drain, leaving the fat in the pot.

Increase the heat under the pot to medium-high. Working in batches, add the chicken, skin side down, and cook, turning once or twice, until lightly browned on both sides, about 5 minutes per batch. Transfer to a platter.

Add the onions and carrots to the pot and cook, stirring occasionally, until lightly browned, about 3 minutes. Add the shallots and cook, stirring occasionally, until softened, about 1 minute. Add the mushrooms and cook for another minute or two. Carefully add the cognac and reduce the heat to low. Using a long-handled match, light the cognac and let the flame burn for 30 seconds, then cover to extinguish the flame. Uncover, add the Riesling and bring to a boil over high heat. Return the drumsticks, thighs and wings, and then the breasts to the pot. Reduce the heat to medium-low, cover and simmer for 35 minutes.

In a heatproof bowl, mash together the butter and flour to form a thick paste. Gradually whisk about 1 cup of the hot cooking liquid into the flour-butter mixture, then stir this mixture into the pot. Simmer until the chicken shows no sign of pink when pierced with the tip of a sharp knife near the bone, 5 to 10 minutes more. Adjust the seasonings with salt and pepper. Crumble the bacon and sprinkle the bacon and thyme over the chicken.

Transfer the chicken to a warmed deep platter and serve immediately.

Chocolate Espresso Biscotti

Anyone that knows me well knows that I love going out for coffee. Sitting at a warm, cozy coffee shop with a comforting cup of coffee, talking with family members or friends about nothing at all is so relaxing and enjoyable. Most of the time I just stick with my mug of coffee and call it good, but I have to admit, I always want something to go with it. A muffin, a pastry, a chocolate chip cookie, anything at all really. It's so nice to have something sweet to balance out that cup of coffee. Biscotti is another great option that sometimes fits the bill perfectly. Crunchy, slightly sweet and just the right size. It's also fun to make at home, pretty easy to throw together and lasts forever in the cupboard because it is dried out to begin with. This chocolate espresso biscotti is one of my favorites, and it really is the perfect companion to your morning coffee.

 I've made a few different biscotti recipes now, and this one is pretty close to the top. The texture is perfect, it's crunchy, but not so hard that you feel like you are going to crack your teeth on it. I love the slightly bitter espresso flavor that is balanced out by the bittersweet chocolate, it's a perfect combination.

Chocolate Espresso Biscotti

Adapted from 

Sage Recipes

Ingredients

  • 1 tablespoon instant espresso powder
  • 1 cup all-purpose flour
  • 1 cup whole wheat pastry flour
  • 1 1/2 teaspoons baking powder
  • 1 pinch of salt
  • 4 tablespoons unsalted butter, room temperature
  • 1/2 cup sugar
  • 2 eggs
  • 1/2 teaspoon vanilla extract
  • 1/4 cup mini chocolate chips (If using regular size, chop coarsely)

Directions

Preheat the oven to 325ºF and line 1 sheet pan with parchment paper.

In a small bowl, dissolve the instant espresso powder with 1 tablespoon hot water. Set aside.

In a medium bowl, sift together the flours, baking powder, and salt. Set aside.

In an electric mixer fitted with a paddle attachment, cream the butter and sugar until light and fluffy, about 4-5 minutes. Mix in the eggs, one at a time. Mix in the espresso flavoring and vanilla extract. With the mixer on low, add in the flour mixture and mix until just combined. Mix in the chocolate chips  until just incorporated.

Divide the dough into 3 equal portions and form each portion into a log (~1 1/2 inches thick). Do not flatten the logs (the dough will be sticky). Place the logs onto the sheet pan, a few inches apart from each other. Bake until golden brown, about 30 minutes.

Remove from the oven and let cool slightly. Turn the oven down to 275ºF. Transfer logs to a clean cutting board. Using a serrated knife, slice the logs diagonally, 1/2 inch thick. Discard the end pieces (or munch on them like I did). Place the cookies cut side down on the sheet pan and bake for another 45 minutes, until toasted and dry.

Tiramisu

I don't know about you, but when I think of Italian desserts the first thing that pops into my mind is tiramisu. I actually made this tiramisu last summer, and just never had the chance to post it. I decided that this was the week to fix that problem.  Booze soaked lady fingers, coffee, mascarpone, heavy cream and a dusting of cocoa, delicious! I can't say that I'm much of a tiramisu connoisseur, but that doesn't really matter, all I know is that this tiramisu was so yummy! Cream and rich and full of flavor. If you are looking to make an impressive Italian dessert for a crowd, this is sure to fit the bill.

Just to warn you, this recipe makes a huge batch of tiramisu. It is quite rich so you don't really need a lot of it at once, not that I will judge you if you do! You do need to make it ahead of time so that it has time to chill in the fridge for at least 6 hours. This makes it a really easy dessert to serve to guest then, you don't have to do anything except cut it up when you are ready to serve. 

The whole process is quite simple, but it is a little time consuming. There are a lot of steps with making the custard, soaking the lady fingers and then layering everything together but none of it is technically difficult, plus there is a lot of opportunity for snooping! 

This is a fantastic dessert for crowd. If you happen to have some left (I had plenty leftover) I found that it froze quite well. I cut it up and threw it in the freezer. When you want a little snack all you have to do is pull it out. You can eat it straight from the freezer which I found turned it into kind of like an ice cream sandwich, or you can let it warm up a little bit and it will be as good as new! However you like it, enjoy!

Tiramisu

From America's Test Kitchen

Ingredients

  • 2-1/2 cups strong brewed coffee, room temperature
  • 1-1/2 Tablespoons instant espresso granules
  • 9 tablespoons dark rum (I used Kahlua, I didn't have any dark rum)
  • 6 large egg yolks
  • 2/3 cup sugar
  • 1/4 teaspoon table salt
  • 1-1/2 pounds mascarpone
  • 3/4 cup cold heavy cream
  • 14 ounces (42 to 60, depending on size) dried ladyfingers (savoiardi)
  • 3-1/2 Tablespoons cocoa, preferably Dutch-processed
  • 1/4 cup grated semisweet or bittersweet chocolate (optional)

Directions

Stir coffee, espresso, and 5 tablespoons rum in a wide bowl or baking dish until espresso dissolves; set aside.

In bowl of standing mixer fitted with whisk attachment, beat yolks at low speed until just combined. Add sugar and salt and beat at medium-high speed until pale yellow, 1-1/2 to 2 minutes, scraping down bowl with rubber spatula once or twice. Add remaining 4 tablespoons rum and beat at medium speed until just combined, 20 to 30 seconds; scrape bowl. Add mascarpone and beat at medium speed until no lumps remain, 30 to 45 seconds, scraping down bowl once or twice. Transfer mixture to large bowl and set aside.

In now-empty mixer bowl (no need to clean bowl), beat cream at medium speed until frothy, 1 to 1-1/2 minutes. Increase speed to high and continue to beat until cream holds stiff peaks, 1 to 1-1/2 minutes longer. Using rubber spatula, fold one-third of whipped cream into mascarpone mixture to lighten, then gently fold in remaining whipped cream until no white streaks remain. Set mascarpone mixture aside.

Working one at a time, drop half of ladyfingers into coffee mixture, roll, remove and transfer to 13 by 9-inch glass or ceramic baking dish. (Do not submerge ladyfingers in coffee mixture; entire process should take no longer than 2 to 3 seconds for each cookie.) Arrange soaked cookies in single layer in baking dish, breaking or trimming ladyfingers as needed to fit neatly into dish.

Spread half of mascarpone mixture over ladyfingers; use rubber spatula to spread mixture to sides and into corners of dish and smooth surface. Place 2 tablespoons cocoa in fine-mesh strainer and dust cocoa over mascarpone.

Repeat dipping and arrangement of ladyfingers; spread remaining mascarpone mixture over ladyfingers and dust with remaining 1-1/2 tablespoons cocoa. Wipe edges of dish with dry paper towel. Cover with plastic wrap and refrigerate 6 to 24 hours. Sprinkle with grated chocolate, if using; cut into pieces and serve chilled.