Three Cheese Ravioli

Ravioli -- thin sheets of pasta encasing spoonfuls of deliciously creamy, cheesy filling, perfumed with fragrant basil; what's not to love? I've made homemade pasta several times now, but I've always cut it up into thin, flat sheets. It was time to try something a little more involved and attempt a filled pasta. Of course ravioli was the first thing that came to mind, it seems to be the most popular (or at least most common) form of filled pasta. Rolling all the dough by hand took some time, but I was in no hurry, and the finished product was definitely worth it. I thought they looked like little edible pillows, perfect for pulling out of the freezer when I don't have a lot of time for dinner.

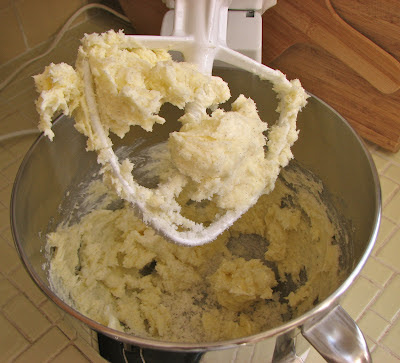
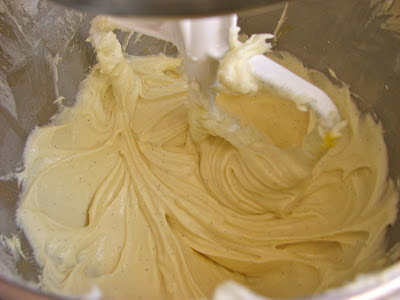
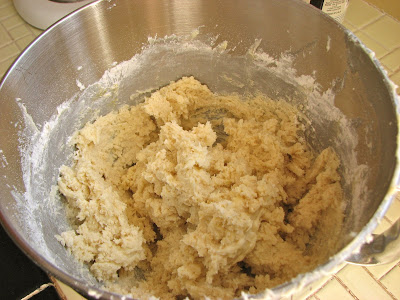
I found a very simple pasta dough recipe online and whipped it together, I don't know how it compares with other pasta dough recipes, all I know is that it seemed to do the job and was quite tasty. For the filling I just made up a cheesy mixture of ricotta, parmesan and mozzarella along with some chopped basil, salt and pepper, and then added an egg to hold it all together a little better. It's hard to go wrong with these ingredients, just eyeball it and taste as you go and it should turn out delicious.

I ended up making a triple batch of the dough and ended up with about 36 ravioli. I ate a few for dinner and then froze the rest of them on floured cookie sheets before bagging them up for later. It has been so great to be able to open up my freezer, pull out a few homemade ravioli, and drop them into boiling water. Heat up some leftover tomato sauce for a few minutes and you've got dinner.

Making homemade ravioli was a fun way to spend an afternoon, and the end result was tasty and convenient. This is a project I will for sure do again when I have a couple of free hours. It's a great accomplishment.

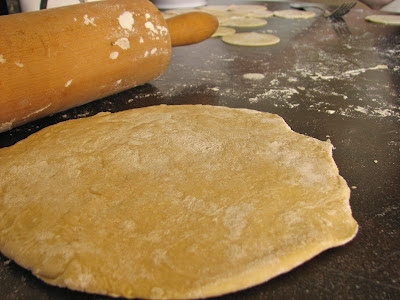
Starting to roll out the dough

Hope you have a lot of muscle

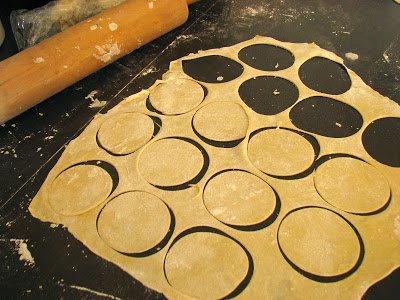
There are many methods for making ravioli,

I did it by cutting out circles with a cookie cutter

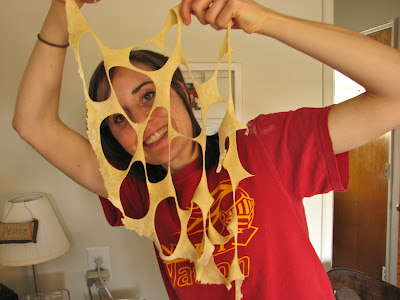
Getting a little silly in the kitchen

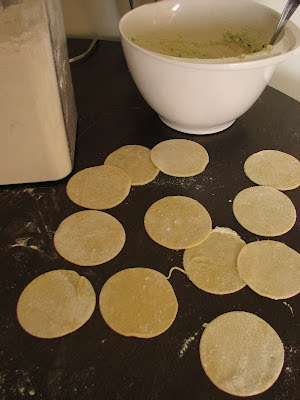
Lots of little circles
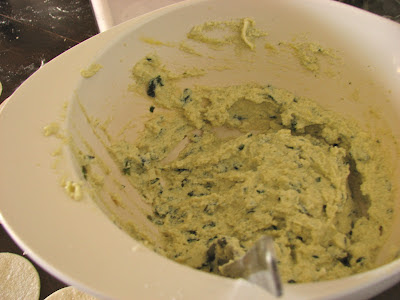
Grab your filling

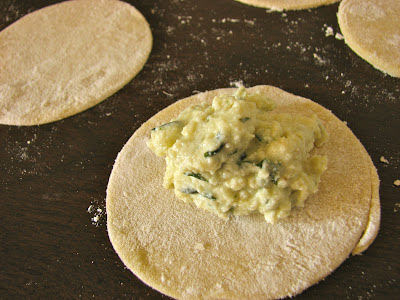
Scoop a small spoonful into the center of a round of dough

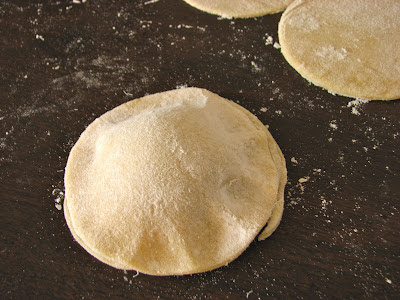
Cover it with a second circle of dough

Use the tines of a fork to seal in the filling

Lay them out in a single layer as you go

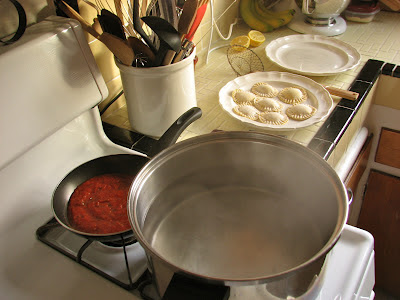
Boil up some water and heat your sauce

Drop the ravioli into the salted water
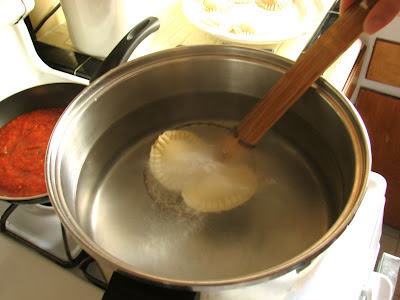
In they go!

Let them cook up in the water for a little bit

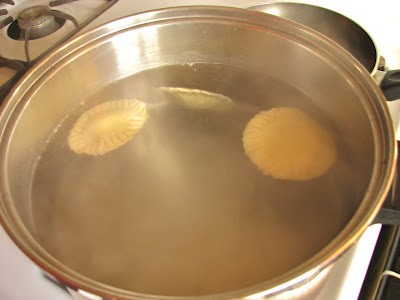
Once they start to float they are done, it only takes a few minutes

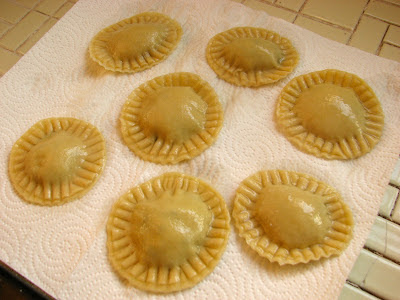
I laid them out on a paper towel for a minute because

I don't like when my ravioli is all watery

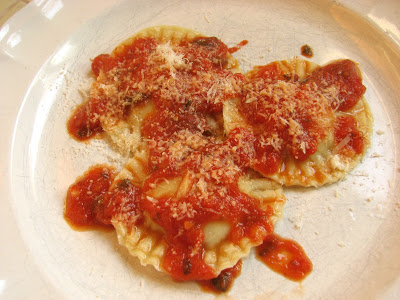
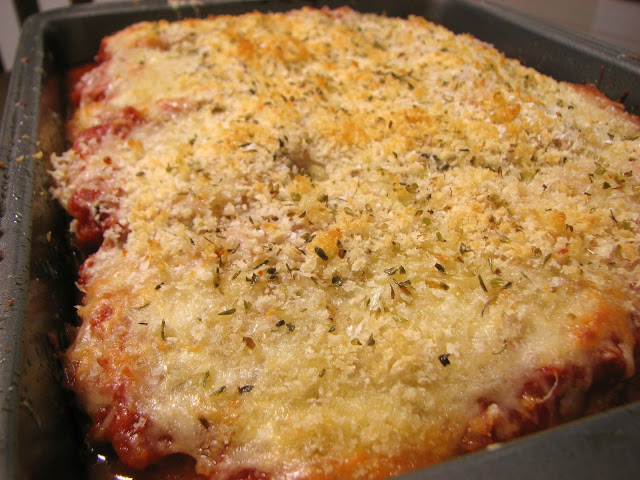
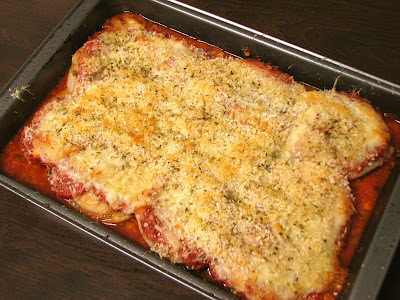
Top with tomato sauce and parmesan cheese
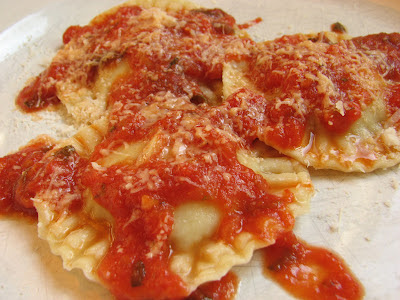
Enjoy!

Basic Pasta Dough
From Allrecipes
Ingredients

  • 1 egg, beaten
  • 1/2 teaspoon salt
  • 1 cup all-purpose flour
  • 2 tablespoons water

Directions
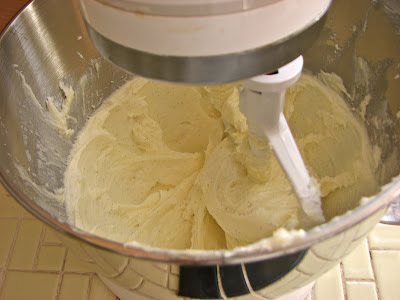
In a medium sized bowl, combine flour and salt. Make a well in the flour, add the slightly beaten egg, and mix. Mixture should form a stiff dough. If needed, stir in 1 to 2 tablespoons water.

On a lightly floured surface, knead dough for about 3 to 4 minutes. With a pasta machine or by hand roll dough out to desired thinness. Use machine or knife to cut into strips of desired width.

Crunchy Granola Bars

Up until a few months ago I was going through box after box of Nature Valley granola bars. They are my favorite, crunchy and sweet, and not fake tasting like so many granola bars out there. Looking at the ingredients list didn't make me feel too bad. Although they are loaded with sugar, they contain mostly natural ingredients which is nice to see. However, it was my goal to make a homemade version that could compete with the crunchy goodness of the store bought kind. Over several months time I tried several granola bar recipes, but none of them would turn out how I wanted them to. They would either fall apart and turn into granola instead of a granola bar, or they were so hard I could hardly cut them, much less take a bite. These attempts were often not the best tasting either. Finally however, I found a recipe that looked promising. It originally came from America's Test Kitchen which made me even more excited. Their recipes almost always turn out great. These granola bars were no exception. They are crunchy and sweet, strong enough to hold up in my lunch box, but not so hard that they break a tooth. They are exactly what I was looking for.

It's a simple recipe that uses ingredients I almost always have on hand. To ensure that these bars are super crunchy, the recipe calls for toasting the oats with oil before forming the bars. I think this is the key step. One of the most difficult parts about making homemade granola bars is cooking them enough so that they get dried out all the way through, but not so long that they start over cooking. Toasting the oats first means that the bars start out dry and crispy, so they don't need to cook as long and start overcooking.

After toasting the oats, all you have to do is pour the liquid ingredients over them, mix it up, and press it in a lined pan. Press down to squish all of the granola together into an even layer, and bake. Nothing to it. I like these bars the best with almonds, but when I made my last batch I was out of almonds, so I just added an extra cup of oats and they turned out just fine. So if you don't have any nuts around, or don't like nuts, just leave them out!

Another key step to making the perfect granola bars is cutting them while they are still warm from the oven, before they harden up and become impossible to cut nicely. I have found that letting the pan rest for 10 minutes works best for me. After these 10 minutes I grab my trusty pastry scraper and cut up the bars (I like cutting the pan into 45 bars, 9X5). Then just let them cool the rest of the way and you have the perfect granola bar.

To be honest, while these bars are delicious, they do not taste like the Nature Valley crunchy granola bars. I still love my Oats and Honey granola bars, but they will definitely just be for emergencies from now on!

Grab your oats

Add the oil and salt and mix to combine

Toast them on a cookie sheet until golden brown

Meanwhile, grab some honey

and combine it with the brown sugar

Cook over medium heat until sugar dissolves

Add the cinnamon (if using) and the vanilla

Pour the liquid mixture over the oats, if using nuts add them here as well

Spread the granola on a greased, foil lined sheet pan and use a spatula to press into a tight, even layer

Bake!

Let the granola cool for about 10 minutes and then cut them up into bars (don't wait any longer than 15 minutes to cut or it will be too hard)

Once cut, let them cool the rest of the way

Break up the bars

Enjoy as many ways as possible!

Crunchy Granola Bars
Adapted from Bakerlady, originally from America's Test Kitchen
Ingredients

  • 7 cups old-fashioned rolled oats
  • 1/2 cup vegetable oil
  • 1 teaspoon salt
  • 1 1/2 cups whole almonds, pecans, walnuts or peanuts 
  • 3/4 cup honey
  • 3/4 cup packed brown sugar
  • 1 Tablespoon vanilla extract
  • 2 teaspoons ground cinnamon (optional)

Directions
Adjust oven rack to the middle of the oven and set the temperature to 375 degrees.

Line an 18 x 13 inch rimmed baking pan with aluminum foil.

Combine the oats, oil and salt in a large bowl and mix until the oats are evenly coated. Transfer the mixture to the baking sheet and spread into an even layer. Bake, stirring every 10 minutes, until pale gold, 20-25 minutes. Remove the oats and lower the oven temp to 300 degrees.

Place the nuts in a food processor and process until coarsely chopped. Or just chop coarsely with a big sharp knife.

Combine the honey and brown sugar in a saucepan and cook over medium heat for about 5 minutes, stirring constantly, to dissolve the sugar. Remove from heat and stir in the vanilla and cinnamon (if using).

Combine the oats, nuts, and honey mixture in a large bowl and stir with a large rubber spatula until the oats are thoroughly coated with the honey mixture. Spray the baking sheet (still with foil sling) with non-stick spray then transfer the granola mixture to the prepared baking sheet and spread in an even layer. Spray a large metal spatula or a square dish with non-stick spray and firmly press the mixture into the pan. Make a flat, tight, and even layer. Bake until golden, about 35-40 minutes.

Cool in the baking sheet, on a wire rack, for 10-15 minutes before cutting into bars, I used a pastry scraper to cut.  Cut the bars all the way through and then allow the granola bars to completely cool. Do not wait longer than 15 minutes before cutting the bars. They harden up significantly as they cool. Any longer and you’ll have a very hard time cutting thru them.

The bars can be stored, covered for up to 2 weeks.

Lemon Poppy Seed Muffins

Growing up, my mom would often come home from the grocery store with a package of a dozen mini poppyseed muffins. They would go on the table along with whatever we were eating that night, and I would always eat two or three. I don't know why these particular muffins popped up every once in a while, all I know is that I sure enjoyed it when they did. It's been a while now since I had one of these muffins, they no longer make a regular appearance at our table, but I still have all the great memories. Because of these memories I've been eyeing this recipe for quite some time, but I never got around to making it. Every time I looked in the cookbook I would think about those grocery store muffins and wonder how these would compare. Well, I don't have to wonder anymore, a few weeks ago I got my answer.


I had an opened package of sour cream in my fridge that had to be used before it went bad and I had an urge to make some muffins. What else was I to do but to go to the store for a bag of lemons and get started on this long awaited recipe? To be honest, I didn't want to make the entire recipe, it looked huge and I didn't need that many muffins, but since the recipe had 5 eggs which can be difficult to halve, and I wanted to be sure they turned out perfectly, I decided to just do it and make the entire thing.

I was right, the recipe was huge. My mixing bowl was almost full with batter, and I think I ended up making 24 good size muffins. It was a fun recipe to make, the batter was so light, fluffy and lemony, the pale lemon of the batter a perfect contrast to the small black poppy seeds. While baking, they perfumed the entire kitchen with a divine sugary, lemony fragrance. Once out of the oven I got to brush the tops of each muffin with a sticky, lemon glaze to keep them moist and light. So the verdict? I thought they were fresh and delicious, and a wonderfully reminiscent of my old grocery store mini muffins, only better. I will be making them again for sure, but I'll probably try to halve the recipe to make the final muffin count a little more manageable.

 Most of the major players, ready to go

 Start with the butter and sugar

 Cream them together until really light and fluffy

 Then add in the eggs, one at a time

 Beat until well combined

 Mix together lemon zest and poppy seeds

 Add in the lemon juice

 Mix it into the butter mixture

 Then alternate adding the flour and sour cream, 
making sure not to overmix, otherwise they won't be 
as light and fluffy as they should be

 All mixed; that's what I call a bowl of batter!

 Fill up those muffin tins and bake

 Brush with the lemon glaze and let cool slightly, 
these muffins are best eaten warm or within 8 hours of baking

A beautiful fine crumb, lovely at a late breakfast

Lemon Poppy Seed Muffins
Adapted from Amy's Bread
Ingredients

Muffins

  • 1 cup (2 sticks) butter
  • 1 1/2 cups (330 grams) sugar
  • 5 eggs
  • 1/3 cup poppy seeds
  • 2 tablespoons lemon zest
  • 2 tablespoons lemon juice
  • 1 tablespoon vanilla 
  • 3 1/4 cup (460 grams) flour
  • 3/4 teaspoon baking soda
  • 3/4 teaspoon baking powder
  • 3/4 teaspoon kosher salt
  • 1 cup (235 grams) sour cream

Topping

  • 1/4 cup lemon juice
  • 1/4 cup sugar

Directions
Line muffin cups with liners and preheat oven to 350 degrees. Cream together the butter and sugar until light and fluffy, about 3 minutes. Gradually add the eggs and mix until fully combined. In a small bowl, combine the poppy seeds, lemon zest, lemon juice and vanilla. Add to the butter mixture and mix until well combined.

In a separate bowl, whisk together the flour, baking soda, baking powder and salt. Add half of the flour mixture to the butter mixture and mix slowly until almost combined. Then add all of the sour cream and mix until almost combined. Finish by mixing in the rest of the dry ingredients until barely moistened. Be very careful not to over mix the batter.

Scoop the batter into the prepared muffin cups. Bake for 15-17 minutes, rotating halfway through baking time or until a toothpick inserted in the center of a muffin comes out clean. Be very careful not to over bake the muffins or they will seem dry even though they are full of rich ingredients.

While the muffins are baking, combine the lemon juice and sugar in a small bowl to make a glaze. As soon as the muffins are removed from the oven, brush the glaze generously over each one to moisten. Allow the muffins to cool for 10 minutes in the pan and then move to a wire rack to finish cooling. 

Cream Cheese Macaroni and Cheese

Cheese is one of my favorite things, any kind, it doesn't matter. Macaroni and cheese is therefore a no brainer for me. Pasta and cheese has got to be one of the best combinations ever. I've been wanting to make homemade macaroni and cheese for some time now, but I would just never get around to it. Either I didn't have the cheese, or the right noodles, or I wanted to eat something lighter for dinner, etc., I always seemed to have an excuse. A few weeks ago though I put my foot down and told myself I was just going to do it. I think the hardest part is picking a recipe. There are a million out there to choose from and they all sound delicious, how is one to choose? In the end I picked this recipe because I happened to have a block of cream cheese in the back of my fridge that I didn't know what to do with, and since I think cream cheese makes just about everything better I knew this had to be good. I was beyond right.

This mac and cheese turned out super cheesy and gooey and absolutely delicious. I chose three cheeses at random to go with the cream cheese and I think I picked the winning combination, it was so delicious. First I went with cheddar because I always have it in the fridge, and it just seems like the right thing to put in mac and cheese. Next I went with fontina because I love it, it is so creamy and flavorful, and it melts wonderfully. Finally I wanted something with a more unique flavor so I decided that something smoked sounded good. I ended up buying smoked mozzarella which I think was perfect. It added a hint of smokiness to the final dish without overpowering it. The smoky undertones from the mozzarella, the sharp bite of the cheddar and the creamy finish of the fontina made this a meal to remember for a long time.

The original recipe did not have a crunchy topping with it, but I love crunchy, cheesy breadcrumbs on top of my baked mac and cheese so I threw together my own version of a breadcrumb topping. It turned out quite delicious if I do say so myself. The butter, cheesy breadcrumbs are the perfect balance to the rich creamy pasta, don't skip it. Trust me, you won't be disappointed.

I actually halved the recipe as written and made it in a 9-inch square pan, but it would be just as easy to make the full batch and throw it into a 9x13. Even though I only made half I did have enough cheese for a second go at this dish. I just stuck it in the freezer, waiting for the perfect time to try again. Guess what I'm having for dinner this weekend?!

The star of the recipe, the cheese

Grate it up

Make sure you have some noodles, I like shells

Toast up your breadcrumbs

Add cheese and spices to make

a the delicious topping

Boil up the noodles, but don't cook them all the way

through, they'll finished cooking in the oven

Then you can start making the sauce,

start by melting the butter

Add in the flour

Stir it around and let it cook for a few minutes to 

cook away the raw flour taste

Then add in the milk and cream cheese, dijon, salt and pepper

Stir it all around until the cream cheese melts and the

sauce gets nice and thick and creamy, yum!

Throw in the partially cooked noodles

And the cheese of course!

Mix it all up until everything is covered in 

the gooey cheese sauce

Pour it into a greased pan

Admire all the cheesy goodness

Then cover with crunchy topping

And bake!

Dish it up next to something healthy, 

to make yourself feel better :)

Dig in!

Cream Cheese Macaroni and Cheese
Adapted from Tasty Kitchen
Ingredients

  • 1 pound Macaroni Noodles
  • 6 tablespoons butter
  • 3 tablespoons flour
  • 2 cups milk
  • 8 ounces cream cheese
  • ½ teaspoons Salt
  • ½ teaspoons Black Pepper
  • 2 teaspoons Dijon Mustard (heaping)
  • 3/4 cup Sharp Cheddar Cheese
  • 3/4 cup Fontina
  • 3/4 cup Smoked Mozzarella

Topping

  • 1/2 cup breadcrumbs
  • 4 tablespoons parmesan cheese
  • 1/2 teaspoon Italian seasoning
  • 1/2 teaspoon salt
  • 1/4 teaspoon pepper
  • 2 tablespoons each of the three cheeses used in the mac and cheese

Directions
Preheat oven to 400 degrees. Start by making the topping. Place the breadcrumbs in an even layer on a baking sheet and toast for about 5 minutes or until golden brown. Remove from oven and let cool a few minutes. When cool, add the remaining ingredients and set aside. 

Bring a large pot of salted water to a boil. Add noodles and cook until al dente; drain.

In a saucepan melt butter and stir in flour. Cook for about 1 minute, until smooth and bubbly; stirring occasionally. Mix in milk, cream cheese, salt, pepper, and Dijon mustard. Continue cooking until sauce is thickened. Add cooked macaroni and the 3/4 cups of each cheese.

Pour into a 2-quart casserole dish and sprinkle the topping mixture on top. Bake for 15 to 20 minutes until heated through and topping is brown and crunchy. Remove from oven and let cool a few minutes before digging in.

Mocha Banana Chocolate Chip Muffins

My recipe binder is continually expanding, filling up with all the yummy new recipes I try. Every once in a  while I attempt to clean it out, but I liked almost everything in it and I want to want to keep all the recipes. They all bring back memories, almost all of them good. It's rare that I make something that I don't like. These muffins have been in my recipe binder for a couple of years now. I remember the first time I made them I really liked them, but I don't remember much else. So when I finally had some ripe bananas I decided it was time to try these again, and I'm glad I did!

These mocha muffins are full of chocolate chips and bananas and are very tender and buttery with a nice crispy top. Both the coffee flavor and the banana flavor are nice but quite mild. I might increase the amount of espresso powder I add next time if I'm feeling like a little more mocha flavor. I love their darker, golden brown color due to the espresso powder. The moment they came out of the oven I wanted to devour them all. If you have a few extra ripe bananas lying around and want to try something new, I would definitely recommend this recipe. A wonderful muffin to accompany a morning cup of coffee.

Start with the butter

Then the sugar

Egg next

Finally the banana and espresso powder

And don't forget the vanilla

Mix it all up

(I didn't quite follow the recipe, next time I'll 

remember to cream the butter and sugar first)

Add the flour mixture

Nicely mixed together

Time for the chocolate

Into the muffin pans

Top with a few extra chocolate chips

Bake them up until golden brown

Breakfast anyone?

Mocha Banana Muffins
From allrecipes.com
Ingredients

  • 1 cup butter
  • 1 1/4 cups sugar
  • 1 egg
  • 3 ripe bananas
  • 1 tablespoon instant espresso (or 1 tablespoon instant coffee granules dissolved in 1 tablespoon water)
  • 1 teaspoon vanilla extract
  • 2 1/4 cups all-purpose flour
  • 1/4 teaspoon salt
  • 1 teaspoon baking powder
  • 1 teaspoon baking soda
  • 1 cup semisweet chocolate chips

Directions
In a medium bowl, mix together the flour, salt, baking powder and baking soda, set aside. In the bowl of a stand mixer beat together the butter and sugar together until light and fluffy, about 2 minutes. Add the egg, banana, instant espresso and vanilla and beat until combined. 

Add the flour mixture, mixing until almost combined. Add the chocolate chips and mix a few times by hand, just until incorporated. Spoon the mixture into lined muffin cups. Bake for 25 minutes at 350 degrees. Cool on wire racks.

Gooey Cream Cheese Butter Cookies

When I heard these cookies described as being somewhat like baked cream cheese frosting I was sold. A cookie dough lover's cookie at its finest? Yes please, now please. Since I also happened to have a block of cream cheese sitting in the back of my fridge, just begging me to do something with it, I knew it was meant to be. It's funny how there are some recipes you come across that you just cannot pass up. They must be made and they must be made soon, today if possible. This was one of those recipes.

These cookies lived up to their name and description. They were pillows of buttery, cream cheesy goodness, super soft and full of vanilla goodness. They were as light as air, almost seeming under baked in the center, reminiscent of cream cheese frosting. The cream cheese flavor really came through, so if you aren't a big fan these probably aren't for you, but since that isn't a problem for me I thought they were fantastic. I like pretty much everything under baked; cookies, cinnamon rolls, brownies, hey, I even like my steak as rare as possible, so this recipe was perfect for me, it's meant to at least seem like it is under baked.

The recipe was a simple one, all you need are the basics along with cream cheese. It calls for a vanilla bean but if you don't have one I'm sure they will still turn out amazing. The next time I make these I think I will try the addition of some mini chocolate chips, chocolate makes everything better, right?

Butter, sugar, cream cheese and vanilla bean

Beat until nice and fluffy

Add the egg

Mmm...creamy

After adding the flour mixture

Shaped, covered in powdered sugar and ready to bake

The finished product

Try to let them cool at least a little before eating, if you can handle it that is

Gooey Cream Cheese Butter Cookies
From  See You In The Morning
Ingredients

  • 2 1/4 cups flour
  • 2 teaspoon baking powder
  • 3/4 teaspoon salt
  • 1 8-ounce package cream cheese, softened
  • 1 stick butter
  • 1/4 - 1/2 vanilla bean, seeds scraped (optional but wonderful!)
  • 1 1/4 cups sugar
  • 1 egg
  • 1/2 teaspoon vanilla extract
  • powdered sugar for rolling and dusting

Directions
Stir together the flour, baking powder, and salt, set aside. In the bowl of an electric mixer fitted with the paddle attachment, cream the cream cheese, butter, vanilla bean seeds, and sugar together until fluffy. Add the eggs and vanilla extract, beating until combined. Add in the flour mixture, stirring until just combined. Chill the dough for at least 30 minutes.

Preheat the oven to 325. Shape the dough into roughly 1 ounce balls and toss in the confectioner's sugar, rolling around to coat. Place on a baking sheet lined with parchment paper, and bake until they spread and puff slightly, about 12-16 minutes. They will be really soft in the center. If they start to brown, they've gone too far. Cool to room temperature.

*refrigerate and serve cookies cold out of the refrigerator...these cookies are said to taste much better cold than warm.

Stewed Lentils and Tomatoes

Over the past few months I've become a big fan of lentils. Until recently I had never tried a lentil, but now I've had them in several dishes and really like them a lot. They don't have a lot of flavor, so you can add them to a lot of different things and they don't change the taste of the dish much. I first bought them because I was looking for a cheap and easy to store protein source. Lentils are a high-fiber, protein-rich legume that cook quickly without any need for presoaking or anything like that. There are a lot of different kinds of lentils, but so far I've only used green lentils, they stay firm and don't get mushy when you cook them. As I've used them they have really grown on me and now I like them a lot. If you've never tried them before, go out and pick up a bag, you really have no reason not to.

This is one of the lentil recipes I've tried recently. It was very simple, hearty and extremely healthy. Basically it is just vegetables, lentils and spices, that's it. Throw it all together in a pot and let it cook for 40 minutes, dinner is served. This recipe uses carrots, onions and tomatoes, but you could really do whatever you wanted and whatever you like best, it is really versatile. In the end it turns into a really thick stew. If you wanted you could add more liquid and make it into more of a soup, either way would work I think. Slice up some nice crusty bread for dipping and you have a delicious and healthy meal, perfect for a cold, blustery night.

Chop just a few veggies

Throw them into the pot

Grab the rest of the ingredients

Once the veggies soften, add the tomatoes...

...lentils...

...and spices

Stir it all together, cover and cook

40 minutes later

A nice, hearty bowl

Stewed Lentils and Tomatoes
From Smitten Kitchen, originally from Barefoot Contessa at Home
Ingredients

  • 2 teaspoons good olive oil
  • 2 cups large-diced yellow onions (2 onions)
  • 2 cups large-diced carrots (3 to 4 carrots)
  • 1 tablespoon minced garlic (3 cloves)
  • 1 (28-ounce) can whole plum tomatoes
  • 1 cup French green lentils (7 ounces)
  • 2 cups vegetable or chicken broth
  • 2 teaspoons mild curry powder
  • 2 teaspoons chopped fresh thyme leaves
  • 2 teaspoons kosher salt
  • 1/4 teaspoon freshly ground black pepper
  • 1 tablespoon red wine vinegar

Directions
Heat the oil in a large saucepan. Add the onions and the carrots and cook over medium-low heat for 8 to 10 minutes, until the onions start to brown. Stir occasionally with a wooden spoon. Add the garlic and cook for one minute more.

Meanwhile,  coarsely chop the tomatoes, either in a food processor or use a pair of kitchen scissors to cut them into piece right in the can. Rinse and pick over the lentils to make sure there are no stones in the package.

Add the tomatoes, lentils, broth, curry powder, thyme, salt and pepper to the pan. Raise the heat to bring to a boil, then lower the heat and simmer covered for about 40 minutes, until the lentils are tender. Check occasionally to be sure the liquid is still simmering. Remove from the heat and allow the lentils to sit covered for another 10 minutes. Add the vinegar, season to taste and serve hot.

Vegetable Parmesan

First of all, I have to say a big thank you to my cousin Anna for giving my blog a new look! I knew I wanted something new and fun, but to be honest I didn't really know what else. So with very little direction Anna came up with a new, fantastic header! I think she did a wonderful job. I know I never could have done it on my own, so thanks Anna! Now on to this yummy cheesy vegetable dish.

This recipe comes from the cookbook Giada at Home by Giada De Laurentiis, a really fun cookbook. In it she says that this dish is the biggest hit of any recipe she's made for her TV show, everyone just loves it. Since I have yet to make a Giada recipe I don't like, I knew it was bound to be good. It is a very simple recipe, but it does take some time to assemble all of the components. All you need are vegetables, marinara, cheese and breadcrumbs, that's basically it. Layer it all up like a lasagna and stick it in the oven. The smell emanating from the oven while this dish cooking was fantastic, a mix of peppers, cheese, toasting bread and tomato sauce. It was like I apparated to Italy!

I started out by whipping together a quick and simple marinara sauce, but canned is good too if you don't have the time (or desire) to make your own. While that cooked I cut and prepped the vegetables for grilling.  The slightly smoky flavor that comes from grilling was really yummy, but if you don't have a grill pan I'm sure you could roast the veggies in the oven instead. After that it was just a matter of layering all the ingredients.

Since I already had onions, and didn't feel like going out to buy fennel, that's what I used and it turned out really nice. I would probably cut the onion a little thinner next time to make sure it cooked through, but it wasn't a big deal. The peppers added really nice flavor, while the eggplant contributed a great contrasting texture. I think summer squash would work really well too. You can use whatever veggies you have on hand at the moment, or just use your favorite. Whatever you choose, it's bound to be delicious!

 The eggplant was so pretty I had to take a picture

 All the vegetables cut up and ready for grilling

 After the grilling, they got some nice grill marks

 Start the layering, first sauce and then eggplant

 Some cheese is next

 Then the peppers

 More sauce

 Cheese and then onions

 The rest of the sauce

 And finally the rest of the cheese

Cover in bread crumbs, drizzle with olive oil, and bake

Crusty and golden, your house will smell like an Italian restaurant, I promise

Vegetable Parmesan
From Giada at Home
Ingredients

  • Butter, for greasing 
  • Olive oil, for drizzling 
  • Kosher salt and freshly ground black pepper 
  • 1 medium eggplant, cut into 1/4 to 1/2-inch thick slices 
  • 2 medium fennel bulbs, trimmed and sliced into 1/4-inch thick pieces ( I used onions instead) 
  • 1 red bell pepper, cut into thirds 
  • 1 yellow bell pepper, cut into thirds 
  • 1 orange bell pepper, cut into thirds 
  • 1 (26-ounce) jar marinara sauce 
  • 3 cups shredded mozzarella cheese 
  • 1 cup grated Parmesan 
  • 1 cup plain bread crumbs 

Directions
Put a grill pan over medium-high heat or preheat a gas or charcoal grill. Put an oven rack in the center of the oven. Preheat the oven to 375 degrees F. Butter a 13 by 9-inch glass baking dish.

Drizzle the eggplant slices, fennel slices and peppers with olive oil. Season with salt and pepper. Grill the vegetables for 3 to 4 minutes each side until softened.

Spoon 3/4 cup of the marinara sauce over the bottom of the prepared baking dish. Arrange the eggplant slices on top. Sprinkle with 1 cup of mozzarella cheese and 1/3 cup Parmesan cheese. Arrange the peppers in a single layer on top. Spoon 3/4 cup of marinara sauce over the peppers. Sprinkle with 1 cup of mozzarella cheese and 1/3 cup Parmesan cheese. Arrange the fennel on top and cover with the remaining sauce. Sprinkle with the remaining cheese. Scatter the bread crumbs over the cheese and drizzle liberally with oil. Bake until the top is golden and forms a crust, about 30 to 35 minutes

Remove from the oven and cool for 10 minutes before serving.

Note: The vegetables can also be baked in a 375 degrees F oven for 15 to 20 minutes until softened.