Pistachio and Lavender Olive Oil Biscotti

Coffee time and biscotti is one of my favorite combinations. I'm a huge biscotti fan as you could maybe tell if you've looked around this blog at all. These crunchy little sweet treats are perfect for dipping into a hot cup of coffee. It had been a while since I'd made biscotti, so last week I decided it was past time. I have a favorite biscotti recipe that I've made several times in the past, but I decided to try something different. While most biscotti are made with butter, this time I wanted to experiment with an olive oil biscotti instead. I did a little Googling and found a recipe that looked promising and went for it. The verdict - delicious! This recipe delivered a tender and crisp cookie, light and airy , not hard and crunchy at all. They almost had the lightness that fried food often has, which makes sense as they are full of olive oil!

I always like to put some add-ins in my biscotti. Since I've been on a lavender kick lately I decided to throw in a little lavender, fitting for the spring season, and also some yummy pistachios. I would have like more pistachios, but had to work with what I had. It was a delicious combination and made a delicious cookie! The flavor of the olive oil definitely comes through which I really enjoyed. If you're not sure how you will like this I'd recommend starting with a lighter, fruitier olive oil.

I will definitely be making these again. I'm even interested in maybe trying this recipe out as a savory biscotti, something that might be good for a cheese board, or charcuterie board. A twist on the typical cracker/bread/crostini. Definitely a fun future project!


Pistachio and Lavender Olive Oil Biscotti
Adapted from Ciao Chow Linda
Ingredients

  • 1 1/4 cups (150 grams) all purpose flour
  • 1/2 teaspoon baking powder
  • 1/4 teaspoon salt
  • 1 egg
  • 1/2 cup (100 grams) granulated sugar
  • 1/4 cup (2 ounces) olive oil
  • 1/4 cup pistachios
  • 1/2 teaspoon dried lavender

Directions
Preheat oven to 350 degrees. In a mixing bowl, combine flour, baking power and salt. Set aside. 

In another mixing bowl, place the egg, sugar, olive oil, and lavender, and mix for one minute until well blended. Add the flour mixture and pistachios and mix until all the ingredients are well blended.

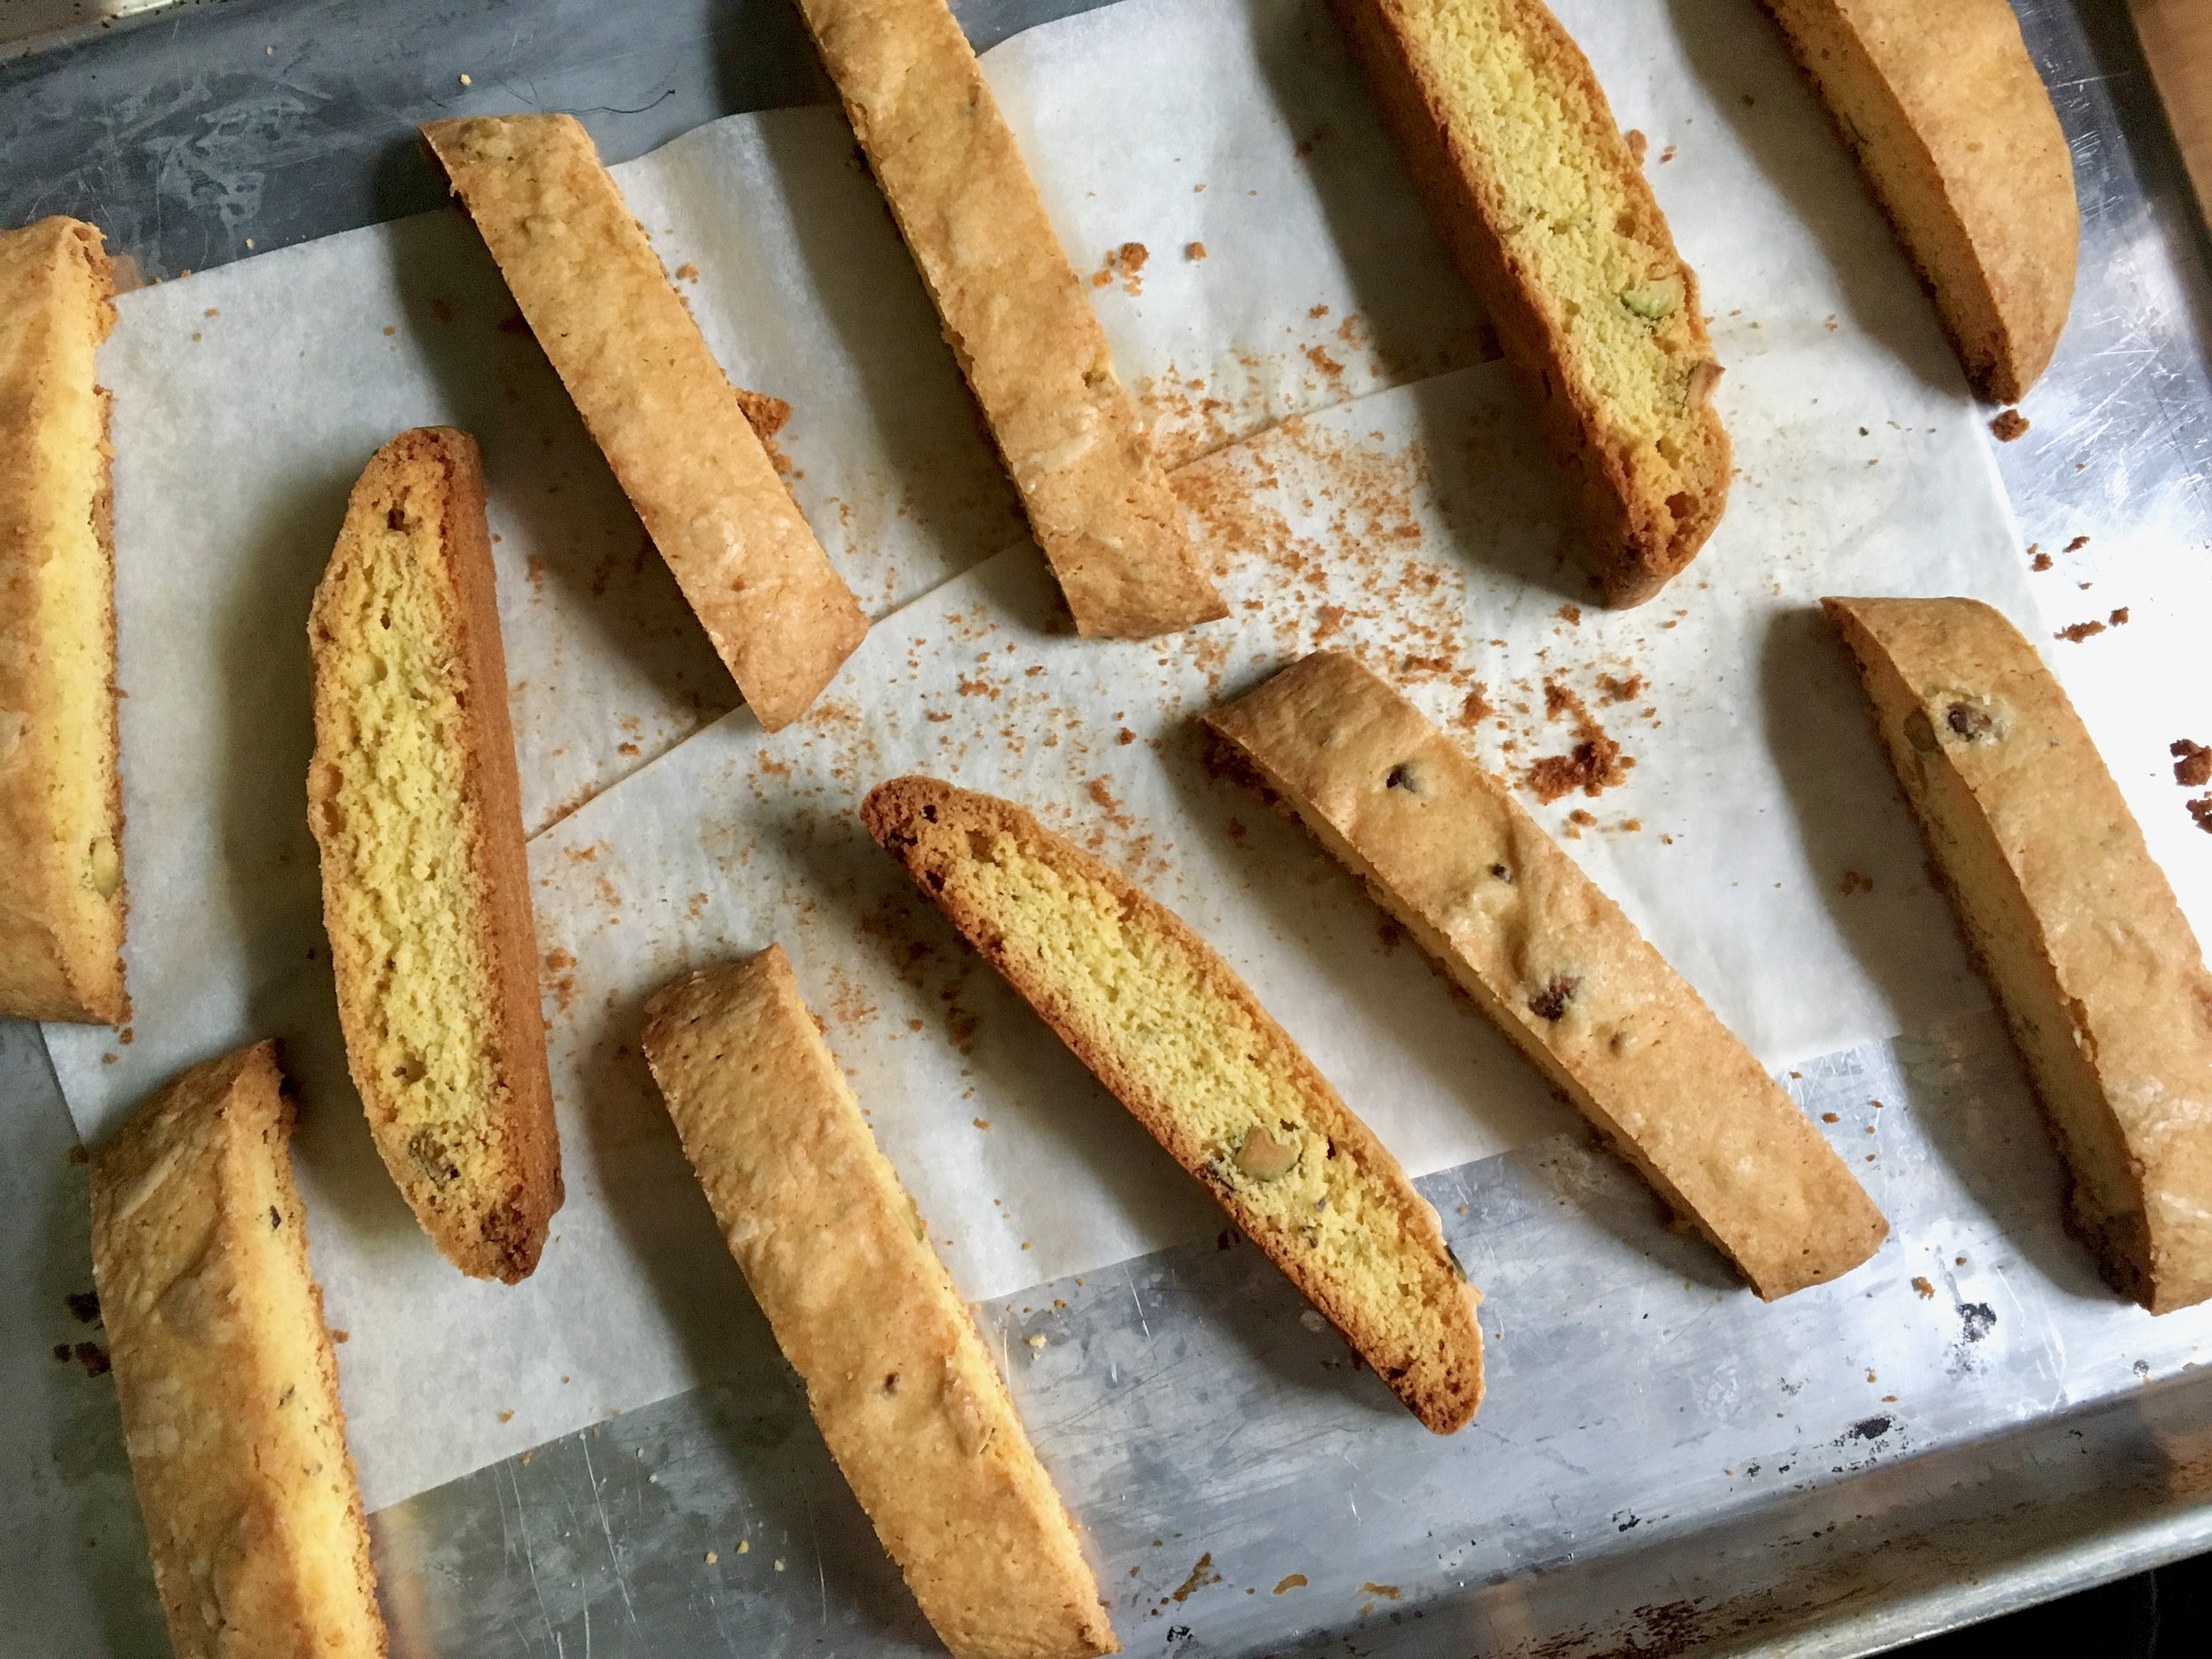
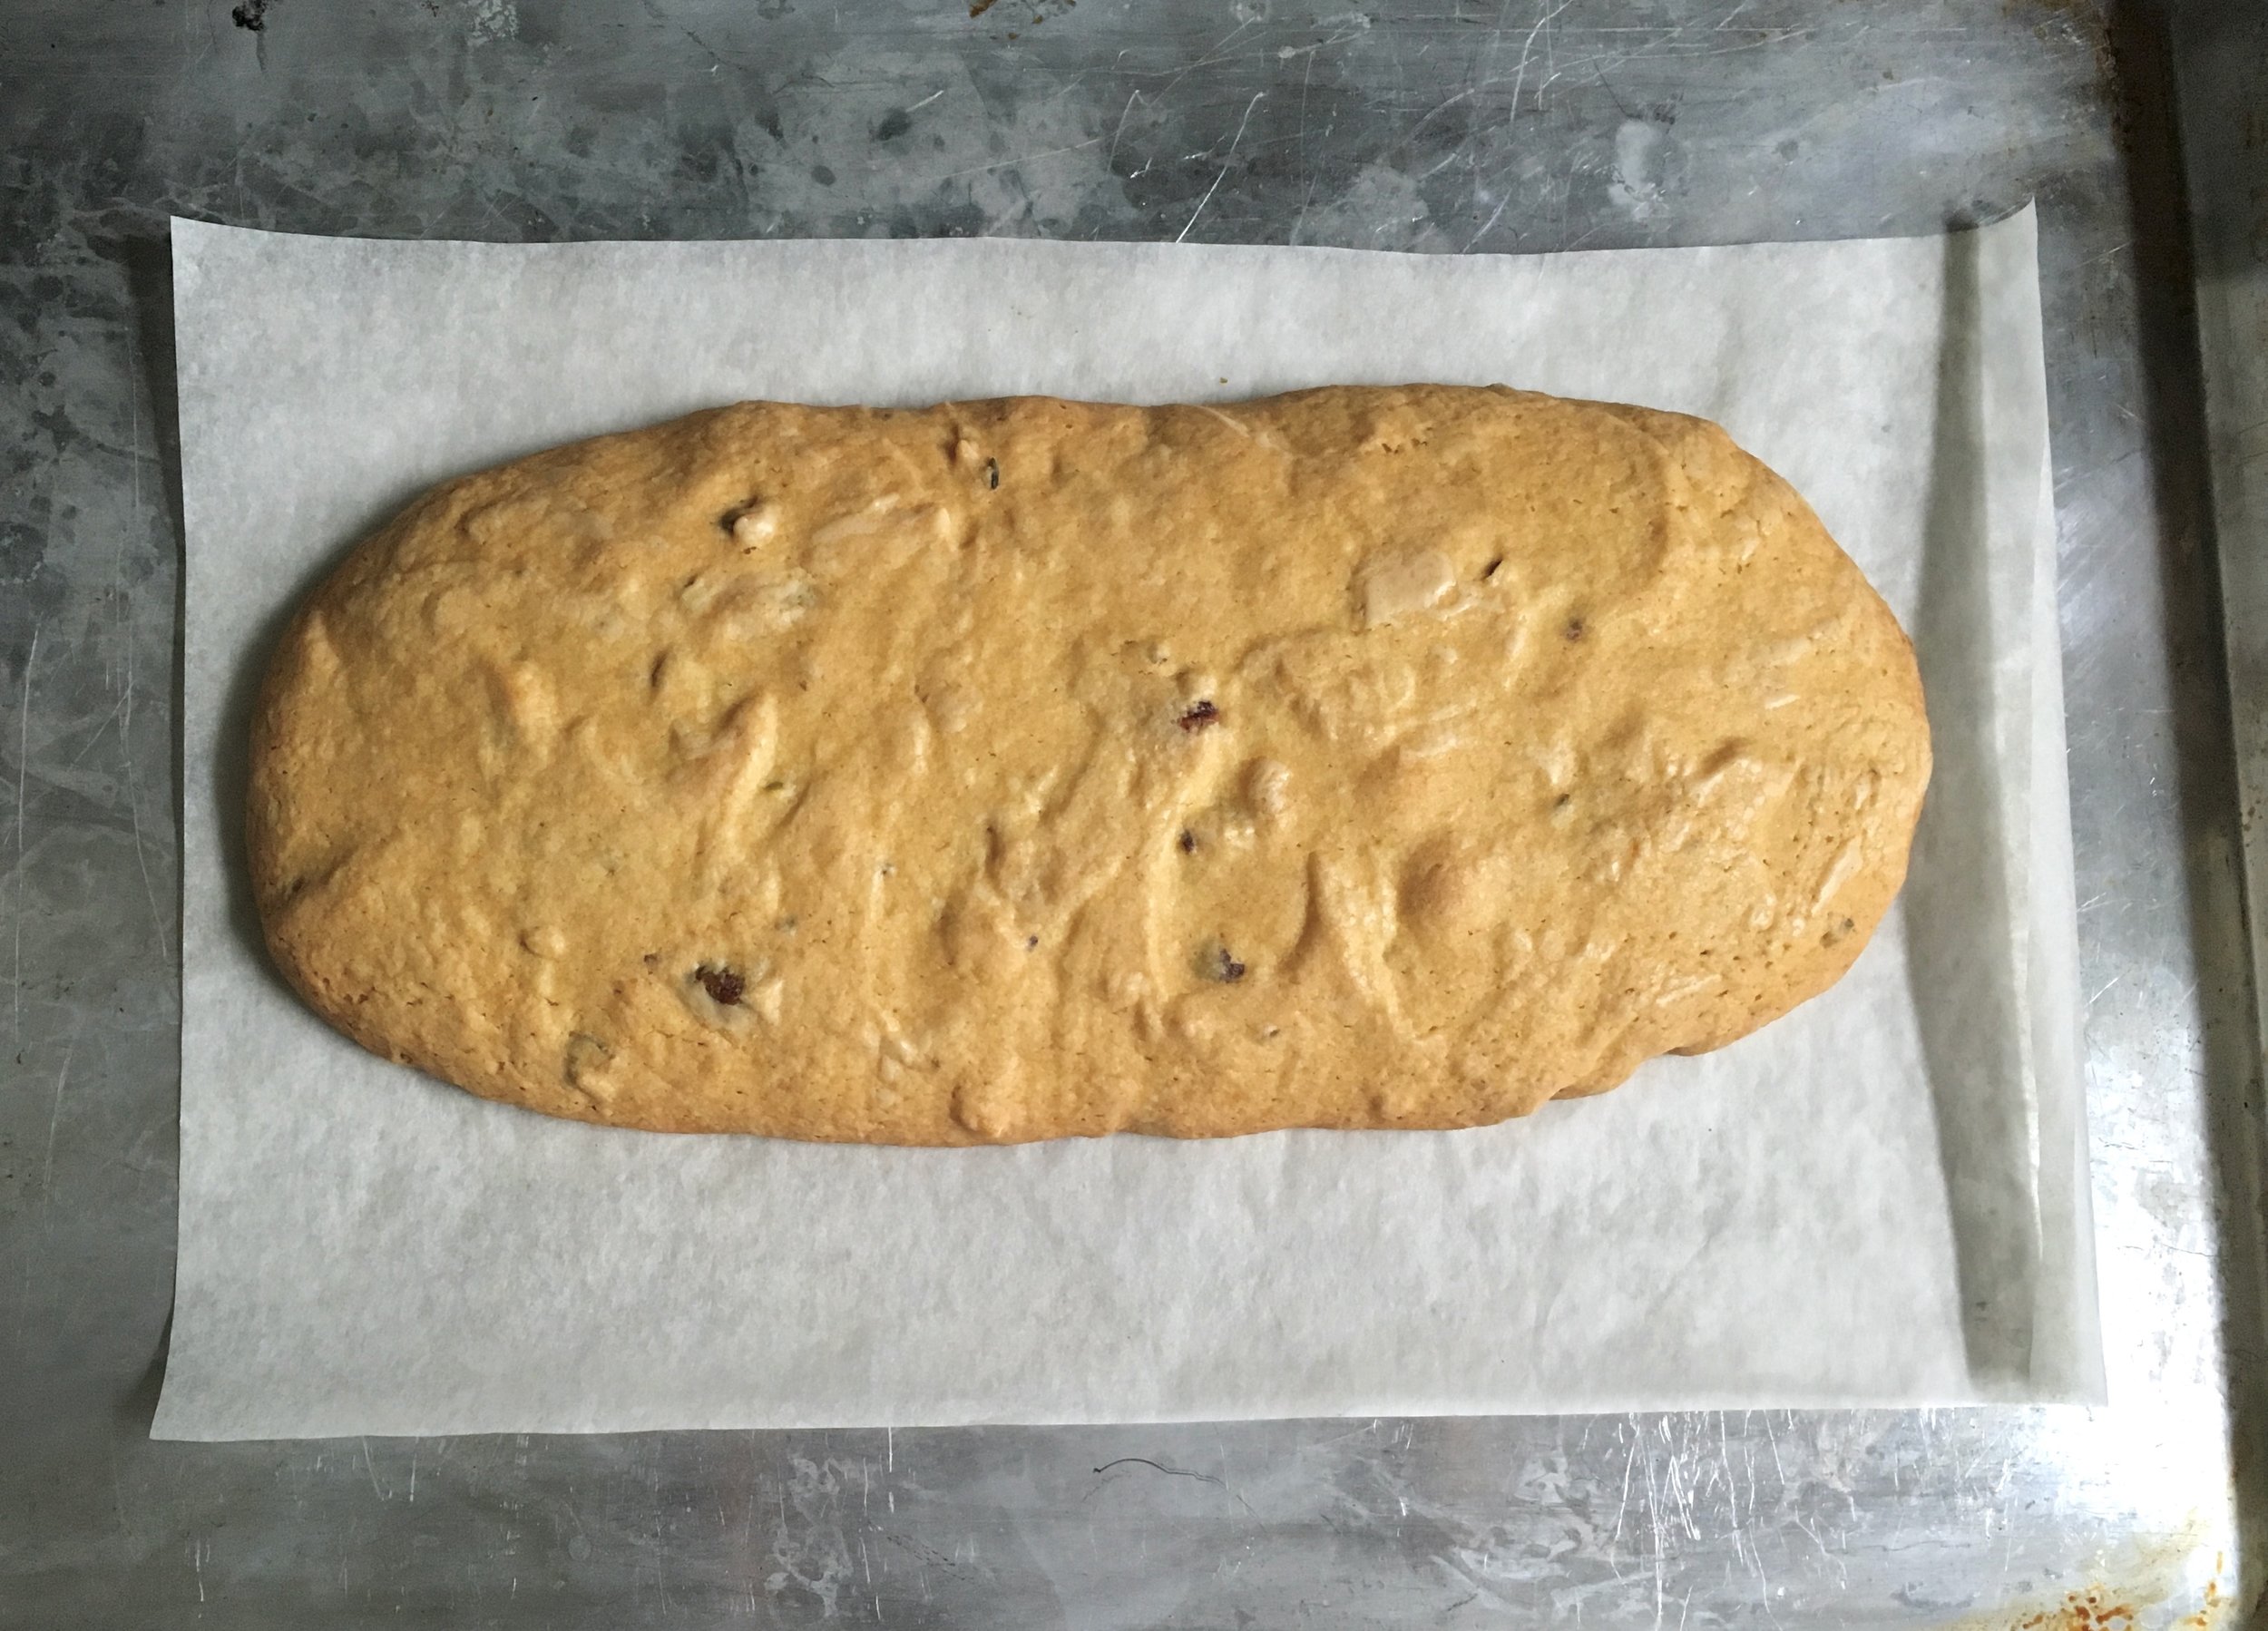
Shape the dough into a long rectangle on a parchment-lined baking sheet. The dough may be a little wet but do your best shape it into a smooth log. Place in the oven and bake for 35 minutes. Remove from oven, let cool for a few minutes, and slice into individual biscotti. Raise the oven temperature to 375 degrees and place the biscotti back on the parchment-lined baking sheet for another 15 minutes, until crisp and dry all the way through. Keep a close eye on them the last five minutes to make sure they don't burn. 
 

Creamy Parmesan Asparagus Soup with Caramelized Onions and Miso

A week and a half ago was what I consider the unofficial start to spring. It was the first week that asparagus showed up at the farmer's market! In my mind, asparagus heralds the return of the fresh produce of spring and a glimpse of what's to come. I eat asparagus continuously from when it first shows up in April or May until the season is over in June. I really never grow tired of it. And I refuse to buy it any other time of the year. What excitement this little vegetable brings. 

The day after I brought my first bunch of asparagus home was a cold and rainy day. I decided that this meant it was time for this absolutely delicious, creamy and filling soup. Asparagus cooked in a some chicken broth until tender, then pureed until smooth with a little miso, maple syrup and parmesan cheese. A simply perfect combination to really showcase this wonderful vegetable in a different way. 

I wanted to keep this soup fairly simple to allow the asparagus to really shine. I thought the miso would be a great way to add some depth and seasoning at the same time, the maple syrup and caramelized onions were important for that little bit of sweetness that most soups call for, and the parmesan cheese was the icing on the cake to really add some cheesy, creamy goodness. That's really about it. Blend it all together until smooth and dinner is served. With some nice crusty bread of course!


Creamy Parmesan Asparagus Soup with Caramelized Onions and Miso
From Delectably Mine
Ingredients

  • 1/2 medium onion, sliced thin
  • 1 1/2 cups chicken stock
  • 1 1/2 cups water
  • 1 teaspoon white miso
  • 1 tablespoon maple syrup, optional
  • 1 small garlic clove, lightly crushed
  • 1/4-1/3 pound asparagus
  • 2-3 tablespoons grated parmesan cheese
  • Olive oil
  • Salt

Directions
Heat a small frying pan over medium heat. Once hot, add 1 tablespoon olive oil. Let it heat for 30 seconds. Add the onions and a pinch or two of kosher salt. Stir to combine. Let Cook for 45-60 minutes, stirring occasionally, until browned and caramelize, adding a splash of water as needed to deglaze the bottom of the pan. 

Meanwhile, heat the stock and water over medium-high heat until simmering. Add the miso, maple syrup if using, and garlic. Cut the asparagus into roughly 1 inch pieces. Add the asparagus to the hot stock mixture and let cook until tender, 15-20 minutes. When the onions are fully caramelized, add them to the pot with the asparagus. 

Once the asparagus is tender, transfer the entire mixture to a blender. Add the parmesan cheese and blend on high speed until completely smooth and creamy. (I went for about 5 minutes with my Vitamix. You might need to go longer with a less powerful blender). During the last minute of blending, slowly pour in an additional 1-2 tablespoons of olive oil while the blender is still running to allow the oil to completely emulsify into the soup. 

Once completely smooth, transfer soup to soup bowls and garnish with additional parmesan cheese and a drizzle of good, fruity olive oil. 

Serves: 1-2

Lavender Orange Scones

This past week I was feeling the itch to bake something special, but wasn't sure what that should be. I took stock of what I had in the fridge and pantry and found a lonely little orange as well as some dried lavender from last spring. With a quick recipe search I found a recipe for chocolate orange scones. Perfect. At first I was going to go with the classic chocolate orange combination, but then decided that since it's spring and I have some beautiful dried lavender that I would try that combination instead. I figured that the sweet and tart orange would pair well with the floral lavender and I was right. These two flavors compliment each other perfectly and make for a light and fragrant scone, perfect for a leiesurely spring breakfast. 

I've used citrus zest and juice in baked goods plenty of times in the past, but I've never put the actual flesh into a muffin or scone or cake so I wasn't quite sure how it would turn out. I should not have worried, these scones baked up perfectly with little pockets of sweetness due to the orange segments mixed throughout. If you have it, I think some chopped white chocolate would also be a wonderful addition to these lovely spring scones. 


Lavender Orange Scones
Adapted from Vanilla and Bean
Ingredients

  • 1/2 stick (2 ounces) cold butter
  • 1 Orange
  • 2-3 tablespoons whole milk, half and half, or heavy cream
  • 1 tablespoon honey
  • 1/2 teaspoon vanilla Extract
  • 1/2 cup + 1 tablespoon (70 grams) all purpose flour
  • 1/2 cup (60 grams) whole wheat flour
  • 1/4 cup (30 grams) oat flour
  • 1 tablespoon (8 grams) cornstarch
  • 2 tablespoons (25 grams) brown sugar
  • 1/2 teaspoon baking powder
  • 1/2 teaspoon baking soda
  • 1/8 teaspoon salt
  • 1/2-1 teaspoon dried lavender
  • Turbinado sugar, for sprinkling, optional

Directions
Line a sheet pan with parchment paper. Cut the cold butter into 1/4 inch cubes and place in the refrigerator while prepping the other ingredients.

Zest the orange, peel and chop the flesh into small pieces, taking care to reserve the juices. Place the flesh into a small bowl and add about 1 Tbs of all purpose flour. Stir to coat. Set aside. In a measuring cup mix the orange juice and zest, milk, honey, and vanilla extract. Set aside. 

Add the flours, corn starch, brown sugar, baking powder, baking soda, salt and lavender into a large mixing bowl. Add the cold butter to the sifted ingredients and use a pastry cutter (or two forks) to cut in the butter into the pastry. The butter should be about pea size, evenly coated, and distributed in the flour.

Pour the wet ingredients into the dry ingredients. Gently stir the mixture until the flour is just moistened. The dough will be shaggy and seem dry but avoid the temptation to add additional liquid. Add the chopped orange pieces. Fold in to incorporate, eventually using your hands to press and fold the dough together, just a few times. Squeeze a portion of the dough in your fist. It should loosely hold together. 

Dump the contents out of the bowl onto a flour dusted work surface and press the dough together forming a circle. You may need to work it a little bit with your hands to bring it all together. Work gently, but quickly to keep the dough as cold as possible. Use a bench scraper, or a knife, to cut the circle into 4 to 6 triangles. Transfer the cut scone to the prepared baking sheet. 

Place scones on the parchment lined sheet pan and rest in the fridge or freezer for 20 minutes, while the oven is preheating to 425F. 

Before baking, moisten the top of the scones with a little milk and sprinkle the raw sugar evenly over the top of each scone. Bake for 10 minutes at 425 degrees, then turn the oven down to 375 degrees, rotate the baking sheet, and bake for an additional 15 minutes until the scones are golden brown and cooked through. Remove from oven and carefully transfer scones to a cooling rack. 

Yields: 4-6 scones

Asparagus Vichyssoise

When the asparagus starts showing up at the farmer's market every year I know I have made it. Spring has (un)officially arrived and warmer weather is on the way. Now it's the middle of June and I've been buying asparagus almost every week at the farmer's market. It's been great!! This past week I decided to try something new with my asparagus, something I've never done before - making a vichyssoise. Of course I was familiar with the name vichyssoise, and I had a vague sense of what this soup was, but until this past week I couldn't have really defined it exactly. Well now I know!

I was excited to try this asparagus vichyssoise first of all because I love asparagus, and second of all because it gave me another opportunity to use my new favorite kitchen toy, a new Vitamix blender! I used some graduation money to splurge on a Vitamix a few weeks ago and have been loving it! It was the perfect tool to make this smooth and creamy soup. So, what I now know about vichyssoise is that it is traditionally a creamy potato leek leak soup that is eaten cold. This was basically that with the wonderful addition of asparagus. There is just a tiny bit of cream and a little Greek yogurt to help make it really nice and creamy with just a bit of tang from the yogurt. A wonderfully healthy and light soup for a hot spring day. 

This is a very simple recipe that does not require a lot of hands on time. All you really need to do is cut up a few veggies, throw them in a pot with some stock and let them cook for a good 40-50 minutes. Then blend away until very smooth with some cream and yogurt and move to the fridge to get nice and chilled. You can garnish with some extra shaved asparagus or a little dollop of cream or yogurt, or a drizzle of olive oil, whatever sounds good to you. I have no doubt you will enjoy this delicious and refreshing spring soup.  


Asparagus Vichyssoise
Adapted from Plenty by Yotam Ottolenghi
Ingredients

  • 1 leek
  • 1/2 pound asparagus
  • 1 small potato, peeled and diced
  • 1 1/2 tablespoons
  • 1 1/2 cups vegetable stock
  • 1/2 teaspoon sugar
  • 1 1/2 tablespoons cream
  • 3 tablespoons Greek yogurt
  • 40g samphire
  • Grated zest of ½ lemon

Directions
Peel the potato and dice roughly. Chop off and discard the tough green ends of the leeks. Cut through the pale center, then wash well and slice roughly. Trim off and discard the woody base of the asparagus. Cut all but two of the spears into 3/4-inch pieces, keeping the tips separate. Reserve whole spears.

Place the vegetables, except for the asparagus tips and reserved whole spears, with the butter in a medium saucepan and sauté on medium heat for about 4 minutes; make sure they don’t take on any color. Cover the vegetables with the stock and add the sugar and some salt and white pepper. Bring to a boil, then simmer, covered, for 40 minutes. At the end of this time add the asparagus tips and continue cooking for 10 minutes.

Once done, blitz the soup well in a blender until very smooth. Gently fold in the cream and half the yogurt. Allow the soup to come to room temperature, then chill.

While the soup is cooling down, bring a pan of water to the boil and blanch the reserved asparagus for 2 minutes; drain and refresh under plenty of cold water. Shred.

Pour the chilled soup into bowls and serve with a dollop of yogurt swirled in and topped with the shredded asparagus and lemon zest if desired. 

Lilac Blossom Almond Scones

I've been aware for some time now that there are quite a few different edible flowers out there; nasturtium, squash blossoms, chive blossoms, lavender, even marigolds and pansies to name just a few. Up until this point however, other than playing around with some lavender (lavender shortbread cookies!) I really haven't done much with these flowers. I decided to change that this spring when I saw the lilac bushes start bursting with their beautiful flowers, perfuming the air when I take walks. It is one of the best smells imaginable. 

It was a video I saw earlier this spring from Kitchen Vignettes that first peaked my interest in playing around with some lilacs. Then my sister showed me this recipe for lilac blossom scones from Holly and Flora and I knew I had to make them. I did a little urban foraging one morning, coming back home with a bag full of lilac blossoms. Into the scones they went, and I also made a quick lilac blossom simple syrup that I've been using to make vanilla and lilac tea lattes (yum!) all week. So although the lilacs blossoms will soon disappear for another year I will thankfully have the memory of these buttery and delicious scones to hold me through until next spring. 

The flavor of lilac blossoms is quite mild, so don't be afraid that these scones will taste like perfume or potpourri. They lend a quiet floral flavor and aroma to the scones without being overpowering. The almonds add a nice crunch and obvious nuttiness that pairs well with the blossoms. I think the addition of a little bit of white chocolate would be a wonderful third component, but I didn't have any on hand at the time so I wasn't able to try it out. Next time!

Some people might be a little intimidated by scones if they've never made them before, but they really are so easy to make. A few things I like to keep in mind: make sure your butter is very cold before starting, don't over-mix the dough once you add the liquid, and don't add too much liquid or your dough will be too soft and the scones may be a little tough. I usually don't add all the liquid right away, just to make sure I don't add too much. You can always add more as needed. You only want as much liquid as necessary to just hold everything together, and not any more. 

This is a fairly basic buttermilk scone recipe, with the addition of lilac blossoms and almonds. Wonderfully simple and delicious. I made my scones on the smaller side, halving the original recipe and cutting them half as big as what was originally called for, but if you want bigger, more coffee-shop sized scones, make 4 scones out of the recipe below (or double it and make 8 as in the original recipe). 


Lilac Blossom Almond Scones
Adapted from Holly and Flora
Ingredients

  • 1 1/2 cups (6.75 ounces) flour, all-purpose
  • 1 1/2 tablespoons (3/4 ounce) granulated sugar
  • 1 1/4 teaspoons baking powder
  • 1/4 teaspoon baking soda
  • 1/2 teaspoon salt
  • 6 tablespoons (3 ounces) unsalted butter, chilled
  • 1/4 cup (1 ounce) toasted, chopped almonds
  • 3/4-1 cup lilac flowers
  • 1/2 cup buttermilk, shaken well (I actually used a mixture of liquid whey and half-and-half because that's what I had and it work wonderfully)
  • 1/2 teaspoon vanilla extract
  • Turbinado sugar, for sprinkling on top

Directions
Pre-heat the oven to 425 degrees. In a large mixing bowl, combine the flour, sugar, baking powder, baking soda, and salt. Whisk the ingredients together. Cut the chilled butter into small cubes and toss into the dry mixture. Using a pastry blender or your fingers, work the butter into the flour mixture, until pea-sized lumps of butter are present. 

Add the almonds, lilac blossoms, vanilla and buttermilk (a little at a time) and fold together in the bowl with your hands just until the all the flour is moistened and the dough holds together. Make sure to not over-work. Lightly flour the ball of dough and flatten it out on the counter, by hand, into a 1/2 -3/4 inch thick disk. Cut the dough into triangles and place onto a parchment lined baking sheet. Lightly dust with turbinado sugar. (At this point I usually place my scones in the freezer for at least 30-60 minutes to firm up. This step is not absolutely necessary, but I find that scones bake up taller and more beautiful when they chill a little first. You can actually freeze the scones entirely, transfer them to a plastic bag and store them in the freezer. Then bake directly from the freezer when needed, adding a few more minutes to the baking time if needed. This is a great time saver on mornings when you want a fresh batch of scones, but don't want the hassle of making them that morning.) 

Bake 12 to 16 minutes, rotating the baking sheet halfway through, until turning golden brown on the edges. Serve warm, plain, or with a little butter and your favorite jam. 

Yields: 4 large or 8 small scones

Strawberry Rhubarb Pie

Strawberry season is basically over, this is always a sad realization to me since strawberries are my favorite fruit. I love buying a couple quarts at the farmers market and then stuffing my face full of sweet, juicy berries because we all know that freshly picked strawberries last about a day before they start going bad. To me this means I am required to eat as many as possible because I can't let any of these early summer jewels go to waste. This is a task I attack with pleasure.

This year I definitely did my share helping out the local strawberry farmers. This sometime required me to become creative with the baskets and baskets lining my counter. I had a wonderful time figuring out what to do with all of my strawberries, what a fantastic problem! When my neighbor called and told me she had rhubarb galore and I needed to come take some off of her hands I jumped at the opportunity. I had never made a strawberry rhubarb pie, but that was all about to change. Strawberry and rhubarb are my favorite combination. The juicy sweetness of the strawberries combined with the puckering tartness of the rhubarb is a match made in heaven. I'm already looking forward to next year!

While I've been making more pies and tarts recently, I still would definitely call myself an amateur. I'm getting better, but I still have things I need to work on. Regardless, this pie turned out absolutely delicious, even if it lacks a little in the looks department. I like to think of it as rustic. In the end it really doesn't matter what the pie looks like, the most important thing is what it tastes like, and this one did not disappoint.

Note: This is a rough estimate of my strawberry rhubarb pie recipe. It was delicious, but it could definitely have used more filling, both strawberries and rhubarb. Feel free to play around with the quantities, increasing the filling until you are satisfied with it.

For the topping: this time around I didn't melt the butter, but for future use I probably would. I think you get bigger chunks of streusel then. Also, if you are a big streusel fan (like me) you'll want to increase the amount of streusel. Try doubling it perhaps!

Strawberry Rhubarb Pie

Ingredients

Pie

  • 1/2 recipe Pate Brisee (or your favorite pie dough)
  • 1 3/4 cup chopped rhubarb
  • 4 cups sliced strawberries
  • 1/4 cup granulated sugar
  • 1/4 cup brown sugar
  • 1/4 cup cornstarch
  • 1/4 teaspoon vanilla
  • 2 tablespoons Yukon Jack Liquor (or whatever you happen to have in your cupboard, this was what was in mine!)

Topping

  • 3 tablespoons room temperature butter
  • 1/4 cup brown sugar
  • 2 tablespoons granulated sugar
  • 1/2 cup flour
  • pinch salt

Directions

Preheat oven to 375 degrees. Make the filling: Mix together rhubarb, strawberries, granulated sugar, brown sugar, cornstarch, vanilla, and liquor. Set aside.

Make the crust: Roll out pate brisee to a 1/8-inch thickness on a lightly floured surface. Fit dough into a 9-inch pie plate. Place in refrigerator or freezer for 15-30 minutes, until well chilled. 

Drain excess juice from the rhubarb/berry mixture. Pour filling into chilled pie crust. Bake pie for 45-55 minutes, until crust is well browned. Remove from oven and cool. Enjoy with vanilla ice cream or lightly whipped cream.