Cornmeal Sourdough Bread

I've got another great sourdough bread recipe today. It's a super simple loaf that comes together very quickly and bakes up beautifully. This bread slices up well and makes the best sandwiches. Made with a majority whole wheat flour for nutrition, but with a little white flour for optimal texture, it's just the right combination. I included a little butter for additional tenderness and flavor, and a little honey for just a hint of sweet, just how I like it. This recipe is great for me, allowing me to use up some sourdough starter without even thinking ahead since I used the cold starter straight from the fridge. Maybe sourdough purists would be appalled, but it works for me in my life and kitchen. If this sounds appealing to you, I encourage you to give this recipe a try.    

IMG_0624.jpg

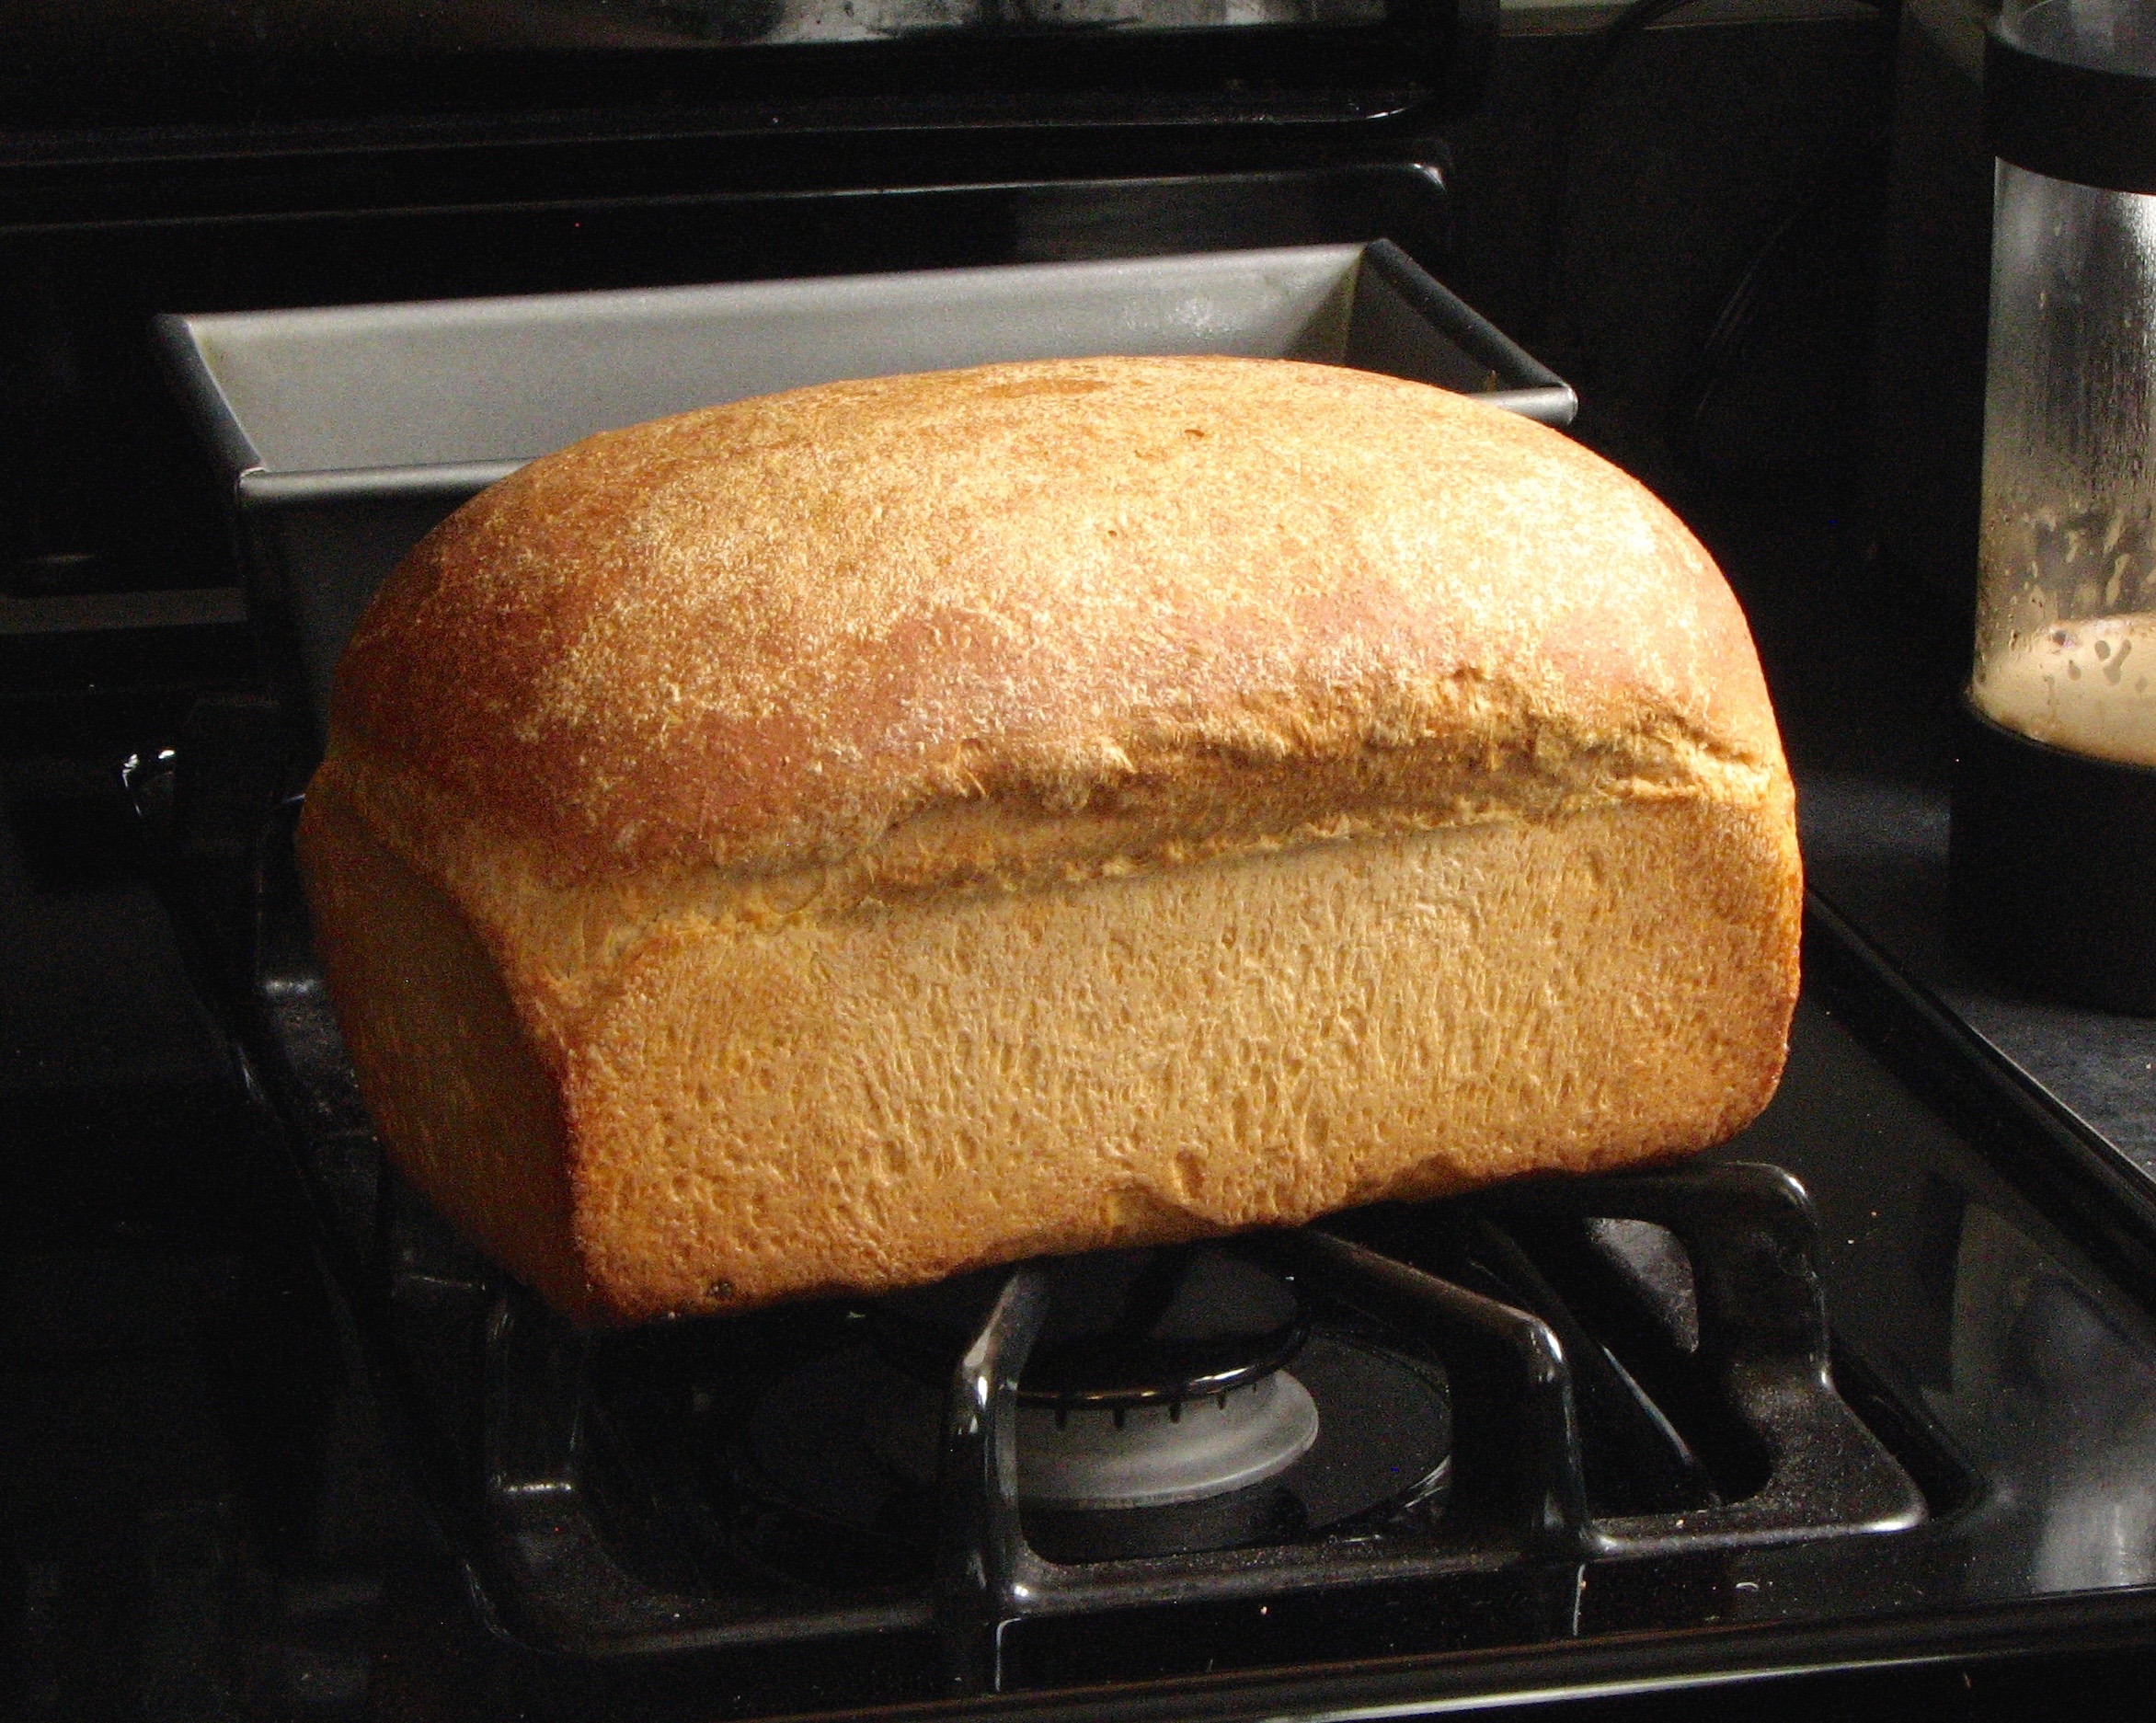
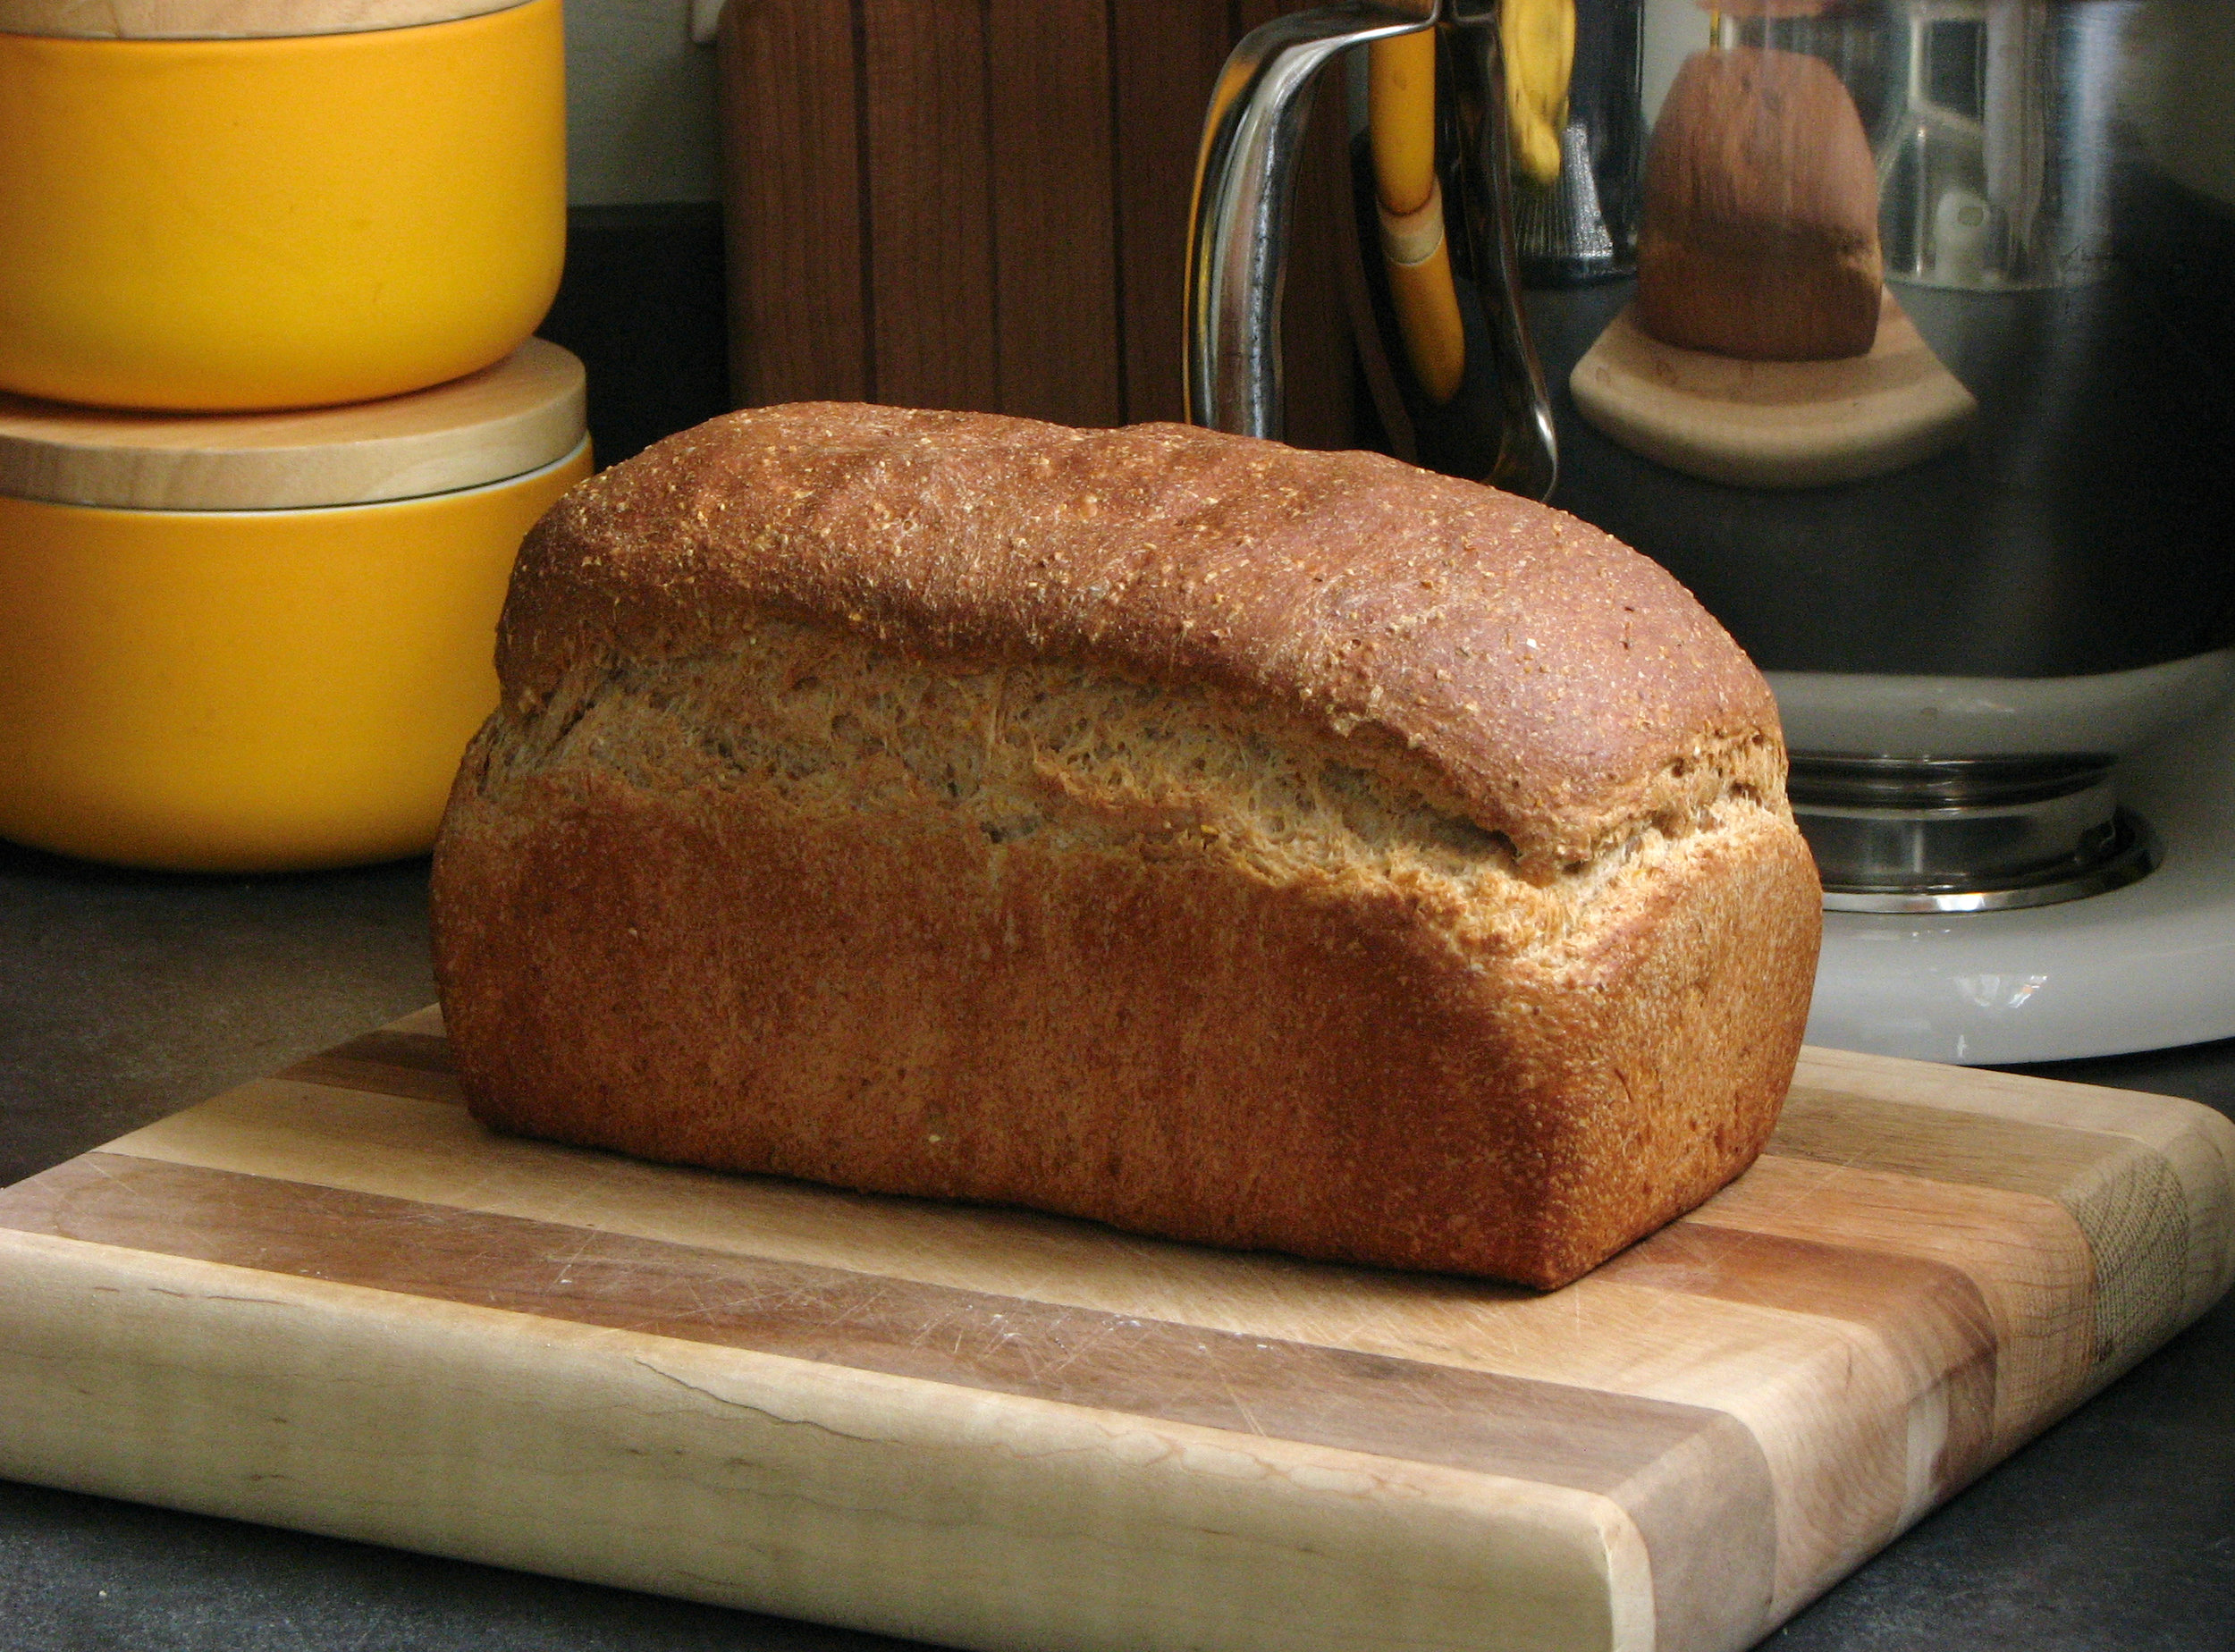
I got some GREAT oven spring out of this bread! It's always exciting to take that first peek into the oven about halfway into baking and see how beautifully tall the bread has risen above the top of the pan. It makes me so happy! This bread has a nice dark brown crust, with a fluffy and light interior, just fantastic. And it's a really easy and quick recipe as yeasted bread goes. I've managed to get it all done in 4.5 hours start to finish. You'll need about another 2 hours to let it cool before slicing, but overall pretty simple and quick. 

 
IMG_0628.jpg
IMG_0626.jpg
IMG_0631.jpg
IMG_0633.jpg
 

Cornmeal Sourdough Bread
Adapted from Easy Sourdough Loaf
Ingredients

  • 110 grams sourdough starter; cold, unfed from the fridge
  • 250 grams whole wheat flour
  • 100 grams all purpose flour
  • 30 grams coarse grind cornmeal
  • 8 grams salt
  • 1 1/4 teaspoons yeast
  • 30 grams butter, softened
  • 15 grams honey
  • 180 grams water

Directions
In the bowl of a stand mixer fitted with a dough hook, combine all of the ingredients. Mix in low speed until the ingredients are incorporated, adjusting the water as needed to achieve a medium dough consistency (you may need additional water). Continue mixing to in medium speed to a medium-high level of gluten development.

Transfer the dough to a lightly oiled container. Cover and let rise until doubled in size, about 1 1/2 hours. 

Turn the dough into a lightly floured counter and shape into a tight loaf. Generously butter a 8.5 x 4.5-inch loaf pan. Place the dough, seam-side-down, into the prepared pan. Proof, covered, for 1 hour, or until the top of the dough has risen to about 1.5 inches above the edge of the pan.

Meanwhile, preheat the oven, with baking stone on the bottom rack, to 425F. Once you are ready to bake, place loaves in the oven, reduce the temperature to 400 degrees and bake for 25 minutes. Take the loaf out of the oven, remove the loaf from the pan, and place it directly on the baking stone, and bake for approximately another 15 minutes, until the crust is a deep golden brown. Remove from oven and place on a cooling rack. Let bread cool completely before slicing. 

Peanut Butter Chocolate Chip Granola Bars

Homemade granola bars. You can never have too many recipes. I'm always trying out new variations, and new renditions. They're all yummy and wonderful to have on hand for (healthy-ish) snacks. This version is a winner because Chocolate!! When I add some nice dried fruit, or delicious nuts or seeds to a granola bar, they're always delicious, but I always want chocolate. Always.  :) 

This bar is a version of my cranberry walnut granola bars, but I replaced the almond butter with peanut butter, and then obviously used chocolate chips instead of the cranberries and walnuts. Both good options, but when that chocolate craving hits there's only one option!


Peanut Butter Chocolate Chip Granola Bars
Adapted from Delectably Mine
Ingredients

  • 2 tablespoons (28 grams) butter
  • 2 tablespoons (28 grams) peanut butter
  • 1/3 cup (112 grams) honey
  • 1 teaspoon vanilla
  • 1/2 teaspoon salt
  • 1 egg
  • 2 cups (160 grams) old fashion oats
  • 1/3 cup (38 grams) whole wheat flour
  • 1/4 cup chocolate chips

Directions
Preheat the oven to 350 degrees. Butter a 12x9 inch or 8x8 inch pan, or line with a parchment paper sling, and set aside. 

Place the butter, and peanut butter in a large microwave safe bowl and microwave until the butter melts. Stir until the well combined. Mix in the honey, vanilla and salt and give a good stir. Add the egg and stir the whole mixture until smooth and combined. 

Add the oats, whole wheat flour, and chocolate and stir everything together until well combined and there are no more dry pockets of flour. 

Transfer the mixture into the prepared  pan and pat down firmly into an even layer. Bake at 350 degrees for 25-30 minutes or until the top is golden brown. Allow to cool completely before cutting.

Yields: 14-16 granola bars
 

Brownie Batter Chocolate Oat Muffins

When it comes to breakfast, I love a good egg sandwich, avocado toast, or a delicious scramble full of peppers, mushrooms, sausage and cheese. However, where my heart truly lies, and what I really want every morning, is with a sweet breakfast. I just have a big old sweet tooth when it comes to breakfast (and really any time), and I will almost always choose a sweet breakfast over a savory one despite how good those savory breakfasts may be. (I usually just end up have a savory "breakfast" for dinner, problem solved!)

I especially love chocolate for breakfast. I don't think I really need to explain it any more than that. Chocolate. Breakfast. Enough said. But even though I love sweets for breakfast, I don't always feel good about eating them. These brownie batter muffins solve that problem. They are sweet and chocolatey, yet have some nutrition in them, and are not just empty calories. Yes, you can have the best of both worlds! 

IMG_0657.jpg

These yummy little brownie batter muffins are easy to make. Really just need one bowl and some simple ingredients. I cut down on the maple syrup from the original recipe from 1/2 to 1/4 cup to make them a little healthier and I thought they were just fine. So naturally sweetened with the maple syrup if that's your kind of thing. I'm sure honey would be fine as well, or just regular white or brown sugar if that's all you have, although I have not actually tried this I bet it would be fine. There is some protein and healthy fat from the almond butter (yes peanut butter would work just fine too). And you can go ahead and add in anything else that floats your boat; chocolate chips or chunks, cocoa nibs, any nut you like, even some fresh or frozen berries, or dried fruit. Customize away, and enjoy!

 
IMG_0654.jpg
 

Brownie Batter Chocolate Oat Muffins
Adapted from Running with Spoons
Ingredients

  • 1 large egg
  • 3/4 cup (6 ounces) milk
  • 1/4 cup (75 grams) maple syrup
  • 1/4 cup (64 grams) almond butter
  • 2 tsp vanilla extract
  • 2 cups (160 grams) old fashioned oats
  • 1/2 cup (60 grams) whole wheat flour or whole wheat rye flour
  • 1/4 cup (20 grams) unsweetened cocoa powder
  • 1 1/2 tsp baking powder
  • Cocoa nibs (optional)
  • Chopped chocolate (optional)

Directions
Preheat your oven to 350 degrees and prepare a muffin pan by spraying the cavities with cooking spray or lining them with parchment paper liners. Set aside.

In a large mixing bowl, lightly beat the egg. Whisk in the milk, maple syrup, almond butter, and vanilla, mixing until smooth. Add the oats, flour, cocoa powder, and baking powder, and mix until well combined. Add the cocoa nibs and chocolate and give one more good stir to combine. 

Spoon the batter into the prepared muffin cups, filling each until about 3/4 full. 

Bake for 15-20 minutes, or until a toothpick inserted into the centre comes out clean. Allow the muffins to cool in the pan for about 5 minutes before transferring them to a wire rack to cool completely. 

Yields: 10 muffins
Approximate Calorie Count: 190 calories each
 

Oat Flour Pumpkin Scones

It may not be autumn any longer (the 4 inches of snow we got last night made this very clear), but that does not mean that baking with pumpkin is over. I am a fan of baking with pumpkin all year long. It's such a good way to add healthy moisture to baked goods. These healthy pumpkin scones are not a traditional scone, but that was the best way I could think of to describe them. Definitely not a "true scone", but close, and a lot healthier then a real scone - I really liked them a lot! There are made with a majority of oat flour, and a little olive oil for fat and moisture. The rest of the moisture comes from the pumpkin. Sweetened with a mix of brown sugar, maple syrup, and molasses, and flavored with cinnamon and vanilla, yum. 

These scones are very tender due to the oat flour, a little on the delicate side, but that is not a problem. They still help together just fine. All you have to do once the batter is whipped up is drop them by the spoonful onto your baking sheet and pop them into the oven. A nice little drop scone. If you don't have a can of pumpkin in your pantry, I recommend you pick some up soon...


Oat Flour Pumpkin Scones
Adapted from Pinch of Yum
Ingredients

  • 1 1/2 cups (120 grams) oats, ground into oat flour
  • 3/4 cup (90 grams) spelt flour
  • 1/4 cup (50 grams) brown sugar
  • 1 teaspoon baking powder
  • 1/2 teaspoon salt
  • 1/2 teaspoon cinnamon
  • 1 teaspoon vanilla
  • 1/4 cup (60 grams) pumpkin
  • 1 egg
  • 1/4 cup (75 grams) maple syrup
  • 2 tablespoons molasses
  • 3 tablespoons (1.5 ounces) olive oil
  • 1/4-1/2 cup total of chocolate chunks and chopped walnuts

Directions
Preheat the oven to 375 degrees. In a large bowl, combine the oat flour, all purpose flour, sugar, baking powder, salt, and cinnamon. In a smaller bowl, whisk the vanilla, pumpkin, egg, maple syrup, molasses and olive oil. Add the wet ingredients to the larger bowl with the dry ingredients - stir until just combined. Add the chocolate and walnuts and stir just a few times to distribute them throughout the batter.

Drop the batter onto a baking sheet lined with parchment paper using a round cookie scoop. Sprinkle the tops with a little turbinado sugar and bake for 12-15 minutes until baked through. Cool slightly before eating, or let cool to room temperature. 

Decidedly Not Sweet Granola

I am a huge granola lover. I make my own granola every couple of weeks, and there are few days that go by that don't include any granola. I've made so many different recipes over the years it's difficult to keep straight. Lara got Allison Roman's new cookbook, Dining In, over Christmas and has been enjoying it for several weeks now. We've made a few recipes together and this was one of the first. It's a granola recipe, but a savory one, very different from my usual! It is also very heavy on seeds, with less oats than a traditional granola. I absolutely love the fennel and caraway seeds, they add so much unique flavor, and really help this granola stand out as truly savory. I wouldn't skip them as it would really change the flavor. 

I've been sprinkling this granola over pretty much everything and anything. It's great on salads instead of the usual crouton to add a nice crunch, or really added on top of any roasted vegetable. It's also good in yogurt just like traditional granola, I would just probably avoid sweetened and flavored yogurt. I really only eat plain yogurt myself and it's great in that. I have no doubt there are so many other places that would be enhanced by this delicious granola. 

IMG_1954.jpg

I halved the original recipe from the cookbook, just to make sure I liked it enough to use up a whole batch. I do. Because of this I ended up using one whole egg instead of egg whites (it would have been 1.5 egg whites which is just annoying). I also didn't have the nigella seeds it called for, I'm going to keep looking though! The recipe said to just replace these with a little more sesame seeds if you can't find them so that's what I did. This equals out to an additional 2 tablespoons seeds for the half of the recipe. 

IMG_1959.jpg
IMG_1955.jpg

Decidedly Not Sweet Granola
Adapted from Allison Roman's Dining In
Ingredients

  • 3/4 cup (60 grams) oats
  • 1/2 cup raw sunflower seeds
  • 1/2 cup raw pumpkin seeds
  • 1/2 cup buckwheat groats
  • 1/4 cup flax seed
  • 1/4 cup + 2 tablespoons sesame seeds*
  • 1 large egg
  • 2 1/2 tablespoons olive oil
  • 2 tablespoons maple syrup
  • 1 tablespoon fennel seed
  • 1 tablespoon caraway seed
  • 1 tablespoon ground Aleppo (this is what I used) or Ancho pepper (this is what the original recipe calls for)
  • 1 tablespoon soy sauce
  • 1 teaspoon kosher salt

Directions
Preheat the oven to 325°F. Line a rimmed baking sheet with parchment paper.

Combine all ingredients in a medium bowl and toss to mix until everything is evenly coated. Season with plenty of black pepper.

Spread the mixture onto the prepared baking sheet and bake, stirring every 15 minutes or so, until everything is golden brown and toasty, 45 to 55 minutes. Let cool completely and break any large clumps into smaller pieces before storing in glass jars or ziplock bags.

*If you can find nigella seeds, use 2 tablespoons of nigella seeds, and just 1/4 cup total of the sesame seeds

Parmesan Roasted Winter Radishes

Winter vegetables certainly aren't sexy. Hitting up the farmers market on a cold day in mid-January can be disappointing. There is no rainbow of fresh tomatoes of every shape and size, gone are the tender strawberries or raspberries bursting with sweet juice, no rows of sweet corn awaiting melted butter and coarse salt, and don't even mention the word peach, I won't be able to even look at one for at least 8 more months when I get to bite into this handful of sunshine.

Over the past few years however, I have tried to embrace the winter months and the produce available, to accept it for what it is. This recipe that I created was just what I needed to embrace a variety of winter radishes that I picked up recently. I had a mix of rainbow and black radishes and wasn't sure what to do with them. I figured that butter and cheese will make just about anything good so that's the direction I went. I was very happy with the results. The caramelized radishes with their intrinsic bitterness mixed with a little richness from the butter, saltiness from the cheese and sweetness from the honey is a lovely combination to help this under-appreciated vegetable shine. 

IMG_1944.jpg

If you've never tried a winter radish I urge you to at least give it a chance. They do have a strong flavor and a bit of a sulfur-y smell but don't let that turn you off. They are delicious, healthy and unique. Not the same old boring vegetables week after week. Expand your horizens, try something new!

IMG_1947.jpg
IMG_1946.jpg

Parmesan Roasted Winter Radishes
From Delectably Mine
Ingredients

  • 6 medium sized winter radishes (I used a mix of black radishes and watermelon radishes)
  • 1-2 tablespoons olive oil
  • 1/3 cup grated Parmigiano Reggiano
  • 2-3 tablespoons butter
  • 1 tablespoon honey
  • Plenty of kosher salt

Directions
Preheat your oven to 450 degrees with a sheet pan inside. Meanwhile, slice the top and bottom off of each radish, cut in half length wise, and then cut each half into 3 or 4 wedges. Place all of the wedges in a large bowl and drizzle with the olive oil, and sprinkle with plenty of coarse salt. Mix until everything is well coated.

Remove the preheated baking sheet from the oven. Line the sheet with foil. Transfer the radishes to the baking sheet and spread out into an even layer. Place baking sheet in the oven and roast the radishes for approximately 40 minutes, rotating the pan halfway through cooking. 

Once radishes are nicely brown and have just a bit of texture left, remove from oven and transfer to a large bowl. Add the butter, honey and cheese to the still hot radishes and mix it all together until the butter is all melted and everything is evenly coated. Serve warm, or at room temperature. 

Butternut Squash Chicken Soup with Winter Greens

It may be cliche, but with the new year in full swing, all of the Christmas decorations put away, and a freshly cleaned house, I am also in the mood for a fresh and healthy start to the year. I had a week off over the new year, and I got inspired by the book, The Magic Act of Tidying Up. I had heard of this book, but didn't really know what it was all about. I randomly started listening to the audiobook and got sucked into the world of "tidying". I went through my apartment and did some extensive purging, rearranging and cleaning. I brought two very large boxes to my local resale shop, and brought many bags of trash out to the trashcan. It's amazing how much stuff one person living in one small apartment can accumulate. If anyone is wanting a little motivation to really get down into the nitty gritty of cleaning and purging your house I highly recommend this book. I would never have thought that a book on cleaning would inspire me so much, but it did and now I feel so good. My apartment feels light and fresh, and amazingly, so does my mind!

One of my first meals of 2018 went along with the theme of starting the new year on a light and fresh note. This light and healthy butternut squash chicken soup was a good way to clean some things out of my fridge and freezer, as well as feel good about what I'm putting into my body. A leftover chicken thigh and roasted onions, homemade turkey stock from Thanksgiving, roasted butternut squash from earlier in the week, and some fresh greens from the farmer's market all combined to create a lovely leftover lunch. I didn't follow any recipe, or write down any measurements, just threw everything into the pot and let it simmer and it was perfect. 

IMG_1951.jpg

Homemade chicken soup does not have to be intimidating nor difficult. When making a simple soup such as this I recommend you look for the best ingredients you can find. Please don't use a cheap can of chicken stock from the grocery store to make chicken soup, you will be disappointed. Either make your own (which is what I always recommend, it's not difficult at all!), or search out some really good store-bought stock or broth. Check labels and make sure the ingredients look decent, it won't be even close to as good as homemade, but it will work in a pinch. 

Other than the stock, you really only need some aromatics - onion, celery, carrot, maybe a little garlic, white wine, miso paste, white wine vinegar or fresh lemon juice. Whatever combo sounds good to you. Saute' all that up with a little olive oil or butter, add in your stock and chicken or turkey, maybe some white beans, butternut squash as I did here, or even pasta. Finish with some fresh greens, kale or spinach are good options. Here I used some amazingly fresh and delicious local Asian greens. I can't remember the name, but it was so good. 

 
IMG_1949.jpg
 

Easy Sourdough Loaf

With the craziness of the holidays now pretty much over (after tonight anyway), it's back to real normal, everyday life. For me, this includes getting back to the basics with simple, wholesome food. I've had my fair share of sugar over the past many weeks and I'm ready to reset and restart in 2018. 

It's been a cold couple of weeks here in West Michigan. As I write this it's 4 degrees out and snow continues to fall. It's beautiful. In this kind of weather a thick slice of hearty toast topped with soft scrambled eggs, a few thick slices of melted cheese, or a generous helping of peanut or almond butter sounds just about perfect. A slice of this bread is just the right for this type of occasion. It's made with simple and basic ingredients, nothing crazy, nothing strange, just good food. It doesn't get much better than that. 

For this recipe, I adapted another sourdough recipe that's also posted on my blog; just changing it a little to make it a more useful recipe for me on a daily basis. I added commercial yeast instead of relying solely on wild yeast for the rise, and cut the recipe in half because as a single person, it takes me quite a while to go through two full loaves of bread. These adaptations worked beautifully and gave me a tall and fluffy loaf, perfect for just about everything. 


Easy Sourdough Loaf
Adapted from Soft Sandwich Sourdough
Ingredients

  • 311 grams flour
  • 160 grams water
  • 8 grams salt
  • 32.5 grams butter, room temperature
  • 15 grams honey
  • 205 grams starter
  • 1.25 teaspoons instant yeast

Directions
In the bowl of a stand mixer fitted with a dough hook, combine all of the ingredients except about 10% of the water. Mix in low speed until the ingredients are incorporated, adjusting the water as needed to achieve a medium dough consistency (you may need additional water). Continue mixing to in medium speed to a medium-high level of gluten development.

Transfer the dough to a lightly oiled container. Cover and let rise until doubled in size, about 1 1/2 hours. 

Turn the dough into a lightly floured counter. Shape into a cylinder and let rest, covered, for about 25 minutes. Generously butter a 8.5 x 4.5-inch loaf pan. Shape the dough tightly into blunt batards and place it, seam-side-down, into the prepared pan. Proof, covered, for 1 hour, or until the top of the dough has risen to about 1.5 inches above the edge of the pan.

Meanwhile, preheat the oven, with baking stone, to 425F. Once you are ready to bake, place loaves in the oven, reduce the temperature to 400F. Bake for 25 minutes. Then remove the loaf from the pan, place directly on the stone, and bake for another 15 minutes or so, until the crust is a deep golden brown. Cool completely on a wire rack before cutting.