Roasted Tomato Basil Soup

I don't know where summer went, but this weekend is definitely feeling like fall. It's so funny though, the leaves have not even started changing colors yet which is super late. So even though it feels like fall, it has yet to look like fall, a very strange combination. I'm not quite ready for the cool weather to start moving in, I want to eek out every last drop of summer that I can. Pining for summer, but dressing for fall, this soup is the perfect way to get the best of both worlds. A creamy and comforting tomato soup using fresh, perfectly ripe tomatoes from the farmers market and basil straight from the garden. It's pure summer in a bowl, yet warming enough to fight off the beginning of autumn chill that has decided to drop by, a winning combination. 

Before making this soup, I looked at a few different tomato soup recipes and then I put together my favorite parts of all of them, using what I had on hand. Tomato soup is so easy to make, and it is so delicious. If you've never had homemade tomato soup, and have only ever suffered through a bowl from a can, you don't know what you're missing. I used to think I didn't like tomato soup. Then I discovered that I just don't like canned tomato soup. Homemade is infinitesimally better, it isn't even comparable to the stuff out of a can. And while I used fresh tomatoes, canned tomatoes make a pretty good soup too, so in the middle of winter you can still whip up a batch. So if you've never tried making your own tomato soup, I urge to to give it a try, it is so easy and so worth it. 

Roasted Tomato Basil Soup

From Delectably Mine

Ingredients

  • 1 1/2 pounds tomatoes
  • 1/2 medium onion
  • 2 garlic cloves
  • Olive oil
  • 2 cups chicken or vegetable stock
  • 1 teaspoon salt
  • 1-2 tablespoon sour cream to taste
  • 1/2 teaspoon lemon juice
  • pinch sugar
  • pinch red pepper flakes
  • 1 tablespoon chopped basil, plus more to garnish

Directions

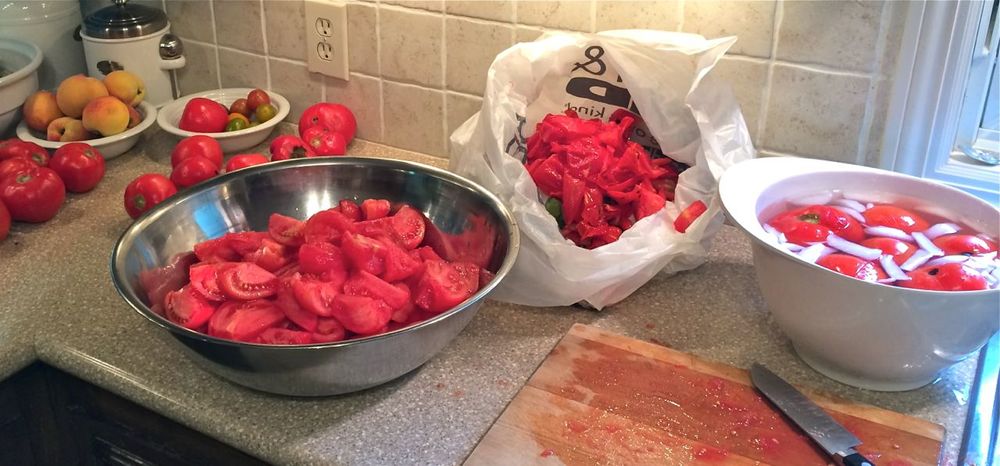
Cut tomatoes in half or in quarters and place on a baking sheet lined with foil. Add the onion and garlic cloves. Drizzle with olive oil and sprinkle with salt and pepper. Roast for 20-30 minutes at 450 degrees. 

Once vegetables are roasted, transfer to a small sauce pot and add the stock. Bring to a boil. Remove from heat and use an immersion blender to puree the soup until smooth. Return pot to heat and add the salt, sour cream, lemon juice, sugar, red pepper flakes and basil. Let soup simmer for 15-20 minutes to allow the flavors to blend. Serve, garnishing with more basil and parmesan cheese, or more sour cream. 

Chocolate Fudge Cookies

As a huge chocolate lover, I'm always on the lookout for any recipe that will satisfy my chocolate craving. There are just days that desperately call for chocolate, and nothing else will do. Sometimes it's no problem to whip together a pan of brownies, or break into that secret stash of chocolate bars hiding in the closet, but what about those days where there is no time to bake something, and for some funny reason that chocolate stash seems to have disappeared? That's where this recipe comes in. With a batch of these cookies stored in the freezer for emergency situations, you will not have to worry about being without a chocolate fix, which is always a comforting thought. 

While I do already have this amazing death by chocolate chip cookie recipe, and these awesome double chocolate chip cookies on the blog, both of these recipes have a good amount of chocolate melted right into the dough. I love having this chocolate melted in, it makes the most intensely rich chocolate cookies, but there are times when I either don't have enough chocolate, or I don't feel like dealing with that. So these chocolate fudge cookies skip the melted chocolate and use only cocoa powder along with some strong espresso to bring out that chocolate flavor. 

Now, if you're afraid that this lack of actual chocolate will diminish their chocolate-ness, have no fear, they are still super chocolate-ty and awesomely rich. Trust me, you won't even miss the melted chocolate. In fact, these cookies are just fantastic. If you are in dire need of some chocolate, these cookies are exactly what you need. 

One word of caution with this recipe; only use natural cocoa powder, don't try substituting with Dutched. The first time I made these cookies I tried them with Dutched cocoa powder and while they tasted really nice, they did not turn out like they are supposed to. The original recipe did not specify whether the cocoa powder should be natural or not, so I just decided to go for it with the Dutched. 

Looking at it now, I should have realized that this wouldn't work. Dutched cocoa is cocoa powder that has been alkalized during processing. Because of this, Dutched cocoa will not react with baking soda during baking because baking soda requires and acid in order to react and do its job. Since this recipe calls for baking soda as a leavener it makes sense to use natural cocoa powder. 

But it all turned out in the end, I made them again with the natural cocoa powder and they turned out great, and in the meantime I also got a bit of a science lesson. So if you're looking for a super delicious chocolate cookie, grab some natural cocoa powder and head straight into the kitchen, you won't regret it!

Chocolate Fudge Cookies
Adapted from Pinch of Yum
Ingredients

  • 1 cup salted butter (1 stick melted and cooled, 1 stick room temperature, see directions)
  • 1½ cups granulated sugar
  • 2 teaspoons vanilla
  • 2 eggs
  • 3 tablespoons strong coffee
  • 2⅔ cup all purpose flour 
  • ½ cup natural cocoa powder (not Dutched)
  • 1 teaspoon baking soda
  • ½ teaspoon salt
  • 2 cups chocolate chips

Directions
Start by melting ½ cup (1 stick) butter in the microwave for 30-45 seconds or until completely melted. Transfer to the refrigerator or freezer and cool until solid, about 30 minutes. Leave the other ½ cup butter out on the counter to bring it to room temperature. 

With an electric mixer, cream the melted and chilled butter, room temperature butter, sugar, and vanilla until creamy and fluffy. Add the eggs one at a time, mixing well after each addition. Add the coffee and mix to incorporate. 

In a separate bowl, combine the flour, cocoa powder, baking soda, and salt. Add the flour mixture to the butter mixture and mix until incorporated. The dough should be thick and sticky, but dry enough to touch with your hands without making a huge mess. If it's still too sticky, add more flour. Stir in the chocolate chips.

Roll the dough into even balls and place on a baking sheet lined with parchment paper. Bake for 10- 12 minutes at 350 degrees until just set, don't overbake. Cool for a few minutes on the cookie sheet, then transfer to wire rack to cool completely. 

Yields: I was able to make 25 50-gram cookies

Oat Bread with Dried Fruit and Almonds

Baking bread is one of my favorite things to do in the kitchen. I just love the whole process, kneading together a handful of individual ingredients and turning them into this live creature that rises and grows before your eyes. Tame it through shaping into loaves, and then into the oven for its final transformation where it becomes your desired creation. It is one of the most satisfying tasks in the kitchen.  Pulling out those final loaves, and seeing what you've been able to do with a few simple ingredients, some time and heat is simply amazing. 

These loaves are my most recent creation. I found the recipe online and for whatever reason it sounded so perfectly delicious that I had to give it a try. This whole wheat and oat sandwich loaf, slightly sweetened with honey and filled with roasted nuts and dried fruit called my name, I simply had to try it. It turned out a couple very large and beautiful loaves that have been perfect for a variety of sandwiches, a hearty snack and a healthy breakfast. 

One of my favorite quick and easy lunches in the past week has been a gourmet peanut butter sandwich with mashed banana and sliced strawberries. Add a drizzle of honey for a little extra sweetness and lunch is served, simple and delicious. It almost feels like eating dessert for lunch. I've also made a variety of other different sandwiches including an heirloom tomato BLT and a grilled vegetable and hummus sandwich with feta. So whatever type of sandwich is calling your name, this bread will get the job done. 

Oat Bread with Dried Fruit and Almonds
Adapted from A Shaggy Dough Story
Ingredients

  • 200g Dried Fruit (I used a mix of prunes and frozen cranberries instead of dried, just because I had them, and it turned out fine)

  • 161g Whole Wheat Flour

  • 130g Rolled Oats

  • 403g Water (I used the reserved water from soaking the fruit and made up the difference with fresh water)

  • 484g Bread Flour

  • 136g Milk

  • 48g Honey

  • 48g Vegetable Oil

  • 19g Salt

  • 4g Instant Yeast

  • 130g Toasted Almonds (or whatever you have, walnuts, pecans, etc)

  • Additional Rolled Oats for coating loaves

Directions
Put dried fruit in a heat-proof bowl, add enough boiling water to cover and let sit for about an hour. Drain, reserving water, and let cool.

Put whole wheat flour and rolled oats in the bowl of a mixer, add the reserved soaking liquid (adding fresh water to make up the difference) and stir to combine. Let sit for 30 minutes.

Add bread flour, milk, honey, oil, salt and yeast to the oat mixture. Using the dough hook of your mixer, blend on low speed until combined, then increase the speed to medium for about 7 minutes. Add the soaked, drained fruit and the pecans and mix on low speed until combined (it took a little bit of time to make sure they were fully incorporated).

Place the dough in a large bowl or container with oil that's been lightly coated with oil. Cover and let rest. After one hour, uncover the dough and fold, then cover and let rest for another hour.

Turn dough out onto a lightly floured surface and divide into two rounds. Cover with plastic and let rest for 15 minutes. Lightly butter or oil two 9-inch loaf pans. Uncover and lightly flour your work surface, if needed. Degas each dough round and shape into a loaf. Place loaves seam side down in the prepared pans. Lightly mist each loaf with water and them cover with oats, if desired. Cover with plastic and proof for about 90 minutes.

Place a steam pan in the bottom of your oven and preheat to 450°. At baking time, uncover the loaf pans, place in the oven and immediately add about 1 cup of ice to the pan to create steam. Bake for 15 minutes, then reduce the temperature to 400° and bake for another 30 minutes or until golden brown (cover them with foil if they start browning too soon). Remove from the oven, transfer to a cooling rack and let cool completely.

Preserving Summer - Canning Tomatoes

Growing up, there was a day or two every August set aside by my mom for a marathon canning session. She would spend all day in the kitchen canning jar after jar of beautiful Red Haven peaches to have on hand all winter long. It seemed like whatever day she decided to can was the hottest day of the whole summer. There she would be, spending all day in the hot, hot kitchen, stove burners on high, boiling water steaming up the entire room, sticky peach juice everywhere. It was worth all the effort however when, in the middle of the winter, she would head to the basement and come back up with a jar, one of these labors of love, adding peaches to the dinner menu and reminding us of the joys of summer produce. 

Over the last few years I've started to do some canning every summer. I've been trying out different recipes, deciding what I find worth while, and what I don't. While I haven't followed in my mom's footsteps by canning peaches, I have found some of my own favorites. My top food to preserve so far has been tomatoes. Tomatoes are probably my favorite fruit/vegetable (however you want to classify them). They are so utterly versatile and fantastically delicious when perfectly ripe. You can use them in so many different ways and in all kinds of different foods from countries all over the world. I just love them, so preserving them via canning has been a no brainer. 

Canning tomatoes is not a difficult task, but it definitely takes some time, and involves quite a few different steps. Just know ahead of time that you'll be spending a few hours in the kitchen, but that's okay because it will all be worth it in the end, on those cold winter days when you can pull out some preserved summer produce and enjoy the product of all your hard work. It brings  a little bit of light to some of those long, cold, dark winter nights. 

Tomatoes Whole, Halved or Quartered - Packed in Juice

From 

Ball

Ingredients

  • 2-­1/2 to 3-­1/2 lb ripe tomatoes (about 8 to 11 medium) per quart 
  • Water
  • Citric Acid or bottled lemon juice
  • Salt, optional 

Directions 

Prepare  boiling water canner. Heat jars and lids in simmering water until ready for use. Do not boil. Set bands aside. 

Wash  tomatoes. Dip in boiling water 30 to 60 seconds. Immediately dip in cold water. Slip off skins. Trim away any green areas and cut out core. Leave tomatoes whole or cut into halves or quarters. 

Add  1⁄2 teaspoon citric acid or 2 tablespoons bottled lemon juice to each hot quart jar, or 1⁄4 teaspoon citric acid or 1 tablespoon bottled lemon juice to each hot pint jar. 

Pack  tomatoes in hot jars until space between tomatoes fills with juice leaving 1/2 inch headspace. Add 1 teaspoon salt to each quart jar, 1/2 teaspoon to each pint jar, if desired. Remove air bubbles. Wipe rim. Center hot lid on jar. Apply band and adjust until fit is fingertip tight. 

Process  filled jars in a boiling water canner 1 hour and 25 minutes for pints and quarts, adjusting for altitude. Remove jars and cool. Check lids for seal after 24 hours. Lid should not flex up and down when center is pressed.

Blueberry Orange Muffins

Blueberry season is still going strong around here, and I am so happy that I have finally jumped on the blueberry bandwagon, they are just so good. It wasn't really until last summer that I truly began to love blueberries, but now there is no doubt that they are one of my favorite fruit. They are so sweet, and juicy, and so much fun to bake with. There is so much you can do with a blueberry. 

Today I'm sharing a classic, the blueberry muffin, but it's a blueberry muffin with a twist. To add some pizzaz and an extra punch of flavor to these muffins, grab an orange and add the zest and juice straight to the batter. Then whip up a nice chunky streusel and sprinkle on top. The sweet citrus notes from the orange and the buttery goodness of the streusel compliment the juicy blueberries and tender muffin. It's the perfect match, and one of the best blueberry muffins I've ever had. 

This is a quick and easy recipe. Combine wet ingredients and dry ingredients and then just mix them together and fold in the blueberries. A quick streusel for the top and you're done. I have made this recipe a couple times now, and it's always good. However, one time I decided to try and cut back a little on the oil, make it a little healthier if I could, so I replaced half of the oil with yogurt. They turned out pretty well, baked up just fine, the texture was pretty normal, but I have to admit, the flavor just wasn't there. Still a nice muffin, but without that wow factor. Fat just tastes good! So if you want to cut back a bit on the oil, go right ahead, but be warned, they won't be quite as good. But still worth making for sure. 

Blueberry Orange Muffins

From

Sarabeth's Bakery: From My Hands to Yours

by Sarabeth Levine 

Ingredients

For the muffins:

  • 1 large seedless orange
  • ⅔ cup canola oil
  • ½ cup plus 1 tbsp whole milk
  • 2 eggs, at room temperature
  • 2¼ cups bread flour
  • 1 cup packed brown sugar
  • 1 tbsp baking powder
  • ¼ tsp salt
  • 1 cup fresh or frozen blueberries

For the streusel topping:

  • 6 tbsp unbleached white flour
  • 1 tbsp cane sugar
  • 1 tbsp brown sugar
  • ⅛ tsp ground cinnamon
  • 2½ tbsp butter, melted

Directions

Position the rack in the center of the oven and preheat the oven to 400 degrees. Line muffin tin with muffin liners or brush the insides of the cups with butter.

Grate the zest of the orange and set it aside. Slice the orange in half and juice both sides. You should have about ⅓ cup of juice.

Whisk the oil, milk, orange juice, orange zest, and eggs together in a medium-sized bowl. Whisk the flour, brown sugar, baking powder, and salt together in another bowl. Add the dry ingredients to the liquids and stir with a spoon, just until combined. Carefully fold in the blueberries.

Portion the batter out into the muffin cups, filling almost to the top.

To make the streusel topping, mix the flour, sugar, brown sugar, cinnamon, butter, and vanilla in a small bowl, using your fingers, until well combined and crumbly.

Sprinkle the muffin tops with the streusel.

Bake for 10 minutes. Reduce the oven to 375F degrees and continue to bake until the tops of the muffins are golden brown and a cake tester inserted into the middle comes out clean, about 10-15 minutes more. (If you are using frozen berries, allow for a few extra minutes.)

Cool the muffins in the pan for 10 minutes. Remove the muffins to a baking rack and cool completely.

Classic White Cake with Vanilla Buttercream

It was my mom's birthday this past week, and what do birthdays mean?? Cake of course! And the chance for me to make a cake, one of my favorite things to do. I'm lucky that I am on an easy rotation at school right now, so it wasn't a big deal to take some time out of my schedule and bake a nice birthday cake for my mom. She is a fan of white on white cakes, so that's what I made. Classic white cake, with sweet and sugary American buttercream frosting. Simple to be sure, but always a winner. 

While I love cake, a normal double or triple layer 9-inch cake is so big for our family. We can usually finish it off eventually, but it can take a while, and even though I absolutely love cake, I start to feel bad about eating it every night for a week straight! So this time I decided to try something new. I took my favorite white cake recipe, cut it in half, and baked it in a smaller 12x9 inch rimmed baking sheet. Once it was cool, I cut it into three rectangles and stacked those rectangles to make a triple layer cake. It turned out to be the perfect size for us. On the night of my mom's birthday, we had 8 people over for cake and they all got nice sized (but not jumbo) pieces, and there was just enough cake left over to snack on for a day or two, perfect!

I frosted this cake very simply because I was trying to quick get it done before my mom came home from work so didn't have the time for anything fancy, but I think it still turned out pretty cute. Just one color of frosting jazzed up a bit with some colored sprinkles, quick and easy.

Love you mom!

The birthday girl and her cake

You can do it!

Classic White Cake

Adapted from

Martha Stewart's Baking Handbook

Ingredients

  • 1 1/2 cups all purpose flour 
  • 1 teaspoon baking powder
  • 1/2 teaspoon salt
  • 1 1/2 sticks butter, room temperature
  • 1 cup plus 2 tablespoons sugar
  • 1/4 teaspoon vanilla extract
  • 1/2 cup milk
  • 4 large egg whites

Directions

Butter and flour a 12x9-inch rimmed baking sheet. In a medium bowl, sift together flour, baking powder, and salt; set aside.

In the bowl of an electric mixer fitted with the paddle attachment, beat the butter and 1 cup of sugar until light and fluffy, 3-4 minutes, scraping down the sides of the bowl as needed. Beat in the vanilla. With mixer on low speed, add flour mixture in three parts, alternating with the milk and beginning and ending with the flour; beat until just combined. Transfer mixture to a large bowl; set aside.

In the clean bowl of an electric mixer fitted with the whisk attachment, beat egg whites on low speed until foamy. With mixer running, gradually add remaining 2 tablespoons sugar; beat on high speed until stiff, glossy peaks form, about 3-4 minutes. Do not overbeat. Gently fold a third of the egg-white mixture into the butter-flour mixture until combined. Gently fold in the remaining whites.

Transfer batter to prepared baking sheet. Bake, rotating pans halfway through, until a light, golden brown and a cake tester inserted in the center comes out clean, 20-25 minutes. Transfer pans to a wire rack and let them cool completely. 

Frost the cakes with vanilla buttercream, recipe follows. 

Vanilla Buttercream Frosting

Adapted From 

Savory Sweet Life

Ingredients

  • 1 cup unsalted butter (2 sticks), softened
  • 4 cups (16 ounces) powdered sugar, sifted
  • ¼ teaspoon table salt
  • 2 teaspoons vanilla extract
  • 1/4 teaspoon almond extract
  • 2-4 tablespoons milk or heavy cream

Directions

On medium speed, beat the butter in the bowl of a stand mixer fitted with the paddle attachment until creamy, 1-2 minutes. Add the powdered sugar and beat on low until all the sugar has been incorporated (you may want to do this in a couple additions to prevent the powdered sugar from getting everywhere). Increase mixer speed to medium and add vanilla and almond extracts, salt, and 2 tablespoons of milk or cream and beat for 3-5 minutes, until light and creamy. Add remaining milk 1 tablespoons at a time, until you reach desired consistency. 

Baked Pita Chips

A few weeks ago I shared my favorite recipe for pita bread. It really is delicious stuff, perfect for filling with just about anything your heart may desire, or just eating straight up, fresh from the oven, either on its own or dipped in some homemade hummus or any other favorite dip of yours. Even though I love eating it fresh in sandwich form, I recently decided to try my hand at some homemade pita chips. I have to admit that I love Stacy's Pita Chips (so addicting!), so I wanted to see if I could make something similar at home. The answer is yes, I could, and so can you. 

It's a pretty easy thing to do, all you need is a couple of pieces of pita bread and some time. I took a few of my homemade pita, cut them into wedges, brushed with oil, sprinkled with salt and popped them in the oven. You're really just drying them out completely until they are crisp and crunchy, basically like making homemade croutons. And the options are endless, you can top them with pretty much any flavors you want; herbs, spices, cinnamon-sugar, whatever you feel like. It's totally worth trying this out, the perfect homemade snack. 

I feel kind of bad because I can't remember exactly how I baked these chips. What I do know is I hate when anything I bake or dry out in the oven takes on that (what I call) "dark" flavor. It's not burned at all, but it's heading in that direction. I like my stuff light in color and flavor. So, I usually use a low oven temperature and a lot of time. I'll probably turn my oven to 278 or 300 degrees and make sure I'm checking it every 10 to 15 minutes, to make sure it's not getting too dark. I want my pita to be completely dried through and lightly golden, but not dark. If the temperature is too high they start browning before they are dried through, and that just doesn't work. It can take some finagling, and sometimes a couple tries, before I get it completely right, but when I do it is totally worth it! So give it a try, if it doesn't turn out exactly how you were hoping don't give up, it's okay, just try it again. You don't want to know how many times I've forced myself to snack on a plate of overcooked baked chips!

Baked Pita Chips

Ingredients

  • A couple pieces of pita bread (I used homemade)
  • Olive oil
  • Kosher salt

Directions

Start by slicing each pita into 6-8 wedges. Arrange on a baking sheet without overlapping them too much, you want the air to be able to circulate between them all. Brush both sides generously with olive oil and sprinkle with salt. Pop them into a 275-300 degree oven (see discussion above) and bake, checking every 10-15 minutes until completely dried through and just beginning to brown. If they start browning too quickly, turn the oven temperature down by about 25 degrees and keep going, checking them a little more frequently to make sure they aren't getting to brown. 

When completely dried out, remove from oven and let cool completely before storing in an airtight container. 

Blueberry Mango Parfait

Blueberry season is officially in full swing here in Michigan, and I'm loving it! They are so good, and so good for you, a great combo. I also like that they aren't too expensive, and they last for a while in the fridge. I love raspberries and blackberries but it seems like you have to eat them in a day or they start going bad. I bought some blueberries at the farmer's market on Saturday and they made it until Thursday, and still looked really good. I only had to pick out a few bad ones here and there over the week, but the majority lasted just fine, they probably would have made it a whole week if I hadn't eaten them before that. 

One of my favorite ways to have fresh fruit for breakfast is in a parfait. All it takes is a couple of different types of fruit, yogurt and granola. It is super easy and absolutely delicious. I almost feel like I'm eating dessert for breakfast, just how I like it! This week I picked up a couple of mangos at the grocery store and made a couple of blueberry mango parfaits. Let me tell you, it's a winning combination. The tartness of the blueberries mixed with the sweetness of the mango is a wonderful mix, and the colors are so beautiful too! I think everyone should try it out before blueberry season has ended, trust me, you won't regret it. 

I'm partial to my plain, homemade yogurt, but you can use whatever kind you like. Whatever brand you get, I strongly suggest trying out plain yogurt instead of the flavored. There is so much sugar in the flavored yogurts it's kind of ridiculous. It takes a little getting used to the plain yogurt, but if you mix it up with some fruit and granola you won't even miss the added sugar. And as a bonus, plain yogurt is good for so many different things, from salad dressings and sauces, to baked goods, it's a great thing to always have on hand. If you need a little sweetness, add your own sugar, it will still be way less than what is added to the kind from the store. 

I'm also partial to homemade granola. It is so easy and cheap to make, and it tastes so much better than store bought. There are so many recipes out there, you are sure to find one that you like. I'll be sharing my current favorite recipe soon, so stay tuned! 

Blueberry Mango Parfait

Ingredients

A handful of blueberries

1/2 a mango, cut into bite-sized chunks

1/3-1/2 cup plain Greek yogurt

A handful of granola

Directions

Grab a tall glass and starting with a little yogurt start layering; yogurt, granola, fruit. Repeat until you've used it all up. Top with an extra sprinkle of granola. Grab a long spoon and dig in!