Stollen Bars

IMG_5541.jpeg

I love stollen at Christmas time. The bakery down the street makes a fantastic one. It’s so buttery and rich, one of my favorite things. It’s something that I think would be fun to make one day, but it would be a project to make and not one I have felt the need to try. It’d be fun and rewarding, but when there is such a great option down the street I don’t really feel the need.

IMG_5536.jpeg

However, when these stollen bars popped up on my Instagram feed I knew that THIS was something I could get on board with! A quick bar that hits all the same notes as stollen, but without the commitment, perfect!

IMG_5539.jpeg

They turned out absolutely delicious. Nothing light and healthy about this recipe, perfect for Christmas giving. The combination of almond extract and orange zest was reminiscent of blue moon ice cream which was a fun surprise!

I followed the recipe to a T with the one exception of replacing the marzipan with almond paste since I already was buying almond paste for making banket and it turned out just fine. It did end up baking about 10-12 minutes longer than called for but not a big deal. A fun and festive recipe that I would certainly make again.

——————————————————————————————

Stollen Bars
My Name is Yeh
Ingredients

  • 2 c (260g) all-purpose flour

  • 2/3 c (75g) almond flour

  • 1 tsp baking powder

  • 1 tsp cinnamon

  • 3/4 tsp kosher salt

  • 1/4 tsp ground cardamom

  • a pinch of ground cloves

  • a pinch of allspice

  • 3/4 c (168g) unsalted butter, divided, at room temperature

  • 4 oz (112g) cream cheese, room temperature

  • 1 c (200g) sugar

  • zest of 1 orange

  • 1 large egg

  • 1/2 tsp almond extract

  • 1/3 c (53g) dried cherries

  • 1/3 c (53g) golden raisins

  • 1 c (112g) roasted pistachios

  • 8 oz (227g) marzipan, chopped into 3/4” pieces [or substitute almond paste which is what I did and it turned out great]

  • 1/3 c (40g) powdered sugar

Directions
Preheat the oven to 350º. grease an 8” square pan and line with parchment paper so that 1” wings come up on two sides. set it aside.

in a medium bowl, whisk together the flour, almond flour, baking powder, cinnamon, salt, cardamom, cloves, and allspice. in a stand mixer fitted with a paddle, beat together 1/2 cup of the butter, the cream cheese, sugar, and orange zest on medium high until pale and fluffy, 3-4 minutes. add the egg and almond extract and beat until combined. reduce the speed to low and then beat in the dry ingredients followed by the cherries, raisins, and pistachios. fold in the marzipan pieces by hand. scrape into the pan and spread it out evenly with your hands or a rubber spatula. bake until golden around the edges and lightly browned on top; begin checking for doneness at 28 minutes. [Mine ended up taking close to 40 minutes give or take, so keep a close eye on it]

spread the remaining 1/4 cup of butter all over the top while it’s still hot out of the oven so that the butter melts and then sprinkle with powdered sugar. let cool in the pan and then cut into squares and enjoy! keep in an airtight container at room temperature or in the fridge for up to two weeks.

Chewy Molasses Cookies

IMG_5554.jpeg

It was Christmas cookie time this past weekend. I took a few days off of work and got some good work done. I painted a wall that had been languishing with just primer on it for weeks, I did a little Christmas decorating, I spent time outdoors, I put new hooks on the wall in the entryway which means my coats won’t be constantly falling onto the floor, all good things. But the best part of the weekend was having time to enjoy baking and delivering Christmas cookie packages.

IMG_5547.jpeg

This molasses cookie recipe has been an absolute MUST every single year since I first made it back in 2013. It’s the only recipe that has appeared at Christmas every single year. Quite a feat! [check out this post from Jan 2014).

It is just the best. It’s buttery, sweet and salty, chewy and full of the perfect balance of spices. It’s always the cookie that takes people by surprise and makes them ask for the recipe. Since first making this recipe I’ve made a few minor changes. The blog I originally got it from had adapted it from this Bon Appetit recipe. After making it a few times I realized that it didn’t make sense how the blogger had changed it. She called for you to melt the butter and then beat it until “light and fluffy” which just doesn’t make sense, or work, with melted butter. So I went to the original recipe which made things much simpler, just melt the butter, add the rest of the wet ingredients, and then mix in the dry. Easy!

IMG_5562.jpeg

The original recipe calls for either light or dark molasses. I’ve made these with both and I much prefer the dark molasses. It adds more of a bitterness which contrasts well with the sweet sugary coating. I would recommend using dark molasses, but either will work.

The only other thing to notice is that the original recipe calls for 1/2 teaspoon of kosher salt, while the other blog called for 1/2 teaspoon of salt. So I’ve been using 1/2 teaspoon of regular/table salt for years which means the cookies are saltier than the original recipe likely intended. Is this a problem? Absolutely not. In fact, I think the extra bite of salt in these cookies is part of what makes them so good. I would not cut back on the salt, or substitute with kosher salt because I love them how they are!

——————————————————————————————

Molasses Cookies
Ingredients

  • 2 cups (260 grams) all-purpose flour

  • 2 teaspoons baking soda

  • 1 1/2 teaspoon ground cinnamon

  • 1 teaspoon ground ginger

  • 3/4 teaspoon ground cardamom

  • 1⁄2 teaspoon salt

  • 1 large egg

  • 1⁄2 cup (1 stick) unsalted butter, melted

  • 1⁄3 cup granulated sugar

  • 1⁄3 cup robust-flavored (dark) molasses

  • 1⁄4 cup (packed) dark brown sugar

  • Coarse sanding or raw sugar (for rolling)

Directions
Place racks in lower and upper thirds of oven; preheat to 375°. Whisk flour, baking soda, cinnamon, ginger, cardamom, and salt in a small bowl. Whisk egg, butter, granulated sugar, molasses, and brown sugar in a medium bowl. Mix in dry ingredients just to combine.

Place sanding sugar in a shallow bowl. Scoop out dough by the tablespoonful and roll into balls (if dough is sticky, chill 20 minutes). Roll in sugar and place on 2 parchment-lined baking sheets, spacing 2” apart.

Bake cookies, rotating baking sheets halfway through, until cookies are puffed, cracked, and just set around edges (overbaked cookies won’t be chewy), 8–10 minutes. Transfer to wire racks and let cool.

Roasted Delicatata Squash with Brown Butter and Pomegranate

IMG_5454.jpeg

I was intivted to a friends Thanksgiving the Saturdayafter thanksgiving. The hosts were providing the turkey and asked everyone to bring a side or dessert. After all of the Thanksgiving prep and cooking I wanted something very simple to contribute. I was inspired a few days before the party by a roasted squash recipe I saw on Instagram.

I used the picture and the name as a starting point but just did my own thing when putting it together. I wrote out the recipe below as best I can remember although I didn’t measure anything when I made it. I roasted the squash with a little oil and maple syrup at 400 for 25-30 minutes which turned out to be a perfect temperature and timing to nicely brown the pieces and get the tender without drying them out or making them get tough. I arranged the squash on a plate and drizzled and sprinkled with everything else. Simple and delicious. I used balsamic, but you could also use pomegranate molasses or date molasses. You could drizzle with just plain melted butter, or a good finishing oil, and you could sprinkle with other fruit, herbs, seeds or nuts (dried cherries or cranberries, pistachios, sunflower or pumpkin seeds, fresh parsley or cilanto, you get the idea).

I thought it turned out great! Got some good review from friends. A fun, different composed salad for a group. Would definitely do this or something similar again.

——————————————————————————————————————————————————————————————-

Roasted Delicatata Squash with Brown Butter and Pomegranate
Ingredients

  • 2 medium-to-large delicata squash

  • 2-3 tablespoons olive oil

  • 1-2 tablespoons maple syrup

  • Kosher salt

  • 4-6 tablespoons butter

  • Balsamic vinegar

  • Pomegranate arils

  • Fresh chives

Directions
Preheat the oven to 400 degrees. Cut the squash in half the long way, scoop out the seeds and then slice eat half of squash into 1/2 inch half-moons. Toss the squash with olive oil, maple syrup and kosher salt to taste. Arrange in a single layer on two baking sheets. Roast for 25-30 minutes until lightly browned and tender, flipping squash about 20 minutes into roasted to more evenly brown both sides.

While the squash is cooking brown the butter. Place the butter in a light-colored pan over low-to-medium heat. Stir the butter or rotate the pan the entire time it is on the heat to keep it moving. Once melted, the butter will begin to foam and sizzle around the edges. Keep stirring. After about 5-10 minutes the butter will turn golden brown. Some foam will subside and the milk solids at the bottom of the pan will be toasty brown. It will smell intensely buttery and nutty. Immediately remove the pan from heat and pour the butter into heat-proof bowl to stop the cooking process or it may burn if left in the hot pan. Set aside until the squash is done.

Remove squash from oven and let cool slightly. Arrange squash in layers on a large platter. Drizzle with the browned butter and balsamic vinegar to taste. Sprinkle with pomegranate arils and chopped chives. Serve warm. As it cools the butter may start to solidify somewhat but it is still perfectly delicious.

Lemony Brussel Sprout Kale Salad with Leeks, Pancetta and Pecorino

IMG_5427.jpeg

I’ve been loving Brussel sprouts this fall. Not that this is a new love for me, but over the past month or two I’ve been eating a lot of them, so I decided that I wanted Brussel sprouts for Thanksgiving this year.

IMG_6637.jpeg

I tried a few different ideas prior to the holiday to see what I thought would be best. I tried a Roasted Brussels Sprouts with Warm Honey Glaze from Bon Appetit to start. It was good but not quite as good as I hoped. I decided that I wanted more of a fresh, lemony recipe. I thought about the flavors I like and the ways I’ve made Brussels in the past and I came up with my own recipe.

IMG_5452 (1).jpeg

I decided to use lots of lemon zest and juice for freshness and brightness. I wanted a punch of flavor with the cheese so I went with a sharp and salty Pecorino. And for something fun that I don’t typically do I decided to add crispy pancetta on the top, using some of the pancetta fat to roast the Brussel sprouts. A little garlic, some kale for bulk, and dried cherries for a little sweetness were the final touches.

I have to say, I loved this combination. I thought it was pretty fantastic, and I would definitely do it again and again! I wrote out a general idea of what I did below. I didn’t really measure anything when I did it, but this is pretty close.

——————————————————————————————

Lemony Brussel Sprout Kale Salad with Leeks, Pancetta and Pecorino
Ingredients

  • 1/2 lb pancetta

  • 2 quarts of Brussel sprouts

  • 2 large leeks

  • Butter

  • 1-2 cloves of garlic, thinly sliced

  • 1 lemon, zested and juiced

  • 1 cup grated Pecorino Romano Locatelli cheese

  • 1 pound kale, torn into bite sized pieces

  • Dried cherries

Directions
Cut the pancetta into small cubes and sauté until the fat has rendered and the pancetta is slightly crispy. Remove the pancetta pieces from the pan and reserve the fat.

Preheat oven to 450 degrees. Halve Brussel sprouts, toss with the reserved pancetta fat and kosher salt and roast in a single layer for 15-20 minutes (length of time will depend on your over and your desired done-ness of the Brussel sprouts).

In the meantime, thinly slice the leeks into rounds and saute in a little butter and kosher salt until wilted and tender and starting to brown. Add the garlic during the last few seconds of cooking to warm slightly, then remove from heat. Add the kale and the lemon juice and zest and mix it altogether so the kale wilts slightly in the heat of the leeks.

Once the Brussel sprouts are done add them to the leek-kale mixture and stir to combine. Add in the pecorino cheese and dried cherries and toss a few more times. Transfer the salad to a serving bowl and top with the pancetta, and sprinkle with a few more cherries and a little extra cheese. Serve warm or room temperature.

Dutch Apple Pie

When I was younger I didn’t really appreciate pie. I was, and always will be, a cake girl, but I have grown to love and appreciate a good pie as well. For Thanksgiving this year I felt like making a pie, and settled on Dutch apple because I love crumb topping, and I love apples. I settled on a recipe that originally came from America’s Test Kitchen, but I found it on The Splendid Table website. I figured I couldn’t go wrong!

IMG_5391.jpeg

I was right! This pie turned out so so well. I didn’t end up using the crust as stated in the original recipe (posted below) because I had a crust I had made a few times recently that turned out so well I wanted to stick to what I knew worked. The recipes are actually quite similar, but mine uses yogurt while this one calls for sour cream.

IMG_5407.jpeg

For the crumb topping, I actually increased the amount because in my opinion you can never have too much streusel! I upped it to 8 tablespoons of butter and then increased everything else by 1.33x. I did not think it was too much! I would do this again for sure!

——————————————————————————————

Dutch Apple Pie
From The Splendid Table
Ingredients

Crust [I did not use this crust recipe, see below]

  • 1/4 cup ice water

  • 4 teaspoons sour cream

  • 1 1/4 cups (6 1/4 ounces) all-purpose flour

  • 1 1/2 teaspoons granulated sugar

  • 1/2 teaspoon salt

  • 8 tablespoons unsalted butter, cut into 1/4-inch pieces and frozen for 15 minutes

Filling

IMG_5399.jpeg
  • 2 1/2 pounds apples, peeled, cored, halved, and sliced 1/4 inch thick

  • 1/2 cup melted vanilla ice cream

  • 1/2 cup raisins (optional)

  • 1/2 cup (3 1/2 ounces) granulated sugar

  • 1 tablespoon lemon juice

  • 1 teaspoon vanilla extract

  • 1 teaspoon ground cinnamon

  • 1/2 teaspoon salt

Topping

  • 1 cup (5 ounces) all-purpose flour

  • 1/2 cup packed (3 1/2 ounces) light brown sugar

  • 6 tablespoons unsalted butter, melted

  • 1/2 teaspoon salt

Directions
We prefer Golden Delicious or Gala apples here, but Fuji, Braeburn, or Granny Smith varieties also work well. You may substitute 1/2 cup of heavy cream for the melted ice cream, if desired. This pie is best when baked a day ahead of time and allowed to rest overnight. Serve with vanilla ice cream.

FOR THE CRUST: Combine water and sour cream in bowl. Process flour, sugar, and salt in food processor until combined, about 5 seconds. Scatter butter over top and pulse until butter is size of large peas, about 10 pulses. Add sour cream mixture and pulse until dough forms clumps and no dry flour remains, about 12 pulses, scraping down sides of bowl as needed.

Turn dough onto sheet of plastic wrap and form into 4-inch disk. Wrap tightly in plastic and refrigerate for 1 hour. (Wrapped dough can be refrigerated for up to 2 days or frozen for up to 1 month. If frozen, let dough thaw completely on counter before rolling.)

FOR THE FILLING: Toss all ingredients in large bowl until apples are evenly coated. Let sit at room temperature for at least 1 hour or up to 2 hours.

Adjust oven rack to lower-middle position and heat oven to 350 degrees. Let chilled dough sit on counter to soften slightly, about 10 minutes, before rolling. Roll dough into 12-inch circle on lightly floured counter. Loosely roll dough around rolling pin and gently unroll it onto 9-inch pie plate, letting excess dough hang over edge. Ease dough into plate by gently lifting edge of dough with your hand while pressing into plate bottom with your other hand.

Trim overhang to 1/2 inch beyond lip of plate. Tuck overhang under itself; folded edge should be flush with edge of plate. Crimp dough evenly around edge of plate using your fingers. Wrap dough-lined plate loosely in plastic and refrigerate until dough is firm, at least 30 minutes.

FOR THE TOPPING: Stir all ingredients in bowl until no dry spots remain and mixture forms clumps. Refrigerate until ready to use.

Place dough-lined plate on parchment paper–lined rimmed baking sheet. Working with 1 large handful at a time, distribute apple mixture in plate, pressing into even layer and filling in gaps before adding more. Take care not to mound apple mixture in center of plate. Pour any remaining liquid from bowl into pie. Break topping (it will harden in refrigerator) into pea-size crumbs and distribute evenly over apple mixture. Pat topping lightly to adhere.

Bake pie on sheet until top is golden brown and paring knife inserted in center meets no resistance, about 1 hour 10 minutes, rotating sheet halfway through baking. Let pie cool on wire rack for at least 4 hours or preferably overnight. Serve.

———————————————————————————————————————————————————————————————

Alternative Crust [This is the crust I used in the pie pictured above]
Yogurt Pie Crust
Ingredients

  • 1 1/4 cup unbleached white flour chilled in the freezer for 15 minutes (I used spelt and it worked beautifully)

  • 1/4 tsp. salt

  • 8 tbsp. (1/2 cup) cold unsalted butter

  • 1/4 cup full-fat yoghurt (if liquidy, drain it first so it is thick and creamy)

  • 2 tsp. fresh lemon juice

  • 1/4 cup ice water

Directions
First, make sure your flour and butter are chilled. In a medium mixing bowl, mix the flour and salt together, then cut the butter into the flour with a pastry blender, a food processor, or two knifes, until the butter is evenly distributed with the largest chunks about the size of peas (these chunks of butter are what will give your crust its delightful flakiness). In a small bowl, mix together the ice cold water, cold yoghurt, and 2 teaspoons of lemon juice. Pour this mixture into the flour. With a wooden spoon, gently mix together, just until you can get it into a ball. It doesn't have to be perfectly mixed, you want to avoid overworking the dough. Flatten the ball into a disc and wrap in plastic or parchment paper and chill in the fridge for at least 1 hour before using.

Thanksgiving 2019

IMG_5410.jpeg

I love thanksgiving. It was another great one this year. There were 16 of us this year including grandpa, grandkids, an aunt and uncle, and some cousins with their kids. A good bunch! I’ve made the same turkey for the past several years. It’s from Bon Appetit and it has turned out great every year. This year I wanted a slightly bigger turkey but know that this can present a problem with roasting evenly so I decided to roast the turkey in parts instead of whole. Just a few days later, lo and behold, I was listening to Bon Appetit’s podscast where they mentioned their turkey receip this year called for the turkey to be cut into pieces before roasting. Perfect!

IMG_5414.jpeg

I listened to another podcast where Alison Roman was talking about her new cookbook and what she was going to make for thanksgiving this year and she mentioned her turkey was dry-brined in a mixture of herbs and brown sugar, and then stuffed with lemons and red onion. I thought this flavor combo sounded great so I decided to combine the two recipes.

IMG_5415.jpeg

I cut the turkey into parts (2 leg/thigh combinations, 2 wings, and one double breast) and then dry brined it (it was a 21.4 pounder this year so I increased the total amount of dry brine accordingly) in Alison’s mixture of sugar, salt and thyme but added in a good amount of lemon zest. I let that sit for 2 days on baking sheets in the fridge, uncovered. I then baked it on Thanksgiving morning following the Bon Appetit method, on a wire rack at 425 degrees initially, and then decreasing to 300 degrees until done. I put a few cut up red onions and two full heads of garlic under the wire racks as well. I glazed with the Bon Appetit glazed as well, but substituted lemon for orange. It ended up baking at 450 degrees (I decided to up the temp just a bit since my bird was so big) for 25-30 minutes, and then another 60-65 minutes at 300 degrees. I had to pull the legs a few minutes before the breast was done.

The final result? It was great! Both the white and dark meat were cooked perfectly, no dry over-cooked breast meat here. I let the turkey sit for about an hour before carving. While it was resting I made Alison Roman’s turkey gravy which turned out beautifully smooth and glossy. It was rich and buttery and so delicious. Overall the combination of recipes and a fresh local turkey came together for another win.

IMG_5422.jpeg

Had one fail this year, thankfully it wasn’t the turkey. And thankfully I had the time to fix it! In addition to the turkey, every year I also enjoy making dinner rolls. This year I was planning on making two different recipes; a simple sourdough white roll, and a slightly sweetened molasses and oat sourdough bun which was dairy free for some family members with food intolerances. Since the molasses buns were a new recipe I tested them twice, TWICE in the week before Thanksgiving and was feeling good about them.

IMG_5425.jpeg

I started these rolls again the Tuesday night before Thanksgiving. The first rise went fine, but after shaping them on Wednesday I left them in the fridge overnight for the second rise. In the morning they didn’t look like they had done a lot, they were still pretty flat, but I had to get them in the oven so in they went after warming on the counter for an hour or two. In the oven they did not rise at all. Not one millimeter. They came out as flat little pancakes of dense dough. I have no idea what went wrong. I know the started was active because I used the exact same starter for the other batch of sourdough rolls and those rose just fine.

IMG_5429.jpeg

I was stumped but didn’t have time to dwell on it. I thankfully knew I had time to whip together something else and get it baked before everyone showed up at 12:30. I found a good basic soft and buttery dinner roll on a dependable blog. I’ve made very similar recipes in the past and knew it would probably be fine. It was. This recipe was simple and rose easily and baked up like a dream. They were not dairy free but they were delicious so that’s what we went with! Phew, saved the rolls!

——————————————————————————————

IMG_5430.jpeg

Spiced and Glazed Roast Turkey
From Bon Appetit
Ingredients
Turkey

  • 1 12–14-lb. turkey, cut into pieces

  • 2 Tbsp. whole black peppercorns

  • 2 Tbsp. whole pink or black peppercorns

  • ½ cup Diamond Crystal or ¼ cup plus 1½ tsp. Morton kosher salt

  • 2 Tbsp. garlic powder

  • 2 Tbsp. onion powder

  • 1 Tbsp. light brown sugar

  • 1 Tbsp. smoked paprika

Glaze and Assembly

  • Small handful of hardy herbs (such as sage, rosemary, bay leaves, and/or thyme)

  • 4 garlic cloves, crushed

  • 2 2x1" strips orange zest

  • ⅓ cup low-sodium soy sauce

  • ⅓ cup (packed) light brown sugar

  • ⅓ cup sherry vinegar or red wine vinegar

  • 6 Tbsp. neutral oil (such as vegetable, peanut, or canola)

Brining the Turkey: Place turkey pieces, skin side up, on a wire rack set inside a rimmed baking sheet. Sprinkle salt mixture liberally all over turkey, patting to adhere. You may not need all of it, but it’s good to have extra since some will end up on the baking sheet. Chill bird, uncovered, at least 24 hours and up to 2 days.

IMG_5436.jpeg

Glaze and Assembly: Remove turkey from wire rack and rinse baking sheet and rack if needed (turkey will most likely release some liquid). Line baking sheet with 3 layers of foil to make cleanup easy and set rack back inside. Arrange turkey pieces on rack, skin side up, and let sit at room temperature 2–3 hours to help decrease the cooking time.

Meanwhile, cook herbs, garlic, orange zest, soy sauce, brown sugar, and vinegar in a small saucepan over medium heat, stirring occasionally, until sugar is dissolved and glaze thickens slightly (it should just barely coat a spoon), 10–12 minutes. Remove glaze from heat.

IMG_5439.jpeg
IMG_5452.jpeg

Place a rack in middle of oven; preheat to 425°. Rub turkey with oil and pour 1 cup water into baking sheet. Roast turkey, rotating baking sheet halfway through, until skin is mostly golden brown, 20–25 minutes. Reduce oven temperature to 300° and continue to roast turkey, brushing with glaze every 20 minutes and adding more water by ½-cupfuls as needed to maintain some liquid in baking sheet, until an instant-read thermometer inserted into the thickest part of breast registers 150°, and 170° when inserted into the thickest part of the thighs, 50–70 minutes longer (total cooking time will be 1–1½ hours). [Mine ended up going an additional 60-64 minutes] Skin should be deep golden brown and shiny. Transfer turkey to a cutting board; tent loosely with foil. Let rest 30–60 minutes before carving.

——————————————————————————————

Dry-Brined Turkey with Sheet-Pan Gravy
From Alison Roman
Ingredients

Turkey:

  • 1 bunch fresh thyme

  • ⅓ cup kosher salt

  • ⅓ cup light brown sugar

  • 2 tablespoons coarsely ground black pepper

  • 1 12- to 14-pound turkey

  • 4 to 5 medium red onions, quartered

  • 3 lemons, halved crosswise

  • 2 heads garlic, halved crosswise

  • ⅓ cup olive oil

  • 6 tablespoons unsalted butter

Gravy:

  • 3 cups Chicken or Turkey Stock, plus more as needed

  • 6 tablespoons unsalted butter

  • ½ cup all-purpose flour

  • 2 tablespoons low-sodium soy sauce, plus more to taste

  • 2 tablespoons apple cider vinegar or white wine vinegar, plus more to taste

  • Kosher salt and freshly ground black pepper

Turkey: Strip the leaves from 4 sprigs of thyme, and coarsely chop the leaves. Place in a medium bowl along with salt, brown sugar and pepper; mix to blend well.

Place the turkey on a rimmed baking sheet lined with a wire rack. (If you do not own a wire rack, just place the turkey directly on the baking sheet.) Make sure the giblets (the bagged heart, kidneys and liver, and the neck) are removed from the cavity. Using paper towels, pat the turkey dry on all sides. Sprinkle with the salt mixture, making sure to distribute the seasoning evenly to all the bits and parts. Refrigerate turkey, uncovered, for 8 to 24 hours — the longer, the better.

Heat oven to 325 degrees. Remove turkey from the fridge, and transfer it to another clean rimmed baking sheet (discard any liquid that has accumulated on the first baking sheet). Stuff turkey with remaining bunch of thyme, a few of the quartered onions and half of the lemons and garlic. Scatter remaining onion quarters, lemons and garlic around the turkey. Combine olive oil and 6 tablespoons butter in a small pot over medium heat until butter is melted. Pour half of the mixture over the turkey and onions. Toss the onions lightly to evenly coat; season everything with salt and pepper.

Roast, rotating the baking sheet every hour or so, until the turkey has reached 160 degrees when a thermometer is inserted in the deepest part of the thigh, 2½ to 3 hours. The turkey will be cooked through and tender, and the skin will be brown, but you can and should get it browner.

Increase temperature to 425 degrees. Pour remaining butter mixture over the turkey (warm it slightly if solidified) and continue to cook until the internal temperature reaches 165 degrees and the skin is very deeply browned all over, 20 to 25 minutes. It's OK if the internal temperature is just shy of 165 degrees, it will come to temperature as it rests. (If you find the skin is browning too quickly, especially on the top at the breast, place a sheet of foil over the breast.)

Remove turkey from the oven and let rest on the baking sheet for 30 minutes (and upward of 45 minutes). Tip the turkey, cavity-side down, making sure the aromatics stay inside the cavity and letting any juices run out onto the rimmed baking sheet. Transfer the roasted onions, lemons and garlic to another dish and set aside. Transfer the turkey to a cutting board and let it continue to rest while you make the gravy.

Gravy: Pour about 1 cup stock onto the baking sheet. Using a spatula, scrape up the bits from the turkey drippings, just as if you’re deglazing a skillet after searing a piece of meat. Carefully pour the contents of the baking sheet into a large measuring cup or other spouted vessel. Add remaining stock until you have 4 cups liquid; you may need more or less stock depending on how juicy the bird was.

Melt 6 tablespoons butter in a medium pot over medium heat. Add flour and cook, whisking constantly, until flour is sizzling furiously and well-toasted, about the color of a graham cracker, 4 to 6 minutes. (The mixture will be thick at first but will thin as the flour cooks.) Slowly whisk in fortified stock mixture, about ½ cup at a time, letting it bubble, thicken and incorporate completely between additions until all of it has been added.

Add soy sauce and vinegar, and season with salt and pepper. Continue simmering until gravy is at your desired viscosity and the flavors have all melded together, 5 to 8 minutes. Add more soy sauce if you think it needs more depth of flavor, vinegar if you want more acidity, and salt and pepper for seasoning. Remove from heat and set aside until ready to serve.

———————————————————————————————————————————————————————————————

Soft and Buttery Dinner Rolls
From Sally’s Baking Addiction
Ingredients

  • 1 cup (240ml) milk, around room temperature

  • 2 and 1/4 teaspoons instant yeast

  • 2 Tablespoons granulated sugar, divided

  • 1 large egg

  • 1/4 cup (60g) unsalted butter, softened to room temperature and cut into 4 pieces

  • 1 teaspoon salt

  • 3 cups (375g) all-purpose flour or bread flour

  • Optional topping: 2 Tablespoons melted unsalted butter mixed with 1 Tablespoon honey

Add flour, salt, sugar and yeast to the bowl of your stand mixer fitted with a dough hook. Whisk to combine. In a separate bowl whisk together the milk and egg - add to the flour mixture. Beat on low speed for 30-60 seconds, scraping down the sides of the bowl with a rubber spatula as needed until all of the flour is moistened. Then increase to medium speed and knead until the the dough is well developed and comes together to form a soft dough. It will be sticky. Add flour as needed to make it manageable but don’t add too much so it becomes too dry.

Lightly grease a large bowl with oil or nonstick spray. Place the dough in the bowl, turning it to coat all sides in the oil. Cover the bowl with plastic wrap, or a clean kitchen towel. Allow the dough to rise in a relatively warm environment for 1-2 hours or until double in size.

Grease a 9×13 inch baking pan or two 9-inch square or round baking pans. Set aside.

When the dough is ready, turn it out onto a lightly floured surface. Divide the dough into 14-16 equal pieces. Shape each piece into a smooth ball. Arrange in prepared baking pan. (For a 9x13 inch pan, 15 rolls is nice to arrange in 3 rows of 5 rolls each).

Cover shaped rolls with plastic wrap, or a clean kitchen towel. Allow to rise until puffy, about 1 hour. Near the end of the rising time, preheat oven to 350°F. Bake for 20-25 minutes or until golden brown on top, rotating the pan halfway through. If you notice the tops browning too quickly, loosely tent the pan with aluminum foil. Remove from the oven, brush with optional honey butter topping, and allow rolls to cool for a few minutes before serving.

Beginner's Sourdough Bread

IMG_5821.jpg
IMG_0640.jpg

Over the past several months (I guess even 6-8 months!) I have gotten back into the habit of making myself bread every week or every other week. I’ve been really enjoying the process and seeing how each loaf and recipe turns out. Some are better than others, but they’re all good. I’ve been using the book, Artisan Sourdough Made Simple which really is simple and the recipes fit my lifestyle well.

IMG_9960.jpg

However, more recently I’ve been wanting to experiment with some other recipes for fun. See what else I can make. I’ve been eyeing some recipes on the blog The Perfect Loaf for literally years now, and finally went for it and decided to try what looked like the simplest recipe on the blog, his Beginner’s Sourdough Bread. While the overall process was longer than the recipe I’ve been making, it was just as simple and was really fun and rewarding to try.

IMG_0466.jpg

I started the dough on Thursday night and was able to bake off the two loaves on Saturday mid-afternoon. There really was very little hands-on time. Just a lot of checking in to see how things were going, deciding when to slow things down in the fridge vs leaving it on the counter. I didn’t follow the timings exactly as written in the original recipe (which is very precise), mainly because my house is much colder than the temperature that he calls for you to rise the bread at. Not a big deal, but takes a lot more monitoring how the rising is going to figure out when to move on to the next step.

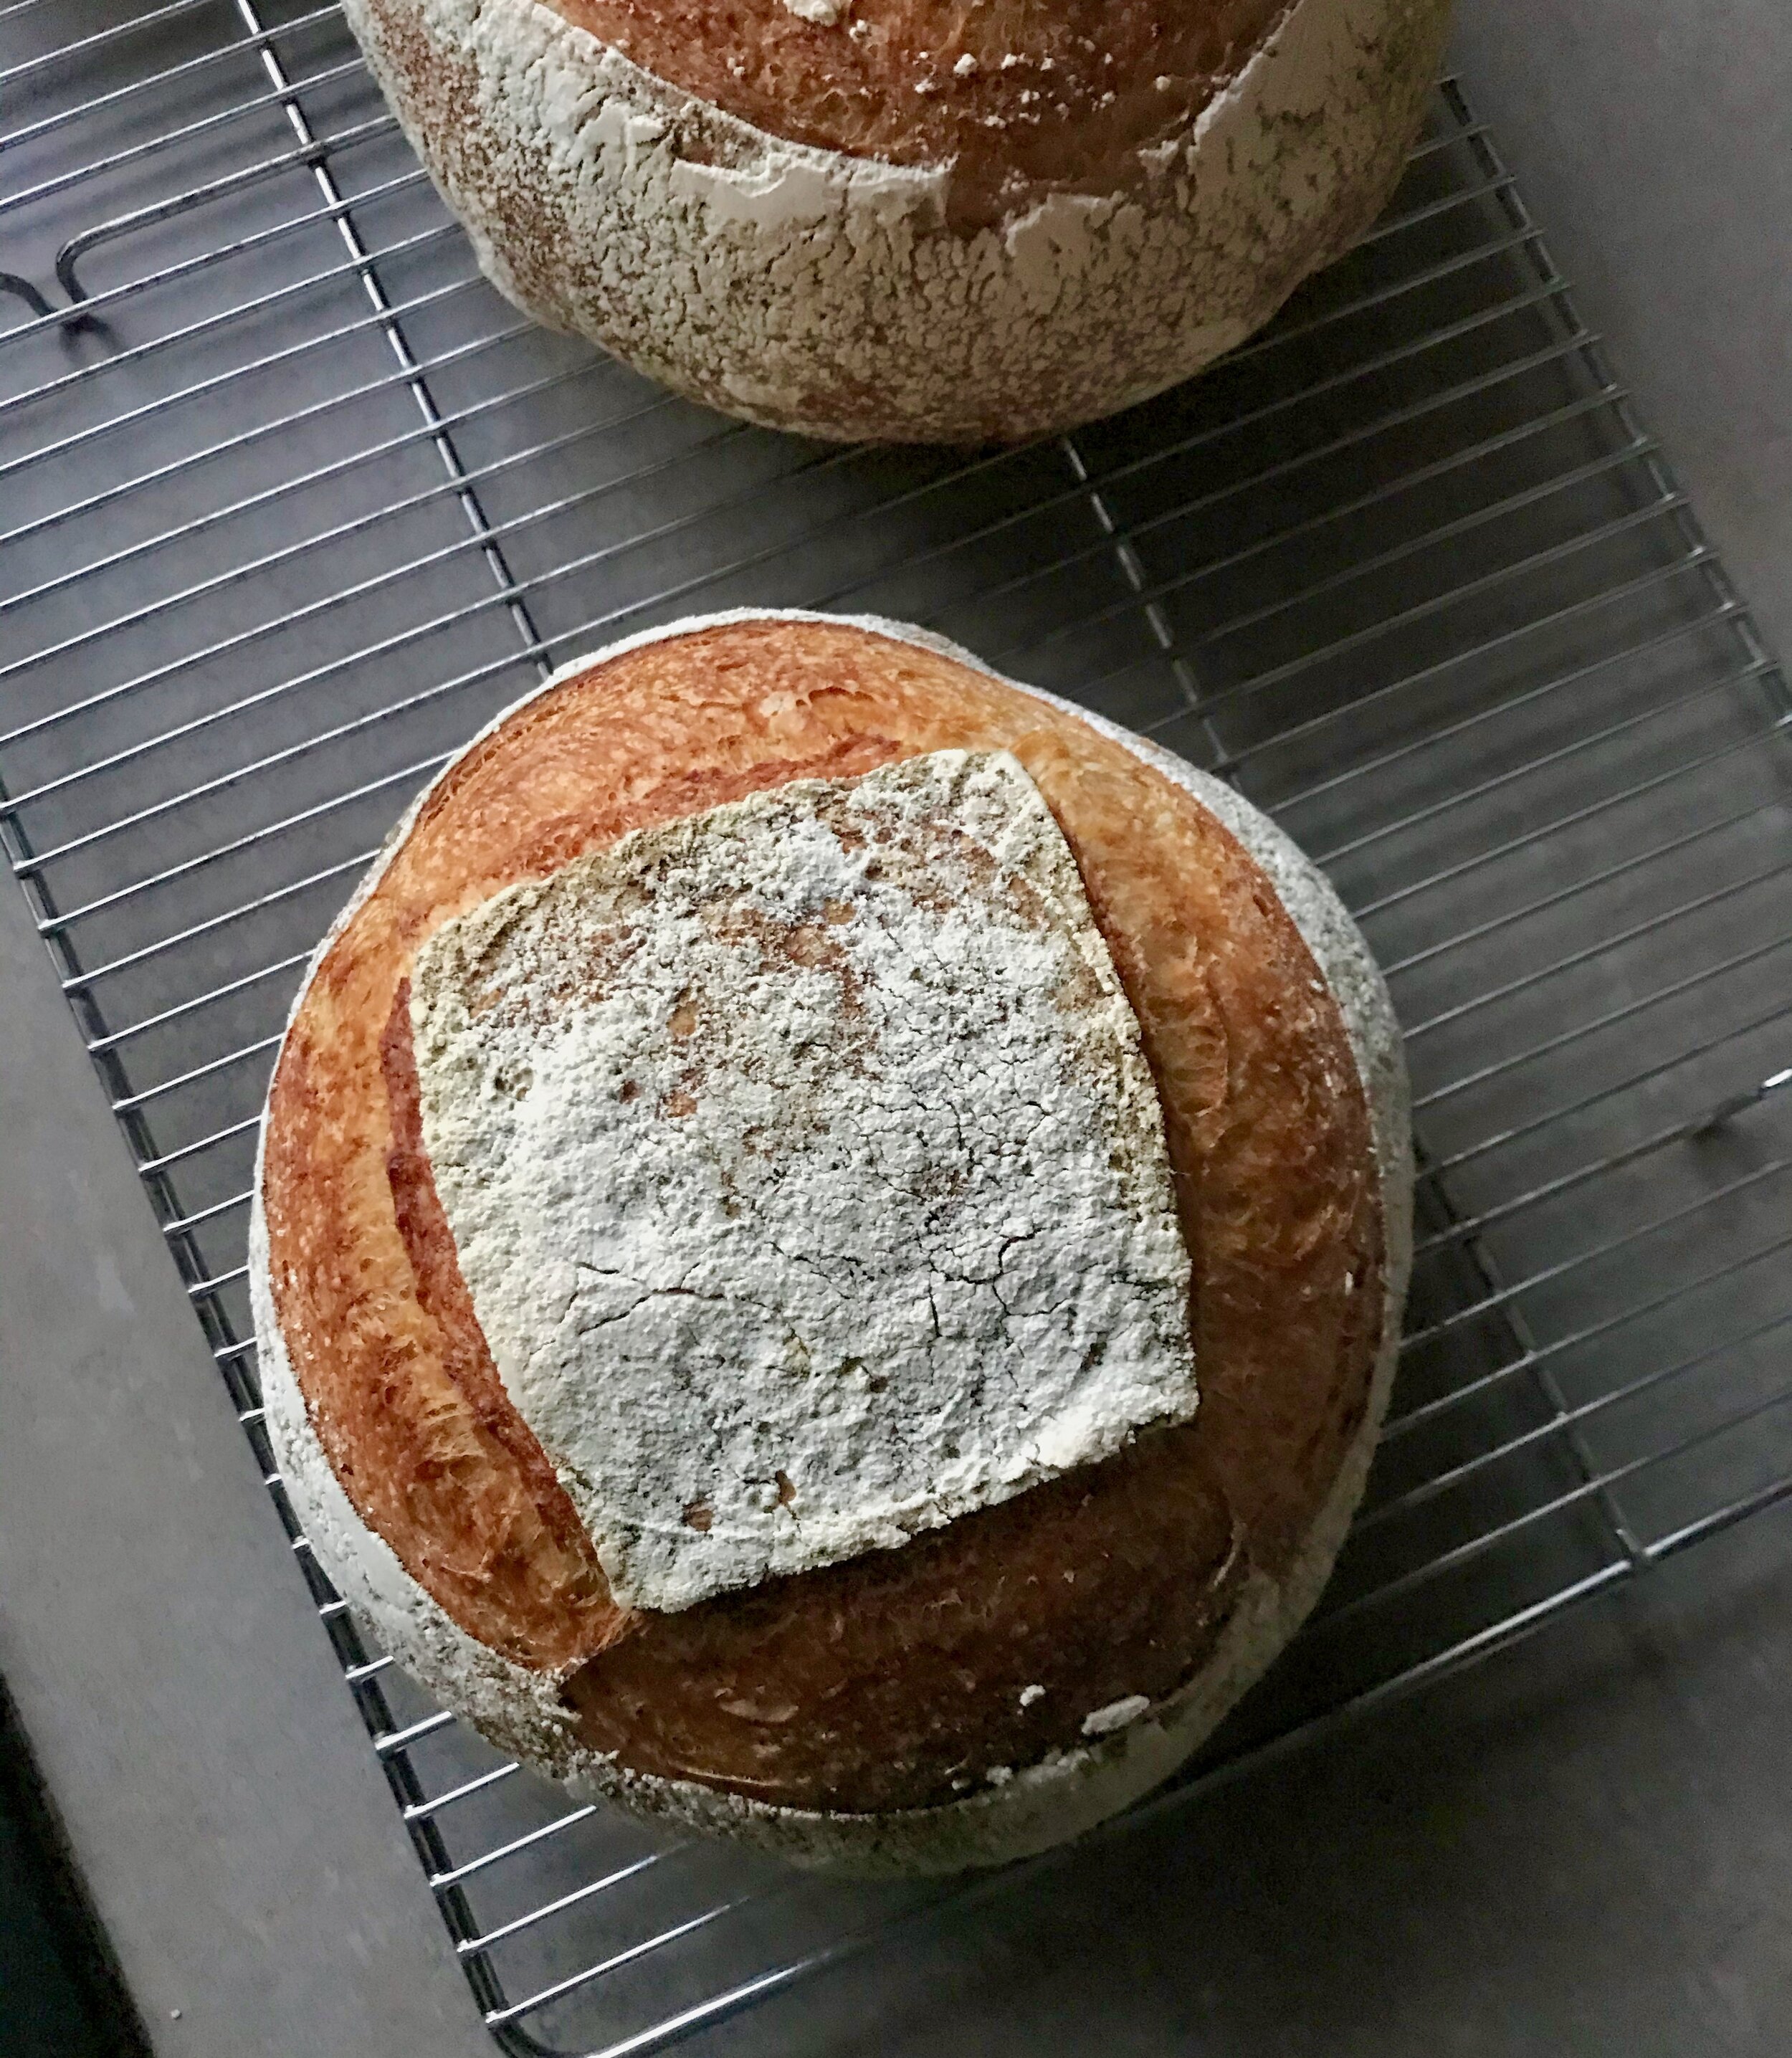
End result: This recipe turned out two beautiful loaves! Some of the best I’ve made. The crumb was tight and even, no big, uneven holes. It got some great oven spring and browned up well. The crust was thin and snappy. Overall extremely happy with this recipe and am excited to see what else I can do with it in the future!

——————————————————————————————

Beginner’s Sourdough Bread
From The Perfect Loaf
Ingredients
Levain

  • 40 grams Mature sourdough starter (100% hydration)

  • 40 grams Whole Wheat Flour

  • 40 grams Bread Flour

  • 80 grams water, at room temperature

Dough

  • 748 grams Bread Flour

  • 110 grams Whole Wheat Flour

  • 49 grams Dark Rye Flour I did not have any rye flour so I used more of the same whole wheat flour

  • 691 grams water (warm/cool water temperature to meet the desired dough temperature)

  • 18 grams salt

  • 184 grams mature, 100% hydration levain (from Levain Build, above)

Directions
LEVAIN: Mix together everything called for in the Levain Build section above in a clean jar in the morning and store somewhere around 74-76°F (23-24°C) ambient for 5-6 hours. Keep an eye on how your levain is progressing during this time. When its ready to be used it will be expanded, bubbly on top & at the sides, and smell almost a little sour.

AUTOLYSE: Using your hands mix all the flour and most of the water (reserve 50g water for later) called for in the “Dough Mix” section above in a bowl until all dry bits are hydrated. Cover the bowl and store somewhere warm (near your levain is convenient) for 1 hour. (Note that this autolyse stage does not incorporate or use salt or the levain build in any way, they are two separate entities at this point that will be mixed together later in the process.)

MIX: At this point your autolyse is complete and your levain is ready. Add salt, reserved water, and levain to your already mixed flour & water and mix thoroughly. I like to spread everything on top of dough resting in the bowl and use my hand to pinch all the ingredients together. Transfer dough to a tub or thick-walled bowl for bulk fermentation.

(At this point use your instant read thermometer to take the temperature of your dough to get your final dough temperature. If your FDT is below 78°F (25°C) next time use warmer water, and conversely, if it’s above 78°F (25°C) use cooler water.)

BULK FERMENTATION: At 76-80°F (24-26°C) ambient temperature bulk fermentation should go for about 4 hours. [I actually ended up bulk fermenting for close to 24 hours in my cool house, it’s been a very cold November and I keep the house at around 64 degrees at night, and during the day when I’m at work. Even with this much prolonged rise the dough did not seem over-risen. It worked out great in the end. But I had to keep checking on it and had to decide at what point did I think it was ready to shape. I ended up using my bakers intuition which seemed to work well this time] Perform 3 sets of stretch and folds during bulk fermentation, spaced out by 30 minutes.

Each set consists of 4 folds, one at the North, South, East and West sides. Wet your hands with a little water to prevent sticking and then lift up one side (North) of the dough with two hands. Stretch the dough up high enough just so that you can fold it completely over to the other side of the dough in the bowl. Rotate the bowl 180° and do the other side (South). Finish the other two sides (East and West) to complete the set. Let the dough rest 30 minutes, covered, between sets.

After that third set of stretch and folds, let the dough rest the remainder of bulk fermentation. During this time we let the flour ferment further, aerating it (making it rise), strengthening it and developing flavor.

At the end of bulk fermentation your dough should have risen anywhere between 20% and 50%, should show some bubbles on top, sides and the edge of the dough where it meets the bowl should be slightly domed showing strength.

DIVIDE AND PRESHAPE: Lightly flour your work surface and dump out the dough. With your bench knife in one hand divide the dough into two halves. Lightly flour your other hand and using both the knife and your hand turn each half of dough on the counter while lightly pulling the dough towards you. This gentle turning and pulling motion will develop tension on the top of the dough forming a round circle.

Let the dough rest for 25 minutes, uncovered.

SHAPE: Lightly flour the top of your dough rounds and the work surface. Working with one at a time, flip the round so the floured top is now down on the floured work surface.

Lightly flour your hands and grab the bottom of the round and stretch it lightly downward towards your body and then up and over about 2/3 the way to the top. Then, grab the left and right sides of the dough and stretch them away from each other, fold one side over toward the other and repeat with the other side.

Then, grab the top of the circle and stretch away from your body and fold down and over all the way to the bottom of the resting dough. You’ll now have a tight package that resembles a letter.

Finally, flip, or roll down the dough so the seams are all on the bottom and using two hands cup the top part of the round and drag the dough gently towards your body. The angle of your hands will gently press the bottom of the dough on the counter creating tension, forming a skin on the top of the dough as you drag.

After shaping, let the dough rest on the bench for a few minutes and then place seam-side-up into a towel-lined kitchen bowl that was lightly dusted with white rice flour.

REST AND PROOF: To prevent your dough from drying out overnight, place your bowls containing your shaped dough in plastic bags sealed shut with a rubber band. I will usually puff up the plastic bag around the bowl by opening it wide and then quickly closing the opening.

Once covered, let the dough rest on the counter for 20 minutes. Then, retard in the refrigerator at 38°F (3°C) for 16 hours. During this time overall fermentation will slow, but (good) bacteria activity will continue, contributing to a more complex flavor and deeper crust coloring.

BAKE: Preheat your combo cooker or Dutch oven inside your oven for 1 hour at 500°F. If you’re using a combo cooker, place the shallow side face up on one side and the heavier, deep side, face down on the other.

When you’re done preheating, take one of your plastic bag-wrapped loaves out of the fridge and unwrap it. Cut a piece of parchment paper so it fits over the top of your basket and place on a pizza peel. Invert the peel and parchment paper so they are resting on top of your basket containing your dough. Then flip the whole thing over. Remove the basket and your dough should be resting on the parchment.

Score these loaves at a 90° angle between the razor blade and dough. If you want a more pronounced “ear” at each score line, lower the angle between the blade and the dough (so the blade is close to horizontal with the dough).

While wearing your oven mitt, and with caution, pull out your shallow side of the combo cooker, or your Dutch oven base. Using your pizza peel, drag a corner of the parchment paper to slide your dough into the combo cooker. Place it back into the oven and cover the shallow side with the deep side to create a seal, or cover your Dutch oven with the lid.

Turn the oven down to 475°F and bake for 20 minutes. After 20 minutes, use your oven mitt to very carefully remove the top of the combo cooker or the lid of the Dutch oven. Close the door, turn the oven down to 450°F (232°C), and bake for 30 more minutes. If you are unsure if your bread is done, use your thermometer to test the internal temperature, it should register over 208°F (97°C).

When done, carefully use your oven mitt to remove the bread from the combo cooker and cool on a wire rack. Place the combo cooker or Dutch ovdn back in the oven and bring the temperature back up to 500°F. Repeat for the second loaf.

Wait 1-2 hours before slicing the bread (I know, it’s hard to do this) to ensure the interior is set.

Thick Chocolate Walnut Cookies

IMG_5327.jpg
IMG_3315.jpg

Aldea coffee is one of my favorite coffee shops in the area. Their first shop is in Grand Haven and I must stop there pretty much every time I’m in the area. They recently opened a second location in Muskegon that I’ve been wanting to visit. Since Muskegon is not right down the road it wasn’t some place I thought I’d get to soon. Thankfully this weekend I decided to go hiking at Hoffmaster State Park which is only about 10 minutes from the new coffee shop so I had to stop and visit!

IMG_5299.jpg

One of my favorite things about Aldea is the cookies they sell. They’re from Laughing Tree Brick Oven Bakery, and they are sooooooooooooo good. I often get their “Hippe Cookie” which is vegan I think, and full of peanut butter and chocolate. Thick and dense. I’ve tried to recreate it, even writing the bakery to see if they would share the recipe (they won’t sadly), but I have not been successful thus far. At this most recent visit to Aldea I got their walnut chocolate chunk cookie and it was also one of the best things ever. So thick and dense and chewy and hearty. When I got home I decided I wanted to make something along the same theme, it had hit the spot so well.

5895066C-DCC0-495D-BA18-7C898B6FEF6B.jpg

THE INSPIRATION

I looked at a few recipes and decided to try this one for a “Fluffy” chocolate chip cookie. It looked thick, dense and large just like I was hoping.

So how was it? A great cookie! I put a lot of finely chopped walnuts into the cookie to add nubbly goodness and big chunks of chocolate because that is required, and this would help recreate the Aldea cookie. I think one of the biggest keys to recreating a “bakery style” cookie is to make them big enough. Not just a little big, bu really big, bigger than you might think. This recipe makes 6 huge cookies. Each cookie was 105-110 grams of dough (almost 4 ounces!). They spread a little with baking, but still stayed nice and thick. It’s also key to not over-bake make sure the center is still nice and gooey. I ended up baking around 19-20 minutes total and think I probably should have pulled them a minute or two sooner. They were still great, but I think they could have been even a little bit better!

—————————————————————————-

Thick Chocolate Walnut Cookies
From Show Me The Yummy
Ingredients

EF9B6B6B-7F5E-42F7-9CEC-BAE593745EF3.jpg

ALDEA!


  • 1 1/2 cups (188 grams) all purpose flour I used 50 grams of whole wheat flour

  • 1 tablespoons cornstarch

  • 1/2 teaspoon baking powder

  • 1/8 teaspoon baking soda

  • 3/4 teaspoon salt

  • 1/2-1 teaspoons ground cinnamon

  • 1 large egg

  • 1/2 tablespoon vanilla extract

  • 1/2 teaspoon almond extract

  • 1/2 cup unsalted butter cold and cut into cubes, 1 stick

  • 3/8 cup (83 grams) brown sugar, packed

  • 1/4 cup (50 grams) granulated sugar

  • 1/2 cup semi-sweet chocolate chips

  • 1/2 cup dark chocolate chunks

  • 1/2 cup chopped pecans toasted* I used walnuts and chopped them very fine so there weren’t big chunks, but little nubs spread throughout the cookies

Directions
Line a rimmed baking sheet with parchment. Set aside.

Whisk together dry ingredients in a large bowl: flour, cornstarch, baking powder, baking soda, salt, and ground cinnamon. Set aside.

In a small bowl whisk together eggs, vanilla, and almond extract. Set aside.

In your stand mixer, cream cold butter until fluffy, about 1-2 minutes. Add in brown sugar and granulated sugar. Beat for an additional 2 minutes. Scrape down the sides of your bowl. Pour in egg mixture and mix until just combined. Add flour mixture 1/3 at a time until well combined, scraping down the sides as needed. Stir in both chocolate chips and pecans.

Using about 1/3 cup, scoop out dough and form 6 cookie balls. Place 6 on baking sheet Place in fridge and refrigerate for 30 minutes.

Preheat oven to 375 degrees F and bake for 17-21 minutes, or until golden brown. Remove from oven and let cool on the baking sheet for 5 minutes. Transfer to a wire cooling rack to cool completely.