Yeasted Pumpkin Bread

8037474C-914E-4498-96DD-9CAE412519C5.jpg

I have recipes not turn out from time to time, but typically they don’t completely fail. The first time I made this bread however it definitely didn’t work. Not because the measurements were off or I did something wrong when putting it together; it just didn’t bake long enough. The recipe called for a total of 1 hour of bake time, but as I found out this was not nearly enough.

C1A80CCA-AC71-48D8-832B-9DC81924E0A8.jpg

After it failed the first time (the dough was raw in the center when I cut it, not just a little mushy, completely raw) I was determined to make it again right away and make sure it worked. I nibbled on the end-y of the first loaf, a part that did cook through, and it was so good.

IMG_5249.jpg

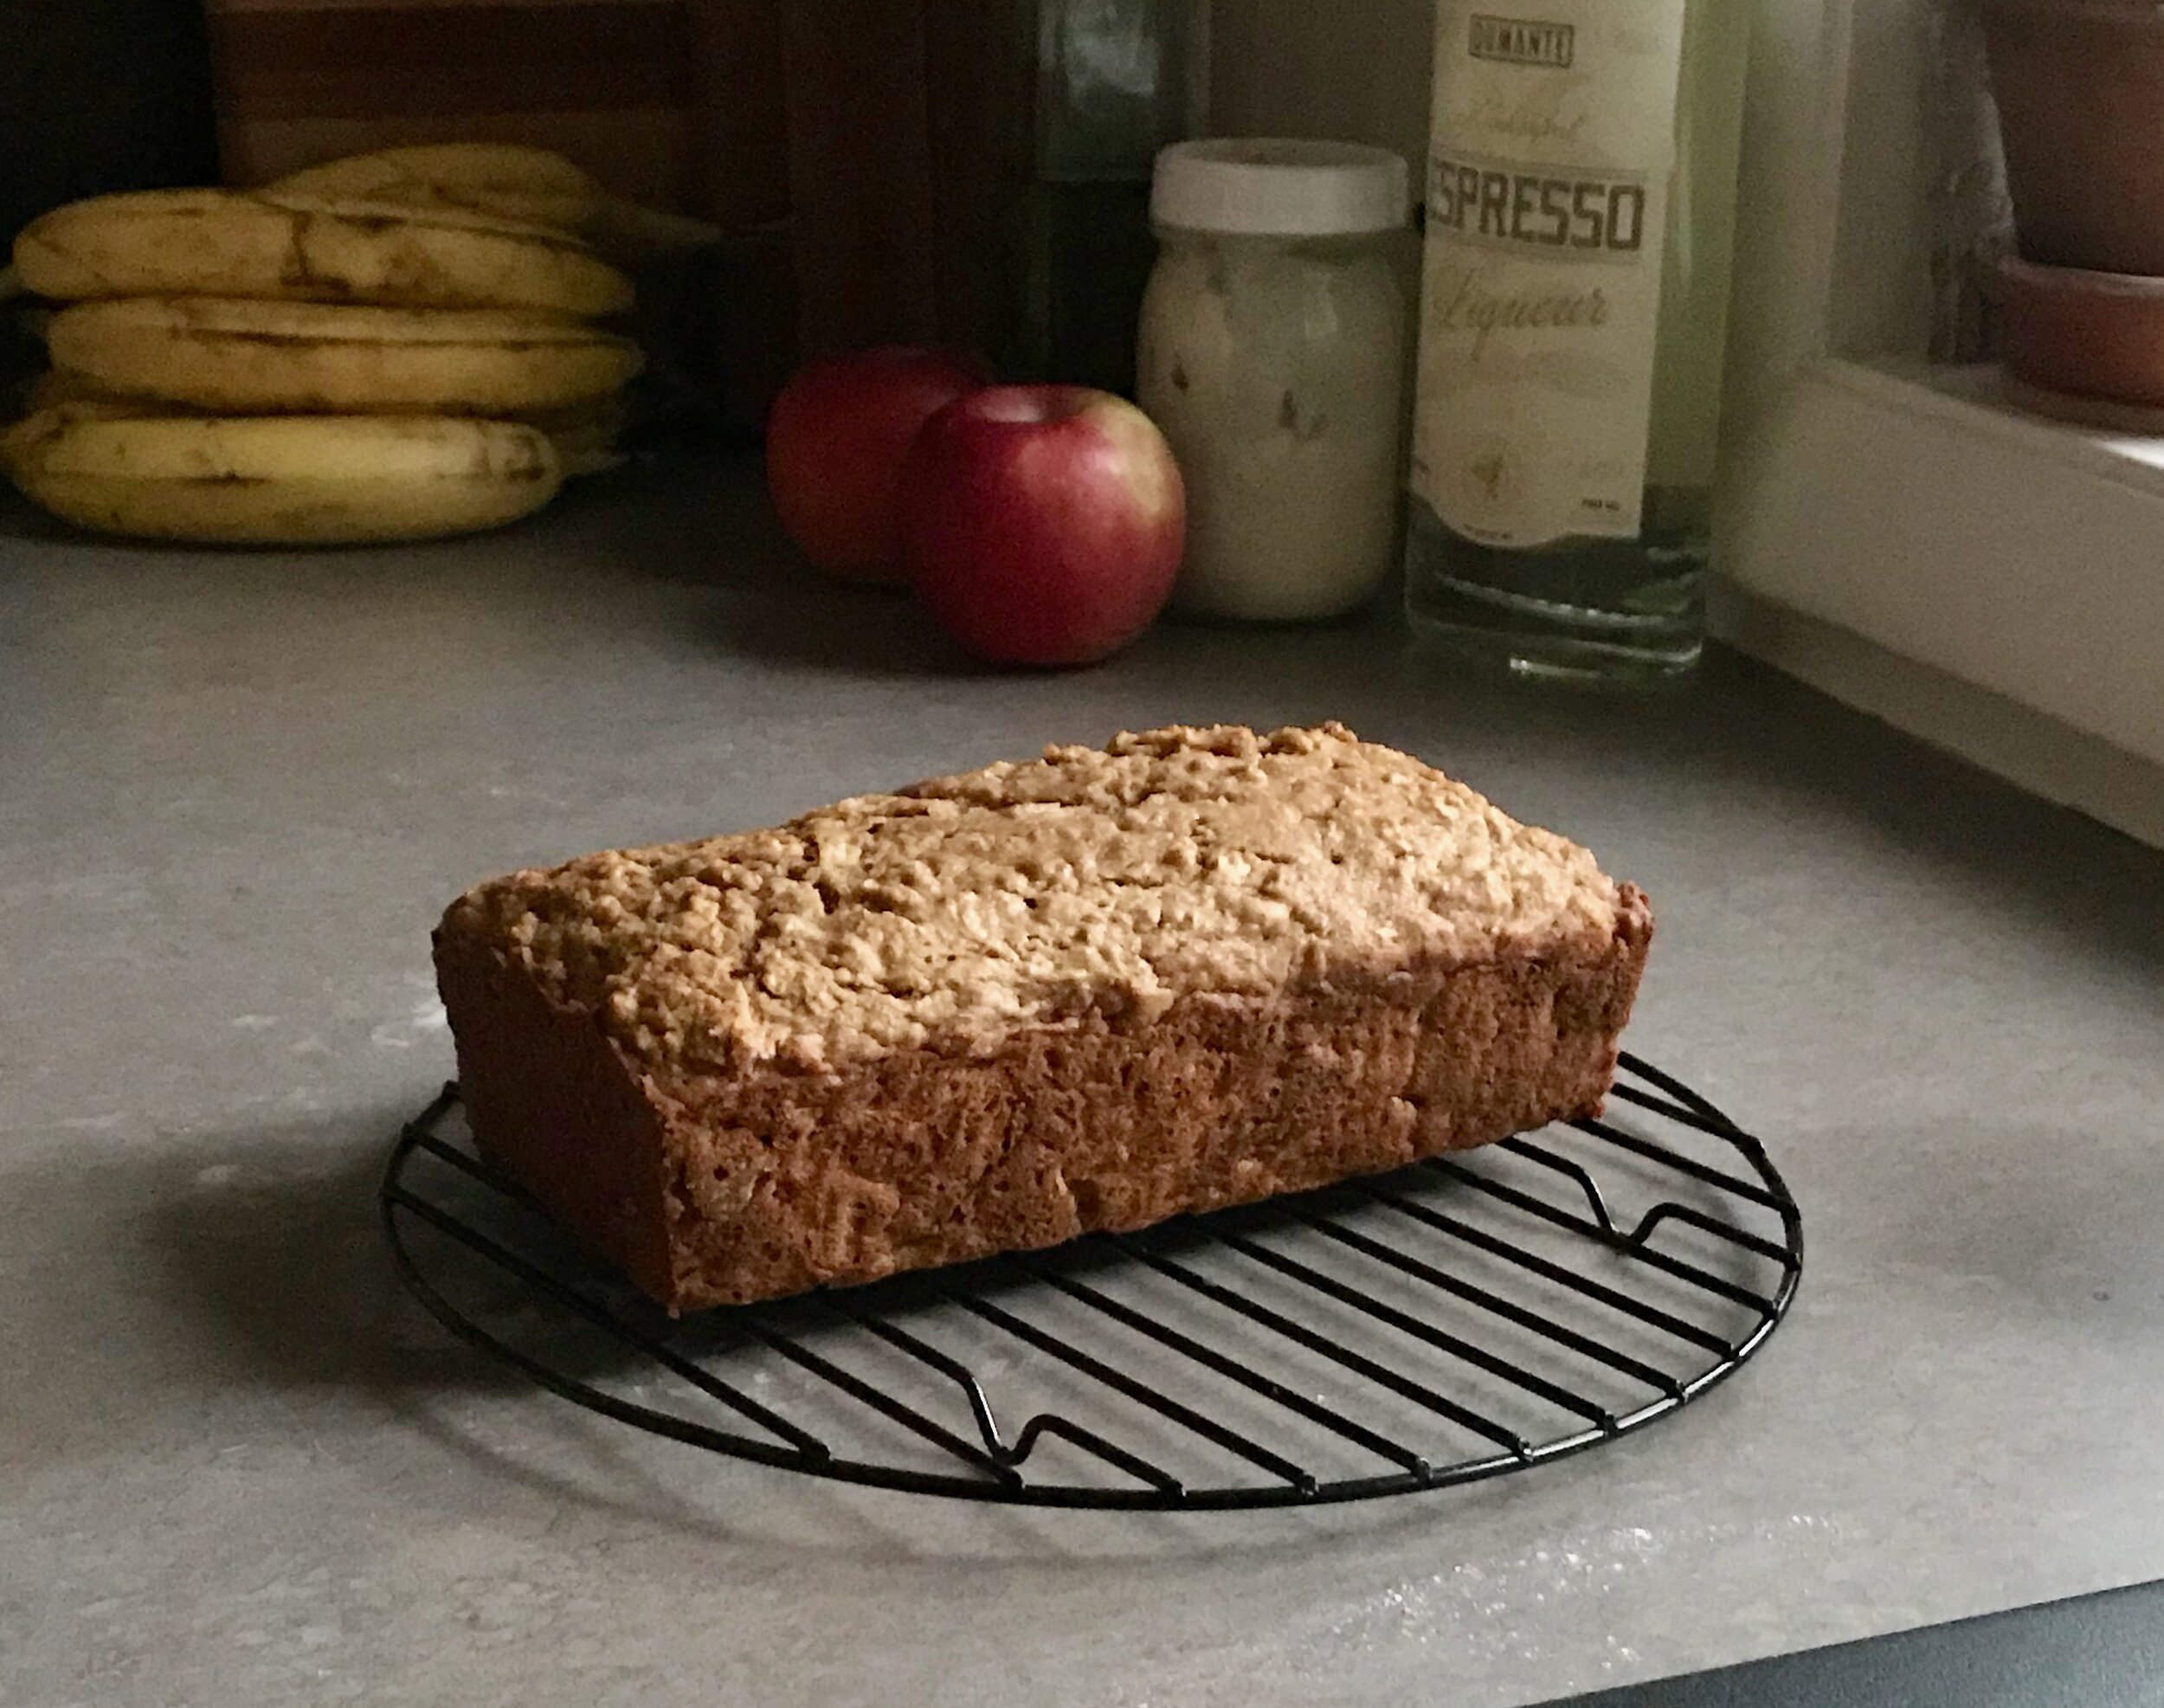
So round two went much better. I used a thermometer to check the temperature before calling it done. I ended up baking it for 20 minutes longer than the original recipe called for, the internal temperature was 205 degrees when I pulled it out. I didn’t make any changes other than the baking time.

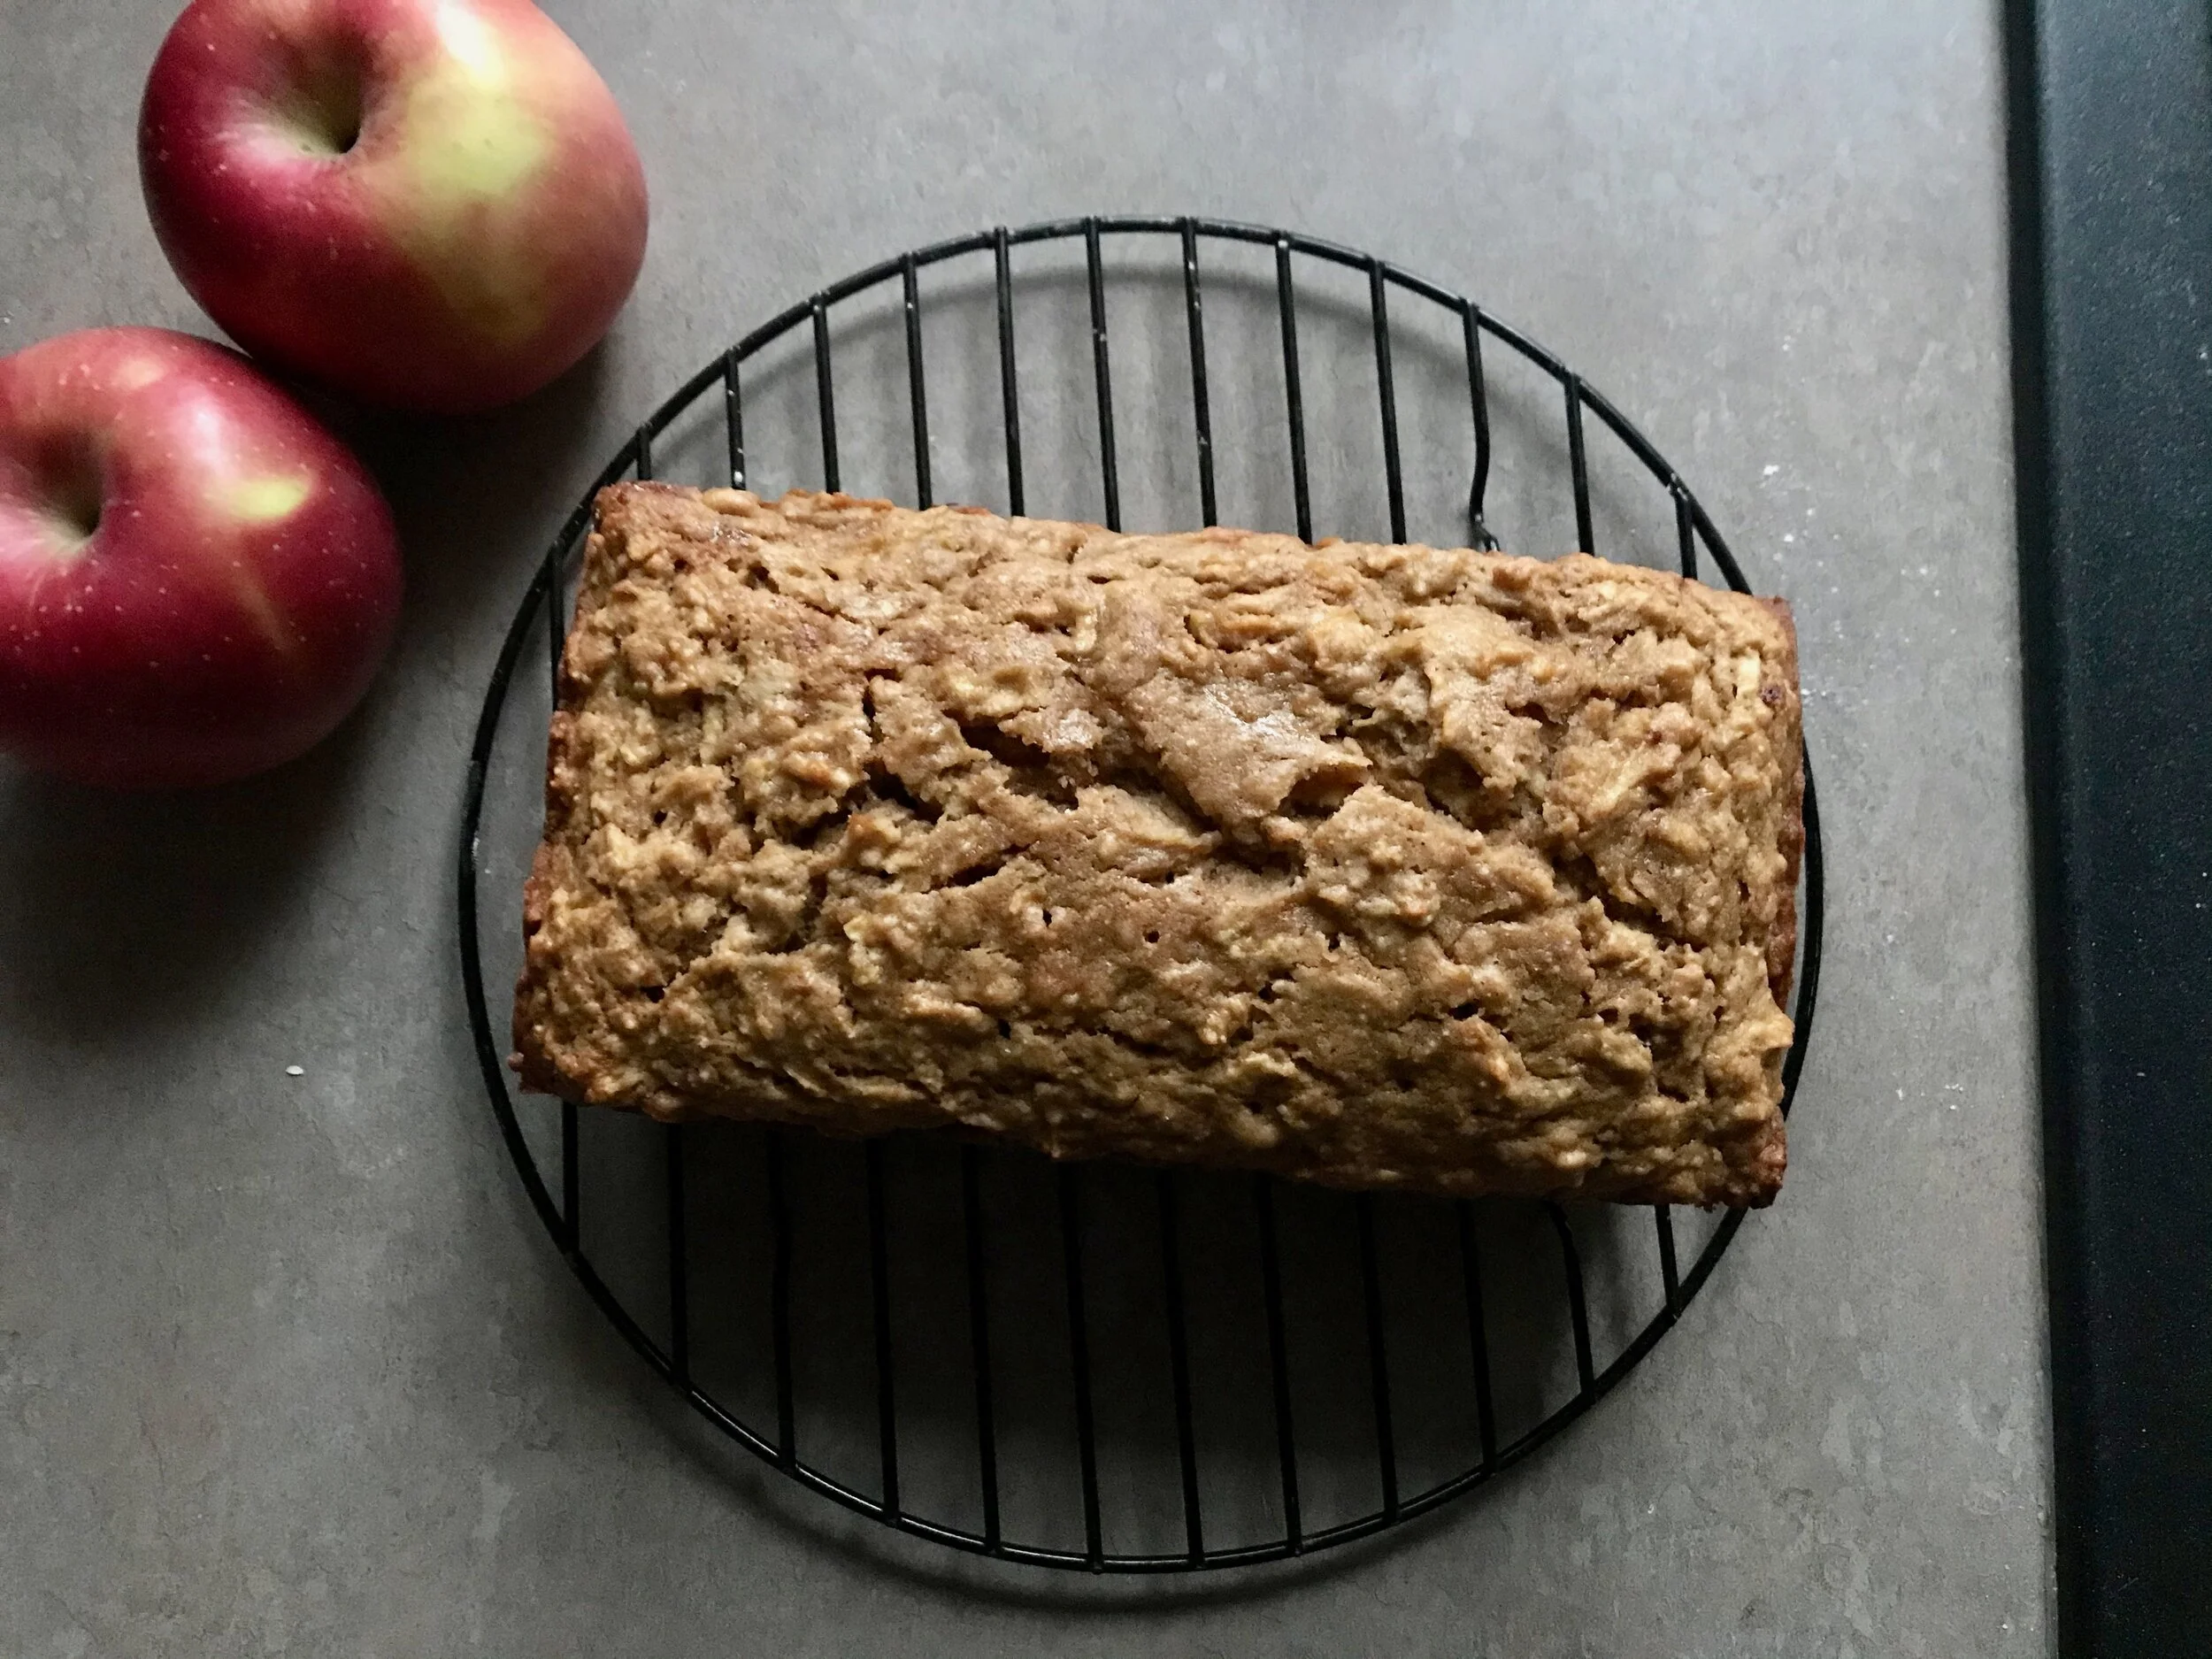
The dough did not rise a ton, but by the time I shaped it it was definitely puffy. The final loaf didn’t get a whole lot of oven spring either, so it was a little dense but not in a bad way. It is a lovely loaf that the pumpkin flavor definitely shines through.

The filling in the original recipe called for dried cranberries. I used raisins the first time, and cut up prunes the second time (all I had left!) and both work just fine. I skipped the orange juice soak both times; with the raisins I used a little hot water and with the prunes I skipped the soaking and the spices because I was just too lazy. Not as much spice flavor because of it but that was okay.

Final thoughts: a delicious and fun fall bread. I would like to try it again and get a little more lift in the dough, not quite as dense.

——————————————————————————————

Yeasted Pumpkin Bread
From Artisan Sourdough Made Simple by Emilie Raffa
Ingredients
Bread

  • 50 g (1/4 cup) bubbly active starter

  • 250 g (1 cup plus 2 tsp) of warm water

  • 184 g (3/4 cup) Pumpkin purée

  • 500 g (4 cups plus 2 Tbs) bread flour

  • 9 g (1 1/2 tsp) sea salt

Fillings

  • 130 g (1 cup) dried cranberries

  • 12 gram (1 Tbs) sugar

  • 5 g (1 tsp) sugar

  • Pinch each of ground cinnamon, ginger and nutmeg

  • 4 clementines or 1 orange

Directions
Make the dough: in a large bowl, whisk the starter, water, and pumpkin purée together with a fork. Add the flour and salt. Mix to combine until a stiff dough forms, then finish by hand until the flour is fully absorbed. Replenish your starter with fresh flour and water, and store according to preference. Cover the dough with a damp towel and let rest for 45 minutes to one hour.

Meanwhile, add the cranberries, sugar, vanilla, and spices to a small bowl. Halve the clementines and squeeze the juice over the cranberries. It's okay if the cranberries are not completely submerged. Stir well to combine.

Add the fillings: After the dough has rested, add the cranberries with their soaking juice to the bowl. Gently knead the fillings to incorporate, about 1 minute.

Bulk Rise: Cover the bowl with a damp towel and let rise at room temperature, 70 degrees, for about 6-8 hours, or until double in size.

Shape the dough: Remove the dough onto a lightly floured surface. Shape it into an boule and let rest for 5-10 minutes. Meanwhile, line a proofing basket with a towel. With floured hands, gently cup the dough and pull it toward you to tighten its shape. Place the dough into your basket, seam side up.

Second Rise: Cover the dough, and let rest until puffy but not fully risen, about 30 minutes to 1 hour.

Preheat your oven to 450 degrees. Cut a sheet of parchment paper to fit the size of your baking pot.

Score: Place the parchment over the dough and invert the basket to release. Make a long cut down the length of the dough using the tip of a small serrated knife or a razor blade. Use the parchment paper to transfer the dough into the baking pot.

Bake: bake the dough on the center rack for 20 minutes, covered. Remove the lid, and continue to bake for 40 minutes or more, mine took an additional 20 minutes, so all together 80 minutes To ensure it is done, use a instant read thermometer to check the internal temperature of the bread, it should be 205-210 degrees. Cool completely before slicing.

Cider Glazed Apple Cake

IMG_0802.jpg
IMG_4597.jpg

I saw this recipe pop up recently on my Instagram feed, perfect for the fall! The original was a beautiful bundt cake, but I generally don’t need an entire bundt cake at once, that’s a lot of cake! I searched the internet to find the recipe (it’s from America’s Test Kitchen and their recipes can be tough to find!) and thankfully I was able to find it without too much difficulty, and the recipe even stated that it could also be made into two loaves pans, perfect! Just cut in half and it’s a much more manageable size for me.

The only issue with halving the recipe was that the original called for 3 eggs, I ended up just using 1 egg to make things easier. I also cut back on the sugar when making it for myself which seemed to work out fine. With all the apples for added sweetness I found half a cup of sugar was plenty.

IMG_2453.jpg

I have now made this recipe twice, the first time I used apple cider as called for which really helped amped up the apple flavor, however, I usually don’t have apple cider in the house and if I want to make a quick and delicious apple bread I don’t always want to have to go out and buy it. I was thinking about making a quick simple syrup, but then I remembered that I had some fun liqueur in the basement that would probably work. I ended up using a sweetened espresso liqueur. I didn’t end up really tasting it in the finished product but it still worked out well and if I had a stronger flavored liqueur it might shine through.

——————————————————————————————

Cider Glazed Apple Cake
Original recipe from America’s Test Kitchen

The original recipe was double the recipe found below and called for a bundt pan, but could also be made into two 9x5 inch loaf pans. I halved the recipe and made one 8.5x4.5 loaf.

Ingredients

  • 2 cups apple cider (reduced to 1/2 cup) the second time I made this I didn’t have any cider so I used some coffee liqueur instead, straight up without reducing it any

  • 1 7/8 cups (9 3/8 ounces) all purpose flour

  • 3/4 teaspoon salt

  • 3/4 teaspoon baking powder

  • 1/4 teaspoon baking soda

  • 1/2 teaspoon cinnamon

  • 1/8 teaspoon all spice

  • 3/8 cup (1 1/2 ounces) powdered sugar

  • 1 stick butter

  • 3/4 cup (5 1/4 ounces) dark brown sugar I cut back on the sugar and only used 1/2 cup (3.5 oz)

  • 1 1/2 eggs - I used 1 egg to make things easier on myself

  • 1 teaspoon vanilla extract

  • 3/4 pound of Granny Smith or Honeycrisp apples, shredded - I shredded up two medium sized Fuji apples and it was almost exactly 12 ounces, shredded, and that worked great. I also did not peel my apples although the original recipe said to peel before grating.

Directions
Bring cider to boil in large skillet over high heat; cook until reduced to 1/2 cup, 20 to 25 minutes. If you accidentally over-reduce, just add a bit of water to make sure you have 1/2 cup of liquid in total.

While cider is reducing, adjust oven rack to middle position and heat oven to 350° F. Grease and flour your pan. Whisk flour, salt, baking powder, baking soda, cinnamon, and allspice in large bowl until combined.

Place powdered sugar in small bowl. Add 1 tablespoons cider reduction to powdered sugar and whisk to form smooth icing. Cover with plastic wrap and set aside.

Set aside 3 tablespoons of the remaining cider reduction. You will use this later to brush on the baked cake.

Pour remaining 1/4 cup cider reduction into large bowl; add melted butter, brown sugar, eggs, and vanilla and whisk until smooth. Pour cider mixture over flour mixture and stir with rubber spatula until almost fully combined (some streaks of flour will remain). Stir in apples and any accumulated juice until evenly distributed.

Transfer mixture to prepared pan(s) and smooth top. Bake until skewer inserted in center of cake comes out with just a few moist crumbs, 40-45 minutes. (mine took closer to 50 minutes)

Transfer pan to wire rack set in rimmed baking sheet. Brush exposed surface of cake lightly with 1 tablespoon reserved cider reduction. Let cake cool for 10 minutes. Invert cake onto wire rack and remove pan. Brush top and sides of cake with remaining 2 tablespoons reserved cider reduction. Let cake cool for 20 minutes. Stir icing to loosen, and then drizzle evenly over cake. Let cake cool completely, at least 2 hours, before serving.

Pumpkin Cinnamon Rolls

IMG_2368.jpg

I made a slightly “healthified” version of these cinnamon rolls in the past but it has been a few years. It was time to re-visit the recipe for a recent fall block party. I followed the recipe as written this time (other than substituting a basic glaze for the cream cheese glaze that is attached to the original recipe because I didn’t have any cream cheese and wasn’t interested in going out to get any!). They turned out great! Super light and fluffy, a lot of nice fall spice thanks to the nutmeg in the dough, as well as the spiced filling.

IMG_5181.jpg

They came together easily and the dough rose quickly. I started making them after lunch and they were out of the oven by mid-to-late afternoon. Highly recommend for a special fall treat.

IMG_2661.jpg

The recipe as written made 12 small-ish (aka appropriate!) sized cinnamon rolls. I was able to fit 10 rolls in a 9.5x7 inch pan, and then baked the additional two rolls in a mini-loaf pan. Not a huge recipe, but perfect for the party, and easy to scale up as needed.

—————————————————————————-

Pumpkin Cinnamon Rolls
From Sally’s Baking Addiction
Ingredients
Pumpkin Dough

  • 1/3 cup milk

  • 2 Tablespoons (30g) unsalted butter

  • 1/2 cup (120g) canned pumpkin (not pumpkin pie filling)

  • 1/4 cup (50g) packed light or dark brown sugar

  • 1/4 teaspoon ground nutmeg

  • 1/2 teaspoon salt

  • 1 large egg

  • 2 and 1/4 teaspoons (1 standard package) instant yeast

  • 2 and 2/3 cups (335g) all-purpose flour

Filling

  • 6 Tablespoons (86g) unsalted butter, softened to room temperature

  • 1/2 cup (100g) packed brown sugar

  • 1 Tablespoon ground cinnamon

  • 1/2 teaspoon ground nutmeg

  • 1/2 teaspoon ground cloves

  • 1/4 teaspoon ground allspice

Instructions
Make the dough: warm the milk and butter together over the stove or in the microwave. Warm the two together until the butter is just melted. You want the mixture lukewarm (105°F-115°F). Set aside. In the bowl of a stand mixer fitted with the dough hook, mix together the pumpkin puree, brown sugar, nutmeg, and salt. Add the warmed milk/butter and mix until combined, then add in the egg and yeast. Add 1 cup of flour. Mix for 1 minute, scraping down the sides of the bowl frequently. Add 1 and 1/4 cups more flour and beat for 1 more minute. The dough will be very soft, add more flour as needed. Place dough into a greased bowl, cover tightly with plastic wrap and allow to rise until doubled in size. This will take about 1 – 1.5 hours.

Turn the dough out onto a lightly floured surface. Gently knead a few times until smooth.

Assembly: Roll the dough out into a 18×10 inch rectangle. Spread the softened butter evenly on top. Combine the brown sugar, cinnamon, and spices into a small bowl. Sprinkle all over the top. Roll it up tightly. Using a very sharp knife, cut into 12 pieces, about 1.5 inches each. Arrange rolls into a greased 9-inch or 11×7 inch pan.

Cover with plastic wrap and allow the rolls to rise again until doubled in size. This will take about 1 hour.

Preheat oven to 350°F. Bake the rolls for 15-20 minutes, covering with aluminum foil at any point to prevent heavy browning. Remove from oven and allow to slightly cool as you prepare the icing as detailed below. When ready, drizzly or pour the icing over the rolls. You will have leftover icing.

Simple Vanilla Icing
Ingredients

  • 2 cups powdered sugar

  • 2 tablespoons melted butter

  • 1/4 cup milk

  • 2 teaspoons vanilla

Directions
Sift powdered sugar into a small bowl. Add the remaining ingredients and mix until smooth.

Vanilla Cake with Swiss Meringue Buttercream

8D1B3FD9-DC7D-4352-AD9A-AF5237D90649 2.jpg
7AC8CB7A-36A8-415B-8469-7AA5B694765F.jpg
17C95D03-867D-40E5-8C9F-CFE32F33A9EF.jpg

A family friend reached out to me a few weeks ago and asked if I would be willing and able to make a cake for her parent’s surprise anniversary party. I love sharing my love of cake with others so I was excited to help. She wanted a simple vanilla cake, which is my favorite as well, and then I had free range to decorate it however I wanted. She was decorating with eucalyptus and gold and white pumpkins so I used that as my inspiration to create this beautiful cake.

F05BE420-4527-4506-91E6-C1C319573F35.jpg

Since I had just made a vanilla cake a few weeks prior (for my own birthday) that turned out great, I used the same recipe, replacing the 1/3 cup lemon juice + 2/3 cup milk with 1 cup of (homemade) buttermilk. I made the full batch of Swiss meringue buttercream and it was the perfect amount to frost this cake without worrying about running out of frosting. I had a little frosting leftover (maybe around a cup).

Vanilla Butter Cake
Adapted from Liv for Cake
Ingredients

Vanilla Cake:

  • 3 cups all-purpose flour

  • 1 Tbsp baking powder

  • 3/4 tsp salt

  • 1 cup unsalted butter room temperature

  • 2 cups granulated sugar

  • 4 large eggs room temperature

  • 2 tsp vanilla

  • 1 cup buttermilk at room temperature

Elderflower Swiss Meringue Buttercream:

  • 6 large egg whites

  • 2 cups granulated sugar

  • 3 cups unsalted butter room temperature

Directions
For the Cake: Preheat oven to 350F. Grease and flour three 8" cake rounds and line with parchment.

In a medium bowl, whisk flour, baking powder, and salt until well combined. Set aside.

Using a stand mixer fitted with a paddle attachment, cream butter until smooth. Add sugar and beat on med-high until pale and fluffy (approximately 3mins). Reduce speed and add eggs one at a time fully incorporating after each addition. Add vanilla. Alternate adding flour mixture with buttermilk, beginning and ending with flour (3 additions of flour and 2 of buttermilk). Fully incorporating after each addition. Spread batter evenly between the prepared pans and smooth the tops.

Bake for approximately 28-30 mins or until a toothpick inserted into the center comes out mostly clean. Place cakes on wire rack to cool for 10mins then turn out onto wire rack to cool completely

For the Swiss Meringue Buttercream: Place egg whites and sugar into the bowl of a stand mixer, whisk until combined. Place bowl over a pot with 1-2" of simmering water and whisk constantly until the mixture is hot and no longer grainy to the touch or reads 160F on a candy thermometer (approx. 3mins) Place bowl on your stand mixer and whisk on med-high until the meringue is stiff and cooled (the bowl is no longer warm to the touch (approx. 10mins).

Switch to paddle attachment. Slowly add cubed butter and mix until smooth.

Basic Pumpkin Muffins

IMG_5033 (1).jpg

I had a friend over a few weeks back to hang out and do some fall baking. We decided to bake something pumpkin-y. It was a cold and rainy Sunday afternoon at the beginning of fall so what could be better. I found a pumpkin bread recipe from Smitten Kitchen where she uses an entire can of pumpkin which is what I like, instead of a recipe that leaves you with 1/4 or 1/2 cup of pumpkin that you don’t know what to do with.

IMG_5029.jpg

These muffins were super easy, as most muffins are, and baked up beautifully. I really loved the cinnamon sugar mixture sprinkled on top. Just a little something extra that makes them even more special. This is a super recipe that I would make over again and again, perfect when you need something pumpkin-y quickly, and don’t have time to browse through recipes, not that you would need to because these are perfectly simple and delicious.

————————————————————————

Pumpkin Bread or Muffins
From Smitten Kitchen
Bread/Muffins

  • 1 15-ounce can (1 3/4 cups) pumpkin puree

  • 1/2 cup (120 ml) vegetable or another neutral cooking oil or melted butter (115 grams)

  • 3 large eggs

  • 1 2/3 (330 grams) cups granulated sugar

  • 1 1/2 teaspoons baking powder

  • 3/4 teaspoon baking soda

  • 3/4 teaspoon fine sea or table salt

  • 3/4 teaspoon ground cinnamon

  • Heaped 1/4 teaspoon fresh grated nutmeg

  • Heaped 1/4 teaspoon ground ginger

  • Two pinches of ground cloves

  • 2 1/4 cups (295 grams) all-purpose flour

To Finish

  • 1 tablespoon (12 grams) granulated sugar

  • 1 teaspoon ground cinnamon

Directions
Heat oven to 350 degrees F. Butter a 6-cup loaf pan or coat it with nonstick spray (alternatively you may make muffins see below).

In a large bowl, whisk together pumpkin, oil, eggs and sugar until smooth. Sprinkle baking powder, baking soda, salt, cinnanmon, nutmeg, ginger and cloves over batter and whisk until well-combined. Add flour and stir with a spoon, just until mixed. Scrape into prepared pan and smooth the top. In a small dish, or empty measuring cup, stir sugar and cinnamon together. Sprinkle over top of batter.

Bake bread for 65 to 75 minutes until a tester poked into all parts of cake (both the top and center will want to hide pockets of uncooked batter) come out batter-free, turning the cake once during the baking time for even coloring.

You can cool it in the pan for 10 minutes and then remove it, or cool it completely in there. The latter provides the advantage of letting more of the loose cinnamon sugar on top adhere before being knocked off.

Cake keeps at room temperature as long as you can hide it. I like to keep mine in the tin with a piece of foil or plastic just over the cut end and the top exposed to best keep the lid crisp as long as possible.

***You can also make this as muffins. It should make about 18 standard ones and you can distribute the cinnamon sugar (perhaps make 1 1/2 tablespoons sugar and 1/2 teaspoons of cinnamon worth) across the tops before you bake them. They should bake for 25 to 30 minutes.

Lemon Elderflower Cake

IMG_4903.jpg

For my birthday earlier this month I kept with tradition and made a simple layer cake decorated with local, in-season flowers. As in years past, I went with dahlias. They are one of my favorite flowers, and they are perfectly in season on my birthday which is a win-win!

I saw this cake a while ago and thought it was so beautiful, and the flavor combination sounded amazing so I decided to go for it. It’s a lemon butter cake, layered with rich and tart lemon curd and smothered in creamy Swiss meringue buttercream.

IMG_9527.jpg

Changes I made: I decreased the frosting amount slightly because in the original recipe she stated that you wouldn’t need all of the frosting for the cake. I cut it down by 1/3 and found that I had just enough to frost the cake, although there were a few spots that you could see the cake through the thin layer of frosting. If I made it again I would make the full amount of frosting. Also, if for some reason you didn’t want to use the lemon curd between the layers you would most certainly need the full recipe for the frosting.

I also didn’t use the lemon curd recipe that was printed with the cake. Since the buttercream recipe called for egg whites, I was left with 4 egg yolks (since I decreased the amount of frosting) so I searched for a lemon curd recipe that called for 4 egg yolks which was easy enough to find. That way I didn’t have to waste anything. It worked out great - 4 whites for the frosting, 4 yolks for the lemon curd!

IMG_4916.jpg

Overall I thought this was a lovely cake. The cake itself was moist and fragrant. It baked up very well. The lemon curd was really nice, but I did find that it was perhaps a bit too strong for my taste. Not that it was bad in any way, but I would probably want a little more of a subtle lemon flavor in this cake if I would make again. I would keep the lemon zest in the cake, but perhaps just put frosting between the layers instead of curd. Or perhaps mix a little buttercream with lemon curd? Not sure how that would turn out, but I think it would be tasty.

IMG_2541.jpg

Also, I was not able to find elderflower cordial so I ended up using elderflower liqueur in the frosting which in the end didn’t really shine through. I couldn’t really taste it, partly because of how tart and strong the lemon flavor from the lemon curd was. In the end still an awesome cake, and a great birthday choice, just a few alterations if making again!

——————————————————————————————

IMG_6820.jpg

Lemon Elderflower Cake
From Liv for Cake
Ingredients

IMG_2803.jpg

Lemon Cake:

IMG_9973.jpg
  • 3 cups all-purpose flour

  • 1 Tbsp baking powder

  • 3/4 tsp salt

  • 1 cup unsalted butter room temperature

  • 1 Tbsp lemon zest from one large lemon

  • 2 cups granulated sugar

  • 4 large eggs room temperature

  • 2 tsp vanilla

  • 2/3 cup milk room temperature

  • 1/3 cup lemon juice fresh squeezed, from one medium lemon

Elderflower Swiss Meringue Buttercream:

  • 6 large egg whites

  • 2 cups granulated sugar

  • 3 cups unsalted butter room temperature

  • 2-4 Tbsp elderflower cordial to taste

Lemon Curd

  • See recipe below

Directions
For the Lemon Cake:Preheat oven to 350F. Grease and flour three 8" cake rounds and line with parchment.

In a medium bowl, whisk flour, baking powder, and salt until well combined. Set aside.

Using a stand mixer fitted with a paddle attachment, cream butter and lemon zest until smooth. Add sugar and beat on med-high until pale and fluffy (approximately 3mins). Reduce speed and add eggs one at a time fully incorporating after each addition. Add vanilla. Alternate adding flour mixture with milk & lemon juice, beginning and ending with flour (3 additions of flour and 2 of milk & lemon juice). Fully incorporating after each addition. Spread batter evenly between the prepared pans and smooth the tops.

Bake for approximately 35mins (mine was done at 30, so start checking before 35 minutes to make sure you don’t overbake) or until a toothpick inserted into the center comes out mostly clean. Place cakes on wire rack to cool for 10mins then turn out onto wire rack to cool completely

For the Elderflower Swiss Meringue Buttercream: Place egg whites and sugar into the bowl of a stand mixer, whisk until combined. Place bowl over a pot with 1-2" of simmering water and whisk constantly until the mixture is hot and no longer grainy to the touch or reads 160F on a candy thermometer (approx. 3mins) Place bowl on your stand mixer and whisk on med-high until the meringue is stiff and cooled (the bowl is no longer warm to the touch (approx. 5-10mins)).

Switch to paddle attachment. Slowly add cubed butter and mix until smooth. Add 2-4 Tbsp elderflower cordial (to taste) one Tbsp at a time whip until smooth.

Assembly:
Place one layer of cake on a cake stand or serving plate. Poke holes into the cake using a bamboo skewer. Brush with elderflower cordial. Spread a thin layer of buttercream on top of the layer and pipe a border around the outside to hold the lemon curd in. Fill with approx 3/4 cup of lemon curd. Repeat with next layer. Place final layer on top and do a thin crumb coat on the cake. Chill for 20mins.

Frost the top and sides of the cake with remaining frosting in a rustic manner. I started by spreading a generous amount of buttercream on the top and letting it overhang on the sides. Then I used a flat spatula to add buttercream to the sides of the cake and to smooth the which created a top lip with the overlapping buttercream. Top with fresh flowers if desired.

Lemon Curd
From Sally’s Baking Addiction
Ingredients

  • 4 large egg yolks

  • 2/3 cup (134g) granulated sugar

  • 1 Tablespoon lemon zest (about 1 lemon)

  • 1/3 cup (80ml) fresh lemon juice (about 3 lemons)

  • 1/8 teaspoon salt

  • 6 Tablespoons (86g) unsalted butter, softened to room temperature

Directions
Fill the bottom pot of your double boiler with 1-2 inches of water. Place on high heat. Once the water begins to boil, reduce to low heat to keep the water at a simmer.

Place egg yolks, granulated sugar, lemon zest, lemon juice, and salt into the top pot of your double boiler. Using a silicone whisk, whisk until completely blended, then continue to whisk as the curd cooks. Constant whisking prevents the egg yolks from curdling. Whisk and cook until the mixture becomes thick, resembling the texture of hollandaise sauce, about 10 minutes. If curd isn’t thickening, turn up the heat and constantly whisk.

Remove pan from heat. Cut the butter into 6 separate pieces, then stir into the curd. The butter will melt from the heat of the curd. Pour curd into a jar or bowl and place a piece of plastic wrap directly on top so it is touching the top of the curd. (This prevents a skin from forming on top.) The curd will continue to thicken as it cools. Once cool, the plastic wrap can be removed.

Refrigerate the curd for up to about 10 days.

Mixed-Bean Salad with Celery and Tarragon

E28474A7-94D7-4634-821D-C05B2354CE54.jpeg

Lara decided That she wanted to try a new recipe earlier last month. Typically we both cook on the fly, rarely using any recipes except perhaps as inspiration. Sometimes it can be helpful however, to actually follow someone else’s recipe to get new ideas regarding flavor combinations, how to use a certain ingredient, or how to use a whole new ingredient. This can really broaden your cooking repertoire and excite your cooking a bit!

FEE3F138-B1AB-48F1-B82D-402FA5F72644.jpeg

This mixed bean salad really was amazing. It is so so fresh, and has such a great combination of flavors and textures. Great make ahead summer salad that isn’t the same old same old.

We took this salad out to Grand Haven to have a picnic on the pier before starting our “real jobs” in August, 2019. It was perfect.

——————————————————————————————

Crunchy Mixed-Bean Salad with Celery and Tarragon
From Six Seasons; A New Way with Vegetables by Joshua McFadden
Ingredients

C4D4E59E-95FB-4D64-A512-8332BC07FEA9.jpeg
  • Kosher salt and freshly cracked pepper

  • 1/2 pound wax beans, green beans, or a mix, trimmed

  • 2 cups shell beans, preferably a mix of types I ended up using white beans and chickpeas

  • 4 to 6 medium inner celery stalks with leaves attached

  • 1 bunch flat-leaf parsley, thick stems trimmed off and reserved, leaves left whole

  • 1/2 cup lightly packed tarragon leaves

  • Extra virgin olive oil

  • 1/2 bunch scallions, trimmed (including 1/2 inch off the green tops), thinly sliced, soaked in ice water for 20 minutes, and drained well

  • 1/2 cup roughly chopped pepperoncini, plus a splash of pickling liquid I used a red jalapeno, sliced thin, and some vinegar, it worked great, and the red pepper added beautiful color

  • 1 lemon

  • 2 tablespoons capers, rinsed, drained and roughly chopped

  • 4 soft-cooked eggs

Directions
Bring a medium pot of water to a boil and add salt until it tastes like the sea. Add the wax beans and boil for just about 1 minute (longer if the beans are mature); you want the beans to be crisp-tender. Drain and immediately run under cold water to stop the cooking. Pat dry.

Pile the wax beans into a large bowl. Add the shell beans.

Roughly chop the leaves on the celery stalks, then cut the stalks crosswise at a sharp angle into 1/4-inch pieces and add all to the bowl of beans. Measure out half the parsley stems, trim off the dried ends of the stems, and very finely slice them crosswise, as you would chives. Add the parsley stems, leaves, and the tarragon to the bowl, along with the scallions and pepperoncini, plus a splash of the pickling liquid. Gently mix all the ingredients. Grate the lemon zest into the bowl, add the capers, season generously with black pepper, add about 1/2 cup olive oil, and toss again. Tear the eggs into pieces and distribute over the bowl.

When you’re ready to serve, give the salad a final spritz of lemon juice.

Four Ingredient Apple Cake

IMG_4965.jpg

This cake recently popped up on my instagram feed and I was intrigued. Only 4 ingredients? And no fat? I had quite a few apples in the fridge, and although they all had good flavor, there were a few that were a little softer than I like to eat out of hand - perfect for baking with! (These were Zester apples, they really had fantastic apple flavor, like really good apple cider, they were just not as crisp as I would have hoped.)

IMG_0926.jpg

So I grabbed my 4 ingredients and whipped together this simple cake. It was super easy, and I thought the end result was quite beautiful in a rustic way. They only small changes I made were to add a little bit of spice (cinnamon mainly, a touch of allspice and cardamom as well) and to grate the apple instead of cutting into chunks. I don’t typically like chunks of apple in my baked goods, I don’t like biting into a semi-soft apple piece, I prefer the apple to melt into the bread and impart flavor and moisture without altering the texture of the bread.

The grated apple seemed to work great. I had no issues at all, it baked up great, had great flavor and texture. Since there is no fat in this recipe it does have more of a springy texture, and ended up being just a little “sticky” on the outside, a little reminiscent of angle food cake which makes sense. The flavor is definitely sweet because there is not fat to balance it out, but not in a bad way. It is a little “eggy” as well for the same reason. I did not find the flavor to be extremely apple-y either even with 4 grated apples either.

IMG_4962.jpg

I definitely recommend pairing the cake with some kind of fat; lightly whipped cream, plain yogurt, or vanilla ice cream. Whipped cream or yogurt are really nice because the contrast between the sweet cake and the not sweet topping is perfect. But sweet ice cream is certainly not a problem either!

Overall, a fun recipe to try for the fall, especially with extra apples hanging around. I would definitely make again for the right occasion.

——————————————————————————————

Easy Apple Cake
From Food52
Ingredients

  • Unsalted butter, at room temperature, or oil for greasing the pan

  • 3 large eggs, at room temperature

  • 1 cup (213 grams) light brown sugar

  • 1/4 teaspoon kosher salt

  • 3 Granny Smith apples (about 198 grams or 7 ounces each) - I used 4 zester apples, 600 grams total prior to grating which equalled 475 grams of grated apple

  • 1 cup plus 2 tablespoons (134 grams) white whole-wheat flour

Directions
Heat the oven to 350°F. Butter the bottom (but not the sides) of an 8-inch springform pan.

Combine the eggs, light brown sugar, and salt in the bowl of a stand mixer fitted with the whisk attachment. Start on low, then raise the speed to medium-high, and beat for about 8 minutes, until the mixture is a pale tan in color and super fluffy.

While that’s going, peel the apples, then cut them into ½-inch pieces (they don’t have to be perfect cubes but they should all be a similar size). This should yield about 4 cups of apple pieces. Or grate the apples on a box grater. No need to peel.

When the egg-sugar mixture is done mixing, remove the bowl from the stand mixture and add the flour. Use a flexible spatula to gently fold in the flour until it’s almost incorporated. Add the apples and fold those in, too. Scrape the batter into the prepared pan.

Bake for about 1 hour and 15 minutes, or until the top is browned and a cake tester comes out completely clean. I checked my cake after 1 hour and it was completely done. So watch your cake closely, and check early. Cool in the pan for about 30 minutes, then run a knife around the edge to loosen the cake, and unhinge the outside.

Serve the cake in big wedges, warm or at room temperature, with confectioners’ sugar dusted on top, and crème fraîche (or whipped cream or Greek yogurt) plopped alongside. This is best the day it’s made.