Baked Pita Chips

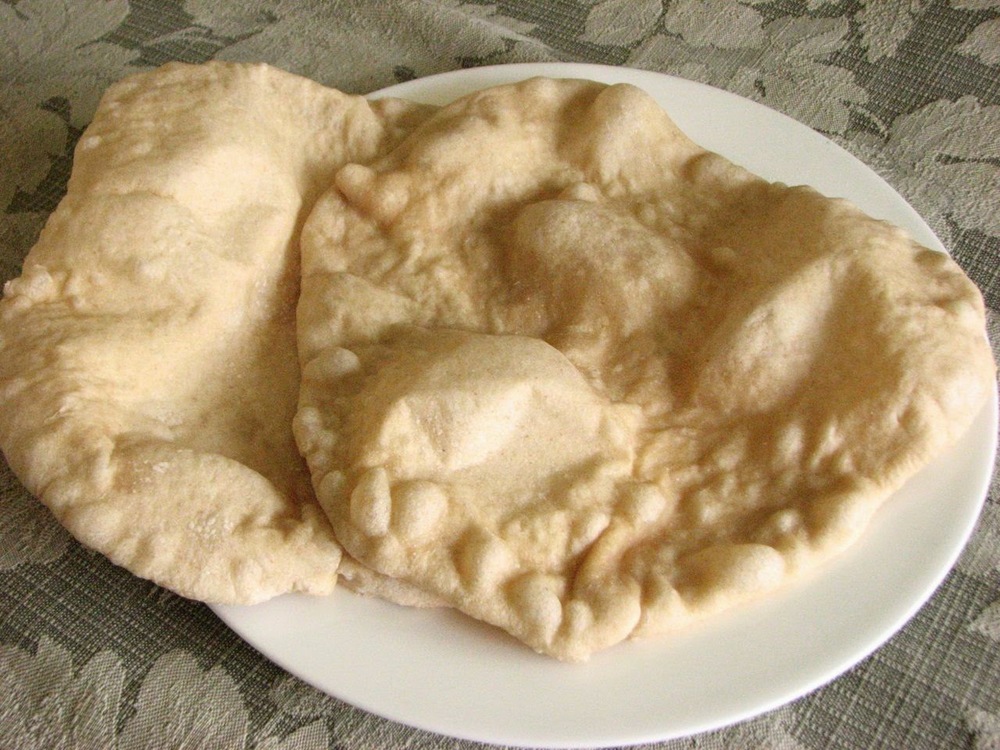
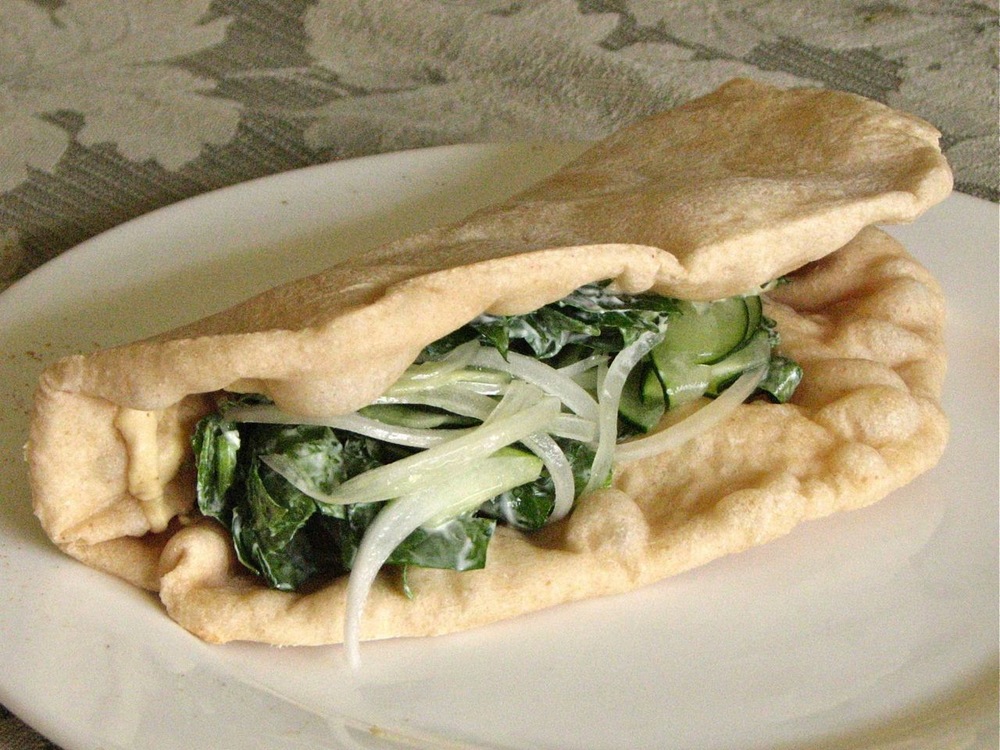
A few weeks ago I shared my favorite recipe for pita bread. It really is delicious stuff, perfect for filling with just about anything your heart may desire, or just eating straight up, fresh from the oven, either on its own or dipped in some homemade hummus or any other favorite dip of yours. Even though I love eating it fresh in sandwich form, I recently decided to try my hand at some homemade pita chips. I have to admit that I love Stacy's Pita Chips (so addicting!), so I wanted to see if I could make something similar at home. The answer is yes, I could, and so can you. 

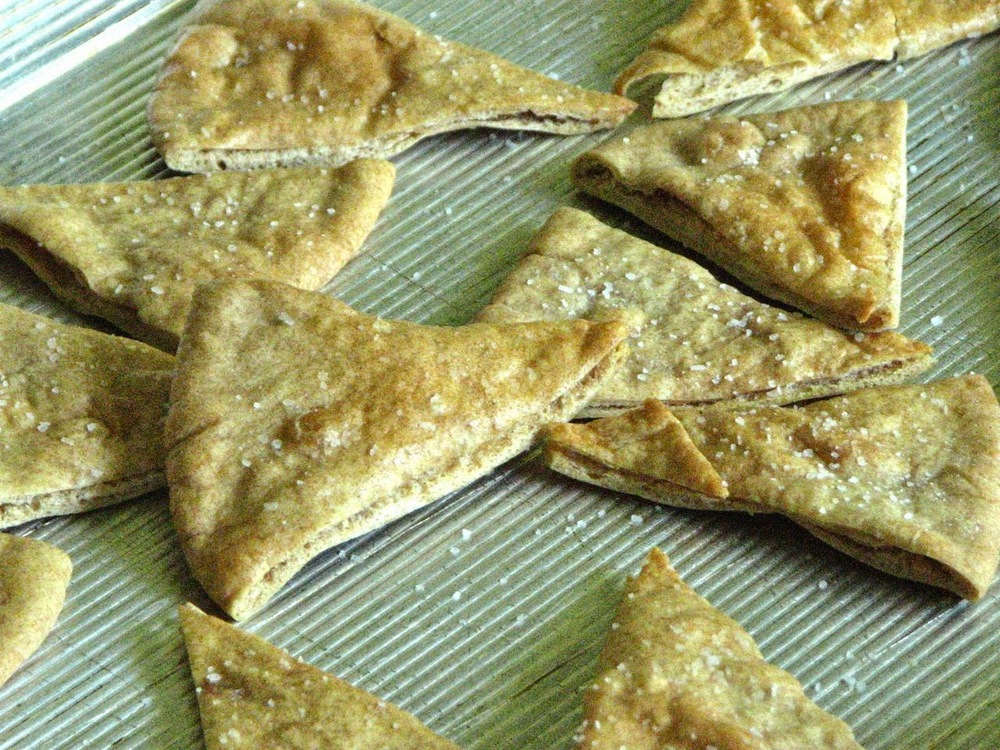
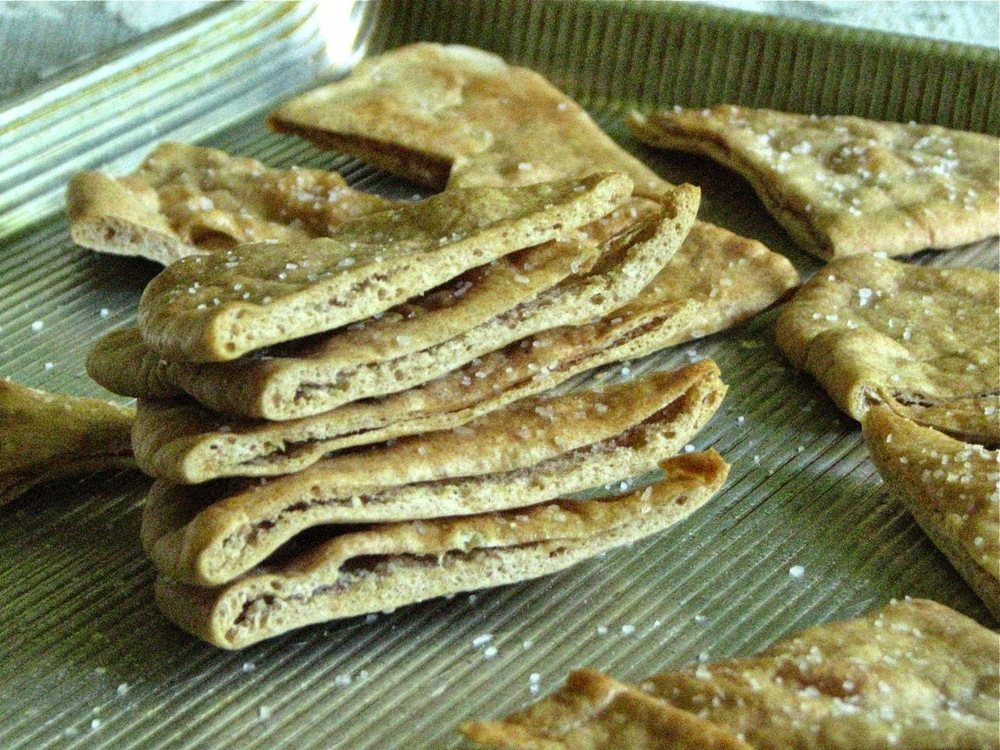
It's a pretty easy thing to do, all you need is a couple of pieces of pita bread and some time. I took a few of my homemade pita, cut them into wedges, brushed with oil, sprinkled with salt and popped them in the oven. You're really just drying them out completely until they are crisp and crunchy, basically like making homemade croutons. And the options are endless, you can top them with pretty much any flavors you want; herbs, spices, cinnamon-sugar, whatever you feel like. It's totally worth trying this out, the perfect homemade snack. 

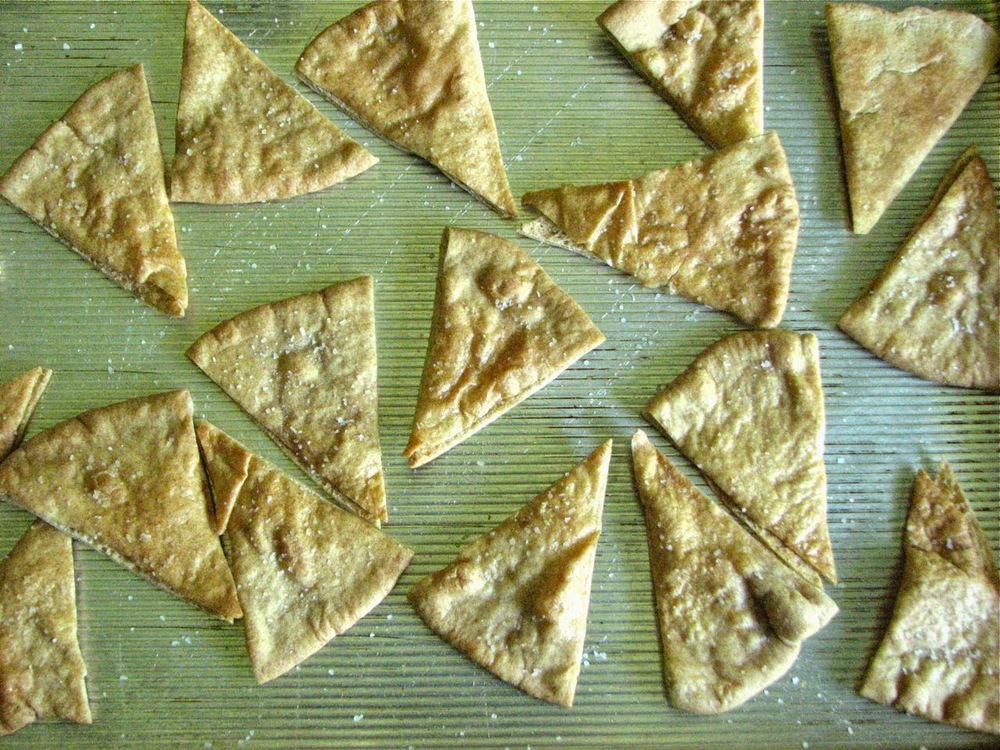
I feel kind of bad because I can't remember exactly how I baked these chips. What I do know is I hate when anything I bake or dry out in the oven takes on that (what I call) "dark" flavor. It's not burned at all, but it's heading in that direction. I like my stuff light in color and flavor. So, I usually use a low oven temperature and a lot of time. I'll probably turn my oven to 278 or 300 degrees and make sure I'm checking it every 10 to 15 minutes, to make sure it's not getting too dark. I want my pita to be completely dried through and lightly golden, but not dark. If the temperature is too high they start browning before they are dried through, and that just doesn't work. It can take some finagling, and sometimes a couple tries, before I get it completely right, but when I do it is totally worth it! So give it a try, if it doesn't turn out exactly how you were hoping don't give up, it's okay, just try it again. You don't want to know how many times I've forced myself to snack on a plate of overcooked baked chips!

Baked Pita Chips

Ingredients

  • A couple pieces of pita bread (I used homemade)
  • Olive oil
  • Kosher salt

Directions

Start by slicing each pita into 6-8 wedges. Arrange on a baking sheet without overlapping them too much, you want the air to be able to circulate between them all. Brush both sides generously with olive oil and sprinkle with salt. Pop them into a 275-300 degree oven (see discussion above) and bake, checking every 10-15 minutes until completely dried through and just beginning to brown. If they start browning too quickly, turn the oven temperature down by about 25 degrees and keep going, checking them a little more frequently to make sure they aren't getting to brown. 

When completely dried out, remove from oven and let cool completely before storing in an airtight container. 

Blueberry Mango Parfait

Blueberry season is officially in full swing here in Michigan, and I'm loving it! They are so good, and so good for you, a great combo. I also like that they aren't too expensive, and they last for a while in the fridge. I love raspberries and blackberries but it seems like you have to eat them in a day or they start going bad. I bought some blueberries at the farmer's market on Saturday and they made it until Thursday, and still looked really good. I only had to pick out a few bad ones here and there over the week, but the majority lasted just fine, they probably would have made it a whole week if I hadn't eaten them before that. 

One of my favorite ways to have fresh fruit for breakfast is in a parfait. All it takes is a couple of different types of fruit, yogurt and granola. It is super easy and absolutely delicious. I almost feel like I'm eating dessert for breakfast, just how I like it! This week I picked up a couple of mangos at the grocery store and made a couple of blueberry mango parfaits. Let me tell you, it's a winning combination. The tartness of the blueberries mixed with the sweetness of the mango is a wonderful mix, and the colors are so beautiful too! I think everyone should try it out before blueberry season has ended, trust me, you won't regret it. 

I'm partial to my plain, homemade yogurt, but you can use whatever kind you like. Whatever brand you get, I strongly suggest trying out plain yogurt instead of the flavored. There is so much sugar in the flavored yogurts it's kind of ridiculous. It takes a little getting used to the plain yogurt, but if you mix it up with some fruit and granola you won't even miss the added sugar. And as a bonus, plain yogurt is good for so many different things, from salad dressings and sauces, to baked goods, it's a great thing to always have on hand. If you need a little sweetness, add your own sugar, it will still be way less than what is added to the kind from the store. 

I'm also partial to homemade granola. It is so easy and cheap to make, and it tastes so much better than store bought. There are so many recipes out there, you are sure to find one that you like. I'll be sharing my current favorite recipe soon, so stay tuned! 

Blueberry Mango Parfait

Ingredients

A handful of blueberries

1/2 a mango, cut into bite-sized chunks

1/3-1/2 cup plain Greek yogurt

A handful of granola

Directions

Grab a tall glass and starting with a little yogurt start layering; yogurt, granola, fruit. Repeat until you've used it all up. Top with an extra sprinkle of granola. Grab a long spoon and dig in!

Almond Cornmeal Biscotti

Sitting down on a lazy afternoon with a cup of coffee doesn't feel complete without a little sweet treat to go along with it. Biscotti is one of my favorite coffee time snacks. It's fun to make, and it lasts forever in an airtight container. I've tried many different biscotti recipes over the last several years, some are better than others, but none have been bad. This one ranks near the top of the list. What I really like about it is the addition of a little cornmeal to the dough. This cornmeal adds just enough crunch to make things interesting, it just livens the cookie right up! The almonds also add to the crunch factor, a perfect combination. I actually made this recipe twice in less than a week the first time I made it, it was that good. And it will definitely be a regular in the coffee time cookie rotation from now on!

The original recipe is for almond anise biscotti, but I'm not a huge fan of anise flavor. I just omitted it and added in a little almond extract to amp up that almond flavoring instead. It turned out great! I love crunchy, almond-y, buttery cookies, especially with a delicious cup of coffee!

Almond Cornmeal Biscotti

Adapted from Martha Stewart's Baking Handbook

Ingredients 

  • 1-1 1/2 cups (4.75-7.5 oz) almonds
  • 2 1/2 cups all purpose flour
  • 1/2 cup yellow corn meal
  • 2 teaspoons baking powder
  • 1/2 teaspoon salt
  • 4 tablespoons butter, room temperature
  • 1 cup sugar
  • 1 teaspoon vanilla extract
  • 1/4 teaspoon almond extract
  • 3 eggs, plus 1 egg, lightly beaten
  • coarse sugar, for sprinkling (optional)

Directions

Preheat the oven to 375 F. Line a large baking sheet with parchment paper; set aside. Spread the almonds in a single layer on a rimmed baking sheet. Toast in the oven until fragant and just beginning to turn light golden, 6 to 8 minutes. Transfer nuts to a clean surface; spread evenly, and let cool completely. 

Sift together flour, cornmeal, baking powder, and salt into a medium bowl; set aside.

In the bowl of an electric mixer fitted with the paddle attachment, beat the butter and granulated sugar on medium-high speed until light and fluffy, about 3 minutes. Beat in the vanilla and almond extracts. Add 3 eggs, one at a time, beating to incorporate after each addition and scraping down the sides of the bowl as needed. Add the flour mixture, and beat on low speed until combined. Mix in toasted almonds.

Turn out the dough onto a lightly floured surface and knead to evenly distribute the nuts. Divide in half. Shape each piece into a 18-inch log, and transfer to the prepared baking sheet, about 3 inches apart (note: this biscotti does not spread a lot during the first bake, so shape accordingly). Brush beaten egg over the surface of the logs, and sprinkle generously with sugar, if using.

Bake, rotating pan halfway through, until logs are lightly browned and firm to the touch, about 25-30 minutes. Transfer parchment and logs to a wire rack to cool slightly, about 20 minutes. Reduce oven temperature to 300 degrees.

Place logs on a cutting board. Using a serrated knife, cut the logs crosswise on the diagonal into 1/2-inch-thick slices. Place a wire rack on a rimmed baking sheet. Arrange slices cut side down on the rack. Bake until firm to the touch, about 30 minutes. Remove pan from oven; let biscotti cool completely on the rack. Store in an airtight container. 

Apple Bread with Oatmeal Streusel

I love having apples in the fridge, they are a perfect snack and easy to throw into a lunch. They seem to last forever in the fridge, although I usually end up eating them so fast that it doesn't matter any way. But as much as I love apples, not just any apple will do. I am very picky about which kind of apples I will buy. In the fall, when they are super fresh and straight from the orchard I love almost all of them, but golden delicious in particular are so good. But as the winter moves on, I usually end up buying just a few varieties from the grocery store, Fuji, Pink Lady, and once in a while Honeycrisp (but I don't generally feel like I should be spending $4 a pound on Honeycrisp when all the other apples cost half as much). 

A few weeks ago I accidentally picked up the wrong bag of apples. I ended up with 3 pounds of Paula Reds which I just couldn't make myself eat out of hand. They have good flavor, but are just too soft and mushy for me. Making applesauce is always an option, but this time I also decided to use some of the apples to do a little baking. While this recipe may seem like a fall recipe, I see no reason to wait until fall to bake something with apples. So grab a couple apples and head to the kitchen to throw this lovely loaf of cinnamon apple bread together. It's good regardless of the season!

This recipe starts with a wonderfully chunky streusel, and plenty of it, just how I like it. Then you just have to throw together a simple cinnamon bread, chop up an apple and mix it all together. Into the pan, streusel on top and into the oven. The bread turned out beautifully, soft and moist, studded with small pieces of apple and perfumed with cinnamon. The original recipe called for cinnamon chips which I didn't have, but I think they would have been great in this. I also ended up using almonds in the topping instead of the walnuts because that's what I had, and it was great. But walnuts would have been wonderful too, I even think it might be nice to put some walnuts directly into the bread. So as you can see, this recipe is very versatile, so give it a shot, you won't regret it. 

Apple Bread with Oatmeal Streusel
Adapted from Cookie Monster Cooking
Ingredients
For the streusel:

  • ¼ cup all-purpose flour 
  • ¼ cup rolled oats 
  • ¼ packed light brown sugar 
  • ¼ cup walnuts or whatever nut you have, finely chopped 
  • pinch of cinnamon 
  • pinch of salt 
  • 3 tablespoons unsalted butter, melted 

For the bread:

  • 2 cups all-purpose flour (I did half whole wheat, 1/2 all purpose) 
  • 2 teaspoons baking powder 
  • ½ teaspoon ground cinnamon 
  • ½ teaspoon salt 
  • ½ cup packed light brown sugar 
  • ¼ cup granulated sugar 
  • 1 large egg 
  • 1 teaspoon vanilla extract 
  • ⅓ cup melted butter 
  • ⅔ cup whole milk 
  • 1 medium apple (or a couple smaller apples), chopped into small pieces, or grated

Directions
Preheat the oven to 350 degrees. Spray an 8 ½ by 4 ½ inch loaf pan with nonstick cooking spray and set aside.

To make the streusel - in a small bowl, mix together the flour, oats, brown sugar, walnuts, cinnamon and salt until well combined. Add in the melted butter and mix until combined and evenly moistened. Set aside.

To make the bread - in a large bowl, whisk together the flour, baking powder, cinnamon and salt. In a medium bowl, whisk together the brown sugar, granulated sugar and egg until well combined (it will clump together at first but just keep whisking and it will smooth out). Add in the vanilla, butter and milk and whisk again to combine. Pour the wet ingredients into the dry and mix until just combined. Gently fold in chopped apple. 

Transfer the batter into the prepared pan and use a spatula to smooth the top. Sprinkle the crumb topping evenly over the top.

Bake for about 50 to 55 minutes, until a tester inserted into the middle of the bread comes out clean. If the top starts to brown too quickly, tent loosely with aluminum foil. Once the bread is cool enough to handle, gently run a butter knife around the edges of the pan to loosen. Remove to a wire rack to cool.

Whole Wheat Chocolate Chip Muffins

Last week I was wanting to bake something that I could stockpile in the freezer, to pull out when I needed something to take with me for breakfast. I wanted something tasty and beautiful, something that I would get excited about eating. It makes me happy when I have something delicious to look forward to in the morning. My mind went immediately to muffins because they are so easy, and extremely portable. The perfect on-the-go breakfast treat in my opinion. 

I immediately went to my 'muffins and quickbreads' Pinterest board to browse through the options I had there. In the end I decided on these whole wheat chocolate chip muffins. First of all I thought the photo of them was just so pretty, it made me want to make them. It is so true that you eat with your eyes first, and these just looked so tasty. They also were on the healthier side for a muffin which was another plus; a lot of whole wheat flour, not tons of sugar, yogurt and applesauce, and only a little bit of butter. It sounded like a nice combination, so I just had to give them a try. 

So how did they turn out? Well I ended up really liking them a lot. They are hearty and definitely muffins, not cakey at all. They are not overly sweet, but with the chocolate they don't need to be extremely sweet anyway. I did end up having to adjust the amount of liquid in the recipe, adding a little extra milk, because otherwise the batter was just way too dry. And the whole wheat flour definitely shines through, giving them a nice nutty flavor that I really like. It might be a little strong for some people but I really enjoyed it. 

One complaint I did have was they turned out a little on the dry side, still perfectly edible and delicious, but slightly dry, and this was even with me cutting down on the baking time. I want to play around with the recipe a little more and see if I can get them to come out a bit more moist next time. I was thinking about possible adding a little more milk, and maybe trying buttermilk instead of the milk (just because I love buttermilk!). But we'll see, I'll keep you posted. One thing I do know, these muffins are definitely worth trying again. 

Whole Wheat Chocolate Chip Muffins

Adapted from

A Spoonful of Photography

Ingredients

  • 2 cups Whole Wheat Flour
  • 1/2 cup All Purpose Flour
  • 1 Tbsp Baking Powder
  • 1/2 tsp Baking Soda
  • 1 Pinch Salt
  • 1/2-2/3 cup (around 4 oz) Sugar
  • 1 egg
  • 1/2 cup (4.25 oz) Yogurt
  • 5 Tbsp Milk 
  • 1/2 cup (4.25 oz) Applesauce
  • 2 Tbsp Butter or Oil
  • 150g dark chocolate chunks

Directions

Preheat your oven to 425 °F. Grease or line your muffin tin with parchment paper. Mix together both flours, baking powder, baking soda and salt. In a seperate bowl beat together egg and sugar, then add in the yogurt, applesauce and butter. Gently fold in the wet ingredients into the dry, gently adding the chocolate chips when only some flour isn't mixed in - be careful to not overmix!

Scoop the batter into your muffin tins until each one is filled about 2/3 and put it in the oven at 425 °C for 5 minutes, then lower the temperature to 375 °C for further 10-12 minutes. Take out, let cool and enjoy!

Yields: 12 nice sized muffins

Frosted Brownie Roll Out Cookies

Need a chocolate fix? These simple yet delicious brownie roll out cookies are super easy to whip together when you need a basic chocolate cookie. They are easy and use ingredients that you are sure to have on hand. I've made them with both natural and Dutched cocoa and both turn out great. If you use the Dutched cocoa the cookies take on more of a oreo-ish look with that deep, almost black appearance, but they are definitely not Oreo texture. 

These cookies are soft and tender, a brownie in cookie form, perfect for any number of uses. They are good just plain, straight out of the oven, or frosted with your favorite frosting. This time I used a bright yellow and summery buttercream, but peanut butter frosting, or a chocolate ganache frosting would also be fantastic. Keep the cookies open faced, or spread the frosting between two cookies for a fun dessert sandwich. I have also scooped ice cream between two cookies for a super delicious ice cream sandwich. The cookies stay nice and soft, even in the freezer, making the perfect ice cream sandwich, easy to bite into and devour. A great recipe to have in your recipe box for any occasion! 

Other than the hour or so chilling time required for these cookies, they come tother very quickly. Mix, chill, cut and bake. Give these cookies a try the next time you want a cookie, but feel like doing something other than the good old standby - chocolate chip cookies. It's a refreshing change of pace. 

Brownie Roll-Out Cookies

Recipe from

Smitten Kitchen

Ingredients

  • 3 cups (375 grams) all-purpose flour
  • 1/2 teaspoon salt
  • 1/2 teaspoon baking powder
  • 1 cup (225 grams) butter, softened 
  • 1 1/2 (300 grams) cups sugar
  • 2 large eggs
  • 1 teaspoon (5 ml) vanilla extract
  • 2/3 cup unsweetened cocoa (approximately 60 grams — weights can vary a bit depending on brand)

Directions

Preheat oven at 350 degrees. Whisk dry flour, salt and baking powder in bowl and set aside. Mix butter, sugar, eggs, vanilla and cocoa in mixer. Gradually add flour mixture, and mix until smooth. Wrap in plastic and chill for at least one hour.

Roll out cookie dough on floured counter. Cut into desired shapes, brushing extra deposits of flour off the top. (It does disappear once baked, though, so don’t overly fret if they go into the oven looking white.) Bake on a parchment-lined baking sheet for 8 to 11 minutes (the former for 1/8-inch thick cookies, the latter for 1/4-inch cookies) until the edges are firm and the centers are slightly soft and puffed.

Transfer to a wire rack to cool.

Grilled Chicken Legs with Barbecue Sauce

During the summer I grill pretty much every day, you can grill just about everything and it is always delicious. I grill burgers, steak, vegetables, bread, pizza, fish, anything! While I love it all and could never pick a favorite, I will always have a special place in my heart for grilled chicken. I don't know what it is about the smell of chicken cooking on the grill that is so intoxicating, but whenever I smell it I want to stop whatever it is I am doing and eat. 

This past week Lara and I were driving home from Holland and we stopped by Kapenga Farm to pick up some chicken. We had never been there before, but Lara had read about the farm online so we decided to check it out. There was a sign out from that said 'chickens for sale' so we stopped in. We walked in to the barn and were greeted with a freezer full of packaged frozen chicken, and a walk-in cooler with several buckets of fresh chicken. There was a sign that told us what to do and how to pay if no one was there, which they weren't. So we grabbed a couple packages of chicken legs, made out a check, dropped it in the drop box, and we were on our way. 

I love buying local, and supporting the farmers in my own community. Buying fresh, local chickens directly from the farm is my favorite way of doing business. And the chicken was delicious! We took it home and grilled it up the next day. It doesn't get better than that. 

I didn't really follow a recipe for the chicken. After looking around the internet at several different recipes to get some ideas I just did my own thing. First, I rubbed the legs with a mixture of chile powder, cumin, coriander, paprika, cayenne and salt. I gave them a drizzle of olive oil and threw them on the grill over medium to high heat. Right away I turned the grill down to low and grilled them for about 25 minutes, turning every 5 minutes or so. After 25 minutes I increased the heat of the grill and started basting with barbecue sauce. I kept basting and turning, basting and turning, building up the flavor of the sauce, and letting it caramelize over the heat. I continued this until the chicken reached an internal temperature of 170 degrees, another 5-10 minutes. Overall the legs took 30-35 minutes.

This is what summer is about. Grilled chicken with barbecue sauce, one of my favorite things. It makes great leftovers too, cold, straight out of the fridge. Easy and oh so good. This will be on the menu at least a couple of times this summer, and I can't wait!

Pita Bread

I found this recipe for pita bread back at Easter when my sister and I made an Israeli inspired meal to celebrate the holiday. There was no way I was going to make all of those Middle Eastern dishes and not serve fresh pita, it was just too perfect. I had made pita once before and I didn't love how it turned out, but it had been a long time. It was time to give it another try, and boy am I glad that I did. This time around the pita turned out perfectly! It was soft, delicious and just wonderful. 

There are so many options for what to do with pita. At Easter I just cut it up into wedges and served it along with homemade hummus. It was also perfect for soaking up all of the extra juices from the chicken I served. It also makes for a fantastic wrap, the perfect vehicle to stuff with your favorite ingredients. If you have some leftover, brush with some oil and salt and pop it in the oven for a little while until it dries out and you've got homemade pita chips. So many options, give it a try and find your favorite!

This recipe is pretty simple. I really like how the dough can be stored in the fridge for up to 5 days, so you can have fresh pita all week! It's so much fun to watch the pita poof up in the oven, almost like magic. It makes me happy every time. Beware, once you make homemade pita, you will be ruined for life. You'll never want to buy that hard, stale, flavorless pita from the grocery store ever again. 

Pita Bread
From The Food Network
Ingredients

  • 1 teaspoon dry yeast
  • 2 1/2 cups warm water 
  • 2 cups whole wheat flour
  • About 4 cups unbleached all-purpose or bread flour
  • 1 tablespoon salt
  • 1 to 2 tablespoons olive oil

Directions
Sprinkle the yeast over the warm water in a large bread bowl. Stir to dissolve. Add whole wheat flour, one cup at a time, then 1 cup white flour. Stir 100 times (one minute) in the same direction to activate the gluten in the flour. Let this sponge rest for at least 10 minutes or as long as 2 hours.

Sprinkle salt over the sponge and stir in the olive oil. Mix well. Add white flour, one cup at a time. When the dough is too stiff to stir, turn it out onto a lightly floured bread board and knead for 8 to 10 minutes, until dough is smooth and elastic. Return the dough to a lightly oiled bread bowl and cover with plastic wrap. Let rise until at least double in size, approximately 1 1/2 hours. Gently punch down. Dough can be made ahead to this point and then stored, covered, in the refrigerator for 5 days or less.

If at this time you want to save the dough in the refrigerator for baking later, simply wrap it in a plastic bag that is at least three times the size of the dough, pull the bag together, and secure it just at the opening of the bag. This will give the dough a chance to expand when it is in the refrigerator (which it will do). From day to day, simply cut off the amount of dough you need and keep the rest in the refrigerator, for up to one week. The dough will smell slightly fermented after a few days, but this simply improves the taste of the bread. Dough should be brought to room temperature before baking.

This amount of dough will make approximately 16 pitas if rolled out into circles approximately 8 to 9 inches in diameter and less than 1/4-inch thick. You can also of course make smaller breads. Size and shape all depend on you, but for breads of this dimension the following baking tips apply:

Place large baking stone or two baking sheets, on a rack in the bottom third of your oven, leaving a one inch gap all around to allow air to circulate. Preheat oven to 450 degrees. Divide dough in half, then set half aside, covered, while you work with the rest. Divide dough into eight equal pieces and flatten each piece with lightly floured hands. Roll out each piece to a circle 8 to 9 inches in diameter. You may wish to roll out all eight before starting to bake. Cover rolled out breads, but do not stack.

Bake 2 at a time (or more if your oven is larger) directly on baking stone or baking sheets. Bake each bread for 3 or 4 minutes, until the bread has gone into a full "balloon" or until it is starting to turn lightly golden, whichever happens first. If there are seams or dry bits of dough - or for a variety of other reasons - your bread may not go into a full "balloon". Don't worry, it will still taste great. The more you bake pitas the more you will become familiar with all the little tricks and pitfalls, and your breads will more consistently "balloon." But even then, if you're like us, it won't always "balloon" fully and you won't mind because the taste will still be wonderful. When baked, remove, place on a rack for about five minutes to let cool slightly, then wrap breads in a large kitchen towel (this will keep the breads soft). When first half of the dough has been rolled out and baked, repeat for rest of dough, or store in refrigerator for later use, as described above. You can also divide the dough into more, smaller pieces if you wish, to give you smaller breads.