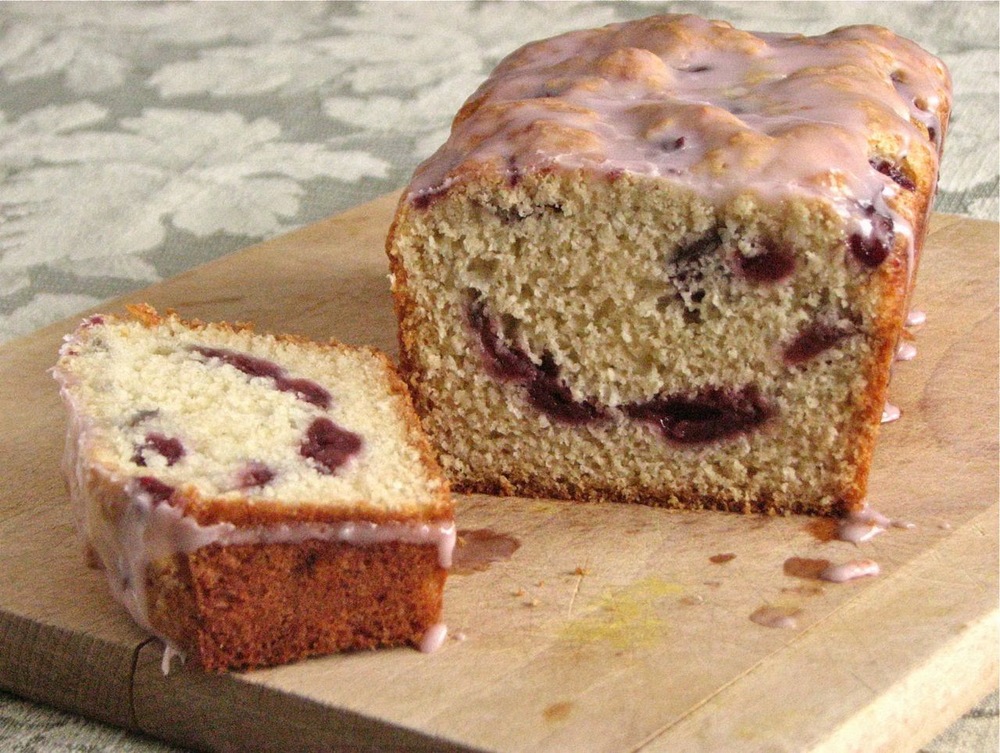
Baklawa

I'm officially back! After hundreds of hours of studying and thousands of practice questions over the course of the past 5 weeks I finally took my boards this past Wednesday. It is such a relief to be finished. This test has been in the back of my mind since last September and it is so wonderful to finally be free of that constant worry. 

So let's celebrate! How about some baklava? I've always liked baklawa, but I really learned to love it when I lived in Dearborn, MI for two years. In case you didn't know, Dearborn has a huge Middle Eastern population which, happily for me, meant some absolutely wonderful Middle Eastern bakeries. I was spoiled with some of the best baklawa you'll ever find. But trust me, this homemade version is pretty close to being just as good. It's flakey, buttery and sweet. If you've ever wanted to try making baklawa I highly recommend it. It's totally worth it!

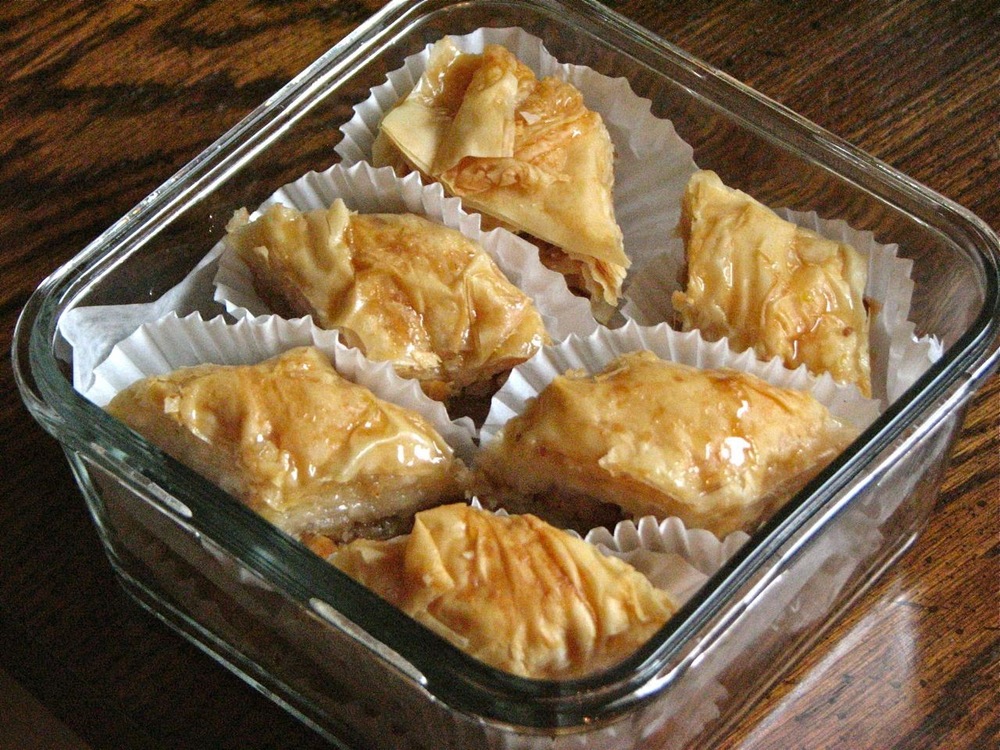
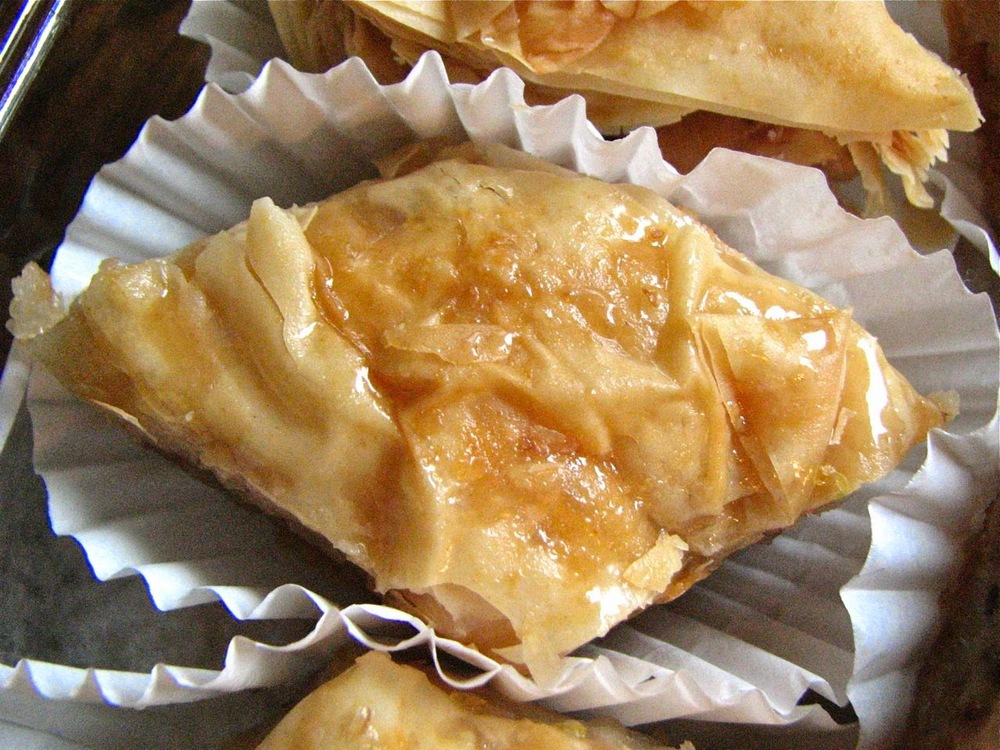
I always thought that baklawa would be complicated to make, and although the recipe looks fairly long with a couple of different steps, it was surprisingly not as difficult as I thought it would be. The original recipe called for clarified butter, but I really didn't feel like dealing with that so I just used plain melted butter and it seemed to turn out just fine. I happened to have some mini cupcake liners and they turned out to be the perfect thing for the individual pieces of baklawa. It is really quite sticky, so having the liners to separate each piece was very helpful, but I would guess some wax paper would work well too, even if it wouldn't be quite as cute.

The recipe makes quite a lot of baklawa, it's so rich that you don't need a big piece. I think it would be great to take to a party, definitely something different and plenty to go around!

Baklawa

Adapted from 

Rose Water & Orange Blossoms

Ingredients

  • 1 lb. box phyllo dough, room temperature
  • 6 oz. (¾ cup) butter, melted 
  • 1 ½ cups sugar
  • ¾ cup water
  • 1 T lemon juice
  • 3 cups walnuts, toasted
  • 1/3 cup sugar

Directions

Thaw the phyllo:

Refrigerate the frozen phyllo overnight, then bring to room temperature. Do not cut open the packages of phyllo until just before you are ready to assemble the baklawa.

Make the simple syrup: 

In a small saucepan, combine sugar, water and lemon juice and bring to a boil over medium high heat. Reduce heat to low and simmer for 10 minutes. Pour into a heatproof container and cool completely. It is essential that the syrup be at room temperature when you pour it over the hot pastry after it comes out of the oven.

Make the sugared nuts:

The nuts can be coarsely chopped in the food processor using pulses, but be careful not to go too far. Some nut-dust is unavoidable, but it is better to have a few nuts that need to be broken by hand than to process too much, which will produce nuts that are too finely chopped. Combine the toasted chopped walnuts and sugar stirring until all of the nuts are coated and appear damp.

Assemble the baklawa:

Preheat the oven to 325 degrees.

Open the phyllo and unroll it on top of the plastic it is packaged in. Keep the phyllo covered with a towel.

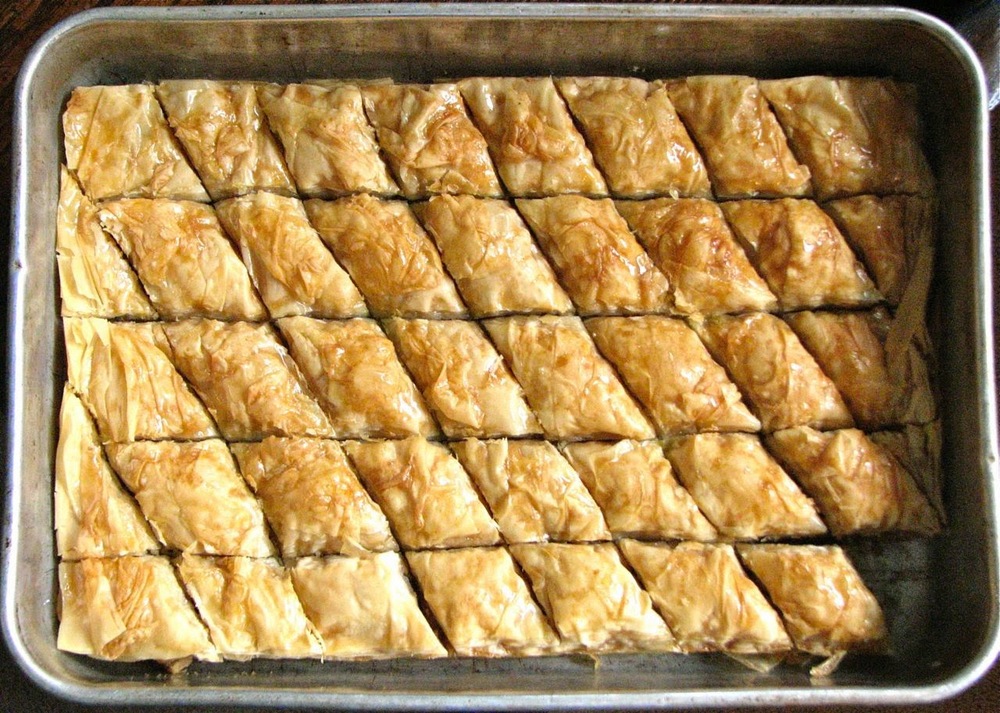
The size of the pan you use does not matter, but the pan should be metal (ideally not dark). For a 9”x13”x2” pan, trim the phyllo to fit. If you have the smaller box of phyllo, the two packages inside will need one inch trimmed off of the long side. If you have the larger box of phyllo, the one package of phyllo will need to be cut in half and trimmed to fit the pan. It’s better to leave the phyllo a little larger than the pan because it will shrink when it bakes.

Brush the bottom of the pan with melted butter. Lay one stack of 20 phyllo leaves in the pan. Spread the nuts over the phyllo in one even layer. Lay the second stack of 20 leaves over the nuts, taking care that the top layer is a sheet that is not torn. Take a layer from the center of the leaves for the top layer if necessary.

Brush the top layer with melted butter. Using the tip of a very sharp chef’s knife, cut the baklawa into diamonds by cutting six rows (5 cuts) lengthwise and ten rows (9 cuts) crosswise on the diagonal. Lightly score the top with your knife so you can see where the cuts will be.

Use your dominant hand to cut and the other hand to hold the top layers of phyllo down while cutting, and be sure to cut all the way through to the bottom of the pan. This is essential so that the butter will seep through all layers. The knife is held almost perpendicular to the pastry, cutting straight down into the phyllo and nuts. The top layer will lift and and fold, but just lay the phyllo back down where it belongs and move on. The sharper your knife, the easier the cutting will be.

Pour the melted butter over the baklawa evenly. Allow the butter to settle in, about 5 minutes. Bake on the oven shelf second from the top until deep golden brown, 50-60 minutes. Rotate the baklawa halfway through baking.

Remove from the oven and immediately pour the 1 cup of the cooled syrup evenly over the baklawa. Let the rest sit, uncovered, for several hours or overnight to allow the syrup to absorb. Cut and serve from the pan as needed, keeping the baklawa lightly, not tightly, covered with plastic wrap or waxed paper. The baklawa will keep, in the pan, for two weeks.

Spinach and Mozzarella Stromboli

Homemade pizza is one of my favorite meals. While I love making a traditional pizza with mozzarella and tomato sauce, I also love using homemade pizzas as a perfect way to finish off some leftovers. Leftover taco meat, make a pizza. Leftover roasted vegetables, throw them on a pizza. A few extra pieces of lunchmeat, on the crust they go. That grilled chicken you just couldn't quite finish, on the crust it goes. You can really put almost anything on a pizza, and it's always delicious. Sometimes I like to change it up and instead of making a pizza, I'll take my pizza dough with all it's yummy fillings and roll it up into what I call a stromboli. It's just a different take on the normal pizza, it's just as tasty, and fun for a change. And again, you can throw anything at all inside. I've done ham and swiss, sausage and cheese, salami and mozzarella, you get the idea. For this particular stromboli I went very simple with fresh spinach, a little garlic, and some mozzarella. So easy and so good!

Pizza Dough

Adapted from

500 Pizzas and Flatbreads

by Rebeca Baugniet

Ingredients

  • 1 cup bread flour
  • 1 1/3 cups all purpose flour
  • 1 teaspoon instant yeast
  • 3/4 teaspoon salt
  • 1/2 teaspoon honey
  • 1 1/2 teaspoons olive oil
  • 3/4 -1 cup warm water

Directions

Mix together flours, yeast and salt. Add in the honey, olive oil and water. Knead together until you form a soft, smooth dough, adding more water if the dough is too wet, and more flour if the dough is too dry, this will probably take 4-6 minutes using a stand mixer with a dough hook. 

Place dough in a lightly oiled bowl and let rise until double in size, about 1-1 1/2 hours. 

Take dough out of bowl, split in two, and you are ready to make your pizza, or stromboli, or whatever it is you want to do with your pizza dough! 

Roasted Chicken with Clementines and Fennel

For Easter last week, my sister Lara and I decided to break from tradition and try something new. Instead of serving ham or lamb with potatoes and a basic vegetable, we chose to go with an Israeli inspired feast. I mentioned previously that this past Christmas my sister-in-law gave me the cookbook Jerusalem by Yotam Ottolenghi and Sami Tamimi. Now that I've made a handful of recipes from this book I can say with confidence that it is a great cookbook, I love it. Everything I've made has been absolutely fantastic. 

We decided on the recipe for Roasted Chicken with Clementines and Arak for our main dish. The photo in the cookbook was mouth watering, and the ingredients didn't look too exotic so I thought it wouldn't be too scary for the less adventurous eaters in my family.  The end result was outstanding, the flavors of fennel and clementine shined through in perfect balance in this beautiful and colorful dish. 

This recipe really couldn't be simpler. Mix together a few simple ingredients and let marinate in the fridge overnight. The next day the work is minimal. Just throw it all in a big roasting pan and stick it in the oven. That's it. So easy and so good. 

Once it comes out of the oven pour all the cooking liquid into a pan and reduce to make a nice flavorful sauce. Pour it over the cooked chicken and serve! You won't be disappointed. 

And here's the entire feast. I thought it was an absolutely fantastic meal. Along with the chicken the rest of the menu included: 

Fresh homemade pita
Homemade hummus
Spinach salad with prunes and almonds
Yogurt pasta salad with basil, pine nuts and feta
Simple rice pilaf
Clementine and almond syrup cake

Roasted Chicken with Clementines and Fennel
Slightly adapted from Jerusalem by Yottam Ottolenchi and Sami Tamimi
Ingredients

  • 6 1/2 tablespoons dry white wine (or Arak, Ouzo or Pernod if you have it, I didn't)
  • 1/4 cup olive oil
  • 3 tablespoons freshly squeezed orange juice
  • 3 tablespoons freshly squeezed lemon juice
  • 2 tablespoons grainy mustard
  • 3 tablespoons light brown sugar or honey
  • 2 1/2 teaspoons salt
  • 1 1/2 teaspoons black pepper
  • 1 medium fennel bulb, cut into chunks
  • 1 or 2 medium onions cut into chunks
  • 3 pounds bone-in, skin-on chicken pieces (I used thighs and legs)
  • 4 clementines (14 oz), unpeeled, sliced thin
  • a few sprigs of thyme
  • 1-2 teaspoons fennel seeds, lightly crushed 
  • Chopped flat-leaf parsley, to garnish

Directions
In a large mixing bowl whisk together the wine, olive oil, orange juice, lemon juice mustard, sugar, salt and pepper. Add the fennel, onion, chicken, clementines, thyme and fennel seeds. Stir well with your hands, then leave to marinate in the fridge for a few hours or overnight (you can also skip the marinating step if you are pressed for time).

When ready to roast, preheat the oven to 475 degrees. Transfer the chicken and its marinade to a baking sheet large enough to accommodate everything in a single layer. Place the chicken skin side up. Roast the chicken for 35 to 45 minutes, until colored and cooked through. 

Life the chicken, fennel and clementines from the pan and arrange on a serving plate; cover and keep warm. Pour the cooking liquid into a small saucepan, place over medium-high heat, bring to a boil, then simmer until the sauce is reduced by one third, so you are left with about 1/3 cup. Pour the hot sauce over the chicken, garnish with parsley and serve. 

Simple French Bread

Bread is always a crowd pleaser at my house, especially soft white bread still warm from the oven, smeared with salted butter. While I love hearty whole wheat loaves and crusty sourdough, sometimes a simple loaf of soft white bread is just what a meal needs. This bread is everything that it should be; soft and tender and delicious, you really can't go wrong. 

The instructions for this bread are a little different than most. There is a little kneading, and then 6 cycles of a 10 minute rest followed by 10 seconds of stirring. Very different than most breads I make, but it seemed to work just fine. Then just shape, let rise, and bake! 

Simple French Bread

From 

Mel's Kitchen Cafe

Ingredients

  • 2 1/4 cups warm water
  • 2 tablespoons sugar
  • 1 tablespoon instant yeast
  • 1 tablespoon salt
  • 2 tablespoons oil
  • 5 1/2 - 6 cups flour

Directions

In a large bowl or in the bowl of a stand mixer fitted with the dough hook, combine the water sugar and yeast. . Add the salt, oil and 3 cups of flour and mix. Add in 2 1/2 to 3 more cups of flour gradually. The dough should clean off the sides of the bowl and not be too sticky but it should still be soft. Knead for 2-3 minutes until the dough is smooth and soft.

Leave the dough in the mixer to rest for 10 minutes and then stir it down (turn on your mixer for 10 seconds or use a wooden spoon to stir down the dough) and then allow to rest another 10 minutes. Repeat for a total of 5 times. Then turn the dough onto a lightly greased surface and divide into two equal parts. Roll each part into a 9X13-inch rectangle. Roll the dough up starting from the long edge and pinch the seam to seal. Arrange seam side down on a large baking sheet lined with parchment paper. Repeat with the second part of dough. Place it on the baking sheet leaving room for both loaves (or use a second baking sheet for the second loaf). Cover with greased plastic wrap and let the loaves rise until doubled in size. 

With a very sharp knife cut 3 or 4 gashes at an angle on the top of each loaf. Bake at 375 degrees F for 25-30 minutes until golden brown and baked through.

Mini Spinach, Onion and Prosciutto Quiche

I love quiche. It is so versatile and delicious. Flaky, buttery crust filled with endless options. Veggies, meats, cheeses, herbs, or spices in any combination. You can really let your imagination go wild. I randomly had some leftover prosciutto and gruyere and decided that some mini quiche would be the perfect place to use it up. Along with a little diced onion an some spinach, it really was a wonderful combination. 

I just thought it would be fun to make some mini quiche, but this would be equally as good as a regular size quiche. Whatever you do, I highly recommend making your own pie dough. It really is so much better than anything you can get at the store. 

Spinach, Onion and Prosciutto Quiche

Ingredients

  • 1/2 small onion, minced
  • 2 eggs
  • 2/3 cup milk
  • 4 ounces frozen spinach, thawed and very well dried
  • A couple slices of prosciutto
  • 2 ounces Gruyere (or your favorite cheese)

Directions

In a small sauté pan with a little olive oil in it, cook the onion for a few minutes until it begins to soften and become translucent. Set aside. Mix together the eggs and milk, seasoning with salt and pepper to taste. Evenly divide the prosciutto, spinach, onions and cheese between the prepared tarts. Pour the custard into the individual tarts, being careful not to overfill. Bake the mini quiches for 15-20 minutes at 375 degrees, or until the custard is just set. 

Pate Brisee

Ingredients

  • 2 1/2 cups all purpose flour
  • 1 teaspoon salt
  • 2 sticks (1 cup) unsalted butter, cold, cut into small pieces
  • 1/4 cup ice water, plus more if needed

Directions

In the bowl of a food processor, combine flour and salt; pulse to combine. Add the butter and pulse until mixture resembles coarse crumbs with some larger pieces remaining, about 10 seconds. (To mix by hand, combine dry ingredients in a large mixing bowl, then cut in butter with a pastry blender or two fork.)

With the machine running, add the ice water through the feed tube in a slow, steady stream, just until the dough holds together with out being wet or sticky. Do not process more than 30 seconds. Test by squeezing a small amount of the dough together; if it is still to crumbly, add a bit more water, 1 tablespoon at a time.

Turn out the dough onto a clean work surface. Divide in half, and place each half on a piece of plastic wrap. Shape into flattened disks. Wrap in plastic, and refrigerate at least 1 hour, or overnight. The dough can be frozen for up to 1 month; thaw overnight in the refrigerator before using.

When ready to use, roll dough out to 1/4 inch thick. Press gently into tart pans, making sure not to stretch the dough. Place pans in the freezer to chill for at least 15 minutes.

Remove tarts from freezer, and blind bake for 15-20 min at 375 degrees. Remove weights and bake about 5 minutes longer, until crust is lightly browned. 

Cherry Almond Buttermilk Bread

I seem to be posting a lot of buttermilk recipes lately. Too much buttermilk, what a happy problem to have. I found this recipe for basic buttermilk quick bread with variations on The Kitchn and wanted to give it a try. Since I had a couple of jars of canned cherries in the basement I decided to throw those in along with a little almond extract. I would have added some chopped almonds too but I didn't have any. Add a simple glaze to the top and you're done, quick and easy. This bread is nice for a quick snack, or along with your breakfast. It's not rich or super sweet, but sometimes that's okay. 

Like I said, this bread is definitely bread, it is not cake masquerading under the title of bread. It's heartier less sweet than cake and a lot of quick breads. Sometimes this is perfect, just what I need. I liked the addition of cherries and a glaze to add some sweetness, but you can also make the bread savory too and add in herbs and cheeses, peppers or onions, just about whatever you can think of. Check out the link for some ideas. It's a nice, versatile recipe to have on hand in case you need it.

Cherry Almond Buttermilk Bread

Adapted from 

The Kitchn

Ingredients

For the Bread

  • 2 cups all-purpose flour
  • 1/2 cup white sugar
  • 1 1/2 teaspoons baking powder
  • 1/2 teaspoon baking soda
  • 1 teaspoon salt
  • 1 cup buttermilk
  • 1 large egg
  • 1/4 cup vegetable oil
  • 1 teaspoon almond extract
  • 1 jar of canned cherries, drained, mixed with a tablespoon or two of flour

For the Glaze

  • 1/2 cup powdered sugar
  • a couple teaspoons cherry juice (or water)

Directions

Heat the oven to 350°F. Grease or spray with nonstick cooking spray a standard 9x5 loaf pan.

Whisk together the flour, sugar, baking powder, baking soda, and salt in a medium mixing bowl. In a separate bowl whisk together buttermilk, egg and vegetable oil.

Pour the liquid ingredients over the dry ingredients. Gently stir and fold the ingredients until all the flour has been incorporated and a shaggy, wet batter is formed, adding in the cherries towards the end of mixing. Be careful not to over-mix.

Scrape the batter into the prepared pan and pat it into the corners. Bake for 45-50 minutes. When finished, the loaf should be domed and golden, and a toothpick inserted into the center should come out clean. Let the loaf cool in the pan for 15 minutes before removing and slicing.

Wrap baked loaves tightly in plastic wrap and store at room temperature. Baked loaves can also be wrapped in plastic and aluminum foil and frozen for up to three months.

Double Chocolate Buttermilk Muffins

Any time some chocolate can find it's way into my breakfast I know it's going to be a good day. These muffins are a delicious way to ensure a great day ahead. They are easy to make, and use simple ingredients that I always have on hand. There is plenty of chocolate flavor from the cocoa powder and chocolate chips, and buttermilk and melted butter add tenderness and lots of yummy flavor (and yea for melted butter! It makes everything just that much easier!). Unlike some other chocolate muffins I have made, these don't have chocolate melted into the batter, but it doesn't seem to matter, they have tons of flavor even without that, and it saves on doing that one extra step. If you're looking for a chocolate pick me up for breakfast, look no further and head into the kitchen. 

Double Chocolate Buttermilk Muffins
Adapted from Hummingbird High
Ingredients

  • 2 cups plus 2 tablespoons all-purpose flour
  • 3/4 cup unsweetened natural cocoa powder
  • 1 tablespoon baking powder
  • 1/2 teaspoon baking soda
  • 1/4 teaspoon salt
  • 2 large eggs
  • 1 1/4 cups granulated sugar
  • 1 cup buttermilk
  • 1/2 cup (1 stick) unsalted butter, melted and cooled
  • 1 teaspoon vanilla extract
  • 6 ounces dark chocolate chunks or chips

Directions
Preheat the oven to 400 (F) and prepare muffin tins with muffin liners.

In a medium bowl, whisk together 2 cups plus 2 tablespoons all-purpose flour, 3/4 cup unsweetened natural cocoa powder, 1 tablespoon baking powder, 1/2 teaspoon baking soda, and 1/4 teaspoon salt until combined. Set aside.

In a large bowl, whisk together 2 large eggs and 1 1/4 cups granulated sugar until a pale yellow. Add 1 cup buttermilk, 1/2 cup melted unsalted butter and 1 teaspoon vanilla extract and whisk until just combined. 

Sprinkle the dry ingredients evenly onto the surface of the wet ingredients. Use a rubber spatula to fold until combined, with one or two flour streaks left in the batter. Add the chocolate chunks, reserving a few for the top if desired, and fold into the batter until just combined. Do not overmix.

Divide the batter between the muffin tins, filling them about 2/3s of the way full. Sprinkle the tops of each muffin with the remaining chocolate pieces. 

Bake in the preheated oven for 16 to 18 minutes or until the tops look set and a skewer inserted into the center of a muffin comes out almost clean. Allow the muffins to cool in the tin on a wire rack for 10 minutes, before turning out onto the wire rack to cool completely.

Perfect Roast Chicken

Some days all I want for dinner is a simple roasted chicken. Roasting a chicken is easy, delicious and so satisfying. Opening the oven door and pulling out the finished product, drinking in the smells of a perfectly cooked chicken mixing with lemon, garlic and wine, it doesn't get much better than that. For this recipe you roast the chicken atop a delicious bed of carrots, onion and fennel with thyme, so you don't even have to worry about making a side dish, it's built in! The only other thing you might need is a loaf of fresh bread with salted butter and your meal is complete. Simple, elegant, and wonderful. 

There's a little prep work involved in this meal, but nothing overly difficult or time consuming. A few vegetables to cut up and some chicken prep but that's about it. You can cut the vegetables a day or two in advance if you are thinking ahead to really streamline this meal. I think the whole head of garlic along with fresh lemon and thyme are the perfect trio to stuff the chicken with. Some of my absolute favorite flavors. The whole thing is just a beautiful combination, and a tasty one too!

Perfect Roast Chicken

Adapted from the 

Food Network

Ingredients

  • 1 (5 to 6 pound) roasting chicken
  • Kosher salt
  • Freshly ground black pepper
  • 1 large bunch fresh thyme, plus 20 sprigs
  • 1 lemon, halved
  • 1 head garlic, cut in half crosswise
  • 2 tablespoons (1/4 stick) butter, melted
  • 1 large yellow onion, thickly sliced
  • 4 carrots cut into 2-inch chunks
  • 1 bulb of fennel, tops removed, and cut into wedges
  • Olive oil
  • White wine (if desired)

Directions

Preheat the oven to 425 degrees F.

Remove the chicken giblets. Remove any excess fat and leftover pin feathers and pat the outside completely dry. Liberally salt and pepper the inside of the chicken. Stuff the cavity with the bunch of thyme, both halves of lemon, and all the garlic. Brush the outside of the chicken with the butter and sprinkle again with salt and pepper. Tie the legs together with kitchen string and tuck the wing tips under the body of the chicken. Place the onions, carrots, and fennel in a roasting pan. Toss with salt, pepper, 20 sprigs of thyme, and olive oil. Spread around the bottom of the roasting pan and place the chicken on top. Pour a little of the white wine into the bottom of the pan if desired. 

Roast the chicken for 1 1/4 - 1 1/2 hours, or until the juices run clear when you cut between a leg and thigh. Remove the chicken and vegetables to a platter and cover with aluminum foil for about 20 minutes. Slice the chicken onto a platter and serve it with the vegetables.