Banket: A New Favorite

Growing up in West Michigan in a family that is very proud of their Dutch heritage means that I grew up eating my fair share of Dutch goodies; boterkoek, Jan Hagels, oliebollen and windmill cookies to name a few. They're all delicious, but in my opinion there is nothing better than a stick of homemade banket, especially during the holidays. I've shared a banket recipe on the site before which was very good, but I was never completely satisfied with it, especially with the filling. I don't like my banket filling to be too dry, and while the previous recipe was delicious, the filling was just too dry for my taste, I wanted something else. 

This Christmas I decided to go on a search to see if I could find the banket recipe I've been hoping for. There are not the many banket recipes out there, so it took a bit of searching, but I finally came up with a recipe from The Lilypad Cottage that looked like it could be the one. It came together pretty easily so I was very hopeful when I put the first batch into the oven. I have to say, they turned out just about perfectly. Exactly what I was hoping for. A light, and flaky buttery crust wrapped around the perfect almond paste filling. I think I found it!

This recipe is a two day affair, or a long one day affair. The dough and filling need to chill up pretty firm before you use them. Another thing I love about banket is that it is so easy to freeze. I just shape it up and pop the unbaked rolls into the freezer for a few hours. Then I wrap them in plastic and keep in a bag in the freezer until I need them. You don't even have to thaw before baking. Just unwrap, place on a cookie sheet and bake from frozen. They might take a few extra minutes from frozen but other than that you can't even tell. Super easy!

Banket
Adapted from The Lily Pad Cottage
Ingredients
Dough

  • 4 cups flour

  • ¼ cup sugar

  • 1 teaspoon salt

  • ½ teaspoon baking powder

  • 1 pound cold butter, cut into small pieces

  • scant 1 cup cold water

Filling

  • 1 pound of almond paste

  • 2 eggs

  • 2 cups sugar

  • 1 teaspoon vanilla

To Finish

  • 1-2 Egg yolks

Directions
For the dough, mix together the flour, sugar, salt and baking powder. Add the pieces of cold butter and cut into the flour mixture with a pastry blender (you can also use two forks or even your fingers, but work fast, you don't want the butter to get too warm) until the butter is about pea sized. Make a well in the middle and add cold water, mix until a shaggy dough is formed, don’t over mix. Wrap in plastic and refrigerate overnight.

For the filling, break up almond paste in a bowl. Add eggs, sugar, and vanilla. Mix well. Cover bowl with plastic wrap and refrigerate overnight.

The next day cut divide both the dough and the filling into 8 equal portions, use a scale if you have it.

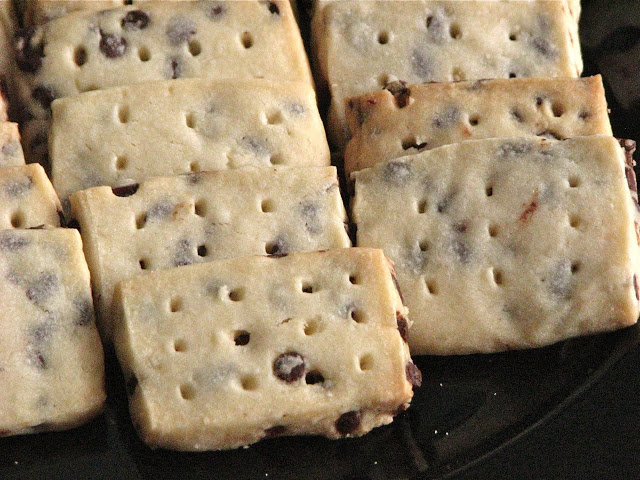
Take one piece of dough and roll out into a long, thin rectangle, approximately 13x4 inches. Place one piece of filling on the rolled out dough, spreading it along the length of dough, a little closer to one side, forming an even line. Roll up the long way, folding the ends under. Pinch together slightly so the filling doesn’t ooze out.

Dock the rolls with a fork, brush with egg yolks.

At this point you can stick the pans in your freezer until the Banket is frozen hard. Then you can wrap them up and bake off as needed.

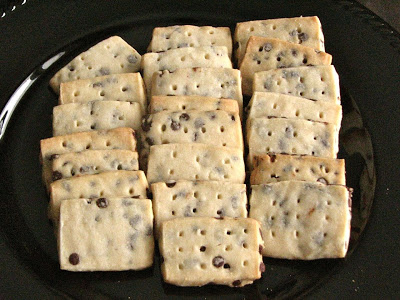
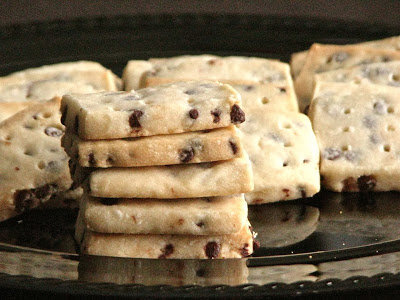
Bake at 400 degrees for 25-30 minutes (I do about 30 minutes when baking from frozen) until golden brown. Let cool before slicing into 1-2 inch pieces, enjoy!

Peppermint-Chocolate Chip Shortbread

Who doesn't love shortbread? It's just butter and sugar held together with some flour, how can you go wrong? Any excuse to eat butter is okay with me! I was at my favorite bakery a few weeks ago and they had bags of peppermint shortbread for sale. The cookies were calling to me, but I knew I could make the same thing at home so I resisted and went home to search the internet for a recipe. I found the perfect recipe in multiple places online. It originally called for espresso powder, so I just replaced that with some peppermint extract and my peppermint shortbread craving was satisfied. Combining the buttery goodness of shortbread with some chocolate, and then throwing in a little peppermint extract results in the perfect cookie. 

One of my favorite parts of this recipe was the method for rolling out the shortbread. When you first make the dough you throw it into a gallon size plastic bag and then roll it out to an even thickness right inside the bag. After a couple hours in the fridge all you have to do is cut the dough out of the bag and cut the cookies into whatever size and shape you want. Transfer to cookie sheet and bake. Super easy!

Peppermint-Chocolate Chip Shortbread

Adapted From 

Use Real Butter

Ingredients

  • 2 sticks (8 ounces) butter, at room temperature

  • 2/3 cup confectioners’ sugar

  • 1/2 teaspoon vanilla extract

  • 1/4 teaspoon peppermint extract

  • 2 cups all-purpose flour

  • 3/4 cup mini chocolate chips

  • Confectioners’ sugar, for dusting (optional)

Directions

Working with a stand mixer, preferably fitted with a paddle attachment, or with a hand mixer in a large bowl, beat the butter and confectioners’ sugar together on medium speed for about 3 minutes, until the mixture is very smooth. Beat in the vanilla and peppermint extracts, then reduce the mixer speed to low and add the flour, mixing only until it disappears into the dough. Don’t work the dough much once the flour is incorporated. Fold in the chopped chocolate with a sturdy rubber spatula.

Using the spatula, transfer the soft, sticky dough to a gallon-size zipper-lock plastic bag. Put the bag on a flat surface, leaving the top open, and roll the dough into a 9 x 10 1/2 inch rectangle that’s 1/4 inch thick. As you roll, turn the bag occasionally and lift the plastic from the dough so it doesn’t cause creases. When you get the right size and thickness, seal the bag, pressing out as much air as possible, and refrigerate the dough for at least 2 hours, or for up to 2 days.

Position the racks to divide the oven into thirds and preheat the oven to 325 degrees F. Line two baking sheets with parchment or silicone mats.

Put the plastic bag on a cutting board and slit it open. Turn the firm dough out onto the board (discard the bag) and, using a ruler as a guide and a sharp knife, cut the dough into little squares or rectangles. Transfer the squares to the baking sheets and carefully prick each one twice with a fork, gently pushing the tines through the cookies until they hit the sheet.

Bake for 18 to 20 minutes, rotating the sheets from top to bottom and front to back at the midway point. The shortbreads will be very pale–they shouldn’t take on much color. Transfer the cookies to a rack.

If you’d like, dust the cookies with confectioners’ sugar while they are still hot. Cool the cookies to room temperature before serving.

Chewy Molasses Cookies

After days of snow, freezing temperatures, and sub-zero wind chills, there is nothing better than curling up inside on the couch with a cup of coffee, a good book, and a couple of cookies. These chewy molasses cookies are buttery, filled with warm spices and coated with coarse sugar for a crunchy finish. They are the perfect accompaniment for that warm cup of coffee. 

With molasses cookies it always seems like you never know exactly what you are going to get. Will they be too molasses-y? Too spicy? Too hard? Not tasty? Well, set all your fears aside with this recipe. They are the perfect mix. Buttery and sweet with the perfect amount of spice, baked until just barely cooked through leaves them perfectly chewy and soft. A delicious cookie to see you through those cold winter days. 

I actually made these cookies twice in about a week. They turned out absolutely delicious both times, however, while the first batch turned out a little poofy as you can see in the pictures, my second batch turned out incredibly flat, they spread out completely while baking. I don't know what the difference was, I can't think of anything I did differently between the two batches. But both batches were still wonderful though, thank goodness. So however they turn out for you, I am sure they will still be delicious.

UPDATE (12/17/14): I added an extra 1/4 cup of flour and really chilled the dough well before baking and the cookies baked up a lot more poofy!

Chewy Molasses Cookies
Adapted from Heart of Gold
Ingredients

  • 2 cups all-purpose flour (UPDATE: add an extra 1/4 cup flour to help make the cookies nice and poofy and less likely to spread)

  • 2 teaspoons baking soda

  • 2 teaspoon ground cinnamon

  • 1 teaspoon ground ginger

  • 1⁄2 teaspoon salt

  • 1 large egg

  • 1⁄2 cup (1 stick) unsalted butter, melted

  • 1⁄3 cup granulated sugar

  • 1⁄3 cup mild-flavored (light) or robust-flavored (dark) molasses

  • 1⁄4 cup (packed) dark brown sugar

  • Coarse sanding or raw sugar (for rolling)

Directions
Place racks in lower and upper thirds of oven; preheat to 375°. Whisk flour, baking soda, cinnamon, ginger, and salt in a small bowl. Combine egg and butter and beat together with a mixer for 4-5 minutes, until light and fluffy. Add granulated sugar, molasses, and brown sugar and beat for 2-3 minutes more. Mix in dry ingredients just to combine. Chill dough for 20-30 minutes, or longer, until firm enough to handle. 

Place sanding sugar in a shallow bowl. Scoop out dough by the tablespoonful and roll into balls. Roll in sugar and place on 2 parchment-lined baking sheets, spacing 2” apart.

Bake cookies, rotating baking sheets halfway through, until cookies are puffed, cracked, and just set around edges (overbaked cookies won’t be chewy), 8–10 minutes. Transfer to wire racks and let cool.

Homemade Marshmallows

A couple of summers ago I made a batch of homemade marshmallows that were really quite tasty, but the texture wasn't what I had been hoping for. They had been incredibly soft, delicious but soft. I had been hoping to be able to roast them over the campfire for a s'more, but there was not way they were going to not immediately melt off the stick and into the fire. But recently I've been wanting to try them again. Not because I'm a marshmallow fanatic, but just because I thought it would be kind of fun to try again. Since it was Christmas I thought that they would also make a fun gift, alongside my favorite homemade hot chocolate mix. A couple of soft and creamy homemade marshmallows floating on top of a mug of rich, decadent hot chocolate sounded divine. 

I searched around for a recipe that sounded good to me and settled on this one from King Arthur Flour. The recipe stated that these marshmallows were more on the 'stiffer' side which was exactly what I was looking for. So I whipped a batch together and was extremely pleased as to how they turned out, stiff, yet still creamy and soft, just not oozingly soft which I did not want. They were exactly what I was looking for. And I have to admit, I did try some of the leftovers in a mug of hot chocolate, for quality control of course, and it was an outstanding combination. With a recipe like this, I may have to make marshmallows more often. 

This recipe really couldn't be easier. It does require a candy thermometer and an electric mixer, but all the steps are very simple. I'm definitely not a candy maker, and they still turned out great. You will also need a package of unflavored gelatin, not something I normally have lying around, but easy enough to get your hands on. Other than that all you need is some sugars; granulated sugar and light corn syrup. Throw in whatever flavor you want after that (I stuck with straight vanilla for a classic taste, but I think some peppermint extract would be wonderful). That's it. Heat it up, mix it together and let it cool. Then you can cut it into whatever size or shape you want. A fun project for the holidays, or really any time of year!

Homemade Marshmallows 
From King Arthur Flour
Ingredients

  • 3 packages (1/4-ounce each) unflavored gelatin

  • 1 cup (8 ounces) cool water, divided

  • 1 1/2 cups (10 1/2 ounces) granulated sugar

  • 1 cup (11 ounces) light corn syrup

  • 1/8 teaspoon salt

  • 1 tablespoon (1/2 ounce) vanilla extract

  • Confectioners' sugar, to sprinkle on top

Directions
Combine the gelatin and 1/2 cup cool water in the bowl of an electric mixer fitted with the whisk attachment. Combine the sugar, corn syrup, salt, and 1/2 cup cool water in a small, deep saucepan. Cook the mixture over medium heat, stirring, until the sugar dissolves. Raise the heat to high and cook, without stirring, until the syrup reaches 240°F on a candy thermometer. Remove from the heat.

With mixer on low speed, slowly pour the sugar syrup into the softened gelatin. Increase the speed to high, and whip until the mixture is very thick and fluffy, and has cooled to lukewarm, 3 to 10 minutes (depending on the mixer and attachment you use; a stand mixer using the whisk attachment will work more quickly than a hand mixer equipped with beaters). The mixture should be cool enough that you can spread it into the pan without burning your fingers, about 95°F. Add vanilla towards the end of the mixing time.

Spread the marshmallow mixture into a greased 9" x 13" pan (glass or ceramic is best). Use your wet hands to smooth and flatten the marshmallows. Sprinkle confectioners' sugar over the top, and let sit for several hours (or overnight) before cutting. Use a greased knife or cookie cutters to make squares or other shapes. Yield: about 100 1" squares.

Christmas Cookies, 2013 Edition

Merry Christmas everyone! I had to put up a quick Christmas post today to share the annual Delectably Mine Christmas cookies. Once again my sister gets almost all the credit. She was the baker and artist in charge of all the sugar cookies, baking and decorating. I was in charge of baking the gingerbread men, but I asked Lara to do a little quick decorating for me once they were done baking since she's had a lot more practice than me and could whip them out quickly. All in all I think they once again turned out great. I hope you all have a wonderful day!

When Lara showed me the idea for reindeer Christmas cookies we both decided that they were happening this year. They were just too cute to pass up. In case you didn't notice, I certainly didn't, you don't need a special cookie cutter for the reindeer, all you need is a gingerbread man cutter that you flip upside down. Once it's decorated you can't tell the difference! You can find a great tutorial for these cookies at  Sweet Sugar Belle. She has such amazing ideas, this was definitely another winner!

Vanilla Almond Sugar Cookies and 

Royal Icing
Recipes can be found here

————————————————

Gingerbread Cookies
From King Arthur Flour
Ingredients

  • 3/4 cup unsalted butter

  • 3/4 cup brown sugar, packed

  • 3/4 cup molasses

  • 1 teaspoon salt

  • 2 teaspoons cinnamon

  • 2 teaspoons ground ginger

  • 1/4 teaspoon allspice or cloves

  • 1 large egg

  • 1 teaspoon baking powder

  • 1/2 teaspoon baking soda

  • 3 1/2 cups flour

Directions
In a saucepan set over low heat, or in the microwave, melt butter, then stir in the brown sugar, molasses, salt, and spices. Transfer the mixture to a medium-sized mixing bowl, let it cool to lukewarm, and beat in the egg. Whisk the baking powder and soda into the flour, and then stir these dry ingredients into the molasses mixture. Divide the dough in half, and wrap well. Refrigerate for 1 hour or longer.

Preheat your oven to 350°F. Get out several baking sheets and line with parchment. Once the dough has chilled, take one piece of dough out of the refrigerator, and flour a clean work surface, and the dough. Roll it out as thin or thick as you like; for slightly less crisp cookies, roll it out more thickly. I like mine gingerbread nice and soft, so I rolled them quite thick.

Cut out shapes with a cookie cutter. Transfer the cookies to cookie sheets. Bake the cookies just until they're slightly brown around the edges 8 to 12 minutes, or until they feel firm. Let the cookies cool on the baking sheets for several minutes, or until they're set. Transfer them to a rack to cool completely. Repeat with the remaining dough.

Once cool, decorate the cookies with Royal Icing or whatever frosting you prefer. 

Sage and Rosemary Nut Mix

I'm a sucker for any type of snack or nut mix, I just love munching on things and this recipe is one of the best ways to do just that. It's super simple to put together, and is just a bit different than a lot of other mixes I've had, thanks in part to the sage. I hadn't worked a lot with sage until this fall, but I randomly planted a couple of sage plants in my backyard this summer, and then promptly ignored it until just a month or two ago. When I actually started to use the leaves in a couple of different things I realized that I love the soft warmth of this beautiful herb, and the distinctive flavor it lends to dishes. 

Tossing this sage together with a couple of cups of mixed nuts, olive oil and some rosemary leads to a deliciously savory mix that makes you step back and contemplate what you've just eaten. It's the perfect mix for any holiday party, from Thanksgiving to New Years, and beyond. This mix is definitely a winner. 

This recipe couldn't really be easier. Just mix everything together, spread on a cookie sheet and bake low and slow for a couple of hours. That's it! I think my favorite part of the whole mix was how crispy and crunchy the sage leaves became after they came out of the oven. They just melt in your mouth, salty and oily and delicious! I have to admit, not many of them actually made it into the final mix. I may have eaten a few to many before I reached that stage, that's the advantage of being the cook!

Sage and Rosemary Nut Mix

From 

Food and Wine

Ingredients

  • 4 cups mixed raw nuts, such as pecans, walnuts, almonds and cashews
  • 32 sage leaves, torn into large pieces
  • One 8-inch rosemary sprig, leaves stripped
  • 3 tablespoons extra-virgin olive oil
  • Salt
  • Freshly ground pepper

Directions

Preheat the oven to 200°. On a large rimmed baking sheet, toss the mixed nuts with the sage, rosemary and olive oil and season with salt and pepper. Spread the nuts in an even layer. Bake for 3 hours; the nuts should not be browned. Let the nuts cool on the baking sheet until they are crisp, then transfer them to a bowl and serve. Store in an airtight container.

Lighter Carrot Cake

I know Thanksgiving has come and gone, but I have one last recipe to share. This year on Thanksgiving I just felt like baking a carrot cake. I'm not really sure why, but it just sounded good to me. I've never made one before, and it definitley isn't on the top of my list of favorite cakes, but that doesn't at all mean I don't love a good carrot cake, I just like a lot of other cakes a little more! But this year a simple one layer carrot cake with cream cheese frosting and walnuts was calling my name.

I did some searching for a good recipe and ended up going with America's Test Kitchen recipe for lighter carrot cake. Since I don't have a go-to carrot cake recipe yet I figured why not just go with the slightly healthier version since I probably wouldn't notice the difference anyway. And I didn't. There was nothing about this cake that would have made me think that it was trying to be a 'lighter'. It was still delicious, moist and flavorful, slightly spiced and covered with a rich cream cheese frosting. Sprinkled with some toasted, chopped walnuts and cut into bite sized pieces, it was the perfect snack for Thanksgiving night, or any other night of the year!

Even though I did go with the lighter carrot cake, I had to go with the not-so-light cream cheese frosting, the lighter frosting just wasn't going to do it for me. It turned out delicious, as all cream cheese frostings do, you really can't go wrong with cream cheese and butter. I finished the cake off with some chopped, roasted walnuts, the perfect finish.

And with that it really couldn't be much easier. With oil instead of butter, and no need to layer the cake with the frosting it really is a quick and delicious cake. I will keep this one in my repertoire for years to come.

Lighter Carrot Cake

From America's Test Kitchen

Ingredients

  • 2 1/2 cups (12 1/2 ounces) all purpose flour
  • 1 1/4 teaspoon baking powder
  • 1 teaspoon baking soda
  • 1 1/4 teaspoon ground cinnamon
  • 1/2 teaspoon ground nutmeg
  • 1/2 teaspoon salt
  • 1/8 teaspoon ground cloves
  • 3 eggs, room temperature
  • 1 cup (7 ounces) brown sugar
  • 1 cup (7 ounces) granulated sugar
  • 1/2 cup vegetable oil
  • 1 pound carrots (about 6 medium), peeled and grated (about 3 cups)
  • Cream cheese frosting (recipe follows)

Directions

Heat oven to 350 degrees. Grease a 13x9 inch cake pan, then line the bottom with parchment paper. Whisk the flour, baking powder, baking soda, cinnamon, nugget, salt and cloves together in a medium bowl.

Beat the eggs, brown sugar, and granulated sugar together in a large bowl with and electric mixer on medium speed until the mixture turns thick and creamy, 1 to 3 minutes. Reduce the mixer speed to low and slowly beat in the oil until thoroughly combined and emulsified, 30 to 60 seconds.

Sift half the flour mixture over the batter and gently whisk in by hand. Repeat with the remaining flour mixture and continue to whisk the batter gently until most of the lumps are gone - do not overmix. Using a rubber spatula, gently stir in the carrots.

Pour the batter into the prepared pan and smooth the top. Bake until a toothpick inserted into the center of the cake comes out with a few moist crumbs attached, 35 to 40 minutes, rotating the pan halfway through the baking time.

Cool the cake completely in the pan, about 2 hours. Run a knife around the edge of the cake and flip the cake out onto a wire rack. Peel off the parchment paper then flip the cake right side up onto a serving platter. Spread the cream cheese frosting evenly over the top and sides of the cake and serve.

Cream Cheese Frosting

Ingredients

  • 2 (8-ounce) packages cream cheese (or neufchâtel), softened
  • 10 tablespoons butter, softened
  • 2 tablespoons sour cream
  • 1 1/2 teaspoons vanilla extract
  • 1/4 teaspoon table salt
  • 2 cups (8 ounces) powdered sugar

Directions

Beat the cream cheese, butter, sour cream, vanilla and salt together in a large bowl with an electric mixer on medium-high speed until smooth, 2 to 4 minutes.

Reduce the mixer speed to medium-low slowly add the powdered sugar and beat until smooth, 4 to 6 minutes. Increase the mixer speed to medium-high and beat until the frosting is light and fluffy, 4 to 6 minutes.

First Birthday Cupcakes

A couple of weeks ago, my nephew celebrated his first birthday. I can't believe he is a year old already! It went so fast, he is growing up right in front of my eyes. Since I was always the youngest on both sides of my family, I'm not used to having a little person around to watch grow and change. It is amazing to see his development progress from week to week. 

Of course I was ready and hoping I would be able to make him some kind of cake for his birthday, so when my sister-in-law asked if I could make a couple dozen cupcakes for his birthday party I was super excited and raring to go. She requested a batch of chocolate cupcakes with green frosting and a batch of chocolate chip cookie dough cupcakes with blue frosting. I had such a fun time with these, and think they turned out really well, it was a great way to celebrate this special birthday. 

For the party I went with two

cupcake recipes I've made many times already and know will always be great. The always popular chocolate chip cookie dough cupcakes which I changed up this time by coloring the frosting blue. I wasn't quite sure how they would look since they wouldn't be quite as cookie dough-ish with blue frosting on top, but I needn't have worried, they turned out beautifully, and tasted great too! 

The second choice were these ultimate chocolate cupcakes for which I skipped the ganache filling this time (mostly because I didn't have any cream, and didn't feel like going to the store) and they still turned out wonderfully. I made a swiss buttercream to finish them off which I colored bright green. The dark chocolate cupcakes contrasted beautifully with the bright frosting which I topped of with some little round candies. 

My sister in law finished off the cupcakes with these super cute little flags. My mouth was watering the whole party, it can be so difficult to wait for dessert!

The birthday boy got the first cupcake. At first I think he was a little unsure as to what he was supposed to do. It was his first party after all.  

He figured it out in the end though, what a cutie! Happy birthday little guy!