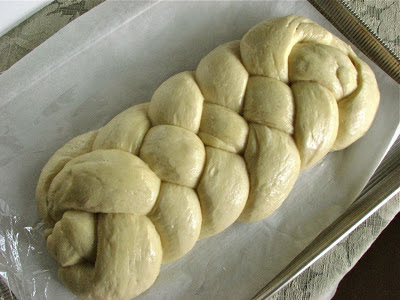
Braided Challah Bread
I've been wanting to try making challah for some time now, but I just couldn't seem to get around to it. Last week I decided it was time to stop coming up with excuses and just do it. I looked at several different recipes for challah, it was difficult to choose one to try, but I finally settled on this recipe I found on The Apron Archives. The pictures were beautiful and the original recipe was from the King Arthur Flour Baker’s Companion Cookbook, so I figured I was in good hands. While my loaf turned out beautifully and smelled divine, it was a little dry and overcooked. I think it would be just perfect if it baked for just a little less time. I'm definitely going to try it again and keep my eye on it. But even so, this bread made some fabulous grilled sandwiches, and killer croutons. I think my next experiment will be french toast! Can't wait!

I just love the braided look of this bread, it is so pretty. If you want to know how to achieve this look, head over to The Apron Archives where I got the recipe, she has a great little tutorial on how to do the 4 strand braid. It is really not difficult at all, and makes the finished product so festive looking.


Braided Challah Bread
From The Apron Archives
Ingredients
Quick Starter
- 1 cup All-Purpose Flour
- 1 cup water
- 2 tsps instant yeast
Dough
- All of the starter
- 3 1/2 cups All-Purpose Flour
- 1 3/4 tsps salt
- 1/3 cup sugar
- 1/4 cup vegetable oil
- 2 large eggs + 1 yolk (save 1 egg white for the wash, below)
Wash
- 1 egg white
- 1 tsp sugar
- 1 Tbsp water
Directions
To make the starter, mix the 1 cup flour, 1 cup water and yeast together in a large bowl. Let the mixture sit for about 45 minutes. Add the dough ingredients to the starter and mix and knead together until a smooth is formed.Place the kneaded dough in a greased bowl, turning it over once to coat both sides. Cover it and let it rise for 1 1/2 hours, or until doubled in size.
Turn the dough out onto a lightly floured surface. Divide the dough into four even pieces and roll each into a strand about 18 inches long. On a lightly greased or parchment-lined sheet pan, braid the strands. Once your braid is done, make the wash by mixing together the reserved egg white, sugar, and water. Brush the loaf with half the wash. Cover the loaf with lightly greased plastic wrap and allow it to rise again for 45 minutes to 1 hour, or until it’s almost doubled in size.
Brush the loaf with the remaining egg wash and bake in a preheated 375°F oven for 35 to 40 minutes, covering with aluminum foil if it starts getting too brown. Remove it from the oven, and cool completely before slicing.