Winter Trip to Chicago

Over Christmas break, Lara and I took a short trip to Chicago to visit our cousin Anna, and to just enjoy walking around downtown, do some shopping and of course eat some good food! We were only there for a little over a day, but we did manage to sneak in some tasty treats in that short amount of time.

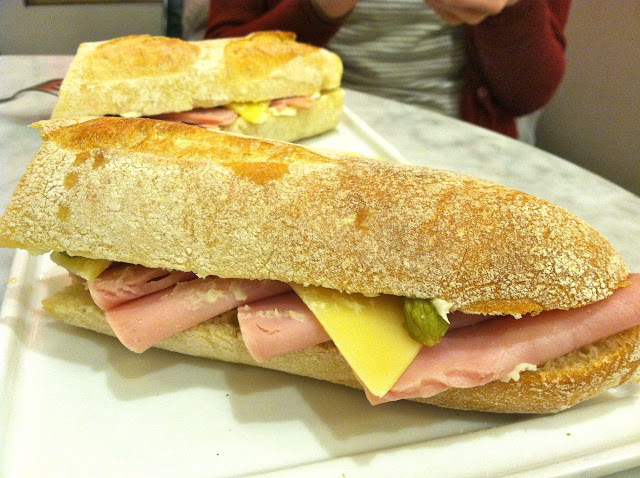
We arrived in downtown Chicago in the morning, and after some shopping, we were ready to find something for lunch. We found a cute little place called Toni's Patisserie and Café which was perfect. This place was loading with the most fabulous looking pastries, cookies, breads and chocolates. When I saw baguette sandwiches on the menu I knew we had found lunch. We decided to split the Le Breton sandwich, a chewy baguette with ham, salted butter, cornichons and gruyere, delicious!

Since we split lunch, that meant it was okay to get dessert of course! Since this was over Christmas break, something festive seemed like the right thing to eat, so we got the eggnog tart, creamy custard in a cookie crust with chocolate and whipped cream. A beautiful end to this delicious experience.

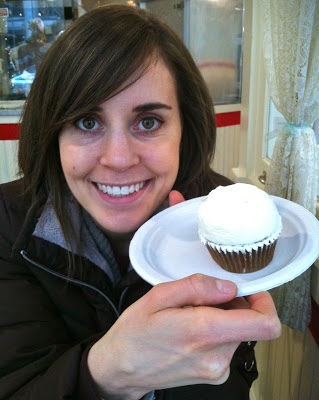
As we continued our walking around, I was just starting to get a little tired when I saw the sign for Magnolia Bakery. Of course I've heard about Magnolia Bakery numerous times, and even though we weren't in New York City, I decided I needed to check it out and see what all the fuss is about. It was a very cute little shop, with tons of people working behind the counter. I wanted to stay and watch them make the cupcakes. I picked out the gingerbread cupcake with vanilla bean butter cream to try. To be honest I wasn't all that impressed. While I loved the light and creamy buttercream, the actual cake was pretty dry, and not anything all that special. At $3.50 a pop I think I'll stick with my homemade cupcakes when I'm feeling a cupcake craving.

Even though the cupcake wasn't that great, I'm glad I got to stop and see what Magnolia Bakery is all about. I know I didn't visit the original, but at least when I read about it again, I'll have some idea what everyone is talking about.

After a day downtown, Lara and I were ready to head to my cousins place to relax, and of course eat dinner. We ended up at a place called Rocks, which Anna said she'd been wanting to try. It was too dark in there to even try to get a photo so I can't share any pictures of my delicious burger. It was the signature Rocks burger which was a cooked to order 8 ounce patty on a soft pretzel roll with bacon, pepper jack cheese, onion strings, lettuce, tomato and a side of giardiniera and fries of course. I'll admit that I'm a sucker for anything on a pretzel bun and this did not disappoint.

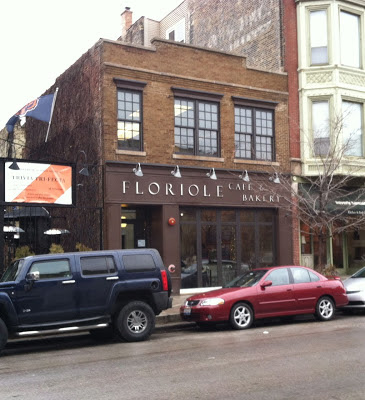
Our final food stop in Chicago was for breakfast before we headed back to Michigan. In my opinion, all a fabulous breakfast needs is a delicious pastry and some good coffee. The Floriole Cafe and Bakery in Lincoln Park delivered just that. I found this cute little place online and knew I had to visit it before leaving. Walking in the door, we found a display case piled high with croissants, calfoutis, scones, galettes, pound cakes, sticky buns, quiche and tartines. I was in heaven.

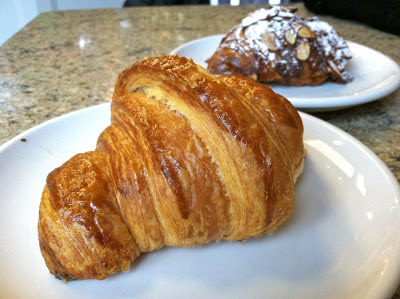
Since I was feeling like something a little lighter for breakfast, I went with a basic croissant. It was fantastic, buttery and flakey, crisp on the outside, soft and light on the inside. Lara decided on the almond croissant, a twice baked croissant soaked with rum syrup and filled with almond cream. To. Die. For. 

Sitting in the front window, breaking into beautiful pastries and sipping delicious coffee, it was a wonderful way to end the trip. A perfect ending to a fun couple of days.

I would recommend any of the places we went on this trip. In fact, I want to go back right now and do it all over again!

Bakery Style Muffins

When it comes to muffins, there are just muffins, and then there are real muffins. I'm sure you know what I mean, some muffins are short, flat and to be honest, rather ugly, not that this means they don't taste good, but let's be honest, it's more fun to eat something beautiful. Then there are the real deal; tall and handsome muffins with those perfectly domed tops, slightly crispy edges and a dense yet tender crumb that will never be confused with a cupcake. This is the kind of muffin I pine after. It's surprising how difficult it can be to find a recipe for this type of muffin, however, I think I've finally done it. These muffins were gorgeous and delicious, true muffins with the perfectly rounded top, exactly what I've been looking for.

What's interesting about this batter is that it doesn't use any milk or other liquid. The dairy is all yogurt, and a lot of it. This makes the batter super thick, almost like pancake batter, and helps create that beautiful mushroom top that doesn't overflow the muffin tins or flatten out too much. For this go around I made half of the mushrooms just plain, so I could really taste the muffin as is. For the other half, I tried swirling in some homemade strawberry rhubarb jam for a little added sweetness. I topped both with some coarse sugar for a little extra crunch.

The results were simply marvelous. The plain muffins were very nice, simple, slightly sweet and perfect as a basic muffin. The jam swirled version was also quite wonderful, a little extra sweet and sticky, the jam brought the muffin up just a notch. I would definitely do it again. Since the batter was so thick and my jam was really thick, it was difficult to actually swirl in the jam,  it mostly just stayed as a blob, but that was okay, it turned out really well in the end. This recipe comes with several delicious looking variations that I hope to share with you all soon.

Bakery Style Muffins
From Food.com, originally from America's Test Kitchen
Ingredients

  • 3 cups all-purpose flour
  • 1 tablespoon baking powder
  • 1/2 teaspoon baking soda
  • 1/2 teaspoon salt
  • 10 tablespoons butter, softened
  • 1 cup minus 1 tablespoon sugar
  • 2 eggs
  • 1 1/2 cups plain low-fat yogurt

Directions
Adjust oven rack to lower middle position and heat oven to 375 F (or 450 F for mini muffins). Mix flour, baking powder, baking soda and salt in medium bowl; set aside.

Beat butter and sugar with electric mixer on medium-high speed until light and fluffy, about 2 minutes. Add eggs, one at a time, beating well after each addition. Alternating 1/3 at a time, beat in the dry ingredients and yogurt until a smooth, thick batter just forms.

Spray 12-cup muffin tin with cooking spray or coat lightly with butter. Scoop batter evenly into cups. Bake until muffins are golden brown, about 20-25 minutes for the large muffins (and 10-12 minutes for the mini muffins). Set on wire rack to cool slightly, about 5 minutes. Remove muffins from tin and serve warm.

Christmas Cookies 2012

Tis the season for decorating Christmas cookies! I'll admit, I had very little to do with these cookies. My sister Lara has become the cookie decorator. I am just around for moral support, suggestions, and a little help here and there, otherwise it is all her. Every year she gets a little better, and a little fancier with the cookies. This year she got some ideas out of a magazine I got in the mail, and then adapted them to work for her. I think she did a fantastic job, they turned out so beautifully! Our kitchen was taken over by cookie decorating for a few days, but that's okay, I think it was worth it.

Lara used the same recipes that we have both been using for the last couple of years, both for the cookies and for the royal icing. We love them both, and haven't had any problems with either. You can find the recipes

here

.

The whole platter full

 Poinsettias!

Good job Lara, they look great! Check out this post for the recipes!

Twisted Sugar Cookies

I finished my first semester of med school on Thursday. It was a great semester, but I am so glad that I now have three weeks off to do whatever I want! Of course, Christmas baking is at the top of that list. I've already spent many hours in the kitchen, and plan to log plenty more there before the break is over. Because I have so many things I want to bake, it is difficult to decide how to prioritize and what to bake first. This year I started with these twisted sugar cookies. I had seen the recipe last year and printed it off with the hopes of making them this Christmas. I thought that they were so beautiful and wanted to try them for myself. They were a lot of fun to make, and quite tasty to eat too. Although they didn't turn out exactly like the pictures I was looking at (she's had a lot more practice than me!), they still turned out beautifully, making me happy at the beginning of this Christmas baking season!

The dough for this recipe has yeast and sour cream, both of which are a little different. You just throw it all together, cutting cold butter in, and then chill overnight. The next day you laminate the dough while covering it in flavored sugar, and then cut into strips and twist. As the cookies bake they kind of unfold a little revealing the layers created while rolling and folding. I just love all the different layers of dough you can see. The sugar crystallizes on the bottom of the cookies, turning into a kind of carmel, yummy!

For the first half of the dough I did what the recipe said and used vanilla sugar to roll them out in, but for the second half I decided to mix it up a little and added a little almond extract as well. They are both good but I absolutely love almond flavored things, especially at Christmas, and so the almond flavored cookies were my favorite. What a fun cookie to start out the Christmas baking season with!

Lots of rolling out

Cut them up

Twisted and ready to bake

Delicious sugary bottoms!

So pretty and twisty

Twisted Sugar Cookies
From Cook and Be Merry
Ingredients

  • 2 ¼ teaspoons Active Dry Yeast (1 pkg) (NOT Rapid Rise, Pizza Crust or Bread Machine)
  • ¼ cup warm water (100 – 110 degrees F)
  • ½ teaspoon sugar
  • 3 ½ cups all-purpose flour
  • 1 ¼ teaspoon kosher salt
  • 1 cup salted butter (2 sticks), chilled, cut into tablespoon-size pieces
  • 2 large eggs
  • ½ cup sour cream
  • 1 teaspoon vanilla

For sugary topping

  • 1 ½ cups sugar
  • 2 teaspoons vanilla extract
  • 1 teaspoon almond extract (optional)

Directions
Preheat the oven to 375 degrees F. Line 1 cookie sheet with foil. Double pan to bake.

In a warm medium bowl, combine water, yeast and sugar. Proof until frothy, about 10 minutes.

In a separate large bowl, mix together the flour and salt. Cut butter into flour until rice-size with two knives or pastry cutter.

In the medium bowl, mix eggs, sour cream and vanilla into the yeast mixture. Pour the egg mixture into the large bowl with the flour. Stir thoroughly with a fork to make a dough.

Divide the dough into 2 patties, wrap each in plastic, and refrigerate a minimum of 4 hours or overnight. Place patties side by side, not stacked to assure even cooling. My patties were 18.5 oz each.

In a medium bowl, thoroughly mix together the sugar and vanilla until evenly distributed. Cover the bowl with a plate or plastic wrap so the sugar doesn’t dry out.

On a dry surface, place ½ of the vanilla sugar. Place one patty of dough on the vanilla sugar (leaving the other patty in the refrigerator) and roll into a 16 x 8-inch rectangle. Scoop up all the sugar from around the edges and spread evenly over top of dough.

With the long edge toward you, fold both edges toward the center, making 3 equal layers. Turn one quarter around and roll into a 16 x 8-inch rectangle. Scoop up any extra sugar and smooth onto the dough. Do not discard any of the vanilla sugar. Use it all.

Fold and roll into a 16 x 8-inch rectangle 2 more times. The dough should be about 1/4-inch thick.

Trim the edges slightly with a sharp knife to as perfect a rectangle as possible.

With the knife, cut the dough the long way into eight 1-inch wide strips. Cut each 16 x 1-inch strip into 4 equal pieces, each 4 inches long.

Twist half (16) of the 4 x 1-inch strips 2 times, over-twisting to stretch the dough in the middle. Place on an ungreased cookie sheet. Make sure the dough twist lies flat on the sheet. You may need to fan out the layers on the ends somewhat to make sure each is touching the sheet. Press down a little to help it adhere.

Double pan. Bake at 375 degrees F, 15 – 20 minutes or until a rich golden brown. With a spatula, remove from sheet immediately before the caramelized sugar hardens and sticks to the foil. Cool on a rack.

Discard foil on cookie sheet and replace with new foil. Repeat with remaining 16 dough strips.

Start over with the second dough ball and remaining half of sugar

Buttermilk Banana Bread

One of my biggest pet peeves is throwing leftover ingredients away because I don't know what to do with them. This happens to me every once in a while, and it really bugs me. There are a few repeat offenders that I deal with more often than others. Two come to mind right away, cream cheese and buttermilk. Both are ingredients that I absolutely love, but often recipes call for only a small amount of them, so then I'm left with the rest. Since both cream cheese and buttermilk can be used in so many different ways, throwing them away is a shame. A couple weeks ago I made a red velvet cake for a potluck and was left with a half used container of buttermilk that I vowed would not go to waste. I searched through my recipes to find some way to use it. This recipe popped out at me and sounded perfect. I love banana bread, but had never it with buttermilk, it sounded like a winner to me. This recipe turned out very nicely, it was buttery and tender with a slight tang from the buttermilk, a wonderful combination. Never again should I throw away a half used container of buttermilk!

 Creaming the butter and sugar

 Bananas, the star of the show

 Mash up the bananas

 Add the eggs, bananas and buttermilk

Mix!

Golden brown and beautiful

Perfect for breakfast with some butter or peanut butter

Buttermilk Banana Bread
From: Two Peas and Their Pod
Ingredients

  • 1/2 cup unsalted butter, softened
  • 1 cup granulated sugar
  • 2 large eggs
  • 1 cup mashed bananas (3 medium sized bananas)
  • 4 tablespoons buttermilk
  • 1/2 teaspoon vanilla extract
  • 1 3/4 cups all-purpose flour
  • 1 teaspoon baking powder
  • 1/4 teaspoon salt
  • 1/8 teaspoon baking soda

Directions
Grease and flour 1 large loaf pan. Set pans aside.

In the bowl of a stand mixer, cream butter and sugar together. Add eggs, mashed bananas, buttermilk, and vanilla until the batter is well mixed.

Add in the flour, baking powder, salt and soda. Mix until well combined. Divide batter into greased and floured pans and bake at 350 degrees for 50-55 minutes or until a toothpick comes out clean.

Let bread cool on a wire rack for 15 minutes. Loosen the bread with a knife and carefully remove from pan. Finish cooling on rack. Slice and serve once cooled.

French Silk Pie

Thanksgiving's over and the Christmas season is officially upon us. I don't know about you, but I'm pretty excited! But before all festivities begin I have to share what I made for Thanksgiving dessert this year. My whole family went to my grandparents place this year and had a wonderful time. My mom, Lara and I were in charge of bringing a couple of different things, including dessert of course! When I was trying to think of what to bring, Lara reminded me of this French Silk Pie that we have been wanting to make. Chocolate, cream, eggs, butter and sugar lying gently on a flaky, buttery pie crust. The perfect complement to our fabulous Thanksgiving dinner. It was a big hit, and a great recipe to have in your arsenal when looking for a rich, chocolaty dessert.

This pie is basically a chocolate mousse in a crust. The buttery crust is a nice complement for the smooth chocolate filling. The eggs are cooked on the stove with sugar and water so if you get worried about things like raw eggs (I don't) you have nothing to fear in this recipe. After the eggs are cooked you add in the chocolate, the butter, and finally fold in the whipped cream. Nothing too difficult, it just takes a little time. Scrape the filling into the pie crust and slide the whole thing into the fridge overnight. The next morning your dessert is ready! If you want, you can finish it off with some whipped cream, or just dig in. Either way it will be delicious!

Baked and cooled pie shell

Getting everything ready

Cook those eggs

Add in the chocolate, and then the butter

Fold in the whipped cream

Keep folding

You're done when you can no longer

see any white streaks

Transfer filling to pie crust

and let chill in the fridge for at least 3 hours

Top with a little more whipped cream

All set to eat!

Chocolaty

And delicious!

French Silk Pie 
From Treats; originally from Cook's Illustrated
Ingredients

  • 1 cup heavy cream, chilled
  • 3 large eggs
  • 3/4 cup granulated sugar
  • 2 tablespoons water
  • 8 ounces bittersweet chocolate, melted and cooled
  • 1 tablespoon vanilla extract
  • 8 tablespoons unsalted butter, cut in to 1/2" cubes and softened
  • 1 pie shell (9-inch), baked and cooled (recipe below)

Directions
With electric mixer on medium-high speed, whip cream to stiff peaks, 2 to 3 minutes. Transfer whipped cream to small bowl and refrigerate.

Combine eggs, sugar, and water in large heatproof bowl set over medium saucepan filled with ½ inch barely simmering water (don’t let bowl touch water). With electric mixer on medium speed, beat until egg mixture is thickened and registers 160 degrees, 7 to 10 minutes. Remove bowl from heat and continue to beat egg mixture until fluffy and cooled to room temperature, about 8 minutes.

Add chocolate and vanilla to cool egg mixture and beat until incorporated. Beat in butter, a few pieces at a time, until well combined. Using spatula, fold in whipped cream until no streaks of white remain. Scrape filling into pie shell and refrigerate until set, at least 3 hours and up to 24 hours. Serve with lightly sweetned whipped cream and chocolate shavings.

Foolproof Pie Crust

From

Treats

; originally from Cook's Illustrated

Ingredients

  • 1 1/4 cups (6 ounces) all-purpose flour
  • 1/2 teaspoon salt
  • 1 tablespoon sugar
  • 6 tablespoons cold unsalted butter, cut in to 6 pieces
  • 1/4 cup vegetable shortening, chilled and cut in to 2 pieces
  • 2 tablespoons cold vodka
  • 2 tablespoons cold water

Directions

Process 3/4 cups flour, salt, and sugar together in food processor until combined, about 2 one-second pulses. Add butter and shortening and process until homogenous dough just starts to collect in uneven clumps, about 10 seconds (dough will resemble cottage cheese curds with some very small pieces of butter remaining, but there should be no uncoated flour). Scrape down sides and bottom of bowl with rubber spatula and redistribute dough evenly around processor blade. Add remaining 1/2 cup flour and pulse until mixture is evenly distributed around bowl and mass of dough has been broken up, 4 to 6 quick pulses. Empty mixture into medium bowl.

Sprinkle vodka and water over mixture. With rubber spatula, use folding motion to mix, pressing down on dough until dough is slightly tacky and sticks together. Flatten dough into 4-inch disk. Wrap in plastic wrap and refrigerate at least 45 minutes or up to 2 days.

Adjust oven rack to lowest position, place rimmed baking sheet on oven rack, and heat oven to 425 degrees. Remove dough from refrigerator and roll out on generously floured (up to ¼ cup) work surface to 12-inch circle about 1/8 inch thick. Roll dough loosely around rolling pin and unroll into pie plate, leaving at least 1-inch overhang on each side. Working around circumference, ease dough into plate by gently lifting edge of dough with one hand while pressing into plate bottom with other hand. Leave overhanging dough in place; refrigerate until dough is firm, about 30 minutes.

Trim overhang to ½ inch beyond lip of pie plate. Fold overhang under itself; folded edge should be flush with edge of pie plate. Flute dough or press the tines of a fork against dough to flatten it against rim of pie plate. Refrigerate dough-lined plate until firm, about 15 minutes.

Remove pie pan from refrigerator, line crust with foil, and fill with pie weights or pennies. Bake for 15 minutes. Remove foil and weights, rotate plate, and bake for 5 to 10 minutes additional minutes until crust is golden brown and crisp.

Pumpkin Streusel Muffins

I know I've posted a lot of pumpkin things lately, but this is probably my last one, so if you are sick of pumpkin just bear with me. Personally, I don't ever get sick of it. Since muffins are always at the top of my list of things to bake, pumpkin muffins were a no brainer this fall, and these muffins didn't disappoint. A nice basic pumpkin muffin, topped with a simple streusel, they are pretty and tasty. Sometimes a simple recipe is just the thing I'm looking for. If you need a easy but delicious pumpkin muffin recipe, this fits the bill.

I actually made these muffins twice in the last couple of weeks, first for myself, and the second time to share with friends at school. For the first batch that I made, I used the streusel recipe that I found with the muffin recipe. This is the streusel that is shown in my pictures. I thought it was very pretty, and tasted quite nice, but just didn't quite cut it as a streusel topping for me. It was a little too floury. I prefer my streusel to be chunky and buttery, so for the second batch I used a different streusel recipe which worked out very nice. I've listed both options below; either one you choose will be very tasty, it's just a matter of opinion. What really matters is just that you make these muffins. They are the perfect breakfast treat for a chilly fall morning!

Pumpkin Streusel Muffins
Adapted from: Buns In My Oven
Ingredients
For the muffins:

  • 1/4 cup butter, softened
  • 1/2 cup sugar
  • 1/4 cup packed brown sugar
  • 2/3 cup canned pumpkin
  • 1/2 cup buttermilk
  • 2 eggs
  • 2 tablespoons molasses
  • 2 cups all-purpose flour
  • 1 teaspoon baking soda
  • 1/2 teaspoon baking powder
  • 1 teaspoon cinnamon
  • 1/4 teaspoon nutmeg
  • 1/4 teaspoon ginger
  • 1/8 teaspoon cloves
  • 1/4 teaspoon salt

Streusel topping option #1:

  • 1/3 cup all-purpose flour
  • 3 tablespoons brown sugar
  • 2 tablespoons cold butter

Streusel topping option #2

  • 2 ounces (4 tablespoons) unsalted butter, melted
  • 3/4 cup all-purpose flour
  • 1/4 cup granulated sugar
  • 1/4 cup packed light-brown sugar
  • 1/4 teaspoon kosher salt
  • 1/4 teaspoon ground cinnamon

Directions
For the streusel, combine the flour and brown sugar in a small bowl. Cut in butter until the mixture is crumbly. Set aside. 

For the muffins, cream together butter and sugars until creamy. Beat in pumpkin, buttermilk, eggs and molasses. 

Combine the dry ingredients in a small bowl and mix into the batter. Stir just until combined. Fill paper lined muffins cups 2/3 full with batter. Spoon streusel topping over the muffins and bake for 20 to 25 minutes at 375, or until a tester inserted in the center comes out clean. Cool in pan for 5 minutes before removing to a wire rack. Enjoy!

Beef Stroganoff

Cold weather always leaves me craving something hearty and warm for dinner. As I was perusing some recipes last week this Beef Stroganoff recipe called out my name and begged me to make it. Chunks of beef simmered with onions and mushrooms in broth and brandy, finished off with sour cream and served with egg noodles. It sounded like the perfect thing to satisfy my craving for something warm and delicious, and it was. Not only was it delicious, but this recipe is quite simple, not too many ingredients, and everything cooks in one skillet, even the noodles. I love only having to get one pan dirty!

Simple ingredients, simple recipe, outstanding results. This is a wonderful winter meal that I can definitely make again. All you need to do is cut up some meat into chunks, and brown them in a skillet. Remove the beef, add mushrooms and onions and cook until they release all of their liquid. Then you just add the broth and brandy, return the meat to the skillet and let it simmer for half and hour or so. Add in the noodles at the end and continue cooking until they are cooked through. Remove the skillet from the heat, add the sour cream, and dig in, yum!

This dish made me happy and warm as I ate it, the flavors are so nice. I ate my leftovers the next day at lunch and thought it was almost better the next day. The flavors had had a chance to sit and meld together, so if it seems like too big of a recipe for you or your family, have no fear, it reheats beautifully!

Ingredients shot

Cut the beef up

and brown it up

Then throw in the mushrooms

and onions

Add in the stock, brandy and beef

Finally it's time for the noodles

and sour cream

Mmmm...

Skillet Beef Stroganoff
Adapted from America's Test Kitchen
Ingredients

  • 1 1/2 pounds sirloin tips, pounded and cut into 1/2-inch strips
  • Salt and pepper
  • 4 tablespoons vegetable oil
  • 10 ounces white mushrooms, sliced thin
  • 1 medium onion, minced
  • 2 tablespoons flour
  • 1 teaspoon tomato paste
  • 1 1/2 cups chicken broth
  • 1 1/2 cups beef broth
  • 1/3 cup brandy
  • 6 ounces egg noodles (about 4 cups)
  • 2/3 cup sour cream
  • 2 tsp lemon juice

Directions
Pat beef dry and season with salt and pepper. Heat 1 tablespoon of oil in a 12-inch skillet until hot. Add half of the beef and cook until well browned on both sides, 6-8 minutes total. Transfer beef to a bowl and repeat with the remaining meat. 

Heat the remaining 2 tablespoons of oil in the now empty skillet. Add mushrooms and onions and 1/2 teaspoon of salt and cook until the liquid from the mushrooms has evaporated, about 8 minutes. Stir in the flour and cook for 30 seconds. Add the tomato paste, and then gradually stir in the broth and brandy, then return the beef and any accumulated juices to the skillet. Bring to a simmer, cover, and cook over low heat until the beef is nice and tender, about 30-35 minutes. 

Stir the noodles into the skillet, cover and cook for about 10-12 minutes, or until the noodles are tender, stirring occasionally. Take the skillet off the heat and add the sour cream and lemon juice. Season with salt and pepper and serve.