Tomato Tart

While it's not tomato season yet in Michigan, the farmers market is starting to have some very nice greenhouse tomatoes that are actually pretty good. I've picked up a few over the last couple weeks and have been quite happy with them, on sandwiches or salads. Over the winter I've forgotten how much I love having fresh tomatoes around, they are so useful and so delicious. They may not be fresh from the garden, still warm from the sun tomatoes, but I am happy with them for now, and they worked perfectly in this tomato tart.

This tart is basically just a pizza in a different form, and it was delicious. Spreading an entire head of roasted garlic on the crust is a brilliant start. Since I had mozzarella in the freezer, I used that instead of the Fontina which was called for. I would have loved to use Fontina, but the mozzarella was still very good. Fresh basil on top was the perfect finishing touch. I thought this tart was just wonderful, and I can't wait to make it again with my very own tomatoes, fresh from the garden.

Tomato Tart
From Martha Stewart's Baking Handbook
Ingredients

  • 1 head garlic

  • 3 tablespoons extra virgin olive oil

  • All purpose flour for dusting

  • 1/2 recipe Pate Brissee (recipe follows)

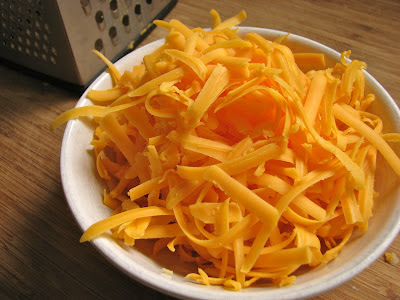
  • 3/4 cup grated Fontina or mozzarella (about 3 ounces)

  • 1 1/2 pounds ripe but firm tomatoes, sliced 1/4 inch thick

  • course salt and freshly ground pepper

  • 12 fresh basil leaves

Directions
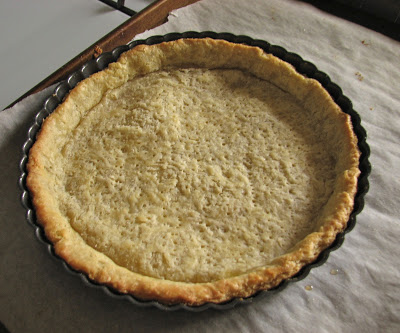
Preheat oven to 350 degrees. Place the garlic on a piece of foil; drizzle with 1 tablespoon of the olive oil. Fold the foil up around the garlic, sealing the edges, and place on a baking sheet. Roast in the oven until golden brown and the tip of a sharp knife easily pierces the flesh, about 45 minutes. Remove from oven and set aside.

Raise the oven temperature to 450 degrees. When garlic is cool enough to handle, squeeze the clovees out of their skins and into a small bowl, mash with fork and set aside.

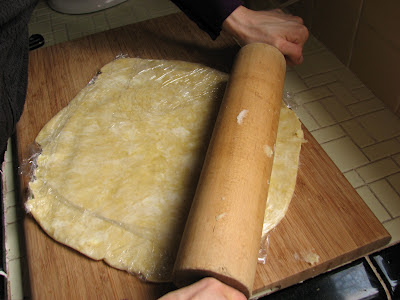
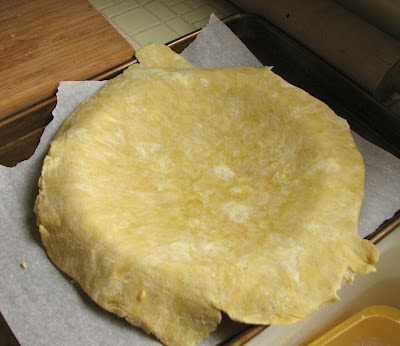
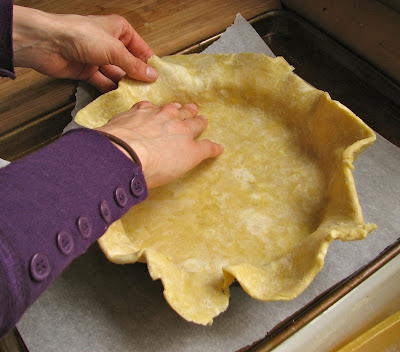
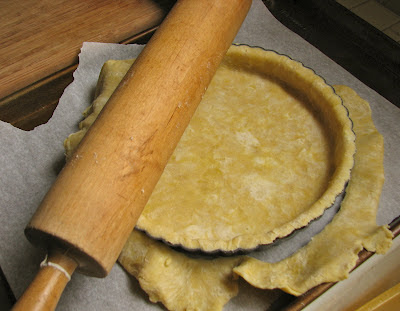
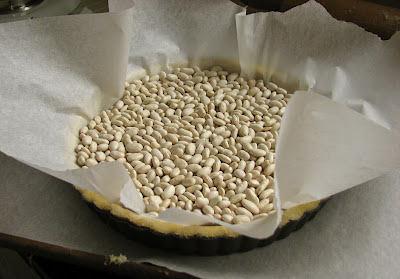
On a lightly floured work surface, roll out the dough to a 13 inch round, about 1/8 inch thick. Fit the dough into a 10 inch fluted tart pan with removable bottom, pressing into the edges. Using a rolling pin or a sharp paring knife, trim dough flush with the top edge of the tart pan; chill tart shell until firm, about 30 minutes.

Spread roasted garlic evenly on the bottom of the chilled shell. Sprinkle with 1/4 cup cheese. Arrange the tomato slices in an overlapping circular pattern on top of the cheese, working from the out edge toward the center. Season with salt and pepper. Sprinkle with remaining 1/2 cup cheese, and drizzle with remaining 2 tablespoons oil.

Reduce oven temperature to 425 degrees. Bake tart until crust is golden and tomatoes are soft but still retain their shape, 45 to 55 minutes. Cool on a wire rack for 20 minutes. Thinly slice basil leaves lengthwise. Sprinkle tart with basil, and serve warm.

Pate Brisee
Ingredients

  • 2 1/2 cups all purpose flour

  • 1 teaspoon salt

  • 2 sticks (1 cup) unsalted butter, cold, cut into small pieces

  • 1/4 cup ice water, plus more if needed

Directions
In the bowl of a food processor, combine flour and salt; pulse to combine. Add the butter and pulse until mixture resembles coarse crumbs with some larger pieces remaining, about 10 seconds. (To mix by hand, combine dry ingredients in a large mixing bowl, then cut in butter with a pastry blender or two fork.)

With the machine running, add the ice water through the feed tube in a slow, steady stream, just until the dough holds together with out being wet or sticky. Do not process more than 30 seconds. Test by squeezing a small amount of the dough together; if it is still to crumbly, add a bit more water, 1 tablespoon at a time.

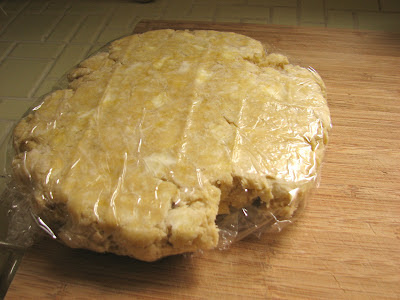
Turn out the dough onto a clean work surface. Divide in half, and place each half on a piece of plastic  wrap. Shape into flattened disks. Wrap in plastic, and refrigerate at least 1 hour, or overnight. The dough can be frozen for up to 1 month; thaw overnight in the refrigerator before using.

French Silk Pie

Thanksgiving's over and the Christmas season is officially upon us. I don't know about you, but I'm pretty excited! But before all festivities begin I have to share what I made for Thanksgiving dessert this year. My whole family went to my grandparents place this year and had a wonderful time. My mom, Lara and I were in charge of bringing a couple of different things, including dessert of course! When I was trying to think of what to bring, Lara reminded me of this French Silk Pie that we have been wanting to make. Chocolate, cream, eggs, butter and sugar lying gently on a flaky, buttery pie crust. The perfect complement to our fabulous Thanksgiving dinner. It was a big hit, and a great recipe to have in your arsenal when looking for a rich, chocolaty dessert.

This pie is basically a chocolate mousse in a crust. The buttery crust is a nice complement for the smooth chocolate filling. The eggs are cooked on the stove with sugar and water so if you get worried about things like raw eggs (I don't) you have nothing to fear in this recipe. After the eggs are cooked you add in the chocolate, the butter, and finally fold in the whipped cream. Nothing too difficult, it just takes a little time. Scrape the filling into the pie crust and slide the whole thing into the fridge overnight. The next morning your dessert is ready! If you want, you can finish it off with some whipped cream, or just dig in. Either way it will be delicious!

Baked and cooled pie shell

Getting everything ready

Cook those eggs

Add in the chocolate, and then the butter

Fold in the whipped cream

Keep folding

You're done when you can no longer

see any white streaks

Transfer filling to pie crust

and let chill in the fridge for at least 3 hours

Top with a little more whipped cream

All set to eat!

Chocolaty

And delicious!

French Silk Pie 
From Treats; originally from Cook's Illustrated
Ingredients

  • 1 cup heavy cream, chilled
  • 3 large eggs
  • 3/4 cup granulated sugar
  • 2 tablespoons water
  • 8 ounces bittersweet chocolate, melted and cooled
  • 1 tablespoon vanilla extract
  • 8 tablespoons unsalted butter, cut in to 1/2" cubes and softened
  • 1 pie shell (9-inch), baked and cooled (recipe below)

Directions
With electric mixer on medium-high speed, whip cream to stiff peaks, 2 to 3 minutes. Transfer whipped cream to small bowl and refrigerate.

Combine eggs, sugar, and water in large heatproof bowl set over medium saucepan filled with ½ inch barely simmering water (don’t let bowl touch water). With electric mixer on medium speed, beat until egg mixture is thickened and registers 160 degrees, 7 to 10 minutes. Remove bowl from heat and continue to beat egg mixture until fluffy and cooled to room temperature, about 8 minutes.

Add chocolate and vanilla to cool egg mixture and beat until incorporated. Beat in butter, a few pieces at a time, until well combined. Using spatula, fold in whipped cream until no streaks of white remain. Scrape filling into pie shell and refrigerate until set, at least 3 hours and up to 24 hours. Serve with lightly sweetned whipped cream and chocolate shavings.

Foolproof Pie Crust

From

Treats

; originally from Cook's Illustrated

Ingredients

  • 1 1/4 cups (6 ounces) all-purpose flour
  • 1/2 teaspoon salt
  • 1 tablespoon sugar
  • 6 tablespoons cold unsalted butter, cut in to 6 pieces
  • 1/4 cup vegetable shortening, chilled and cut in to 2 pieces
  • 2 tablespoons cold vodka
  • 2 tablespoons cold water

Directions

Process 3/4 cups flour, salt, and sugar together in food processor until combined, about 2 one-second pulses. Add butter and shortening and process until homogenous dough just starts to collect in uneven clumps, about 10 seconds (dough will resemble cottage cheese curds with some very small pieces of butter remaining, but there should be no uncoated flour). Scrape down sides and bottom of bowl with rubber spatula and redistribute dough evenly around processor blade. Add remaining 1/2 cup flour and pulse until mixture is evenly distributed around bowl and mass of dough has been broken up, 4 to 6 quick pulses. Empty mixture into medium bowl.

Sprinkle vodka and water over mixture. With rubber spatula, use folding motion to mix, pressing down on dough until dough is slightly tacky and sticks together. Flatten dough into 4-inch disk. Wrap in plastic wrap and refrigerate at least 45 minutes or up to 2 days.

Adjust oven rack to lowest position, place rimmed baking sheet on oven rack, and heat oven to 425 degrees. Remove dough from refrigerator and roll out on generously floured (up to ¼ cup) work surface to 12-inch circle about 1/8 inch thick. Roll dough loosely around rolling pin and unroll into pie plate, leaving at least 1-inch overhang on each side. Working around circumference, ease dough into plate by gently lifting edge of dough with one hand while pressing into plate bottom with other hand. Leave overhanging dough in place; refrigerate until dough is firm, about 30 minutes.

Trim overhang to ½ inch beyond lip of pie plate. Fold overhang under itself; folded edge should be flush with edge of pie plate. Flute dough or press the tines of a fork against dough to flatten it against rim of pie plate. Refrigerate dough-lined plate until firm, about 15 minutes.

Remove pie pan from refrigerator, line crust with foil, and fill with pie weights or pennies. Bake for 15 minutes. Remove foil and weights, rotate plate, and bake for 5 to 10 minutes additional minutes until crust is golden brown and crisp.

Broccoli Cheddar Quiche

For my cousins bridal shower that I threw a few weeks ago, I knew I wanted to serve quiche. It seemed like the perfect savory option for the brunch, a savory pastry to go along with all of the sweets! One possible problem with this was the fact that I haven't actually made quiche that often, if at all, I honestly can't remember. Although I am confident in my baking abilities and wasn't too concerned that they wouldn't turn out, I did want to give the quiche a test run before serving it to a large group of people. This broccoli cheddar quiche was my first attempt. It turned out delicious, and even though there were a few things I wanted to tweak before the big day, I definitely could have served this at the shower.

I really loved the custard filling in this quiche. It was silky and creamy, and not too eggy, perfect for filling the flaky and buttery crust. The crust however, didn't turn out quite like I wanted which I think was mostly my fault. To begin with, I think I probably added too much liquid to the dough, it wasn't as delicate as I wanted. I also didn't end up rolling the dough out thin enough so it was quite thick and didn't get a chance to cook all the way through. Despite these small problems, it still tasted buttery and yummy.

Another thing I learned on this trial was that I want to put the cheese in the crust first and not last. I didn't like how the cheddar formed a orange shell on top of the custard. I don't think it looks bad, but I just didn't like how it turned out. For the shower I went ahead and put the cheese on the crust first and it turned out much better.

For a first attempt I thought this turned out quite well. It gave me the confidence I needed to serve quiche at the shower. I ended up using a different crust recipe, one that had good reviews and sounded foolproof. I didn't want to worry about this crust turning out exactly like I wanted it to. I plan on trying this recipe again, but for myself first. I think it has the potential to be quite wonderful.

 Get your filling ready, I used lightly steamed brocoli and sautéed onions

And cheese of course!

Buttery, chilled dough, ready to be transformed

Start a rolling

Use those muscles

Grab a tart pan, or a pie plate (that's what I used

at the shower)

Gently lay your pastry dough on the pan

Lightly press the dough into the pan making

sure not to stretch it out

Cut off the excess dough

Ready for blind baking

Grab your pie weights, or beans, or rice, whatever

Bake it up until golden

Time to start filling,

onions first

Then broccoli

And top it off with the cheddar

Baked! 

Piping hot, it's still bubbling away

Remove from pan

Cut yourself a slice, yum!

Broccoli Cheddar Quiche
From: The Sweeter SIde of Amy's Bread

***I didn't actually measure the broccoli, onion or cheese when I made this quiche. The measurements below are a rough estimate of how much I used. Feel free to alter the amounts of these ingredients when making the quiche to fit your taste buds. 

Ingredients
Crust

  • 7/8 cup (200 grams) butter, cut into 1/2 inch dice and very cold
  • 2 cups (280 grams) all purpose flour
  • 1 3/4 teaspoons Kosher salt
  • 3 large egg yolks
  • 4 tablespoons (52 grams) ice water

Custard Filling

  • 1 cup (240 grams) half and half
  • 3 large eggs
  • 1/2 teaspoon salt
  • pinch cayenne pepper
  • 3/4 cup lightly steamed broccoli
  • 1/2 medium onion, sautéed
  • 3/4 cup cheddar cheese

Directions
To form the crust, mix together the flour and salt in a large bowl. Rub the very cold, but not frozen, butter into the flour with your fingers or a pastry blender until it looks like coarse breadcrumbs. If the butter starts to feel soft, freeze the mixture for 10 minutes before continuing. In a small bowl, whisk together the egg yolks and ice water. Make a well in the center of the flour mixture and pour in the liquid. Use a fork to stir the ingredients together until they form a rough ball.

As the mass become more define, use you hands to press it gently together into a single mass of dough. There should not be any pockets of dry crumbs remaining. If needed, sprinkle with an additional 1 to 2 teaspoons of ice water. Place the dough on a large piece of plastic wrap. Seal the wrap around the dough and flatten to make a round 3/4 inch thick disk. Refrigerate it for at least 30 minutes before rolling it out.

Remove the child pastry from the refrigerator. On a lightly floured surface, roll out eh dough to 1/8 of an inch thick. Remove the bottom of your tart pan and place the ring of the tart pan on a parchment lined sheet pan. Lay the pastry round on the pan and gently push it down into the pan, pressing the pastry firmly to the sides, making sure the bottom sits flat in the pan, with no curve where the sides and bottom meet. Refrigerate the dough for at least 30 minutes, and up to overnight.

Line the tart with parchment paper and spread the paper with pie weights, beans or rice, pressing down gently to be sure the paper is weighted firmly against the sides of the pastry shell. Bake at 400 degrees for 20 minutes, or until the top edges of the pastry just begin to brown. Remove the paper and the weights, and return the tart to the oven. Continue baking for 5 minutes more, or until the shells are lightly browned and the bottoms begin to look a little dry instead of doughy. Remove the pan from the oven and allow to cool slightly, about 5 minutes, before adding the quiche filling.

While the crust bakes, make the custard filling. In a large measuring cup or a large container with a pour spout, whisk together the half and half, eggs, salt, and cayenne pepper until well combined and set aside. When you are ready to assemble the quiche, layer the onions, cheese and broccoli in the bottom of the tart shell. Place the baking sheet that is holding the tart into the oven. Stir the custard and pour it over the quiche mixture, fill in the pan to within 1/8 inch of the top of the pastry. Don't overfill, or the custard will run out of the crust during baking.

Bake the quiche for 20 to 25 minutes, or until the edges of the filing begin to puff up and the center still jiggles slightly when you shake the pan. Place the sheet pan on a wire rack to cool. When cool enough to handle, remove the quiche from the pan. Serve slightly warm or at room temperature. Leftover may be refrigerated or frozen and reheated in a 400 degree oven for 20 minutes, or until heated through.