Zucchini Slice with Bacon Sausage

We're going to continue on the zucchini theme for a little while yet. I for one am not yet ready to embrace all things pumpkin and spice. The trees are still green, the sun is still warm, and most importantly, it's still summer! I'm going to hang on to every last second as long as I can. Today I have for you another somewhat different way to use up some zucchini you might have hanging around; it's my take on the zucchini slice, something I'd never heard of before I stumbled across it over at The Clever Carrot. Apparently it's an Australian thing, but other than that I know nothing about it. If someone out there would like to enlighten me feel free! 

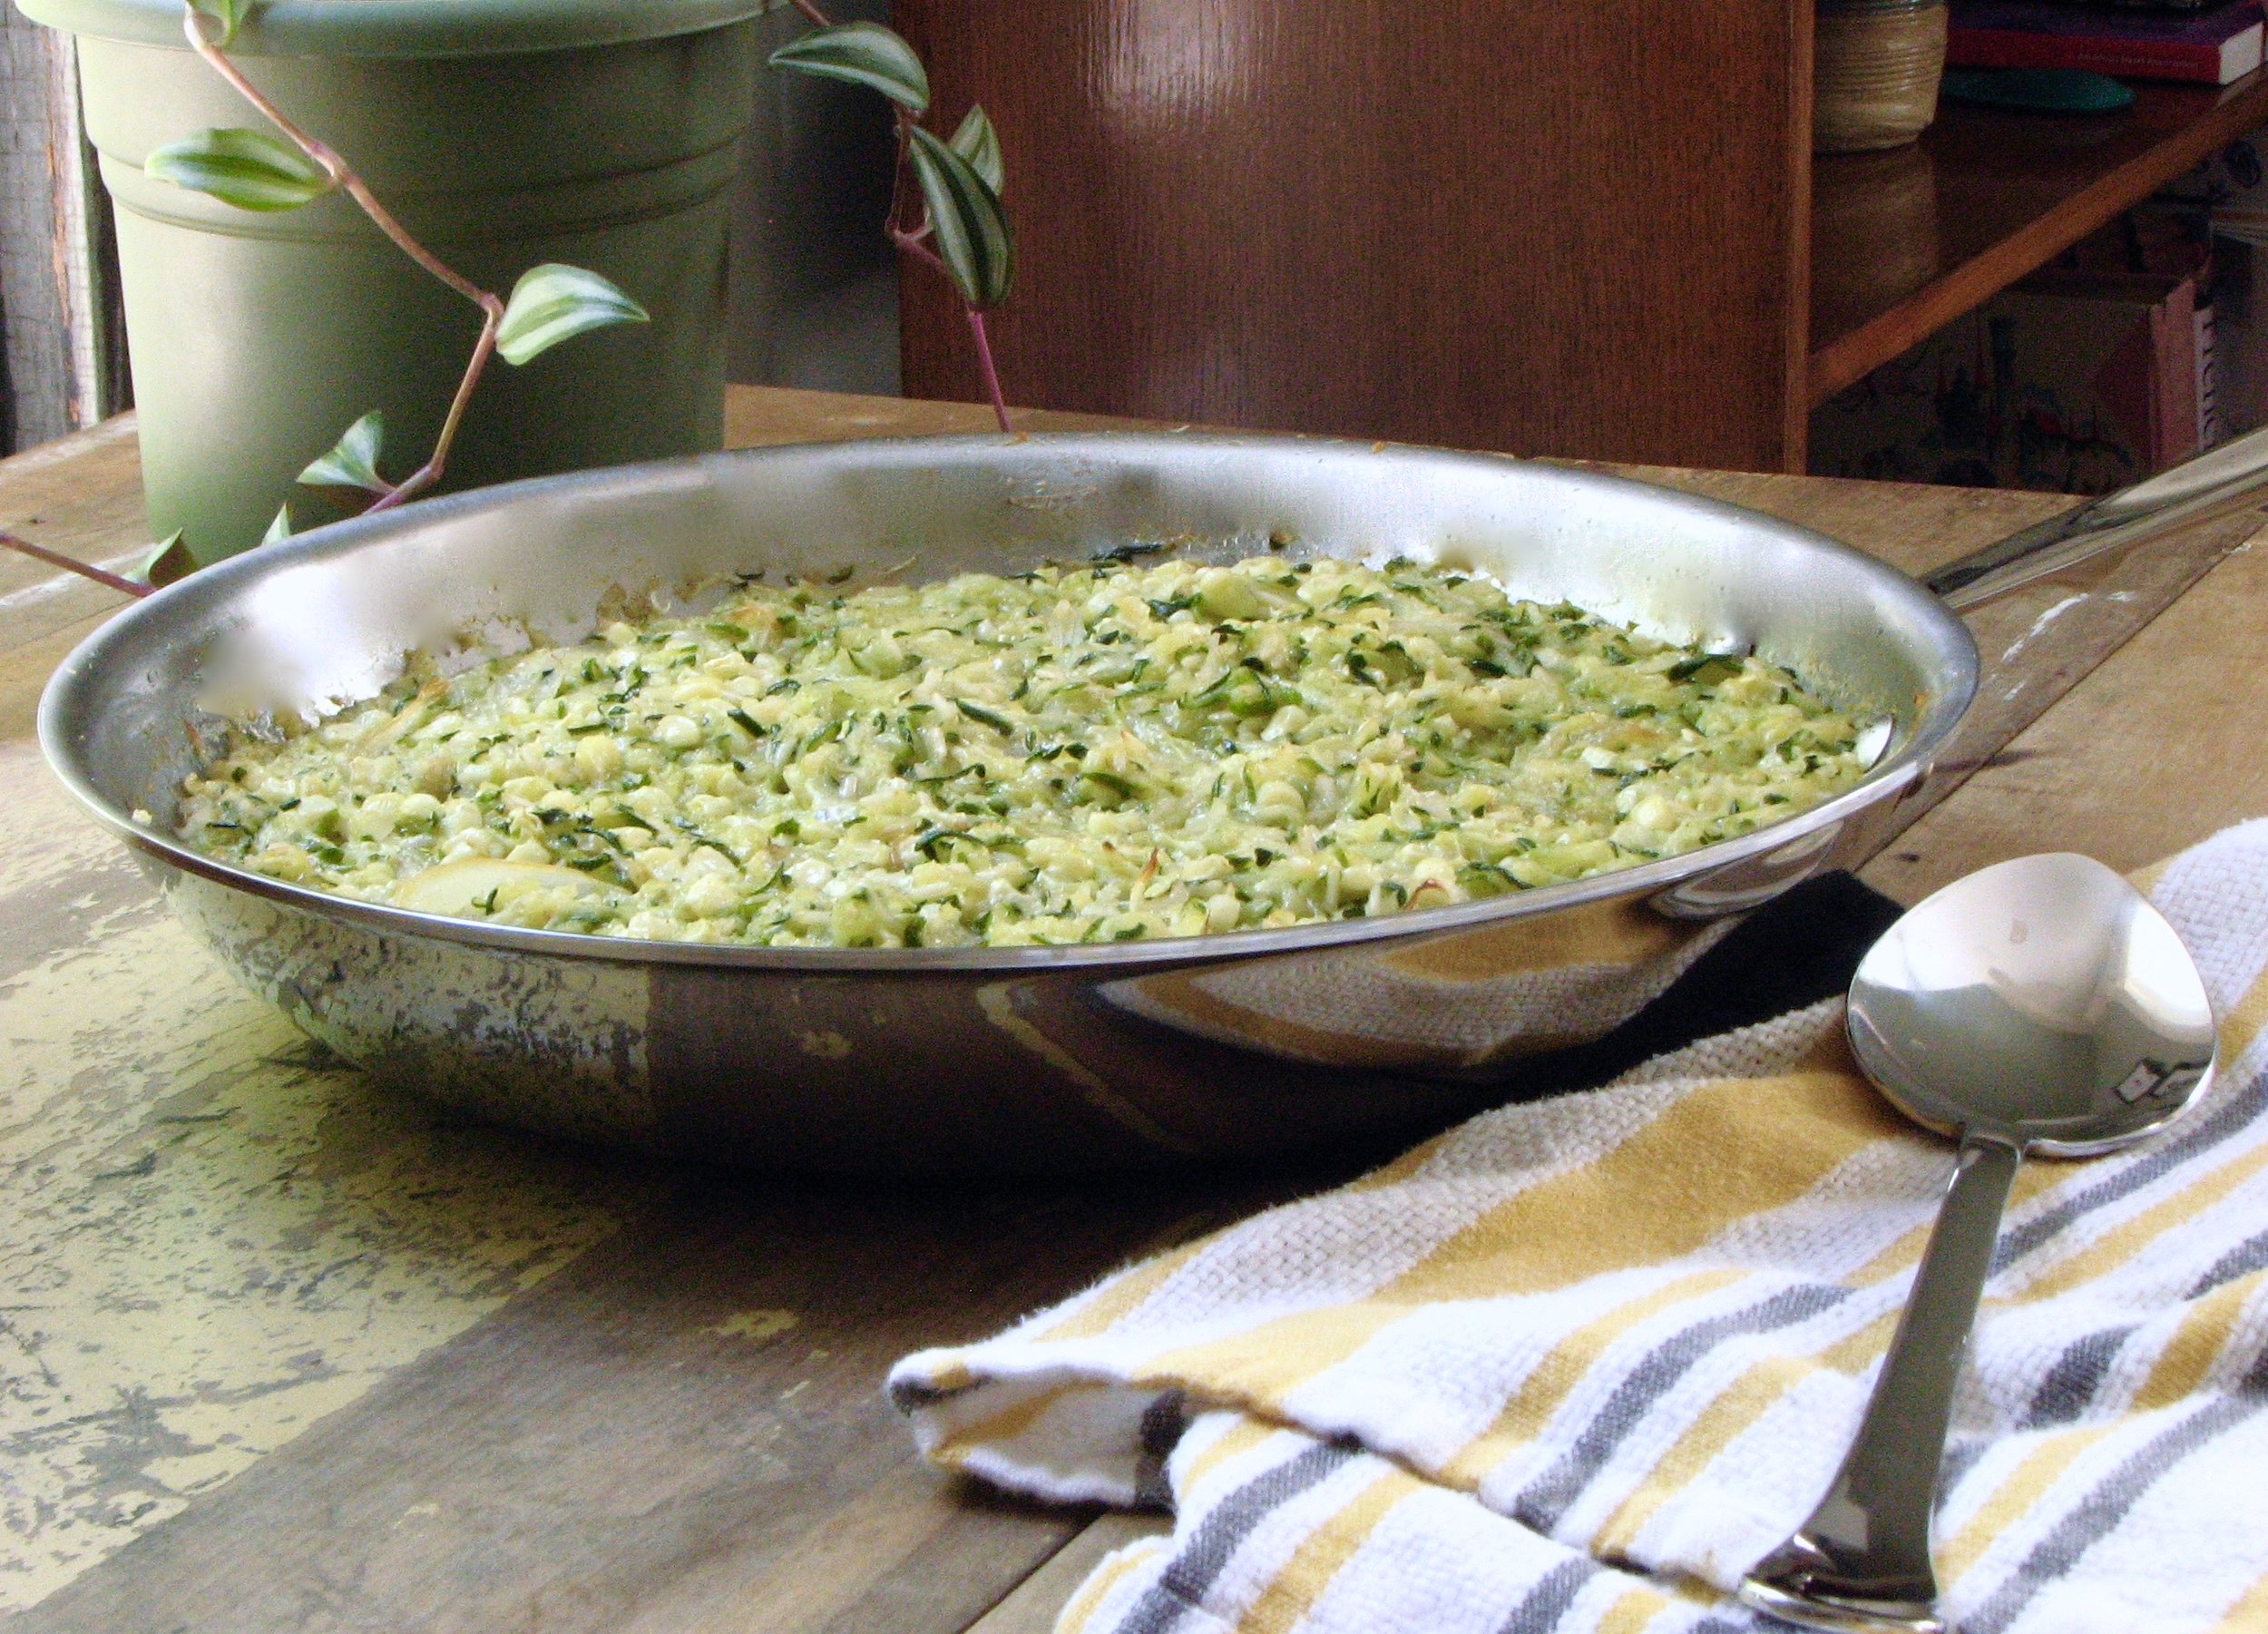
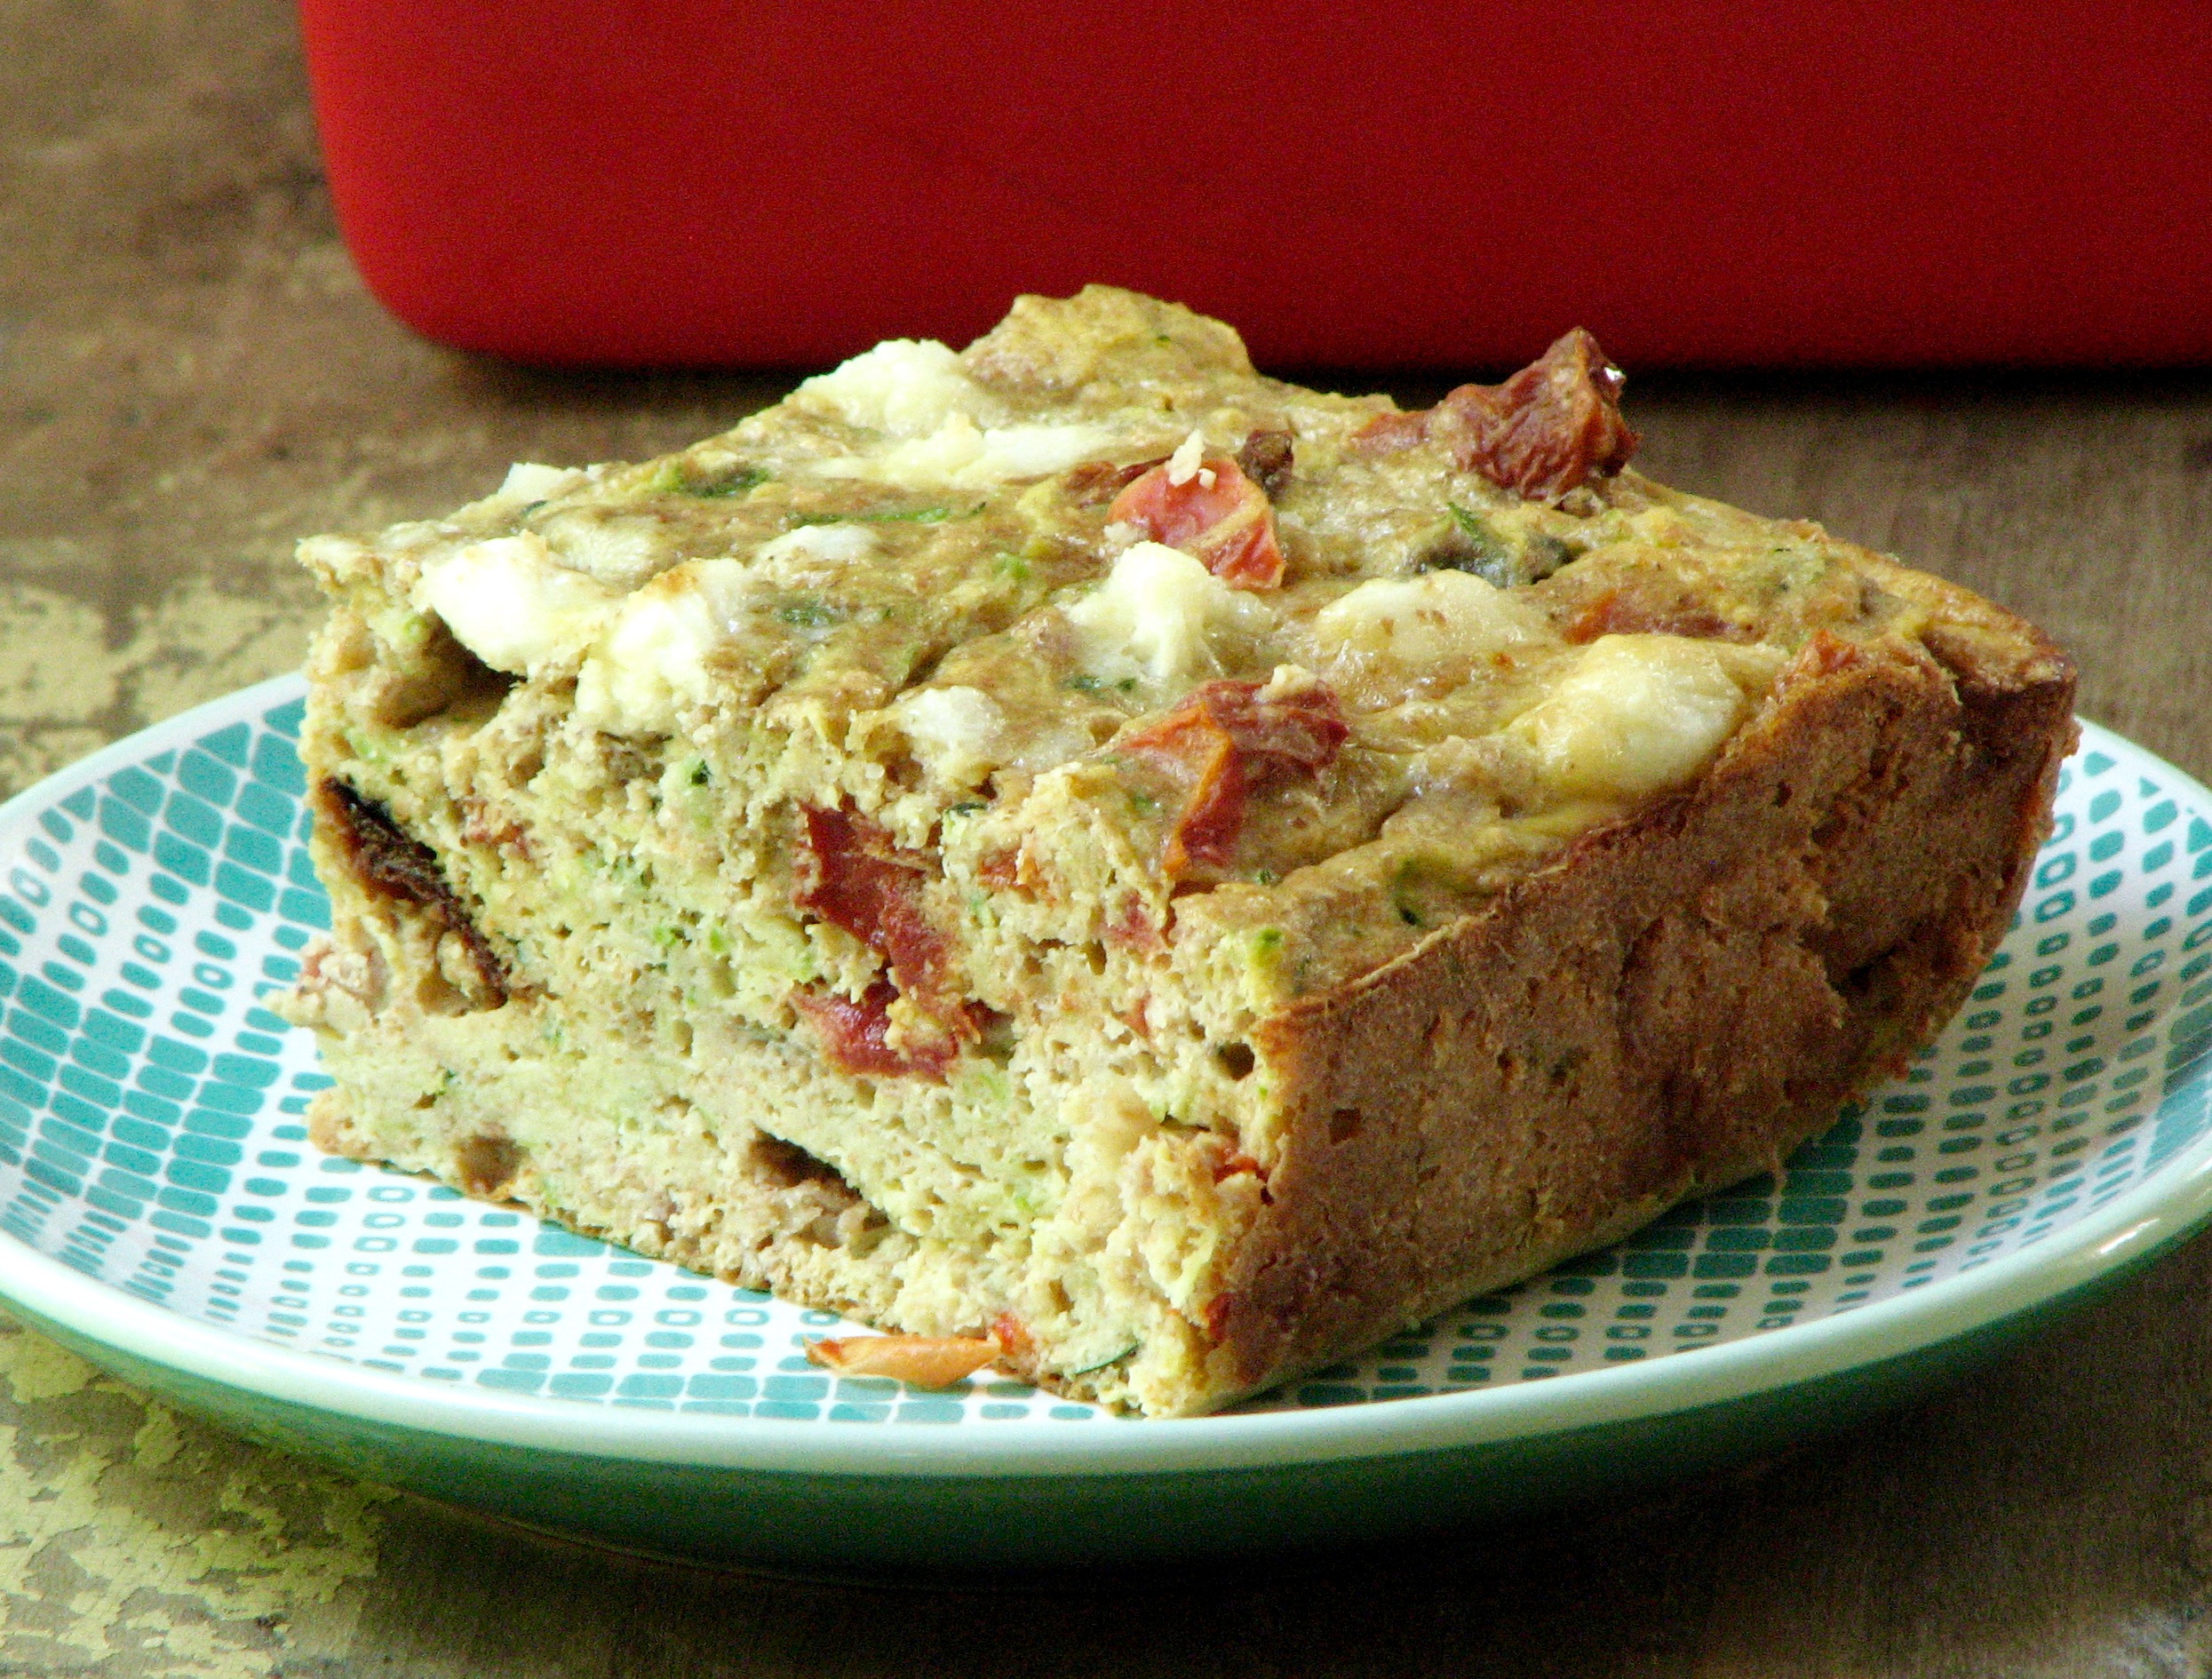
I thought the recipe looked intriguing, full of zucchini and eggs with a relatively little amount of flour, like a cross between a savory quick bread and a frittata. And that's really how it turned out! I'd say the texture was more like a frittata, but a little less egg-y due to the flour. It'd be a great thing to have on hand for a quick and filling breakfast, or a light lunch. Easy to whip together and open to endless variations. A fun late summer project, and a great way to use up some zucchini and eat well all at the same time!

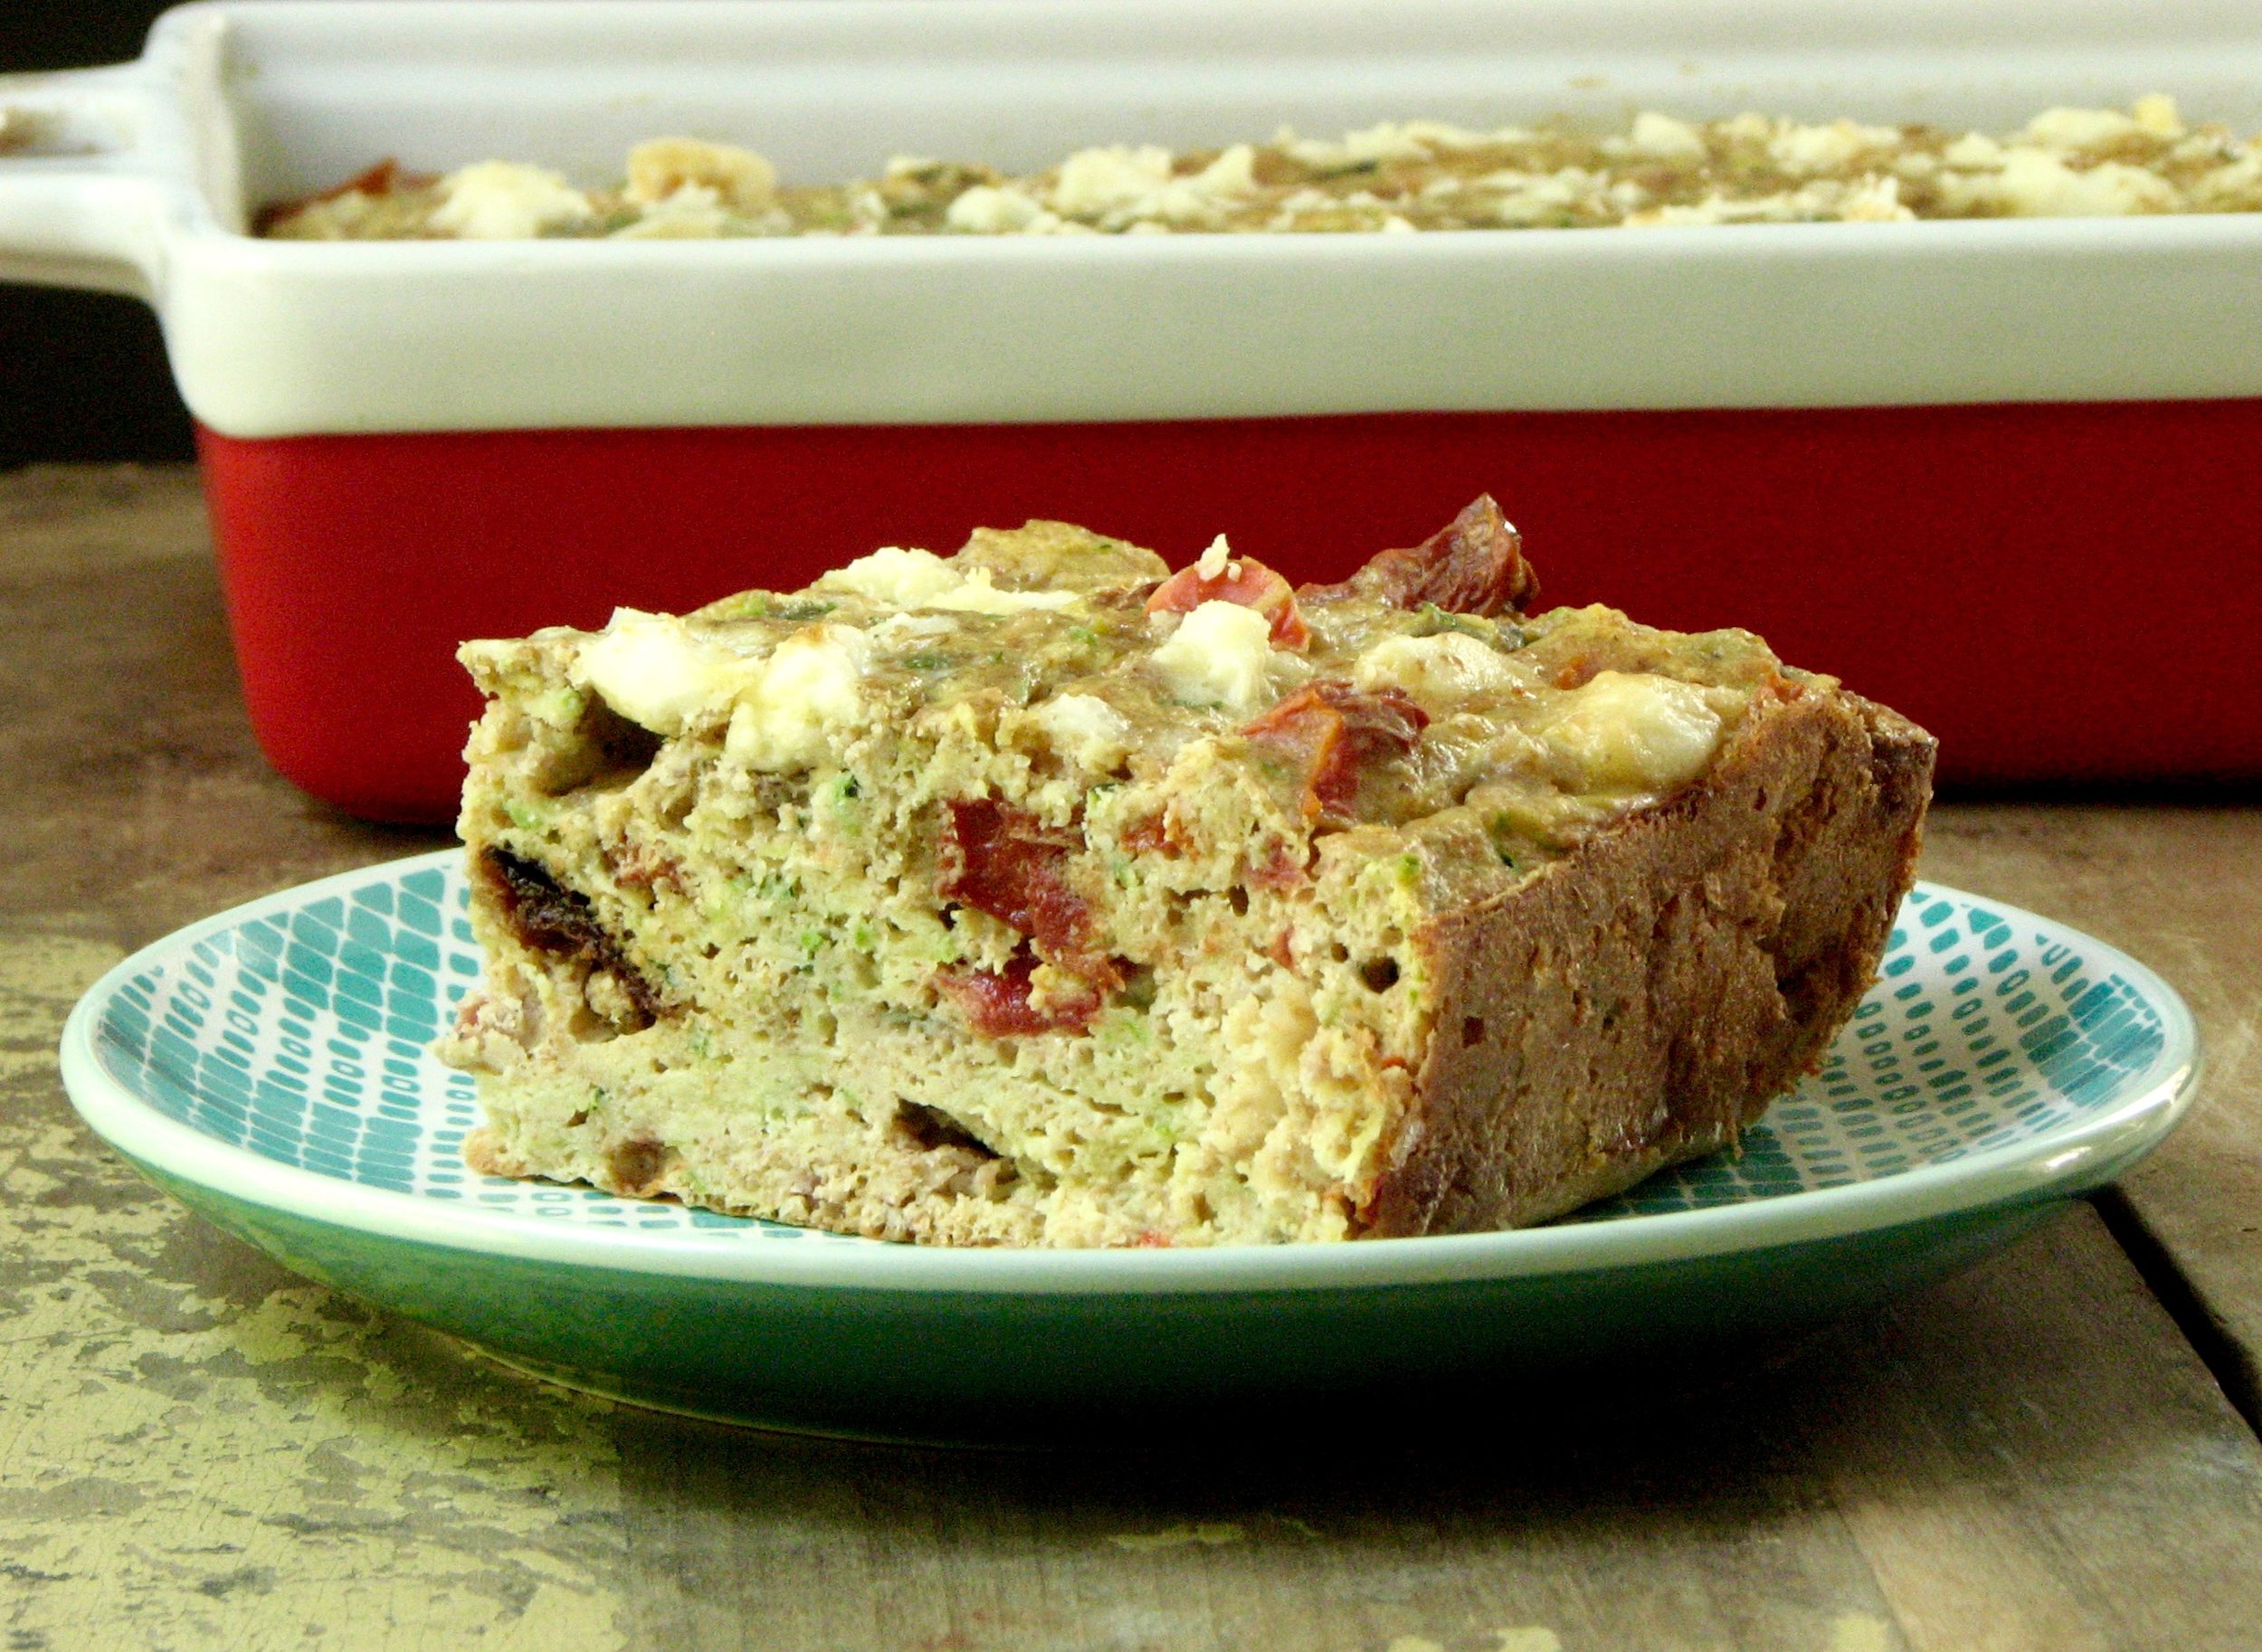
The original recipe called for some bacon, but when I went to the butcher, my eye's were drawn to a new sausage that was in the case, bacon sausage!! I thought this would be a fun place to try it so I went with the sausage instead of the actual bacon. I also added some red pepper along with the onion and topped it with a wonderful dry sheep's milk cheese that I picked up at the farmer's market last week. Feta would be a wonderful substitute, or creamy goat cheese for that matter. I also used 100% whole wheat flour in mine, which is probably why my slice does not look as beautiful and light as the pictures at The Clever Carrot looked, but don't let that stop you from trying out this fun recipe. 


Zucchini Slice with Bacon Sausage
Adapted from The Clever Carrot
Ingredients

  • 3 cups grated zucchini, well drained
  • 1/4 medium red onion, roughly chopped
  • 1/2 red bell pepper, roughly chopped
  • 1 bacon sausage, or alternatively 3 slices of bacon
  • 5 eggs
  • 2-3 tablespoons bacon fat
  • freshly ground black pepper
  • 1 cup flour
  • 2 tsp baking powder
  • Crumbled sheep or goat's milk cheese

Directions
Preheat your oven to 350 F.Line an 8x8 square pan with parchment paper for easy removal. Coat with cooking spray (even when lined with parchment, the eggs can sometimes stick).

Using a box grater, shred the zucchini. Line a bowl with a clean kitchen towel and place the zucchini inside. Twist it up to close, and squeeze out as much liquid as possible. Set the zucchini aside until ready to use.

In a large non-stick skillet, sauté the onion and red pepper until softened and just starting to take on some color, 10-15 minutes. 

Meanwhile, crack the eggs into a large bowl. Add the bacon fat. Season with black pepper and whisk well to combine. Toss in the sautéed onion and pepper, and the reserved zucchini. Crumble in the cooked bacon sausage (or bacon).  Mix well to combine everything. 

To the bowl, add the flour and baking powder. Continue to mix until it looks like pancake batter. Pour into your lined baking pan. Sprinkle the sheep or goat cheese over the top.

Bake until the filling is set, about 40-50 minutes. The top and bottom should be deep golden brown. Rotate the pan halfway through cooking time for even browning.

Remove from the oven and cool for at least 10 minutes before slicing.

Gratin of Zucchini, Rice and Corn with Cheese

I was browsing through my Instagram feed earlier last week when I came across a photo for a zucchini rice casserole that for whatever reason just called to me. I went online to find the recipe and was happy to see that it was a very simple and a very healthy recipe. So when I went to the farmer's market on Saturday I picked up two large zucchini so I could whip this dish up over the weekend. I am a huge zucchini fan and usually end up just slicing it up into rounds or spears and grilling it. I liked that this dish gave me something else that I could do with zucchini if I am feeling ambitious. Not that it's a difficult dish by any means, but it's slightly more involved than slicing and grilling!

Of course, I couldn't leave the recipe alone so I decided to add my own twist and add in some freshly picked sweet corn that I also picked up at the farmer's market. I think zucchini + corn is one of the best late summer combos so I couldn't pass it up. I think it was a brilliant addition to the gratin! The tender zucchini mixed with the juicy and sweet corn is fantastic along with some salty parmesan and a couple little pats of butter. Fresh, healthy and delicious, this is a great late-summer winner!

On the blog where I got the recipe she used brown rice in this gratin as opposed to the white rice which is what the original recipe that she used called for. I went with the brown rice as well and parboiled it for 8 minutes as she said. I found that in the finished dish the rice was not quite tender so I would recommend upping the length of the parboil to 10-12 minutes, or alternatively, baking the casserole longer overall. I ended up baking it for 35 minutes and there was still quite a bit of liquid left over when I dug in. This extra liquid did not detract from the delicious flavors, but if you are looking for a finished product with less moisture I would bake it longer and/or add less liquid prior to baking.


Gratin of Zucchini, Rice and Corn with Cheese
Adapted from Sprouted Kitchen
Ingredients

  • 2 1/2 pounds zucchini or other summer squash
  • 2 ears corn
  • 1/2 cup short grain brown rice 
  • 1/2 onion, sliced thin
  • 2 tablespoons butter, divided
  • 2 tablespoons olive oil
  • 2 large garlic cloves, minced
  • 2 tablespoons whole wheat flour
  • about 2 1/2 cups warm zucchini juices
  • 3/4 cup grated parmesan cheese 
  • salt and pepper to taste

Directions
Shred the zucchini in a food processor or with a box grater, toss with a heaping teaspoon of salt and drain in a colander. Reserving the juices. Meanwhile drop the rice into boiling salted water, bring rapidly back to a boil for 10-12 minutes; drain and set aside. Preheat the oven to 400'.

Cut the kernels off of the ears of corn. In a large oven-proof frying pan melt 1 tablespoon of the butter. Add the corn, salt and pepper and cook over medium high heat until starting to brown. Remove corn from pan and set aside. 

Return the frying pan to heat. Add the 2 tablespoon olive oil and cook the onions with a little salt for 15-20 minutes, or longer, until tender and translucent and starting to brown. Stir in the grated and dried zucchini and the garlic. Let sit without stirring for a few minutes to start browning some of the zucchini. Then, toss for about 5 minutes until the zucchini is almost tender. Add the corn back to the pan. Sprinkle in the flour, stir over moderate heat for a minute and remove from the heat. 

Gradually stir in the 2-2 1/2 cups warm liquid (zucchini juices). Put the pan over moderately high heat and bring to a simmer, stirring. Remove from the heat again, stir in the blanched rice, 1/2 cup of the grated parmesan and 1 tablespoon butter. Taste carefully for seasoning and add more salt and pepper if needed. 

Transfer frying pan to oven. Bake until the gratin is bubbling, top is browned and appears most of the liquid has absorbed, approximately 35-40 minutes, sprinkling with additional parmesan in the last 5 minutes if desired.

Tomato and Asiago Pizza

August is almost gone, can you believe it? I sure can't. This summer just FLEW by! One of my favorite parts about August is how amazing the farmers market is this time of year. Tomatoes, peaches, melon, corn, squash, peppers and the first of the apples, wow is it glorious. I have been eating good! 

There's almost nothing better than a simple, homemade pizza to showcase some of that summer bounty. This pizza only needed a couple ingredients to help it shine. Start with a good crust, add some garlicky oil, top with a couple handfuls of whole milk mozzarella mixed with a bit of asiago, top with a couple slices of one of those juicy, sweet and tender August tomatoes and sprinkled with thyme. A quick trip to the oven and you're ready to go. Serve with a bit of fresh parley and Parmesan cheese and you are set for dinner.

You could kind of consider this a spin on the traditional Margarita pizza, just switching up the cheese a bit and using a different herb, so not really a Margarita pizza at all! But in the same spirit in my opinion! Whatever you all it, it's delicious!


Tomato and Asiago Pizza

  • 1/4 of the perfect pizza dough recipe
  • 1/4 cup olive oil
  • 2 garlic cloves, thinly sliced
  • 1/2 tomato, sliced thin
  • Asiago cheese, shredded
  • Parmesan cheese, grated
  • Fresh Thyme
  • Fresh parsley, for garnish

Directions
Heat a small frying pan over medium to low heat. Add the oil and allow it to heat up for 30 seconds, then add the sliced garlic. Fry the garlic in the oil until it is just starting to turn golden, watching it closely to ensure that it does not burn. Remove pan from heat and set aside to cool. 

Prepare pizza dough. Brush shaped dough liberally with the garlic oil, you may not need it all, save the leftover oil to use later on. Sprinkle the oiled dough with a few tablespoons of parmesan cheese. Then top with asiago cheese, spreading almost to the very edge. Lay tomato slices on top of the cheeses. Sprinkle the whole thing with minced fresh thyme and some salt and pepper. Slide pizza off peel and onto your heated stone or baking sheet. Bake until the crust is golden and and cheese is bubbling and just beginning to brown, 6-10 minutes depending on your oven. 

Vanilla Sablé

When I went to the Netherlands earlier this year I loved the fact that every cup of coffee I ordered (and let's just say there were a LOT of them!) came with some kind of cookie on the side. Just a small little sweet bite to complement the dark, roasted flavor of coffee. Having been raised in a Dutch American home, I was already quite accustomed to "coffee-time" at home always having accompanying cookie of some sort (windmill cookies were always the go-to) , but seeing the same principle in action in everyday Dutch life was simply wonderful. After getting back from Europe I was inspired to whip together a couple batches of coffee-time cookies for myself. This vanilla sablé recipe was one of the cookies I happened to try out and it turned out to be an amazing choice. It was a fitting choice after my trip to the Netherlands and France; a French cookie to go along with my Dutch cookie culture inspiration! 

These cookies may look simple and humble but they are absolutely delicious! Super easy to make with just a few simple and basic ingredients, but the end result is heavenly. They are rich yet crisp and light, and melt-in-your-mouth buttery. If you have some good butter to spare, this is the place to use it and really let it shine. A perfect cookie to stand alongside a cup of strong dark coffee. 

The recipe I used for these cookies originally called for lemon and lime zest to make citrus sablé, but this time I just wanted something super simple and classic and so I flavored mine with just a little vanilla (vanilla bean would also be amazing if you have one). I also made a few little adjustments in order to not be left with 1/2 and egg. As far as I can tell these adjustments did not end up harming the final cookie one bit. Another great thing about these cookies is that you can make the dough ahead, and shape it into a long and then freeze the log of dough for up to a couple months before thawing and baking. I love finding ways I can work ahead and make life easier for myself in the future. 


Vanilla Sablé
Adapted from Joy the Baker
Ingredients

  • 1 stick butter
  • 1/4 cup (50 grams) granulated sugar
  • 2 tablespoons (15 grams) powdered sugar
  • 1/4 teaspoon salt
  • 1 egg, separated
  • 1 teaspoon vanilla extract
  • 1 cup (130 grams) flour
  • Turbinado sugar, for decorating

Directions
Working in a mixer fitted with a paddle attachment, beat the butter at medium speed until it is smooth and very creamy.  Add the sugars and salt to the butter and continue to beat until smooth and velvety, not fluffy and airy, about 1 minute. Reduce the mixer speed to low and beat in the egg yolk until well blended.

Turn off the mixer, pour in the flour and mix on low speed just until the flour disappears into the dough and the dough looks uniformly moist. If you still have some flour on the bottom of the bowl, stop mixing and use a rubber spatula to work the rest of it into the dough. (The dough will not come together in a ball — and it shouldn’t. You want to work the dough as little as possible. What you’re aiming for is a soft, moist, clumpy dough. When pinched, it should feel a little like Play-Doh.)

Scrape the dough onto a work surface and gather it into a ball. Shape into a smooth log about 9 inches long (it’s easiest to work on a piece of plastic wrap and use the plastic to help form the log). Wrap the log well and chill for at least 2 hours. The dough may be kept in the refrigerator for up to 3 days or frozen for up to 2 months.

When ready to bake, center a rack in the oven and preheat the oven to 350 degrees. Line a baking sheet with a silicone baking mat or parchment paper and keep it at the ready.

To decorate the edges of the sables, whisk the egg white until smooth. Place chilled log of dough on a piece of waxed paper and brush it with the white, and then sprinkle the entire surface of the log with turbinado sugar. Trim the ends of the roll if they are ragged and slice the log into 1/3-inch-thick cookies (I got around 18 cookies). May chill the dough again at this point if desired, or proceed directly on to baking. 

Place the rounds on the baking sheet, leaving an inch of space between each cookie, and bake for 17 to 20 minutes (mine went the whole 20), rotating the baking sheet at the halfway point. When properly baked, the cookies will be light brown on the bottom, lightly golden around the edges and pale on top. Let the cookies rest 1 or 2 minutes before carefully lifting them onto a cooling rack with a wide metal spatula. Repeat with the remaining log of dough. 

Baked Lentil Falafel

Quick. Easy. Healthy. Delicious. Those are all words I like to hear, especially when it comes to prepping meals for a busy week at work. These baked lentil falafel fit the bill perfectly. Now, I know, since they're baked, not fried, and made out of lentils, not chickpeas or fava beans, they really aren't falafel. But humor me here. It's the easiest way to describe these little patties. They have a little heat from a jalapeno, some spice with the cumin and coriander, and freshness from the herbs.  Throw it all in the food processor,  and process away! Shape, bake, eat, repeat. It's that easy! 

The original recipe for these little bites was just 5 or so ingredients long. A great base recipe from which you can improvise to your hearts content. I added a few extra flavorings because I couldn't help myself, but you can keep it simple if you like. I used my favorite seasonings of cumin and coriander, along with cilantro, parsley and mint. Probably my favorite combination of flavors, but try adding your own favorite spices and see what happens. I ate mine the first day on a chickpea flour wrap with garlicky kale and tahini. Yum! But I've also made sandwiches, topped salads, and dipped these little guys into yogurt for a quick snack. Go ahead, try something new!


Baked Lentil Falafel
Adapted from Pinch of Yum
Ingredients

  • 2 cups (320-340 grams) cooked lentils*
  • 1 cup cilantro
  • 1 cup parsley
  • 1/4 cup fresh mint (optional)
  • half a jalapeño, leave the ribs and seeds if you like it spicy
  • 1 green onion, coarsely chopped
  • 1-1½ tablespoons olive oil
  • 1-2 cloves garlic
  • a squeeze of lemon juice
  • 1 teaspoon salt
  • 1/2 teaspoon cumin
  • 1/4 teaspoon coriander
  • 1-2 tablespoons whole wheat flour

Directions
Preheat the oven to 350 degrees. Pulse all ingredients except flour in a food processor until combined. Stir in the flour - just one tablespoon at a time, until it's just dry enough to handle. Form into 10 or so patties and place on a parchment lined baking sheet. Bake for 20 minutes. Remove sheet from the oven and carefully flip each patty over. Return to oven for another 10 minutes. Remove from oven and let cool slightly. Use however you would like; in salads, sandwiches, wraps, bowls, etc. They also freeze great, so you can whip up a batch and keep on hand for  a quick meal any time. 

*I was using up the rest of the lentils I had in the pantry. The dry weight was 140 grams which ended up being 340 grams cooked. When I weighed out 2 cups it was 320 grams, but I only had an additional 20 grams of lentils so I just threw them in too! So it doesn't need to be exact. 

Date and Almond Breakfast Bars

Quick post this week. You may or may not have noticed my love for snack bars. Usually oat based, hearty, filling and on the healthier side. Well, here's another winner! These bars are soft, but not chewy, more of a sandy texture. They are slightly sweet, just enough for me, and a little salty (which I love!). The dates add a nice natural sweetness without being an overwhelming flavor. They bars bake up pretty firm and hold together unless it's really warm out, or they sit in a hot car for a while! Whoops!! 

I cut back slightly on the honey in these bars, just by 1 tablespoon. They may have been slightly firmer with that additional tablespoon, but I didn't mind them at all the way they turned out. While the title of this recipe is "breakfast bar" I really found them to be more of a homemade granola bar. But in the end it doesn't really matter what they are called. I just know I enjoyed them!


Date and Almond Breakfast Bars
Adapted from Donuts, Dresses and Dirt
Ingredients

  • 2/3 cup (90-100 grams) chopped dates
  • 1 1/4 cup (110 grams) old fashioned oats
  • 3 tablespoons (22 grams) whole wheat flour
  • 1/3 cup (20 grams) wheat germ
  • 1/3 cup (35 grams) chopped almonds
  • 1/2 teaspoon salt
  • 1/4 teaspoon cinnamon
  • 1/2 cup (65 grams) almond butter
  • 1/4 cup (50 grams) olive oil
  • 3 tablespoons (63 grams) honey
  • 1/2 teaspoon vanilla

Directions
Preheat oven to 350. Line a 8x8 inch pan with parchment paper and spray with oil. Set aside. 

Combine the dates, oats, flour, wheat germ, almonds, salt and cinnamon in a large bowl. In a separate bowl, whisk together the almond butter, olive oil, honey, and vanilla. Pour the wet ingredients over the dry mixture, and stir together until evenly combined. Spread the batter into the prepared pan, pressing the mixture firmly onto the bottom, edges and corners.

Bake the bars for 30-35 minutes, until they are golden brown all over. Cool the bars completely in the pan on a cooling rack. When mostly cool, transfer to the fridge and let them chill for a few hours. This will make it easier to cut into neat bars.  Remove from fridge and cut into bars.

Seedy Cranberry Crisps

You know those fancy seedy crisps that you can buy at specialty grocery stores? They come in fun flavors such as rosemary raisin pecan, salty date and almond, or fig and olive. I love these crackers. They're sweet and crunchy and full of yummy fruits and nuts and seeds. Regardless of how much I enjoy these little snacks, I have never once bought a box of them, nor considered buying a box, they are always so expensive. I look at them longingly, and then dejectedly pick up a box of plain water crackers or butter crackers of something like that and leave. 

But no more! I have discovered a wonderful alternative. Homemade crisps. these little crisps are super easy to whip together. They take a bit of time because they are baked, cut and then baked again. But you can do this all in stages and each step is very easy. The resulting crisp is impressive looking, super yummy, and so so much cheaper than the store. If you need some crackers at your next party and you've got a few extra minutes, whip together a batch of these crackers and enjoy!

I've made these crackers several times and just add in whatever nuts or seeds or dried fruit I have at that moment. I usually add anywhere from 1-2 cup of add-ins. Again, really whatever you have on hand. There's also a nice amount of sugar (both brown sugar and maple syrup) in these which makes them delicious and nicely sweetened. But I have also made them without the maple syrup and they are just as good, just a little less sweet. So depending on your preference and how your going to use the crackers you can add more or less of the sugar and they will still be a great addition to your table. 


Seedy Cranberry Crisps
Adapted from Use Real Butter
Ingredients

  • 2 cups (9 ounces) whole wheat flour
  • 1/4 cup (1.75 ounces) brown sugar
  • 2 tsps baking soda
  • 1 tsp ground cinnamon
  • 1/2 tsp salt
  • 2 cups (16 ounces) buttermilk or liquid whey (left over from making yogurt)
  • 1/4 cup maple syrup (optional, I think they are sweet enough without this, but add it in for a little extra something special!) 
  • About 1 cup of a mix of dried cranberries, raw pumpkin seeds and raw sunflower seeds 

Directions
Make the loaves: Preheat oven to 350°F. Lightly grease four mini loaf pans with vegetable oil spray or butter. In a large bowl, combine the flour, sugar, baking soda, cinnamon, and salt with a whisk. Add in the buttermilk or whey and maple syrup (if using) and stir until just combined. Fold the cranberries, pumpkin seeds, and sunflower seeds into the batter. Divvy the batter among the four mini loaf pans and bake for 30 minutes or until the tops are golden brown and a toothpick inserted into the center comes out clean. Let the loaves cool in the pans for 10 minutes and then remove them from the pans and let cool completely over several hours or overnight. (You want them to be completely cool before cutting or they will fall apart as you cut the crisps.)

Make the crisps: Preheat the oven to 325°F. Using a sharp bread knife, slice the loaves into 1/8-inch thin slices. This can be a little challenging, but do your best. I've found that it helps to chill the baked bread before cutting. Arrange the slices on parchment-lined baking sheets and bake for 50-60 minutes until dark golden and crisp, flipping the slices and rotating the baking sheet halfway through. Start checking them at around 40 minutes to make sure they don't overbake and get bitter. 

Yields: 70-80 crisps

Lime Cornmeal Cookies

I first made these cornmeal cookies 5 years ago when I was living in Dearborn. So much has happened since that time, but one thing that has not changed is how delicious these cookies are. That first batch was back in the early years of this blog and the photos on that first post were not so hot (if you're interested in taking a look you can see it here). I thoughts it was time to revisit this recipe and give it the photos it deserves. 

It had been a little while since I'd made a batch of these cookies, but I was having some friends over for a Bible study and the food I was making was full of Mexican flavors so I thought these cookies would be the perfect dessert to finish off the night with. They are buttery and tart with a wonderful crunchy texture from the cornmeal. The lime glaze on top really finishes them off nicely. All around a great cookie that's just a little bit different than the usual. Everyone I served them to loved them, so I'm sure anyone you serve them to will love them too! 

I halved the original recipe this time, the full batch makes quite a few cookies and I didn't need that many on this occasion. When shaping them I used my scale and made each cookie 30 grams, this yielded 17 cookies that were the perfect size in my opinion. The recipe calls for 90 grams cookies but that is just massive. I'm sure they'd be awesome, but I didn't feel the need to make mine this big. I ended up chilling the dough overnight before baking which is not called for in the original recipe, but the dough was fairly soft, and I had the time to throw it in the fridge before I needed to bake. The cookies might spread a little more if you don't chill the dough, but I haven't tested this. They did spread a bit regardless of the chilling, so just make sure there is enough space between each ball of dough before putting in the oven. And if you're feeling tempted to skip the lime glaze as I was...don't! It really finishes off the cookies perfectly - the sweet and tart glaze complements the crunchy and buttery cookie and brings them up a notch. Plus, it just looks so cute! 


Lime Cornmeal Cookies
Adapted from The Sweeter Side of Amy's Bread by Toy Kim Dupree and Amy Scherber

  • 3/4 cup (3 1/2 ounces) all purpose flour
  • 1/2 cup (3 ounces) coarse cornmeal or fine grits
  • Scant 1/2 cup (2 ounces) bread flour
  • 7/8 teaspoon kosher salt
  • 1/2 teaspoon baking soda
  • 1/2 cup plus 2 tablespoons (4 3/8 ounces) granulated sugar
  • 1/2 cup (4 ounces) butter, slightly softened
  • 3/4 ime zest, finely minced
  • 1 egg
  • 1 egg yolk
  • 1 cup powdered sugar
  • 1 1/2 tablesppons lime juice

Directions
Preheat the oven to 350 degrees. Line a cookie sheet with parchment paper.

In a bowl, add the all-purpose flour, cornmeal, bread flour, salt and baking soda and whisk together. Set aside. 

In another bowl, using an electric mixer with a paddle attachment, cream the sugar, butter and lime zest together on medium speed for 2 minutes, or until light and fluffy, scraping the sides and bottom of the bowl frequently. Add the egg and egg yolk, mixing until every thing is well combined.

With the mixer on medium-low speed, add the dry ingredients in stages. Mix only until everything is well combined, scraping the sides and bottom of the bowl frequently. There should not be any pockets of dry flour left in the dough. At this point, you can refrigerate the dough overnight, or move on immediately to the next step. 

Portion the dough into individual balls, rolling them between your hands to make them uniform. Place them on the cookie sheet with an inch or two between each cookie. They will spread during baking. (The original recipe calls for you to make giant cookies, 90 grams/3.2 ounces of dough each, which is huge and wonderful. However, I made my balls of dough a little more reasonably sized at 30 grams, 1-2 tablespoons, each.) This dough will be soft, so don't flatten the dough balls at all before baking. Bake the cookies for 16-18 minutes, rotating the cookie sheet halfway through the baking time. The cookies should be lightly browned on the edges and baked all the way into the center. They should be soft, but be careful not to underbake them or the centers will collapse and be doughy.

Cool the cookies on the sheets for 5 minutes, then move them to a rack and cool completely before glazing.

Whisk together the confectioner's sugar and the lime juice to make a loose glaze. Use a 2 inch pastry brush to frost the top of each cookie, leaving an unfrosted 1/4 inch border around the edge. Let the glaze dry completely before storing the cookies in an airtight container.