Festive Lemon Berry Bars

Happy Fourth a few days late! I hope you all had a great weekend. Mine was incredibly relaxing and lazy, exactly what I was hoping for! One of the few things I did accomplish during this wonderful weekend was baking up a batch of these festive and delicious lemon berry bars. I wanted an easy and quick dessert that was summery and fitting for the 4th of July. These bars fit the bill perfectly, filled with colorful red and blue berries and topped with a simple white glaze. The hint of lemon from some fresh lemon juice and zest was the perfect way to brighten them up for the middle of summer. Light and refreshing, these bars will be wonderful all season long!

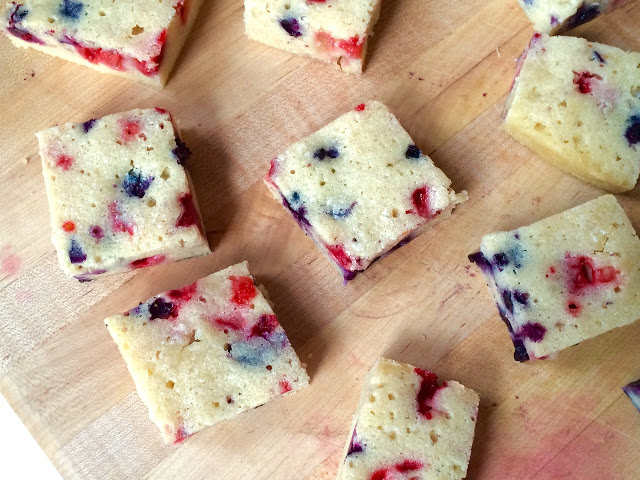
The original recipe for these bars called for just blueberries, but I wanted to make them more festive for the holiday so I threw in the strawberries too because I had them on hand. Raspberries would have also been really good. I think pretty much any berry would do very nicely in these bars, so don't feel constrained to just blueberries and/or strawberries. 

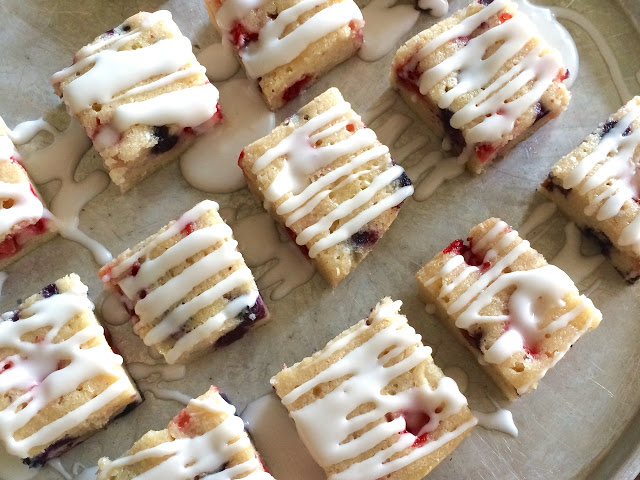
When I first pulled the bars out of the oven they looked kind of funny. Since there is no leavening in them, they didn't really rise much, and the top was covered in bubbles which you can kind of see in the pictures. I wasn't sure what they would look like in the end, but once I cut them, and especially after adding the glaze they looked really nice, and quite delicious. So if they turn out a little funny looking at first, have no fear! Just cut them up once cool and add a nice hefty dose of glaze and all should be well!

Festive Lemon Berry Bars

Adapted from 

Sweet Pea's Kitchen

Ingredients

For the Bars:

  • 8 tablespoons unsalted butter, softened
  • 3/4 cup granulated sugar
  • 1 teaspoon finely grated zest 
  • 2 large eggs
  • 1 tablespoon fresh lemon juice 
  • 1/2 teaspoon vanilla
  • 3/4 cup all purpose flour
  • 1/4 teaspoon table salt
  • 1/2 cup blueberries
  • 1/2 cup strawberries, cut into small pieces

For the Glaze:

  • 1/2 cup powdered sugar
  • 1 tablespoon of water or fresh lemon juice 

Directions

Adjust oven rack to middle position and heat oven to 350 degrees. Spray an 8” x 8” pan with nonstick cooking spray.

In stand mixer fitted with paddle attachment, beat butter, sugar, and lemon zest at medium speed until light and fluffy, about 3 minutes, scraping down sides and bottom of bowl with rubber spatula. Add eggs 1 at a time, beating well after each addition, about 20 seconds. Add lemon juice and vanilla and mix to combine. Add flour and salt, mixing until incorporated. Fold in blueberries and strawberries.

Spoon batter into prepared pan and smooth top.

Bake until skewer inserted into brownies comes out clean, 25-30 minutes. Cool in pan on wire rack to room temperature.

To make the lemon glaze, in a small bowl, whisk together the confectioners’ sugar and water or lemon juice. Spread over bars and let firm up, about 10 minutes.

Soft Sandwich Sourdough

I decided to try out a new sourdough sandwich loaf recently, just for something new. I don't like getting stuck in a rut, so I did some browsing of recipes I had pinned as well as exploring the internet for anything new that I might want to try. I finally settled on this soft sandwich sourdough. It has enough butter and sugar to make it a little special without being overly rich and heavy, a good compromise. This was the first time I've made a truly sourdough bread, one without any added commercial yeast. I wasn't sure how it would turn out, I was hoping my starter was healthy and vigorous enough to provide the rise needed to make a nice and light loaf. No need to worry! There recipe turned out two beautiful loaves, absolutely perfect for whatever sandwich you are craving. Not overly sour tasting, but soft and full of flavor. A definite keeper! 

Without the addition of any commercial yeast, this recipe definitely took longer to rise than most "normal" bread recipes. But that is okay with me. It just needed a little more time and it rose beautifully. The final loaves are extra tall, but they were just the right size for me to make a very nice sandwich on. 

One other unique part of this recipe is that it calls for you to bake it about halfway until the crust is completely set, and then you remove the loaves from the bread pans and continue the baking process directly on a baking stone to finish. I've never done this before but it seemed to work quite well, helping the crust brown evenly all over.

Soft Sandwich Sourdough
Adapted From Wild Yeast
Ingredients

  • 622 g flour (I used about 1/2 all purpose, 1/2 whole wheat)
  • 200 g water
  • 16.2 g salt
  • 65 g unsalted butter at room temperature
  • 31 g honey
  • 120 g milk, scalded and cooled
  • 411 g mature 100%-hydration sourdough starter

Directions
In the bowl of a stand mixer fitted with a dough hook, combine all of the ingredients except about 10% of the water. Mix in low speed until the ingredients are incorporated, adjusting the water as needed to achieve a medium dough consistency (you may need additional water). Continue mixing to in medium speed to a medium-high level of gluten development.

Transfer the dough to a lightly oiled container. Cover and ferment for 3 hours, with folds* after the first 1 and 2 hours.

Turn the dough into a lightly floured counter. Divide it in half. Preshape each piece into a cylinder and let rest, covered, for about 25 minutes. Generously butter two 8.5 x 4.5-inch loaf pans. Shape the dough tightly into blunt batards and place them, seam-side-down, into the prepared pans. Proof, covered, for 3 hours, or until the top of the dough has risen to about 1.5 inches above the edge of the pan.

Meanwhile, preheat the oven, with baking stone, to 425F. You will also need steam* during the initial phase of baking, so prepare for this now.

Once the loaves are in the oven, reduce the temperature to 400F. Bake for 15 minutes with steam, and another 10 minutes without steam. Then remove the loaves from the pans, place them directly on the stone, and bake for another 20 minutes or so, until the crust is a deep golden brown. Cool completely on a wire rack before cutting.

*For more information about folding and steaming check out the original recipe on Wild Yeast

Nutrition: Approximate calorie count, 1/12 of a loaf is 143 calories

Chewy Trail Mix Cookies

Last week I was trying to decide what I should bake to have on hand for a quick grab and go breakfast. Breakfast cookies had been on my mind lately, so I decided to just go for it. I've been eyeing recipes for a while, and have a bunch of them pinned, but so far I hadn't got around to making any. There are so many different routes you can go with a breakfast cookie and I had been having difficulty deciding which recipe to use. I finally settled on these chewy trail mix cookies. They looked hearty and filling and were full of all sorts of good things like any trail mix should be. 

I'm glad that in the end I went with this recipe because it sure was a winner. The oats and nuts come together to form a delicious base that is filled with coconut, chocolate, seeds and dried fruit. A little brown sugar and honey for sweetness, and butter for flavor are all held together with some nut butter and an egg. They baked up thick and chewy just as I was hoping they would. An quick and easy breakfast that I can feel pretty good eating on those busy weekday mornings. 

I adapted the original recipe a little to work for me and they still turned out great. The original recipe was both vegan and gluten free, my version is neither but it would easy to go back and make the appropriate adjustment if this is something you are looking for. If you use gluten free oats they still would be gluten free, and replacing the egg with a flax egg and the butter with coconut oil as in the original recipe is a easy way to get them back into vegan territory. So as you can see, the recipe is pretty forgiving and adaptable. 

The add ins can also be adjusted to fit your tastes. Any type of seed, nut, chocolate, dried fruit, etc. could be used in this recipe. It really just depends on what you like and what you have in your pantry. As long as you aim to keep the volume of filling approximately the same as what is written I think they will turn out just fine. So play around with it, use what you like and make them your own!

Chewy Trail Mix Cookies
Adapted from Oh She Glows
Ingredients
Dry

  • 1 cup (80 grams) old fashioned rolled oats, blended into oat flour
  • 1/2 cup almond meal or almond flour (I used 2 ounces almonds ground in the food processor)
  • 1/2 cup (40 grams) old fashioned rolled oats
  • 1/2 cup (2 ounces) chopped or thinly sliced almonds
  • 1/4 cup (50 grams) brown sugar
  • 3 tablespoons (15 grams) shredded unsweetened coconut
  • 3 tablespoons (30 grams) mini dark chocolate chips (or finely chopped chocolate)
  • 2 tablespoons (20 grams) sunflower seeds
  • 3-4 tablespoon (28 grams) dried cranberries
  • 3/4 teaspoon cinnamon
  • 1/2 tsp fine grain sea salt
  • 1/2 tsp baking powder
  • 1/2 tsp baking soda

Wet

  • 1 egg, lightly beaten
  • 1/4 cup (64 grams) raw almond or peanut butter
  • 3 tablespoons butter, melted
  • 1/4 cup (80 grams) pure maple syrup
  • 1 tsp vanilla

Directions
Preheat oven to 350F and line a baking sheet with parchment paper.

In a large mixing bowl, whisk together all of the dry ingredients. In another medium sized bowl, stir together the wet ingredients until thoroughly combined. Add the wet mixture on top of the dry mixture and stir well until combined. 

Form the dough into small balls, rolling them between your palms until smooth. Place on prepared cookie sheet. (I made 12 total, they were approximately 50 grams each.) 

Bake cookies for 15-18 minutes until light golden brown on the bottom. Cool on the baking sheet for 5 minutes before transferring to a cooling rack until completely cool. 

Calories: 231 calories each for 12 cookies

Greek Yogurt Banana Bread

I don't think I really know anybody who doesn't like a good slice of banana bread. I'm sure there are plenty of those people out there, but I have yet to meet one! For the rest of you who love banana bread as I do, I have a winner of a recipe to share. This banana bread recipe was just what I was looking for the other week. It's the classic with a few updates that make it a little healthier, but no less tasty. Full of great banana flavor, lightly sweetened with just enough sugar to keep it super tasty, but not so much that it tastes like cake, and lightened up with a little Greek yogurt to keep it nice and moist and a few tablespoons of butter to maintain that delicious flavor. This is one of the best banana bread recipes I've tried. It reminded me of one of those slices of bread or cake you can pick up at Starbucks or other coffee shops, but so much better, healthier, and cheaper! You really can't loose with this recipe, I highly recommend you give it a try soon!

With 3 bananas in just the one loaf, you really don't need a ton more sugar, so I found that 1/2 cup was just perfect. Vanilla and cinnamon add a delicious aroma and amp up the flavor just a touch, without being overpowering. The texture of the finished bread is very moist, and a little spongy as a lot of breads are that use yogurt; this is not a bad thing, I like this in my breads. Just be sure to not overbake. Nothing kills a good banana bread like overbaking, resulting in a dry and flavorless loaf. often set my timer for a few minutes less than what the recipe calls for just to be sure. Watch it carefully and you should be good to go!

Greek Yogurt Banana Bread
Adapted from The Recipe Rebel
Ingredients

  • 3 ripe bananas (~15 ounces total)
  • 3 tablespoons (1.5 ounces) butter, softened 
  • 1/3 cup plain (unsweetened) Greek yogurt 
  • 1/2 cup sugar
  • 1 tsp vanilla
  • 2 large eggs
  • ½ tsp salt
  • ¾ tsp baking soda
  • 1 tsp cinnamon
  • 2 cups flour (I used 6 ounces whole wheat, and 3 ounces all purpose)

Directions
Preheat oven to 350 degrees F and lightly grease a loaf pan.

In a large bowl, mash bananas with a whisk. Add butter, yogurt and sugar and whisk until combined and somewhat smooth. If it's still a little chunky, don't worry. 

Add vanilla and eggs and stir until combined.

Add salt, baking soda, cinnamon and flour and stir just until combined (don’t overmix – it doesn’t have to be perfectly smooth).

Spread in loaf pan and bake for 50-55 minutes, or until toothpick inserted in the middle comes out with a few moist crumbs. 

Easy Sourdough Rolls

I've had my sourdough starter going for quite some time now. I really enjoy working with sourdough, and I love the sour flavor it gives to the breads I make with it. The whole idea of sourdough intrigues me. Being able to cultivate wild yeast in my fridge and then bake bread with it is so amazing! Since sourdough does take little a bit of care I'm always on the lookout for a new recipe to use some of my starter. When I saw these easy rolls I knew they would be the perfect way to use some starter and have a stash of rolls/buns on hand in the freezer to pull out when in a pinch for an easy lunch or dinner. 

This recipe is really a winner. Simple, basic, easy and fairly quick to throw together. They turned out light and fluffy and a perfect roll to top with some cold cuts, a large scoop of chicken salad, or your own personal favorite topping. Also great for a bread basket on the side, all you need is a little butter, with some honey or jam if you like a little extra sweetness. A great all purpose recipe to tweak for many different occasions. 

I decided to make small cuts in the top of my rolls, just for fun. Not necessary but I think they turned out kind of cute. They sort of look like little mouths to me. But if you prefer a smooth topped roll just skip the cutting step. They will still turn out just as delicious!

Easy Sourdough Rolls

Adapted from 

Kitchen Grrrls

Ingredients

  • 5 cups all purpose flour
  • 1 tablespoon yeast
  • 1 tablespoon salt
  • 2 tablespoons brown sugar
  • 1-2 tablespoons olive oil
  • 1 1/2 cups sourdough starter
  • 1 1/2 cups warm water

Directions

In the bowl of a stand mixer fitted with the dough hook  mix together the flour, yeast, salt and sugar. Add the olive oil, starter and water and knead it all together on medium-medium high speed until smooth and elastic, 5-7 minutes, adding extra flour or water if needed to produce the correct consistency. Place the dough in a clean large bowl sprayed with non-stick cooking oil, cover the bowl with a kitchen towel or plastic wrap and let the dough double in size.

Divide the dough into rolls, each approximately the size of a tennis ball (I made mine around 70 grams each which yielded 20 rolls). Lightly oil a pan. Set the rolls into the pan and let them rise until doubled. Once the rolls have doubled place them in the oven and bake for about 20 minutes at 375F until lightly browned. 

Yields: I made 20 nice sized rolls (about 72 grams of dough each)

Banana Poppy Seed Cake

Simple cakes such as this banana poppy seed cake are good recipes to have in your back pocket just in case you need to whip together a quick dessert sometime. What I like about this cake is that it is a little different than the typical everyday cake. Bananas and poppy seeds are not ingredients I often use in my desserts. Although I do bake with bananas a lot, I usually don't use them in my cakes such as this one which is what initially intrigued me about this recipe. The combination of tender banana scented cake paired with the slightly bitter crunch from the poppy seeds came together in a perfect pairing making this cake a winner. Although this time I opted to pass on the cream cheese frosting that the original recipe called for, I'm sure it would be wonderful atop this cake, making it just that much more special. 

The bananas as well as a nice half cup of sour cream keep this cake moist and tender. A touch of butter is added for flavor and a little more richness and then finish it off with those cute and crunchy poppy seeds. It is a simple combination that works wonderfully to turn out this simple cake that is just unique enough to make things interesting.

Banana Poppy Seed Cake
Adapted from The View From Great Island
Ingredients

  • 2 Tbsp unsalted butter, at room temperature
  • 2/3 cup sugar plus 1 tablespoon
  • 1/2 cup sour cream
  • 1 large egg
  • 2 ripe bananas, mashed
  • 1/3 cup poppy seeds
  • 2 teaspoon vanilla extract 
  • 1 cup flour
  • 1/4 teaspoon salt
  • 1/2 teaspoon baking soda

Directions
Sift together the flour, salt and baking soda. Set aside. Cream the butter, 2/3 cup sugar and sour cream together. Beat in the egg, bananas and vanilla until smooth. 

Sift the flour mixture and poppy seeds into the wet mixture. Mix together just until just combined. Spread the batter into a greased 8-inch round cake pan and sprinkle the top with the remaining tablespoon of sugar. 

Bake the cake for 25-30 minutes at 350 degrees until a toothpick just comes out with just a few moist crumbs. Cool on a wire rack. 

Homemade Ricotta

I don't know if I've made it clear before, but if not, let's set the record straight, I absolutely love cheese. All kinds of cheese, it doesn't matter, I have never met a cheese I didn't like. So of course I've been interested in making my own. Now I know that making any aged cheese takes a lot more work, and is a bigger investment then I want to make right now, so currently I'm sticking to fresh cheeses that are quick and easy to make, and are ready right away.

Homemade ricotta is about as easy as it gets. You don't need any fancy ingredients or tools and it can be ready to eat in less than an hour. All you need to start is some milk and an acid such as vinegar or citrus juice. A thermometer of some kind and a small amount of cheesecloth are the only other tools that you really do need (and you can get by without the cheesecloth if you have too, that's what happened to me the first time!). After you have this all set, all it takes are some heat and a little time and you'll have a bowl of fresh, homemade ricotta, ready for anything you might imagine!

Traditionally, ricotta is actually made from the whey that is leftover from cheesemaking. But since I don't generally have a lot of whey sitting around ready and waiting, this alternative using milk does the trick. I've heard some people complain that this is not actually ricotta then, but in the end I don't really care. Call it whatever you want, but it's close enough to ricotta for me. All I know is that it is easy to make and absolutely delicious to eat! If you've ever been interested in making your own cheese, this is definitely the place to start!

Heating the milk and vinegar over medium heat

You can see some nice curds forming

Straining the cheese in a cheesecloth lined colander 

(or in my case, an old cotton t-shirt lined colander, definitely 

not ideal, but sometimes you have to improvise!)

All strained with the salt mixed in

A beautiful bowl of cheese!

(don't look too closely at the 6 ounce measurement, 

I actually lost some cheese down the drain while I was

straining it :( so you should actually get more than this!)

Ready to eat!

Homemade Ricotta

Adapted from

One Hour Cheese

by Claudia Lucero 

Ingredients

  • 1/4 cup white wine vinegar (can also use lemon juice)
  • 6 cups whole milk, not ultra-pasteurized (I highly recommend whole milk, you can use other milks, but they will result in a less creamy final product and a lower yield, whatever you do, don't use skim milk)
  • 1/4 teaspoon flake salt

Directions

Pour the milk and vinegar into a large pot and set over medium heat. Heat the milk and vinegar mixture to 190 degrees, gently stirring occasionally to prevent a skim from forming and to prevent any milk from sticking to the bottom of the pot. Don't stir so vigorously that the curds are not broken up. Some curds will begin to form right away, and will begin to form more rapidly as the milk approaches the target temperature of 190 degrees. It should look like thin oatmeal. 

Once the mixture reaches 190 degrees, turn the heat off and take the pot off the burner. Allow the curds to sit undisturbed for 10 minutes. They will release more whey this time. 

While you wait, line a colander with cheesecloth  and either set over a large bowl (if you want to save the whey) or in the sink. 

After the 10 minutes are up, pour the curds and whey into the cheesecloth lined colander. Allow the whey to drain for about 10 minutes, or until you get the creamy smooth texture of smooth mashed potatoes. 

Gather the cheesecloth into a bundle and give it a gentle squeeze to remove the last bit of whey. Place the clothe of fully drained ricotta back in the colander and add the salt. Stir the salt into the ricotta gently until thoroughly mixed. The salt will help release more whey, but air will dry out the cheese so if you stir too long the cheese will become crumbly instead of creamy. 

The ricotta is ready to eat. It will be loose and creamy while warm, but will firm up after being chilled in the fridge. 

Yield: about 7-8 ounces cheese

Simple Spaghetti Sauce

A week ago I ran my first race of the year, the Gazelle Girl Half Marathon. It's an all female half marathon run in Grand Rapids, MI. This is the third year for the race and I've run it all three years now. It's fun race and I've really enjoyed being a part of it over the past few years. This year the race turned out the best yet both due to the weather and some course changes they've made. The first year of the race the weather was just awful, it was super cold (in the low 30s) with rain/sleet/snow the whole race along with a nice strong wind. Last year the temperature was okay, but I was scared it was going to rain the whole time. This year however, the sun was out the whole race and the temps were in the mid 40s or so. There was a little wind, but it was mainly a cross wind and not too bad, definitely could have been worse! The race organizers have also tweaked the course every year and this year it was by far the best yet. All in all a really nice spring run that I hope to be a part of for years to come. 

Although I'm not a big believer in the need to truly "carbo load" the night before a half marathon, I like to just pretend that it's necessary so I can whip together a big bowl of pasta and feel like it's a requirement that I eat it all! For this race a simple meat sauce was calling my name. This is the type of spaghetti sauce that my mom would make all the time when I was growing up, so for me this is true comfort food. It is so quick and easy to throw together and it always turns out simply delicious. Honestly, this is one of my favorite meals of all time, it will never get old, something I will return to over and over again. The perfect pre-race dinner for my first race of the year. 

There's no need to follow a recipe like this exactly, it's really easy to mix things up based on your preferences and what you have in your fridge/pantry. So don't feel tied to the recipe. You can use your favorite herbs and spices, the type of meat you prefer and really any type of canned tomatoes, whole, diced, or crushed. Other than that all a simple sauce like this needs is some onions and garlic and you're all set. In all honesty, this is one of my favorite meals of all times, and also a perfect pre-race pasta dinner. 

A few race pics; here's me at the finish, very happy that I'm almost done! And below me with some friends and fellow race participants, all glad to be finished!

Simple Spaghetti Sauce

Ingredients

  • 1/2 pound Italian sausage (can use turkey, chicken, or beef)
  • 1/2 onion, diced
  • 3-4 cloves garlic, minced
  • 2 tablespoons tomato paste
  • 1 28 ounce can whole tomatoes
  • 1 28 ounce can diced tomatoes
  • 1-2 tablespoons dried oregano (or more if you like!)
  • 1/2 teaspoon dried rosemary
  • Red pepper flakes, to taste
  • Olive oil 
  • Salt
  • Pinch of sugar

Directions

Brown meat in a large skillet. Remove from pan and drain on a paper towel if desired. Add a couple teaspoons of olive oil to the pan and add the onions and a couple pinches of salt. Cook over medium to low heat until beginning to wilt and starting to turn slightly golden, about 8-10 minutes. Add the garlic and cook until nice and fragrant, a minute or two. Add the tomato paste and let it cook and caramelized for a few minutes without stirring, then mix it into the onion/garlic mixture. 

Add both cans of tomatoes and the meat back to the skillet and stir to combine. Add in the oregano, rosemary and red pepper flakes and stir again. Bring the sauce to a boil, then reduce to medium-low and let simmer. Taste, and add salt and a pinch of sugar as needed. You can eat it right away if in a hurry, but it tastes better the longer it can simmer and thicken, letting the flavors blend into a perfect sauce. I recommend at least 30 minutes but it will still be delicious if you can't wait that long. 

Serve over spaghetti and top with freshly grated parmesan cheese and some julienned basil leaves or minced fresh parsley.