Washington Food Finds

It's been a busy couple of weeks with school starting, and over the labor day weekend I was involved in my cousin's wedding so I was unfortunately unable to post anything last week, too much craziness. Hopefully I can make up for that today. I don't have a recipe this time, but I did want to share some photos from my trip to Washington this summer. In July I spent 4 weeks in Vancouver, Washington working at New Heights Clinic, a church based health clinic for the underserved. It was a great experience and I learned a lot from my time there.

Thankfully I also had a lot of time in my month there to explore the area and get to know this part of the country. And what did I focus on, the food culture of course. I received so many recommendations of places to visit and foods to try that I couldn't even begin to do it all. I did however manage to get a pretty good sampling of some of my favorite things. In other words, I visited a lot of coffee shops and bakeries! Washington has some great coffee that is for sure, and I enjoyed it immensely. It was a great trip, great experiences, and great food!

One of the doctors from the clinic showed me around the area on my first weekend. She drove me along the Columbia River Gorge for some beautiful scenery and magnificent waterfalls. We finished up our tour at La Bottega Cafe and Deli, a cute little Italian restaurant with fantastic sandwiches, the perfect place for lunch. I decided on the Giuseppe; prosciutto, salami, fresh mozzarella, roasted garlic mayo and tomato basil vinaigrette on ciabatta. I'm a sucker for cured Italian meats. Since it was July I had to get the berry crisp for dessert, a la mode of course!

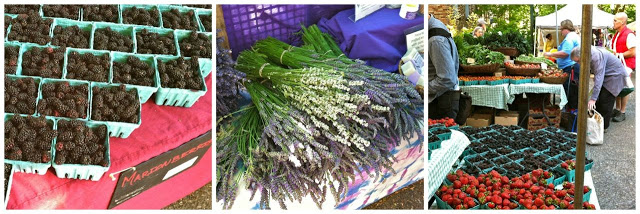
Also on my first weekend, I headed across the river to Oregon to check out the Portland farmer's market. I had a wonderful time taking in all of the fresh fruit, baked goods, flowers and the people. I loved the fresh seafood too, we just don't have that at our farmer's markets back in Michigan. The colors, smells and sounds of an early morning farmers market make me happy.

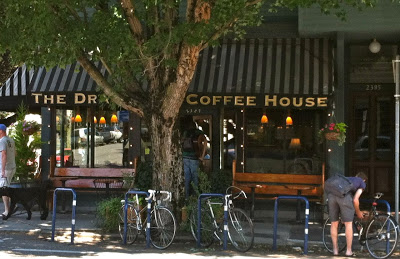
After the farmer's market I needed some coffee, so I drove around until I found just the right place. The Dragonfly Coffee House. It was a small little place, but cozy and relaxing, perfect for enjoying a late morning coffee and cookie.

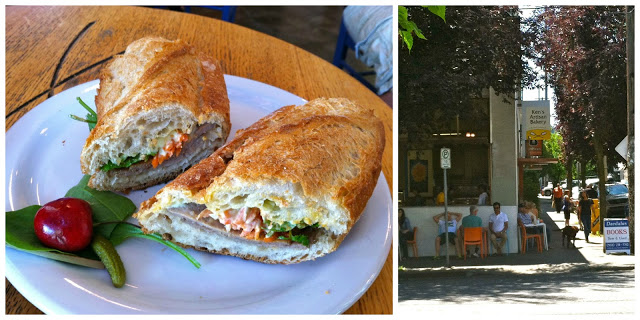
For lunch I drove around a little more until I found Ken's Artisan Bakery, one of the bakeries on my list. It took me a while to find it and then find parking, but boy am I glad I did! I ordered the banh mi; 5 spice pork terrine, pickled daikon carrots, wasabi mayo and sriracha on a baguette. One of the best sandwiches I've had, all thanks to the baguette. It was crisp and crackly on the outside without being hard or tough, and the inside was pillowy, soft and super tender. I wish I could go back everyday for a baguette. I also bought a loaf of ciabatta to take home, which was just as fantastic. A very successful lunch.

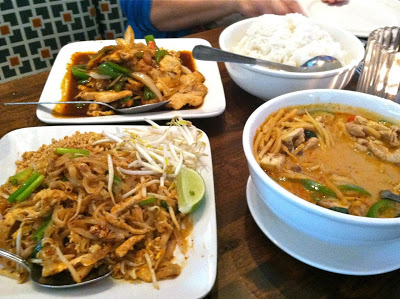
One night I went out for Thai with some people from the clinic to a place called Thai Orchid in downtown Vancouver. I'm no Thai connoisseur but I thought it was delicious. We ordered all kinds of different dishes and ate them family style so I got to try a little bit of everything.

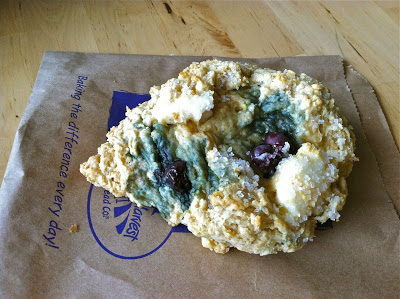
 My breakfast one morning from Great Harvest Bread Company. I kind of felt like I was cheating since we have a couple Great Harvest's in the Grand Rapids area, but my blueberry cream cheese scone was so good I didn't even care.

Basically my life while in Washington; fresh fruit and yogurt for breakfast. There were berries galore the whole time I was there. The family I was staying with also had a few blueberry bushes that were exploding with berries. I picked and ate more blueberries in a few weeks than I've eaten in my whole life up until this point. I have now officially become a blueberry lover, but I've been spoiled with the freshest, most plump and juicy berries, I don't think I can go back.

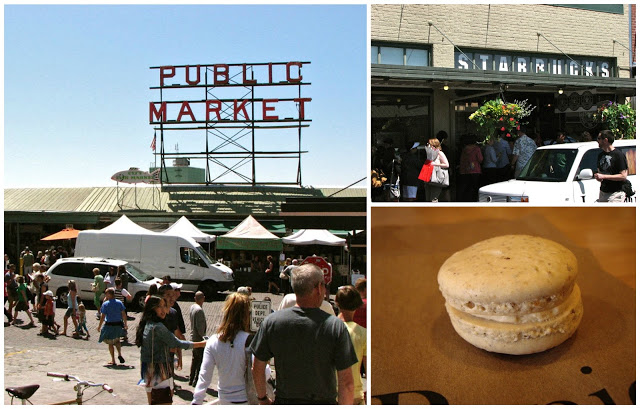
I was able to drive up to Seattle one weekend to see the city and visit my friend Hannah from college. To start out with I visited Pike's Place Market. It was one place I had to see. The whole experience was super interesting, there was so much to see, so many different people and all kinds of restaurants and food booths and knick knack-y shops. Of course it was crazy busy, but I managed to explore and get a good feel for the place.

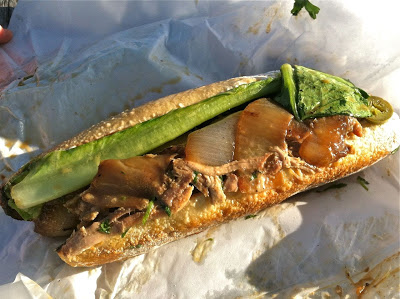
For dinner my first night in Seattle, my friend brought me to Paseo, just down the street from her apartment. We both got the Caribbean roast sandwich which was to die for. Absolutely one of the best things I've ever put in my mouth. It may not look like much but it was so incredibly good. Pork shoulder, coated in their special marinade, slow roasted until falling apart, served on a lightly toasted baguette slathered with aioli, fresh cilantro, pickled jalapeños, a leaf of romaine and caramelized onions. What a mess, a fantastic mess.

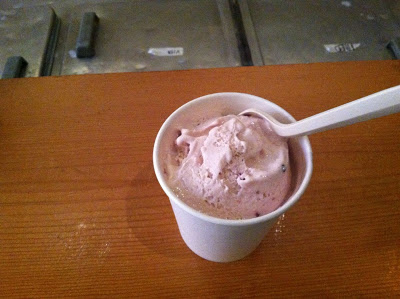
Late night ice cream at Bluebird ice cream. Strawberries and cream, so good. 

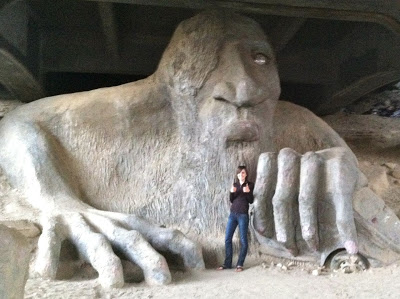
 We walked around the neighborhood a little bit, and I met a troll!

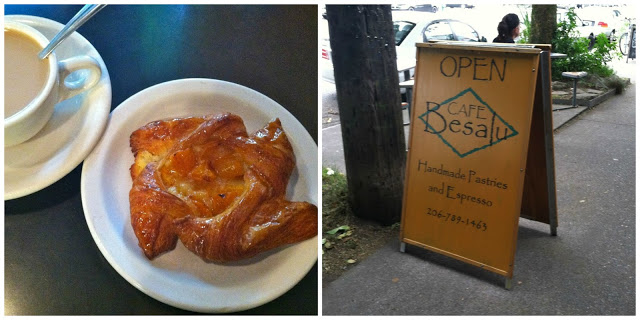
Breakfast the next morning at Hannah's favorite bakery, Cafe Besalu. A tiny little shop with top notch croissants and danishes. We were there early, around 8, and the line was already out the door. I got the apricot danish, delicious.

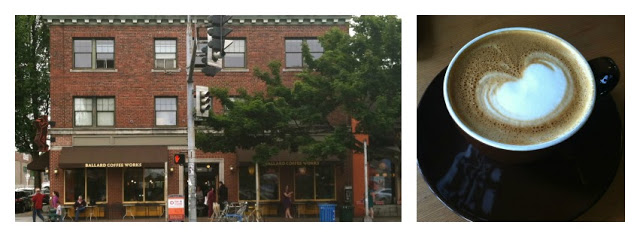
Coffee break at Ballard Coffee Works. The perfect place to spend the dreary morning with a cappuccino, catching up on some emails.

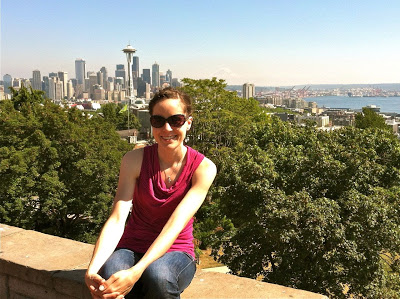
The sun came out in the afternoon and we headed to Kerry Park to get a great view of the city.

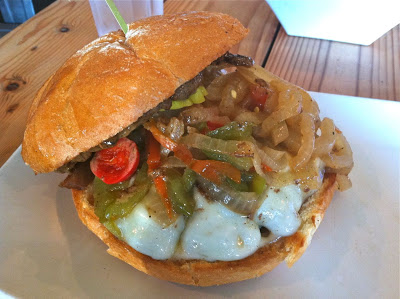
Dinner was burgers and fries at Uneeda Burger, a casual burger shack with lots of character. Tons of different options for burgers and homemade shakes, I could hardly decide what to get. I decided on the Philly smash; charred peppers and onions with swiss and their special sauce. Sometimes I just need a burger, and this was one of those times. The perfect way to finish off the day.

One last breakfast in Seattle before heading back to Vancouver at Fresh Flours. This place was interesting because they had not only the basic breakfast options, croissants, scones and danishes, but they also had some Japanese influenced pastries. It was a kind of Japanese-French fusion, not something I would ever think of but I decided to give it a try and went with the Azuki croissant. Basically a basic croissant folded over slightly sweetened bean paste. I really did enjoy it immensely. The croissant itself was very flavorful and flaky, and the mild filling adding just a hint of extra sweetness.

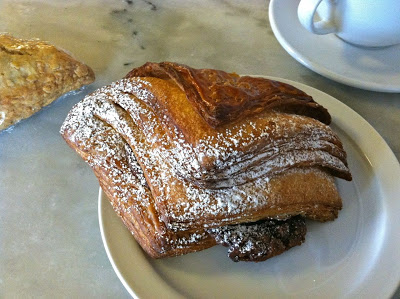
Back in Portland the next weekend, trying out Lovejoy Bakers which was just wonderful. A bright and busy contemporary bakery with windows everywhere, and so many delicious and fun options to try. Tons of great outdoor seating as well. A wonderful place to spend a sunny summer morning. I opted for the butterhorn, with a name like that it was just impossible to pass up. I don't know exactly what it was, but I know a lot of butter was involved, and the whole thing was covered with a delicious layer of streusel. It seemed like there was some kind of laminated dough hiding in there, but it's hard to know.  

A nice little cafe was lunch for the day. Grilled ham and swiss with a fresh cucumber salad. Sometimes the basics are just the right thing.

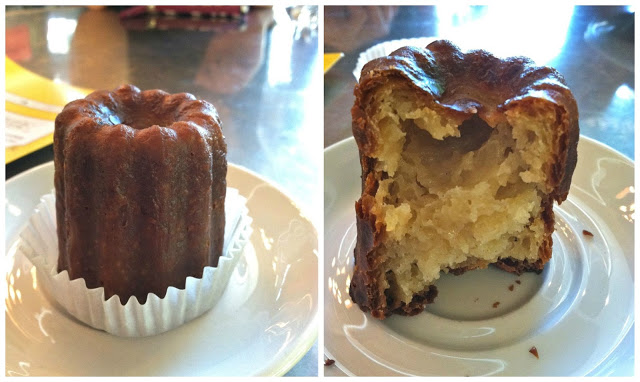
A friend I met at the clinic took me hiking in Portland which turned out to be a lot of fun. Who knew there were some great hikes in the actual city. It's hard to believe that these two worlds are so close to one another. The end of our hike brought us by another awesome French bakery; St. Honore' Bakery. It was packed with people, which was good because it gave me time to look around, and there was so much to see. They not only had amazing looking bread, but the cases were full of cakes, tarts, eclairs, pies, danishes, croissants, quiche, and sandwiches, to name just a few. It was wonderful. We only stopped for a few minutes, but I managed to buy a canele' to try. I've always wanted to try one so when I saw it I knew I had to give it a go. It was absolutely delicious, a crisp and firm outer layer gave way to a smooth, custardy inside. Eggy with a hint of rum, so good.

My host family took me out for dinner one of the last nights I was around to one of there favorite local spots, Woody's Tacos. It was kind of a hole-in-the wall, lots of fun. They had a ton of different options for tacos to try. I decided on roasted corn and grilled zucchini with roasted tomatillo, avocado and green chili salsa and a homemade chorizo and potato taco with fire roasted salsa, both very tasty. And the atmosphere was fun too, sitting outdoors under cheerful yellow umbrellas.

Thatcher's Coffee became my go-to coffee shop in Vancouver. Great coffee, great atmosphere, and it was located pretty close to where I was staying. It is located in a strip mall in a newly developed area, so the first time I went there I didn't really expect much. From the outside it doesn't look special in any way. Inside however is a different story. It's on the end of the strip of stores, and so basically the entire side of the shop is windows letting in so much beautiful natural light. The decor is modern yet warm which is how I like it. Plenty of seating and free wifi rounded out this wonderful spot. I only ever got coffee except the last time I went. I had to splurge on my last day for a berry scone, and it was worth it. Huge and tender and sweet and delightful, a perfect way to say goodbye.

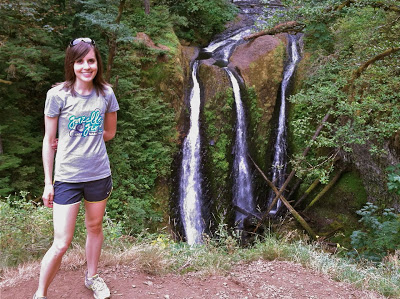
My friend from the clinic took me on one last hiking adventure before I had to leave. We went about 5 miles I think to see several waterfalls and some beautiful scenery. We ended up at triple falls which you can see from the picture is an apt name. The northwest sure is some beautiful country.

One last night out before I went home. I went out with one of the doctors from the clinic to Pho Green Papaya to get some pho. I'd never had pho before, and so didn't know what to expect. I was pleasantly surprise with this flavorful Vietnamese soup. It was full of different cuts of meat and noodles, and we could customized it however we wanted with fresh basil, jalapeños, lime juice and bean sprouts. It is definitely something I'd like to try again. 

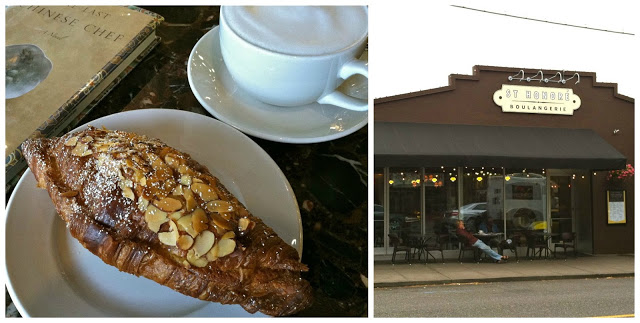
And on my last morning in Washington, I had to drive back in to Portland to spend some time at St. Honore' Boulangerie. I really wanted to enjoy a leisurely breakfast of coffee and a freshly made French pastry. Deciding on what to buy was difficult, but I finally settled on the almond croissant and it was absolutely fantastic. Crispy and flaky on the outside, and creamy and custardy on the inside. I don't know how they do it, but I was in heaven. It was a fitting way to end my culinary explorations of the northwest. I will definitely miss all of my delicious finds!

Strawberry Coffee Cake

It may no longer be strawberry season, but that doesn't mean you can't keep those early summer flavors alive throughout the summer, and even the entire year, especially if you were able to freeze a couple bags of those peak season berries a few months back. This coffee cake is the perfect way to tantalize those tastebuds with the bright, summery sweetness of juicy red strawberries topping a fluffy, tender cake. The whole thing is sprinkled with a chunky, buttery streusel and baked to perfection. Invite a few friends over, brew up some coffee and you've got yourself the best kind of party.

For whatever reason, I was recently craving a tall and beautiful strawberry breakfast cake. It surprised me that so many of the recipes I came across, although they looked very tasty, were such short cakes. I wanted something with a little more stature and this cake delivered just what I was looking for. It's difficult for me to not top my breakfast cakes with a generous layer of streusel so on it went once again. I thought it was a wonderful combination, something I will return to without a doubt.

Strawberry Coffee Cake
Heavily adapted from Tidy Mom
Ingredients
Cake

  • 2-1/2 cups (12 oz) all-purpose flour

  • 1/2 tsp salt

  • 2 teaspoons baking powder

  • 1/2 teaspoon baking soda

  • 1/3 cup (2 3/4 oz) greek yogurt

  • 2 eggs, separated

  • 1 cup milk

  • 3/4 cup (5 oz) brown sugar

  • 1/2 cup butter, softened

  • 2-3 cups sliced strawberries

Topping

  • 3 tablespoons butter, melted

  • 1/4 cup (1.75 oz) granulated sugar

  • heaping 1/2 cup (3 oz) flour

  • pinch salt

Directions
Preheat oven to 350°. In a medium bowl, mix together flour, salt, baking powder and baking soda, set aside. In a small bowl whisk together the yogurt, milk, and egg yolks. In the bowl of a stand mixer, cream butter and sugar until light and fluffy. 

Add the wet and dry ingredients alternatively to the butter and sugar mixture, starting and ending with the dry, mixing until just combined after each addition. 

Transfer mixture to a large bowl. Clean the bowl of the stand mixture and add the egg whites to it. Beat until firm peaks form. Fold the egg whites into the batter. 

Pour into greased 9 inch springform pan. Spread the strawberries on top. To make the topping, mix all the ingredients in a bowl with your fingers until crumbly. Spread on top of strawberries.

Bake for 45-50 minutes. Until lightly brown on top. Allow to cool, then remove from pan.

No Knead Bread

I know there is nothing new about this no knead bread recipe. It's been around for a while now but I never really got around to trying it before. Recently however, I decided to give it a go and see how it turned out, you never know until you try. It is super easy and turns out a beautiful loaf of bread. Some of the comments I had seen mentioned that it wasn't as tall of a loaf as they would have liked, and I agree. It would be nice if it rose a little taller in the pot, but that's okay.

So obviously, there is no kneading with this recipe, very little hands on at all in fact. This does not mean however that it is quick. You have to think ahead to have this bread on your table at dinner. It requires a 12-18 hour rise after mixing the ingredients together. And after shaping it needs another 2 hours. But this is all hands off time. All you have to do is set it aside and forget about it. It doesn't get much easier than that!

As for the flavor, this bread was pretty good. The crumb inside was full of beautiful air bubbles and the top crust was beautiful golden brown. On the other hand, the bottom of this loaf got quite dark brown, almost to burned which I don't like at all. Maybe there's a way to change this, but as it was, the bottom was overcooked. Also, while the crust was beautiful, I did think it was a little tough and thick. Not horrible, but not great either. But the bread inside was flavorful and moist, perfect for dipping into your soup bowl, or smearing with a pat of butter. I think this recipe has a lot of potential, but I might need to play around with it a little to make it work for me.

No Knead Bread

From

Jim Lahey via The New York Times

Ingredients

  • 3 cups all-purpose or bread flour, more for dusting
  • ¼ teaspoon instant yeast
  • 1¼ teaspoons salt
  • Cornmeal or wheat bran as needed

Directions

Mix together the flour, yeast and salt in a large bowl. Add 1 5/8 cups water, and mix well; dough will be shaggy and sticky. Cover the bowl with plastic and let dough rest at least 12-18 hours, (preferably 18), at  room temperature.

When the surface of the dough is dotted with bubbles it is ready to continue. Place dough on a lightly floured work surface and sprinkle with a little flour and fold it over on itself once or twice. Cover with plastic wrap and let rest about 15 minutes.

Gently and quickly shape dough into a ball using just enough flour to keep dough from sticking. Coat a cotton towel with plenty of flour, wheat bran or cornmeal and put dough seam side down on towel and dust with more of the flour, bran or cornmeal. Cover the dough with another cotton towel and let it rise for about 2 hours. When the dough is ready, it will be more than double in size and will not readily spring back when poked with a finger.

At least a half-hour before dough is ready, heat oven to 450 degrees and place a 6- to 8-quart Dutch oven inside. When dough is ready, carefully remove pot from oven. Slide hands under towel and turn the dough over into the pot, seam side up; it may be messy, but that is okay. Shake pan once or twice if dough is unevenly distributed; it will straighten out as it bakes. Cover with lid and bake 30 minutes, then remove lid and bake another 15 to 30 minutes, until loaf is browned beautifully. Cool on a rack before slicing

Yield: One 1½-pound loaf.

Rhubarb Almond Crumb Cake

I have a weakness for anything cake. Cake is one of my absolute favorite things. All flavors, all occasions, breakfast, lunch, or dinner. It amazes me how many people tell me they don't like cake (traditional frosted birthday/wedding cake that is.) When people tell me this, I just assume they never have had good cake. It's true, a bad cake is just bad. Unfortunately, the majority of the cake most people eat is just plain, bad cake. But moving on, I am in the other camp on cake. I love it. I am especially a sucker for a good breakfast cake. They are so simple, easy and delicious.

In my opinion, breakfast cake is the perfect way to start a day. I found this rhubarb almond cake online a few months ago and have been wanting to make it ever since. It was the picture that got me, a tall, golden cake with a crunchy, crumbly topping. I love anything with streusel. Sometimes it can be dangerous to fall in love with a picture of a recipe, when your doesn't quite live up to the expectations you had visually. That's what happened with this cake. It didn't come out as tall as I was hoping, and the streusel topping kind of sunk, and melted into the cake. I usually like it better when streusel is almost a separate layer, all alone of top.

So I was unhappy with the look of this cake when I took it out of the oven. But have no fear, all of that changed when I finally dug in. This cake was light, yet substantial, with a wonderful tartness from the rhubarb. I cut up my rhubarb pretty small because I don't like chunks, and it kind of disappeared into the cake leaving behind the perfect amount of sourness to blend with the sweetness of the cake. And the disappointing streusel actually turned into a crunchy and sweet topping that was a perfect complement to the soft cake beneath it. This recipe taught me to not judge a cake by its cover. A plain looking cake can mask an absolutely delicious treat. The more I ate this cake the more I fell in love with it. Good thing there is plenty of rhubarb in the freezer...

Rhubarb Almond Crumb Cake
Slightly adapted from Food 52
Ingredients 
THE CRUMB

  • 2 tablespoons flour

  • 2 tablespoons slivered almonds

  • 2 tablespoons rolled oats

  • 1/4 cup brown sugar

  • 1/4 teaspoon salt

  • 2 tablespoons unsalted butter

THE CAKE

  • Butter for greasing the pan

  • 2 large eggs

  • 1 1/4 cup granulated sugar

  • 1/2 teaspoon salt

  • 1 teaspoon almond extract

  • 6 tablespoons unsalted butter, melted

  • 1 1/4 cup white whole wheat flour (or all-purpose)

  • 1 1/2 cup rhubarb, cut into 1/2-inch pieces

Directions
Heat the oven to 350°F. Butter the bottom and sides of an 8-inch, deep, fluted tart pan or an 8-inch round cake pan.

For the crumb, combine the dry ingredients in a small bowl. Using a fork or your fingers, gently work in the butter until pea-sized lumps are formed.

Combine the eggs, sugar, salt, and almond extract in a large bowl. Beat on high until the mixture triples in volume, about five minutes. Fold in the melted butter, flour, and rhubarb. Evenly spread the thick batter into the prepared pan. Sprinkle the crumb topping evenly over the top.

Bake for 45 to 50 minutes, until the topping is deeply golden and a toothpick inserted into the center comes out clean. Remove the cake from the pan when it’s completely cool.

Garlic Scape Pesto

Earlier this year I resolved to be more adventurous, to try new foods that I always want to try, but never know what to do with. I don't want to get stuck making the same 10 things over and over again, there is so much more out there to explore! When I saw garlic scapes for sale at the farmer's market a few weeks ago I knew I had to get them, even though I wasn't quite sure what I'd do with them. But being a lover of garlic, I knew something delicious would come to mind. When I got them home, I went straight to the computer to find some inspiration. The one thing that kept popping up over and over was garlic scape pesto. It sounded perfect to me, so I dove right in and whipped up a batch.

I can probably say that this is probably pretty close to the top of my all time favorite spread/sauce, whatever you want to call it. It was garlicky without being overwhelming, slightly chunky, with a smoothness from the oil, almonds for body and texture, and finished with salty and sharp parmesan cheese. All the ingredients complemented each other so well, it was perfect for smearing on my sandwiches, spreading on my pizza dough, and folding into pasta, utterly versatile and utterly delicious.

Garlic Scape Pesto

From

Food 52

Ingredients

  • 1 cup garlic scapes, thinly sliced crosswise
  • 1/4 cup almonds (or pine nuts, or walnuts)
  • 1/2 cup extra virgin olive oil
  • 1/4 cup Parmesan cheese, grated
  • Salt and pepper, to taste

Directions

Add the scapes and pine nuts to the bowl of a food processor and pulse until everything is broken up a bit. Then turn the processor back on, and with it running, add the oil a little at a time until it's fully incorporated.

Add cheese, pulse, then season with salt and pepper to taste.

Note: This won't brown like basil pesto will, so if you're not using immediately, just store in a container in the fridge. It will last about a week. Makes about 1 1/2 cups

Strawberry Rhubarb Pie

Strawberry season is basically over, this is always a sad realization to me since strawberries are my favorite fruit. I love buying a couple quarts at the farmers market and then stuffing my face full of sweet, juicy berries because we all know that freshly picked strawberries last about a day before they start going bad. To me this means I am required to eat as many as possible because I can't let any of these early summer jewels go to waste. This is a task I attack with pleasure.

This year I definitely did my share helping out the local strawberry farmers. This sometime required me to become creative with the baskets and baskets lining my counter. I had a wonderful time figuring out what to do with all of my strawberries, what a fantastic problem! When my neighbor called and told me she had rhubarb galore and I needed to come take some off of her hands I jumped at the opportunity. I had never made a strawberry rhubarb pie, but that was all about to change. Strawberry and rhubarb are my favorite combination. The juicy sweetness of the strawberries combined with the puckering tartness of the rhubarb is a match made in heaven. I'm already looking forward to next year!

While I've been making more pies and tarts recently, I still would definitely call myself an amateur. I'm getting better, but I still have things I need to work on. Regardless, this pie turned out absolutely delicious, even if it lacks a little in the looks department. I like to think of it as rustic. In the end it really doesn't matter what the pie looks like, the most important thing is what it tastes like, and this one did not disappoint.

Note: This is a rough estimate of my strawberry rhubarb pie recipe. It was delicious, but it could definitely have used more filling, both strawberries and rhubarb. Feel free to play around with the quantities, increasing the filling until you are satisfied with it.

For the topping: this time around I didn't melt the butter, but for future use I probably would. I think you get bigger chunks of streusel then. Also, if you are a big streusel fan (like me) you'll want to increase the amount of streusel. Try doubling it perhaps!

Strawberry Rhubarb Pie

Ingredients

Pie

  • 1/2 recipe Pate Brisee (or your favorite pie dough)
  • 1 3/4 cup chopped rhubarb
  • 4 cups sliced strawberries
  • 1/4 cup granulated sugar
  • 1/4 cup brown sugar
  • 1/4 cup cornstarch
  • 1/4 teaspoon vanilla
  • 2 tablespoons Yukon Jack Liquor (or whatever you happen to have in your cupboard, this was what was in mine!)

Topping

  • 3 tablespoons room temperature butter
  • 1/4 cup brown sugar
  • 2 tablespoons granulated sugar
  • 1/2 cup flour
  • pinch salt

Directions

Preheat oven to 375 degrees. Make the filling: Mix together rhubarb, strawberries, granulated sugar, brown sugar, cornstarch, vanilla, and liquor. Set aside.

Make the crust: Roll out pate brisee to a 1/8-inch thickness on a lightly floured surface. Fit dough into a 9-inch pie plate. Place in refrigerator or freezer for 15-30 minutes, until well chilled. 

Drain excess juice from the rhubarb/berry mixture. Pour filling into chilled pie crust. Bake pie for 45-55 minutes, until crust is well browned. Remove from oven and cool. Enjoy with vanilla ice cream or lightly whipped cream. 

Grilled Chicken with Romescu

I love trying new things when cooking, new flavors and textures, new foods and new cuisines. This past week I experimented with a new sauce, romescu sauce. This sauce is one of the many delicious looking sauces in a great cookbook I have, The Sauce Book by Paul Gaylor. Just flipping through this book is so interesting. It is set up by region/country and I love seeing what people eat all around the world. I've been eyeing this romescu for a while now, it has pretty simple ingredients, and they're all ingredients that I love; roasted red peppers, tomatoes, paprika, almonds, garlic, what's not to love! Boy was I right, this sauce was absolutely delicious, the perfect accompaniment some summer grilled chicken.

This cookbook has a little blurb about each sauce before the ingredient list. I love this because it gives you a little idea what you can do with each sauce. Before the romescu the author writes:

One of the great Spanish sauces, dating back hundreds of years to Tarragona in the Catalonia region. Whether made with hazelnuts or almonds, it never fails to impress. I think I've served it with just about every type of grilled fish, vegetable, meat, even fried eggs - utterly versatile. 

I agree, it is utterly versatile, and super simple to make. I had it with chicken one night, on a sandwich as a great spread the next night, and a few days later as sauce on a grilled Spanish inspired pizza. And there are so many other ways it could be used. This is definitely one sauce I will be making again. It's so easy, and you don't even have to cook anything (except the pepper if you don't have any roasted red peppers on hand)

Just making this one recipe got me thinking about Spanish cuisine, and I realized how little I know about Spanish food. I can only name a few Spanish dishes off the top of my head (paella anyone?). This recipe has therefore inspired me to try out some other Spanish foods. This is my goal for the summer, learn about and how to cook Spanish food, wish me luck!

Romescu

From

The Sauce Book

 by Paul Gayler

Ingredients

  • 2/3 cup extra virgin olive oil
  • 1 slice white bread, cut into cubes
  • 3 garlic cloves, crushed
  • 1/2 cup almonds or hazelnuts, lightly toasted
  • 1 teaspoon dried red pepper flakes (or 1 dried red chile)
  • 1 teaspoon smoked Spanish paprika
  • 12 ounces roasted red peppers
  • 3 tablespoons white wine vinegar
  • 8 ounces tomatoes, blanched, peeled, seeded and chopped
  • salt and freshly cracked black pepper

Directions

Heat 2 tablespoons of the oil in a large frying pan, add the bread cubes and fry until golden. Add the garlic, almonds or hazelnuts, red pepper flakes, and paprika, and cook for another 30 seconds.

Transfer to a blender and add the roasted red peppers and vinegar. Blitz to a pulp. Using the feeder tube and with the motor running, gradually trickles in the remaining olive oil.

Add the tomatoes, blitz again, and season to taste.

Almond Peach Tartlets

After making my Tomato Tart last week I had a good chunk of tart dough leftover. Not wanting to waste any of this buttery goodness I pressed the pieces I had left into a few mini tart pans and threw them in the freezer. This week I had a few peaches sitting on the counter just crying out to be used. What to do? Then, what do you know, the King Arthur Flour Baker's Companion magazine showed up in the mail with a recipe for an almond tart. Out of all of this inspiration these peach tartlets appeared. It was the perfect solution to a very wonderful problem!

I took the recipe for the almond tarts and added some delicious peaches. I love the combination of almond and peach so I knew this was going to be good. I spread the peaches on the chilled crust and then topped with the filling. It worked out quite well, but when I try it again I would try to remember to save a few peach slices to lay on top of the filling too. This would make the finished product look even better I think. But they were still delicious as they were. This is a great versatile tart that I can think will be the perfect starting point for many other delicious tarts this summer!

Almond Peach Tartlets

Adapted From 

King Arthur Flour

Ingredients

Filling

  • 1/4 cup (4 tablespoons) soft butter
  • 1/4 teaspoon salt
  • 1 cup sugar
  • 2 tablespoons Flour
  • 1 teaspoon almond extract
  • 1 teaspoon vanilla extract
  • 3 large eggs
  • 1 1/4 cups almond flour or finely ground sliced or slivered almonds
  • 3-4 peaches, cut into slices

Glaze

  • 1 cup glazing sugar or confectioners' sugar
  • 2 tablespoons milk

Directions

You'll need to start with 6 mini tart pans filled with your favorite tart/pie dough. I used some leftover  Pate brisee, but whatever you like will work. (Here's the easy press in press in crust that King Arthur Flour suggests)

To make the filling: Beat together the butter, salt, sugar, flour, and extracts. Beat in the eggs, then add the almond flour, stirring just to combine.

Lay sliced peaches onto the well chilled crust. Spread the filling over the peaches.

Bake the tarts for 18 to 24 minutes, until their tops are lightly browned. Remove from the oven, and cool in the pans.

To make the glaze: Stir together the sugar and milk until smooth.

Spread the glaze over the cooled tarts. Top with some whipped cream or a scoop of ice cream if desired.

Yield: 6 mini tarts.