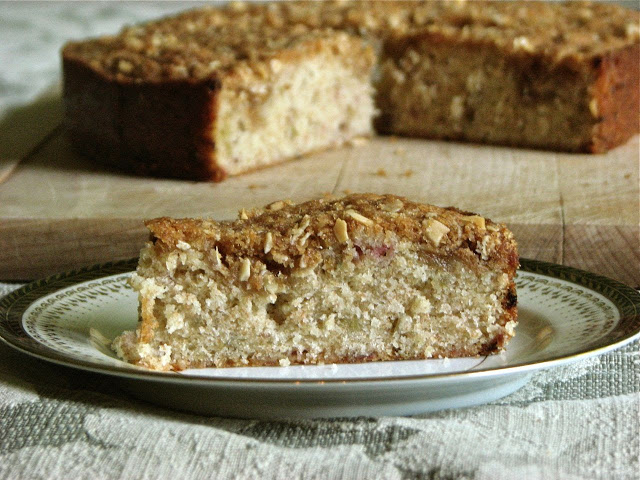
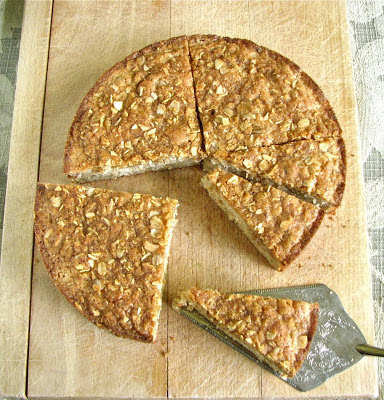
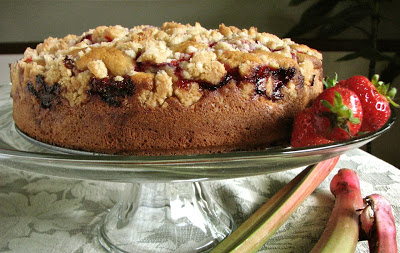
Strawberry Coffee Cake
It may no longer be strawberry season, but that doesn't mean you can't keep those early summer flavors alive throughout the summer, and even the entire year, especially if you were able to freeze a couple bags of those peak season berries a few months back. This coffee cake is the perfect way to tantalize those tastebuds with the bright, summery sweetness of juicy red strawberries topping a fluffy, tender cake. The whole thing is sprinkled with a chunky, buttery streusel and baked to perfection. Invite a few friends over, brew up some coffee and you've got yourself the best kind of party.

For whatever reason, I was recently craving a tall and beautiful strawberry breakfast cake. It surprised me that so many of the recipes I came across, although they looked very tasty, were such short cakes. I wanted something with a little more stature and this cake delivered just what I was looking for. It's difficult for me to not top my breakfast cakes with a generous layer of streusel so on it went once again. I thought it was a wonderful combination, something I will return to without a doubt.

Strawberry Coffee Cake
Heavily adapted from Tidy Mom
Ingredients
Cake
2-1/2 cups (12 oz) all-purpose flour
1/2 tsp salt
2 teaspoons baking powder
1/2 teaspoon baking soda
1/3 cup (2 3/4 oz) greek yogurt
2 eggs, separated
1 cup milk
3/4 cup (5 oz) brown sugar
1/2 cup butter, softened
2-3 cups sliced strawberries
Topping
3 tablespoons butter, melted
1/4 cup (1.75 oz) granulated sugar
heaping 1/2 cup (3 oz) flour
pinch salt
Directions
Preheat oven to 350°. In a medium bowl, mix together flour, salt, baking powder and baking soda, set aside. In a small bowl whisk together the yogurt, milk, and egg yolks. In the bowl of a stand mixer, cream butter and sugar until light and fluffy.
Add the wet and dry ingredients alternatively to the butter and sugar mixture, starting and ending with the dry, mixing until just combined after each addition.
Transfer mixture to a large bowl. Clean the bowl of the stand mixture and add the egg whites to it. Beat until firm peaks form. Fold the egg whites into the batter.
Pour into greased 9 inch springform pan. Spread the strawberries on top. To make the topping, mix all the ingredients in a bowl with your fingers until crumbly. Spread on top of strawberries.
Bake for 45-50 minutes. Until lightly brown on top. Allow to cool, then remove from pan.