Pork Chops Shepherd Style

A few months ago I was searching for something new and different for dinner. I looked around online for something that looked simple and fairly quick, and yet yummy and different from what I normally eat. Since I was feeling like Italian, I looked at Lidia Bastianich's site Lidia's Italy and I came across this recipe. All I needed to go buy was a few pork chops, and some cheese, the few other ingredients were already in my fridge. Although this recipe only used these few ingredients, they melded together nicely to make a delicious and hearty meal, perfect to satisfy my craving for something new and flavorful.

So all you really need to do for this recipe is brown up your pork chops until nice and crispy. Then just sauté up some onions until nice and soft, cover the chops in the onions and top with cheese. Pour in some wine and let it reduce a little bit, then throw the whole thing into the oven until the chops are cooked through. That's it. Pull them out of the oven and dig in!

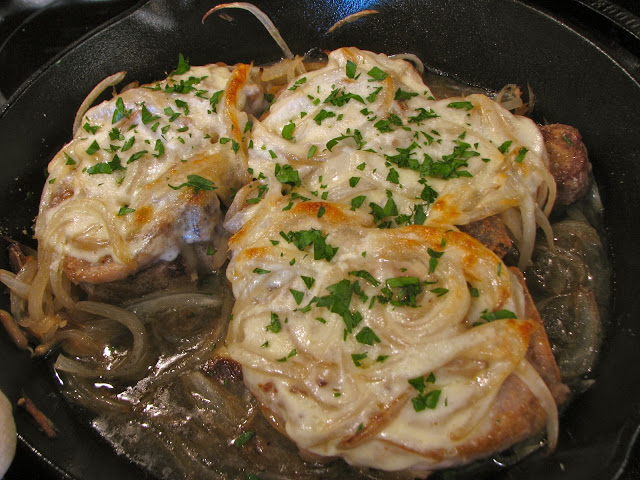
Since I think that covering anything in cheese will make it better, these pork chops were definitely elevated by the melty, gooey provolone on top. The sprinkle of pecorino added a nice sharp bite which I love. The softened onions add such a nice gently onion flavor that goes so well with meat. To be honest I don't really love pork chops most of the time. I think they are pretty boring. But this recipe added just a couple of ingredients that really helped the chops shine!
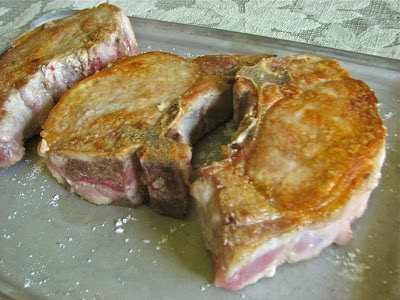
Browned up nicely

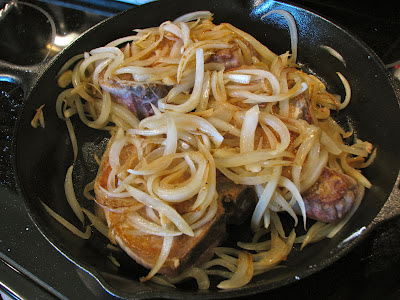
Cover with the softened onions

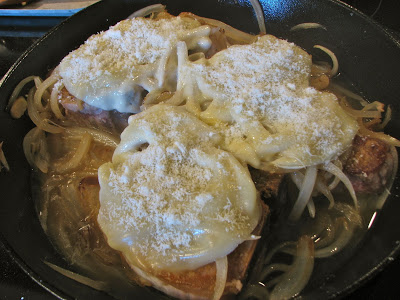
And don't forget the cheese!

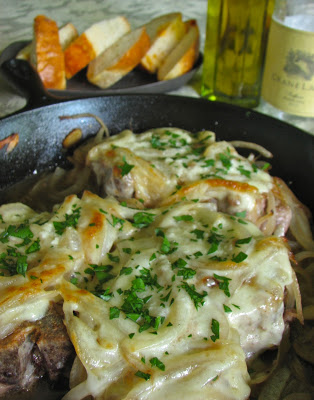
Serve it up with some crusty bread to soak up all the tasty juice

Pork Chops Shepherd Style
From: Lidia's Italy
Ingredients

  • 3 bone-in pork loin chops, about 1-inch thick, 6 to 8 ounces each
  • 1 teaspoons kosher salt
  • 1/4 cup all-purpose flour, for dredging
  • 1 1/2 tablespoons extra-virgin olive oil
  • 2 medium onions, halved and thinly sliced (about 4 cups)
  • 2 plump garlic cloves, sliced
  • 3 ounce provolone, chunk, preferably imported from Italy
  • 3 tablespoons pecorino, grated

Directions
Trim excess fat from the pork chops, leaving only a thin layer on the edges. Season both sides of the chops with 1 teaspoon of the salt. Spread the flour on a plate, and dredge the chops, lightly coating both sides with flour.

Meanwhile, pour the olive oil in the skillet, and set it over medium heat. Shake excess flour from the chops, and lay them all in the skillet in one layer (depending on the size of your pan, you may have to snuggle them in). Gently brown the pork on the first side, about 4 minutes; turn the chops over, and brown the second side, another 4 minutes. Remove the chops to a plate and keep warm.

Scatter the onions and garlic in the skillet, stir them around the pan, season with the remaining salt, and cover. Cook the onions slowly, stirring occasionally, and scraping the pan bottom to mix the crusty browned bits with the onion juices.

Meanwhile, if you'll be finishing the dish right away, set a rack in the middle of the oven and heat it to 400 degrees. Slice the provolone into 3 or more thick slices about the size of the pork chops.

After the onions have cooked for 15 minutes or so, and are quite tender and colored with the pan scrapings, uncover, and push them all to one side of the skillet. Lay the pork chops back in, one at a time, spooning a layer of soft onions on the top of each chop. When they're all in the pan, lay the provolone slices over the onions.

Raise the heat, and when the meat is sizzling again, pour the wine into the skillet (in the spaces between the chops, not over them). Swirl the pan so the wine flows all through it, and bring to a boil. Sprinkle about a tablespoon of pecorino on each chop, then carefully move the skillet from the stove to the oven.

Bake the chops for 10 minutes or so, until the cheese toppings are bubbly and crusty. Carefully remove the skillet from the oven, and let chops rest in it for a few minutes. To serve, lift out each chop with a spatula, keeping the cheese topping intact, set it on a dinner plate, and spoon some of the skillet juices and onions around it.

Zucchini, Carrot, and Banana Muffins

Are you looking for a moist and delicious, beautiful and healthy summer muffin? A muffin that incorporates not only two types of vegetables, but some fruit as well? Well, I am always on the lookout for this type of muffin to bake up for a breakfast treat. Earlier this week I had an abundance of zucchini sitting on my counter thanks to both a coworker and a neighbor. Of course, zucchini bread came to mind right away, but my internet search for an amazing sounding recipe didn't turn up much. There are about a gazillion zucchini bread recipes out there, but none of them jumped out at me and got me excited to bake. That's when I turned to my trusty cookbook collection and came up with a nice looking recipe from what is probably my favorite cookbook, The Sweeter Side of Amy's Bread. It was the perfect solution to my baking conundrum.

The original muffin recipe was for zucchini, carrot and apple muffins, but I hate having chunks of apple in my bread, so I decided to sub bananas in instead. It was a brilliant substitution if you ask me. The recipe also calls for coconut and toasted walnuts, both of which I omitted. I'm not a big fan of coconut, and I don't like nuts in my bread either. I didn't miss either of them, the muffins were wonderfully flavorful without them.

These muffins turned out incredibly soft and moist, they were not dry in the least. They did not have the lightly crisp tops that some muffins do, but instead were soft and almost sticky because of how moist they were. I found them to be incredibly delicious, and also surprisingly healthy. Yes, they have some sugar, but only half a cup of oil for 24 muffins. I don't think that is bad at all. Now that I have a bunch of frozen, grated zucchini in my freezer alongside my collection of frozen ripe bananas, these muffins will show up all year long.

Lined up and ready to go

Dig in to deliciousness!

Zucchini, Carrot and Banana Muffins
Adapted from: The Sweeter Side of Amy's Bread
Ingredients

  • 3 cups (435 g) flour
  • 1 1/8 cups (227 g) sugar
  • 2 1/2 teaspoons cinnamon
  • 2 1/4 teaspoons baking soda
  • 1 teaspoon kosher salt
  • 3/4 teaspoon baking powder
  • 3 cups (340 g) carrots, peeled and grated
  • 2 cups (255 g) zucchini, grated
  • 1 cup (270 g) mashed, ripe banana
  • 4 eggs
  • 1/2 cup + 1 tablespoon (120 g) vegetable oil
  • 2 1/2 teaspoons vanilla extract

Directions
In a medium bowl, whisk together flour, sugar, cinnamon, baking soda, salt and baking powder. Set aside.

In another medium bowl, whisk together the eggs, oil, and vanilla. Set aside.

In a large bowl, gently toss together the carrots, zucchini, and bananas. Pour the liquid egg mixture over the grated vegetables and bananas, and fold in gently to combine. Add the dry ingredients to the wet and fold in until just combined.

Scoop the batter gently into greased or lined muffin tins. Bake for 8 minutes at 400 degrees, then rotate the pan and reduce the temperature to 350 degrees. Bake for an additional 9-11 minutes, or until a toothpick comes out clean. Leave muffins in the pan for 10 minutes, then remove from the pan and place on a wire reach to cool completely.

Yields: 24 muffins

French Style Lemon Yogurt Cake

A few weeks ago I read the book A Homemade Life by Molly Wizenberg. It was one of those books that, though I enjoyed it while reading it, it wasn't until I had finished the book and was thinking back to it that I realized how well I actually liked it. Each of the short chapters in this book shares a small moment in Molly's life that in some way relates back to the recipe that is printed at the end of every chapter. Of all of the recipes in this book the one that stood out the most to me was her French style lemon yogurt cake. I am a sucker for any type of cake, and this simple recipe looked easy and wonderful, it was at the top of my list.

I was right about this one. Sometimes a recipe comes along that you know you will make again and again. This is one of those recipes. In the past week I've already made it twice, and am excited to whip it together again soon!

As I said, this is a very simple recipe. No need for any fancy equipment or special ingredients. I did use a blender to make some coarse almond flour, but the original recipe calls for 1 1/2 cups of flour instead of the 1 cup of flour and 1/2 a cup of ground almonds. So if you don't feel like grinding up any almonds, don't! But since I had some almonds in the pantry, and Molly suggested trying this substitution, I decided to give it a try.

The first time I made this cake I turned it into an almond cake. I didn't have any lemons, and I don't love lemon flavoring in my baked goods, so I decided to substitute with 1/2 a teaspoon of almond extract. It was absolutely delicious! With some raspberries on top and a little whipped cream you have the most delicious, light and summery dessert.

For the second go at the cake I decided to make it as written and add in the lemon flavor. This cake also turned out delicious; sweet and tart and very lemony. The lemon syrup and glaze added moisture and sweetness, a lovely way to top it all off. I paired this variation with some vanilla bean ice cream and it was absolutely wonderful. I probably still prefer the almond version to the lemon one, but both were yummy and worth making again.

Both cakes had a slight problem with falling during the end of baking. It didn't affect the taste at all, but meant the loss of the beautiful domed top I was going for. I hope to be able to make this cake again without it falling. But either way, I know it will be delicious. I have lots of ideas of different versions of this cake I want to try, so it may make another appearance on this blog sometime soon.

 A quick buzz in the blender turns

blanched almonds into almond flour

 Mix the almond flour into the regular flour, 

powder, and salt

 In another bowl combine the eggs, yogurt, 

and sugar

 Mix together well 

 Add the dry ingredients

 Finally, add the oil

 Pour into prepared 9-inch pan, and bake

 Once baked, cover the cake with 

lemon syrup

 Finish off with a drizzle of lemon icing

 Cake with the book

 Cut a nice big slice

Dig in

French Style Lemon Yogurt Cake
From: A Homemade Life by Molly Wizenberg
Ingredients
For the Cake

  • 1 cups all-purpose flour
  • 1/2 cup finely ground blanched almonds
  • 2 teaspoons baking powder
  • pinch of salt
  • 2 teaspoons grated lemon zest
  • 1/2 cup plain whole-milk yogurt (not low-fat or non-fat)
  • 1 cup sugar
  • 3 large eggs
  • 1/2 cup vegetable oil, such as canola

For the Syrup:

  • 1/4 cup powdered sugar, sifted
  • 1/4 cup lemon juice

For the Icing:

  • 1 cup powdered sugar, sifted
  • 3 tablespoons lemon juice

Directions
Preheat the oven to 350 degrees. Line the bottom of a 9-inch round cake pan with parchment paper and then grease the pan and the parchment with butter or cooking spray.

In a medium bowl whisk together the flour, almonds, baking powder and salt. Add the lemon zest and mix thoroughly.

In a large bowl, combine the yogurt, sugar and eggs, and mix well. Add the flour mixture to the yogurt mixture and stir until just combined. Add the oil and stir well until it comes together into a smooth yellow batter. Pour the batter into the prepared cake pan.

Bake the cake for 25 to 35 minutes until a toothpick or cake tester comes out clean. Do not over bake.

Cool the cake in the pan on a wire rack for 15 minutes. Then invert the cake unto a large plate, remove the parchment paper and invert the cake back onto the wire rack so it sits upright.

In a small bowl, whisk together the powdered sugar and lemon juice for the syrup. Place the cake on the wire rack over a rimmed baking sheet or over the sink and slowly spoon the syrup atop the warm cake. Some of the syrup will run down the sides of the cake. Then cool the cake completely.

In a small bowl, combine the powdered sugar and lemon juice for the icing. Whisk well to completely dissolve the sugar. Spoon or drizzle the icing over the cooled cake. 

Oven S'mores

It's been a little while since I've posted, but that is because I've been having fun vacationing. After spending some time up in Traverse City, I had a week off and then it was off to Grand Haven for a week of camping. My family and I have been doing this for about 15 years now, and it has been a great tradition. I love having nothing to do for a week except read a good book, lay on the beach, and eat good food over a campfire. With camping still on my mind, I thought I'd share these homemade oven s'mores. They're more of an idea than an actual recipe, but regardless, they are delicious. If you don't have the ability, or the time, or the inclination to start a fire, but you are still craving a good ole s'more, these will definitely hit the spot.

I've always liked eating s'mores while camping, but I have to admit that they have never been my favorite. The only reason I would make them is because they are fun to make and eat, and it's just what you do when camping. After discovering the joy that is a homemade graham crackers however, my thoughts about s'mores changed. I knew that they would make the absolute best s'mores ever, and I was sure right. Even when just using an oven instead of a campfire, these s'mores were lightyears ahead of their store-bought counterparts.

All you have to do for these mind blowing s'mores is to lay out 2 graham crackers upside down on a cookie sheet. Top one of them with a bit of marshmallow, and the other with some chocolate chips. Stick them under the broiler for a few minutes until the marshmallows poof up and turn a beautiful caramel color. Make sure to keep an eye on them when they are in the oven, because marshmallows can go up in flames rather quickly.

As soon as they come out of the oven, take both graham crackers and smoosh them together nice and tightly. Then just set them back on the cookie sheet and let them cool a bit. As they cool they will stick together nicely and make it easy to transport and eat these little yummies. At this point the s'mores are ready to eat. But I went a step further of course and decided to add a bit more chocolate. I just melted down some chocolate chips and dipped one end of each s'more in the chocolate. This extra bit of chocolate was probably my favorite part of the whole thing, I would highly recommend this extra step.

This is all there is too it, nothing too difficult. If you don't have any homemade graham crackers, store bought would also work fine. These little desserts are just a fun way to make sure you get your sugar for the day. Cute and also delicious.

And don't worry, when camping this week I got to make a s'more over the campfire on a homemade graham cracker. It was... To. Die. For. I want to go back to Grand Haven just for the s'mores!

Lay everything out

Ready for the oven

Mmmm...

Toasty!

Squeeze it all together 

And top it all off with some extra chocolate

Grab a napkin and dig in!

Sour Cherry Coffee Cake

It's the Fourth of July, what better way to celebrate then with a beautiful and delicious breakfast treat? Last week I went up to Traverse City for a couple of days and came back with some cherries, so I knew this breakfast would be featuring some delicious summer cherries. I'd always wanted to visit Traverse City, but before this past week I had never made it there, even though it is just a few hours away. In case you don't know much about Traverse City, it is the self proclaimed cherry capitol of the world. They are especially well known for their tart cherries, growing 70-75 percent of tart cherries that are grown in the US. Cherry season was just starting last week, so I of course had to visit the local farmers market and buy a couple baskets of cherries. I got some delicious, sweet black cherries, as well as a few tart cherries that were perfect for this patriotic breakfast treat.

This cake turned out beautifully! The perfect thing for a summer holiday breakfast. The only extra effort involved pitting the cherries. I don't have a cherry pitter so it took me a few extra minutes, but nothing too extreme. Once that was done, it was easy to whip together the rest of the cake and the streusel topping. I absolutely love anything with streusel on top. It adds such a nice texture and sweetness to the top, yum!

I baked my cake in a 9-inch springform pan and it turned out great. A springform pan makes it really easy to get the cake out of the pan after it cools. Then it's a cinch to cut out some slices and dig in. This coffee cake was the star of a delightful holiday breakfast.

 Beautiful red sour cherries

 Put together the topping first, then set aside

For the cake, start by getting your dry ingredients mixed

Then it's time for the butter

and sugar

 Cream them together until light and fluffy

 Next is vanilla

 and two eggs

 Pour it into your prepared pan

 Smooth the batter out

 Then it's cherry time

 Spread the cherries out on top of the batter

 Look at all those delicious cherries!

 Then top with the streusel 

 Time for the oven

 Baked to golden perfection!

 It's time for breakfast

 Cut a nice big slice

 Look at the cake/cherry/streusel goodness

 It's time to eat!

Sour Cherry Coffee Cake
From Lottie and Doof
Ingredients
For the topping:

  • 2 ounces (4 tablespoons) unsalted butter, melted, plus more for dish
  • 3/4 cup all-purpose flour, plus more for dish
  • 1/4 cup granulated sugar
  • 1/4 cup packed light-brown sugar
  • 1/4 teaspoon kosher salt
  • 1/4 teaspoon ground cinnamon

For the cake:

  • 1 1/2 cups all-purpose flour
  • 1 teaspoon baking powder
  • 1/4 teaspoon kosher salt
  • 4 ounces (1 stick) unsalted butter, softened
  • 3/4 cup granulated sugar
  • 2 large eggs
  • 1 teaspoon pure vanilla extract
  • 1/4 cup buttermilk
  • 2 cups fresh sour cherries, pitted

Directions
Preheat oven to 350° F. Butter a 9-inch round baking dish, dust with flour, tap out excess.

In a medium bowl, stir together butter, flour, sugars, salt, and cinnamon. Set topping aside.

Whisk together flour, baking powder, and salt in a medium bowl. Using a stand mixer fitted with the paddle attachment, cream butter and granulated sugar until pale and fluffy. Beat in eggs and vanilla. Working in alternating batches, add flour mixture and buttermilk, beginning and ending with flour. Beat until just combined. Pour into prepared dish, and smooth with an offset spatula. Dot top with cherries, and sprinkle with crumb topping.

Bake until golden and a tester inserted into center comes out clean, about 1 hour. Let cool before cutting.

Wedding Cupcakes (Part 2)

After Day 1 of making wedding cupcakes I was super excited to start on day two. Frosting and decorating cupcakes is the most fun part of the whole process. Taking a squat little cake and covering it in a beautiful layer of buttery, sugary goodness and adding a few decorative touches to finish them off makes me smile. They can be so beautiful. As day two dawned, I was ready to go!

The whole day turned out beautifully, the weather was perfect, the ceremony was lovely, and the reception was fun and enjoyable, an all around good time. And of course, one of the highlights of the night was dessert! :)

The finished product, at the reception

On the day of the wedding, I was alone in the house for a few hours, and my morning consisted of making something like 10 batches of frosting (this is a time when an industrial sized mixer would have come in quite handy). That was really the time consuming part. Once that was out of the way it was a cinch to fill the pastry bags and pipe the frosting on the top of the cupcakes. By that time Lara was back and we flew through the decorating. It is always so exciting to see the finished product, especially when they turn out just as well as you imagined.

Lots and lots of frosting!

Piping it all on 

We made it to the reception in one piece, all of the cupcakes intact, no big accidents thank goodness. Whoever was in charge of the dessert tables had done a beautiful job laying out platters and stands for the cupcakes. Hanging up behind the sweets were the wedding dresses from all four of my cousin's grandmas along with photos of those four brides in their wedding dresses. The dresses hung down onto the table creating a beautiful tablecloth of sorts. The whole display was gorgeous, the perfect back drop for the cupcakes. 

Another shot of the beautiful table

The Cupcakes

 Cherry Limeade Cupcakes

 Chocolate Chip Cookie Dough Cupcakes

Classic White Cupcakes

A cute sign Lara made to help people 

with their difficult dessert decision

Just some more pictures of the table

Yum!

It all looked so pretty

There was also a candy table

This beautiful bride (with a reflection right on 

her face, sorry) is my grandma

Just a couple more pretty pictures

So fun and pretty

The cupcake bakers with the bride at the end of the night, what a wonderful time we all had!

The whole process was fun and pretty much went without a hitch. We managed to do it all in just two rather full days of baking and decorating. It took a lot of time, but was still very doable. I managed to jot down a few things that I learned through this whole thing:

  • Have double the number of pans that you are going to bake together. For example, we baked 30 cupcakes at a time, so it was great that we had enough pans so that we could get another batch of 30 filled and ready for the oven while the first batch baked. This cut down on the time a lot. 
  • Have two bowls for your stand mixer. This way you can have a clean on ready to go if you need it and don't have to waste time washing the same one over and over. We actually had two Kitchen Aid mixers, but found that while it wasn't really necessary to have two mixers, having the two bowls was a big help. 
  • You really need a stand mixer. While it would be physically possible to make this many cupcakes without a stand mixer, I wouldn't try it. It would take forever and be a mess.
  • Make sure you have something to store and carry your cupcakes in. I ordered some plastic cupcake holders online that were not that expensive and they were worth it. I didn't have to worry about how to transport them without falling over, or where to store them until they were needed. And, when the night is over, you don't have to worry about getting all of you own plastic containers back, you can just throw them away. 

Wedding Cupcakes (Part 1)

Last week, my family and I got to celebrate the marriage of my cousin Bailey. It was a gorgeous outdoor wedding with perfect weather, an all around wonderful day. What made this wedding extra exciting for me though was the fact that Lara and I were in charge of making all of the cupcakes for the reception. It all started shortly after Bailey got engaged. She approached us with the idea of making a couple different kinds of cupcakes to serve at the reception. Of course Lara and I jumped at the opportunity. The three of us often get together to do some baking and hang out, so it was fun to be able to bake for her on such a large scale on her special day. In this post and the next I'll share some pictures, thoughts, and ideas about baking cupcakes for a wedding, or any other large group.

240 of the 274 cupcakes we ended up making, waiting for the big day

Bailey decided that she wanted three different kinds of cupcakes at her wedding. Two of them we had made together previously and had loved, so it was a no brainer to use them for her wedding. In addition she wanted just a plain white cupcake too, something simple and familiar. With that all figured out the cupcake menu was as follows:

Chocolate Chip Cookie Dough Cupcakes
Cherry Limeade Cupcakes
Classic White Cupcakes

It was a good mix of flavors, a little something for everybody. Bailey's wedding colors were coral and green, so the light pink frosting of the cherry limeade cupcakes and the light green we decided to color the frosting of the white cupcakes were a beautiful and fitting way to finish off the meal.

This was by far the most cupcakes I have ever made at one time. Last fall Lara and I made around 120 cupcakes for some friends, but this was over double that. Since the wedding was on Friday afternoon, we decided to bake all of the cupcakes on Thursday, and make the frosting and frost the cupcakes on Friday morning. It was a lot of baking and frosting in two days, but it all went really well. I would definitely do it in two days again if I am able. We thought about making the cupcakes ahead and freezing them, but since we had the time to do it all the day before, we thought that would be the better option. Fresh cake is always the best!

Just getting started, tons of flour, sugar, eggs and butter, not to mention two Kitchen Aids

Another view of all the ingredients, it was good to have plenty of counter space

That's right, 16 pounds of butter, don't worry about it, just accept it!

It was very nice to have a pair of mixers, but the best part was having more than one mixing bowl, that saved a ton of time

In the midst of baking

Just keep filling those muffin tins

Part way through the baking, cooling the cakes

Lots of cupcake liners

We had a few casualties, but nothing too horrible thank goodness! For the next installment of Wedding Cupcakes, Click Here

Pan-Roasted Carrots

I've never been very good at side dishes. Coming up with the main course is the easy part, but I have a hard time figuring out what to eat with it. I often end up with a salad, green beans or some roasted broccoli, all delicious but not always very inspiring. A few weeks ago, while I was looking for something just a little different to have with dinner, I came across this recipe. It was perfect because I actually had all the ingredients which is amazing. Glazed carrots may not be anything new and amazing, but these were absolutely delicious, the perfect accompaniment to my roasted chicken dinner.

This recipe is fairly straight forward and easy. Cut up the carrots, throw them into a super hot pan to get them nice and caramelized, then just add the rest of the ingredients and cook unit done. Easy as that. A simple recipe that is sure to please. Perfectly cooked carrots, slightly sweetened with a light glaze.

Four beautiful carrots

Peel the carrots 

Start cutting

A bowl of carrots, cut on the bias

Into the pan they go, make sure it's nice and hot

You want them to get dark and caramelized, caramelization = flavor

Finished and glazed, so yummy

Pan-Roasted Carrots
From: America's Test Kitchen, Cooking for Two, 2010
Ingredients

  • 1 tablespoon vegetable oil
  • 4 carrots, peeled and sliced 1/2 inch thick on the bias
  • salt and pepper
  • 1/2 cup chicken broth
  • 1 teaspoon brown sugar
  • 1 small sprig of fresh rosemary

Directions
Heat oil in a 10-inch skillet over medium-high heat until shimmering. Add the carrots, 1/4 teaspoon salt and 1/8 teaspoon pepper, and cook, stirring occasionally, until the carrots are golden brown, 8 to 10 minutes.

Stir in the broth and sugar, then add the rosemary sprig and bring to a simmer. reduce the heat to medium-low, cover and cook, stirring occasionally, until the carrots are tender, 6 to 8 minutes.

Uncover, remove and discard the rosemary sprig, and continue to cook until the liquid evaporates, about 1 minute. Season with salt and pepper to taste and serve.