Chipotle Quinoa Sweet Potato Tacos with Roasted Cranberry Salsa

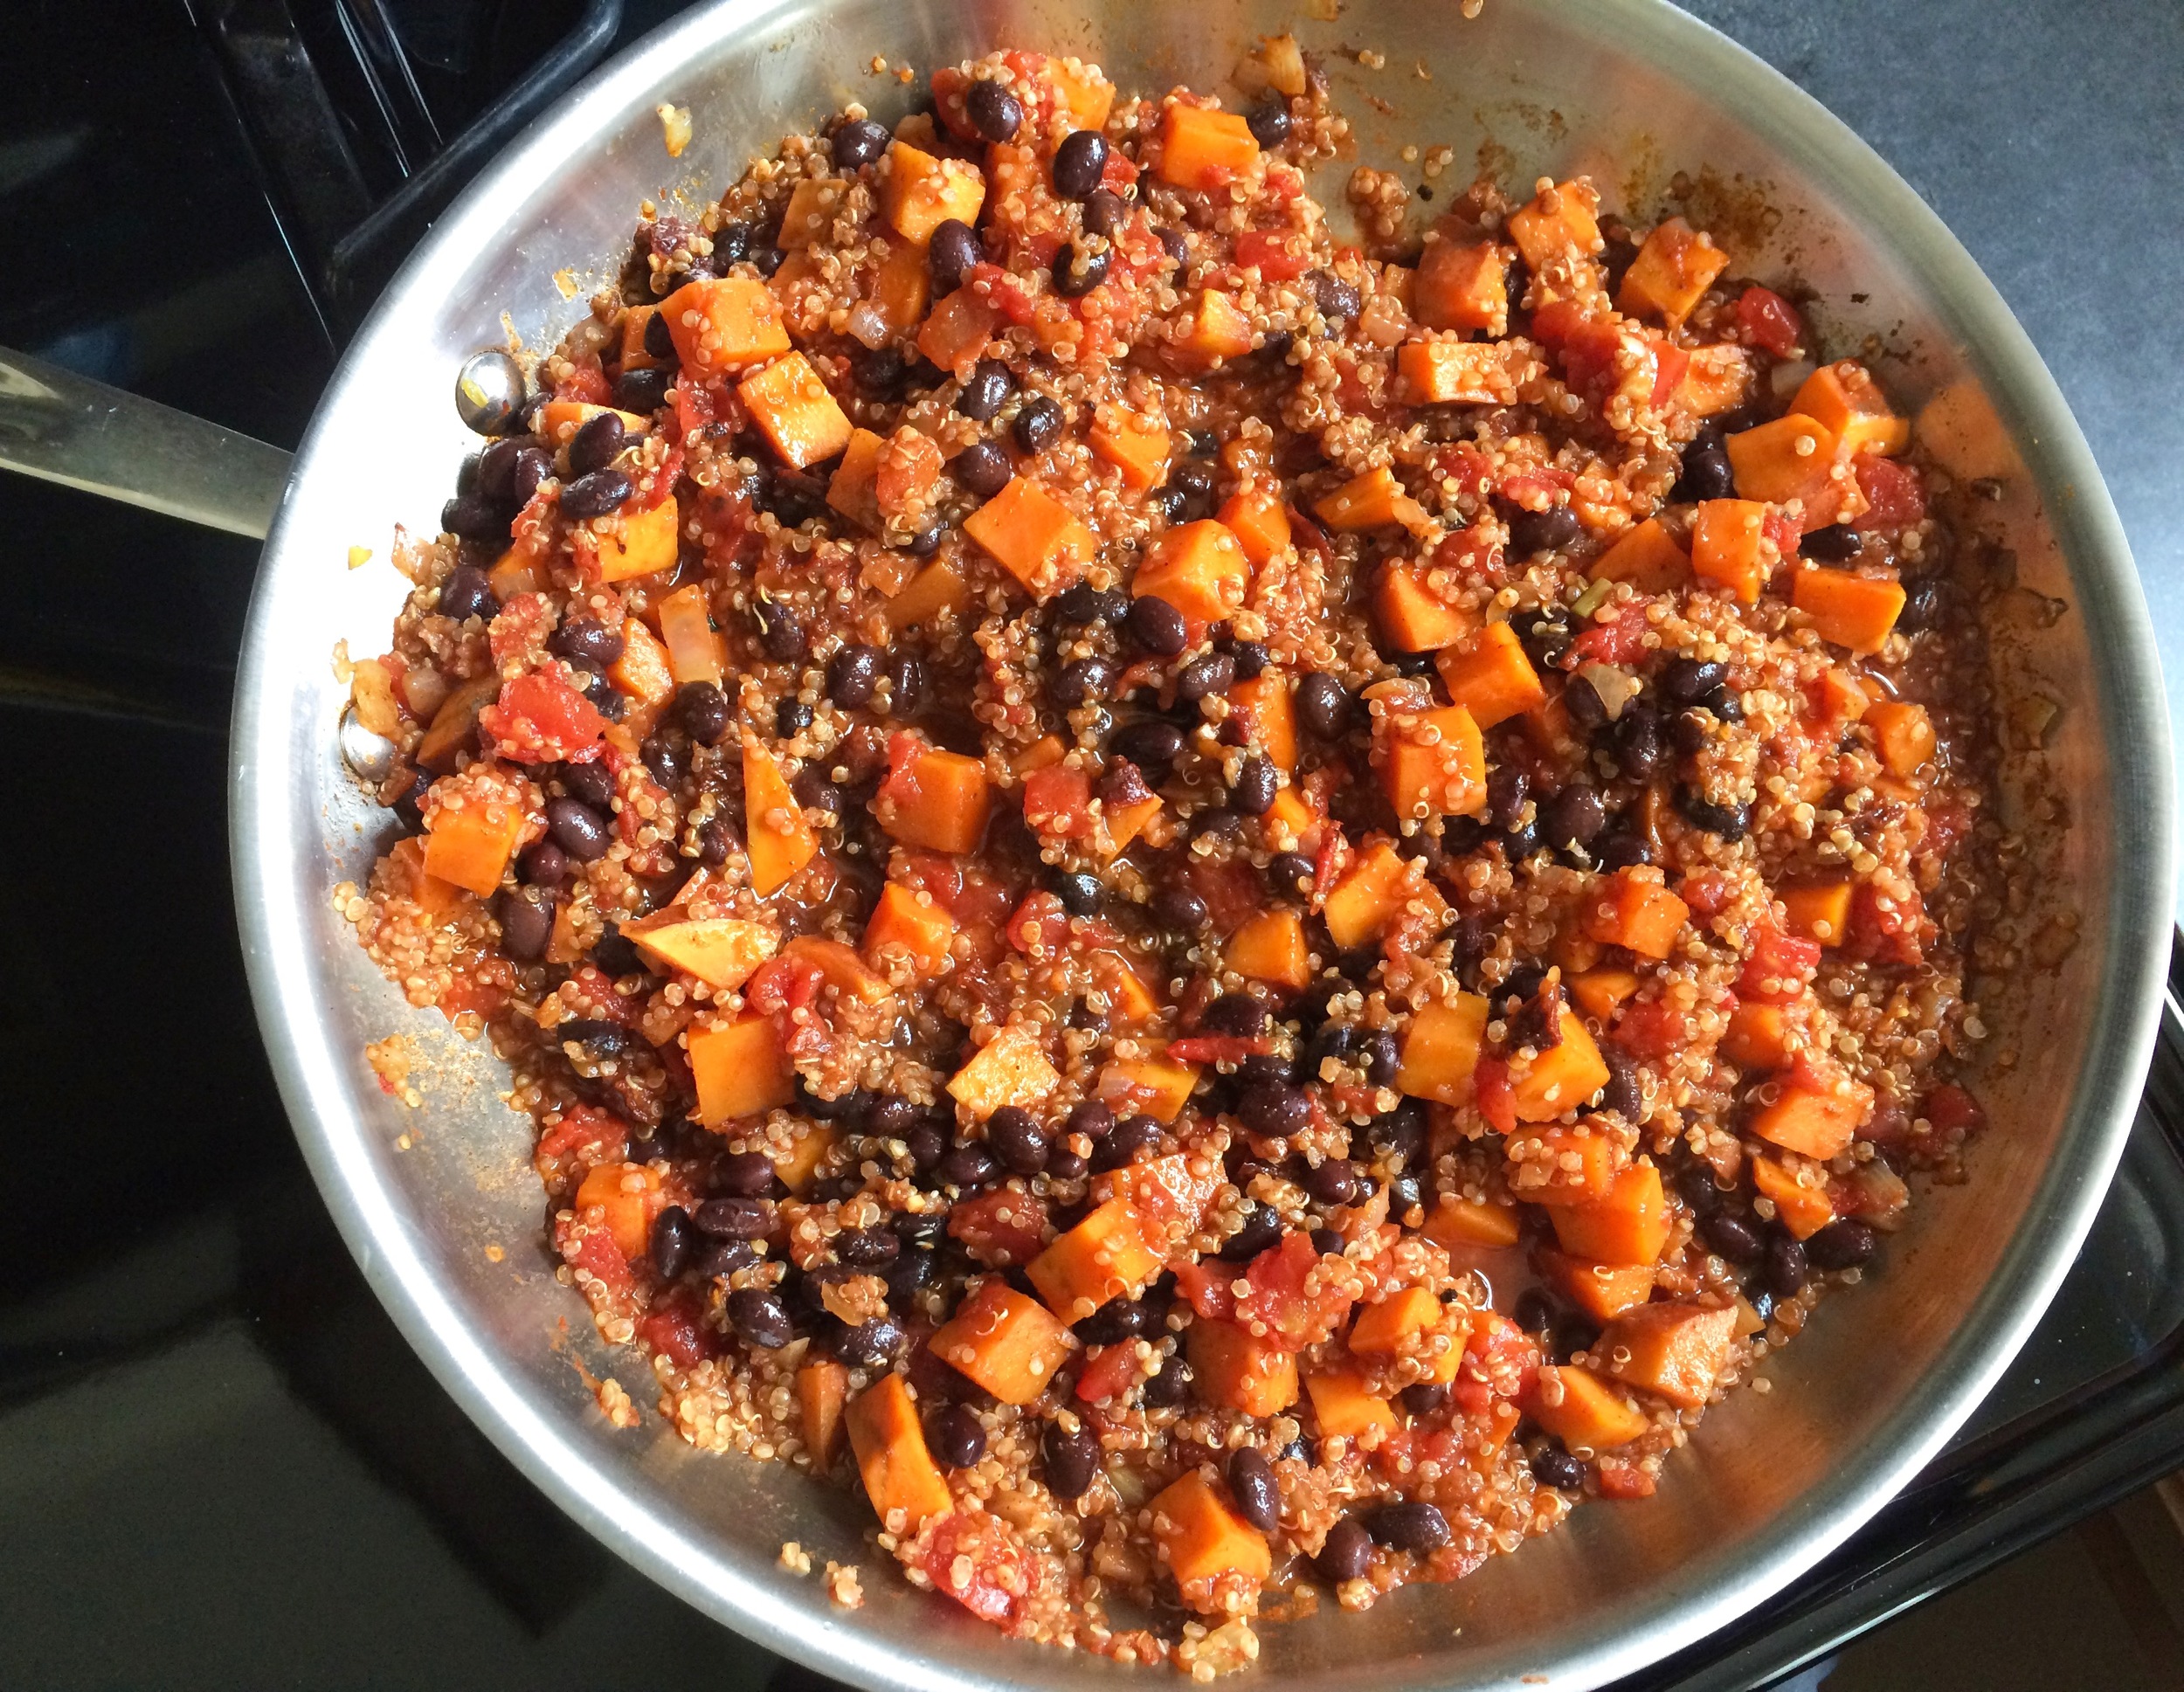
This dinner idea combines some of my all-time favorite ingredients into one fabulous dish. Quinoa, sweet potatoes, and black beans come together with a few spices, some tomatoes, and spicy chipotles. It's a super healthy dish, just look at those ingredients! All this piled onto a warm corn tortilla and topped with a tart and sweet cranberry salsa and a creamy avocado makes a fantastic meat-free dinner option that I don't know who could dislike. 

This is a great option to make ahead and eat throughout the week for a quick dinner or lunch. It's the type of meal that only gets better with time (to a point of course!). You could also throw the taco filling on top of some brown rice or hearty greens, or throw it in a pita or flour tortilla for a different take on dinner if you don't like eating the exact same thing night after night. 

There are a few different steps in this recipe, and while none of them are at all difficult, they do take just a little bit of prep-work. Cooking the quinoa, prepping the sweet potato, cooking the black beans and making the salsa can all be done ahead though which would streamline the process later on. Also, go ahead an grab a can of black beans if you don't have the time or the inclination to cook up some dried beans.

Whatever you do, don't skip the salsa! It is the perfect tart complement to the spicy tacos, something different than the traditional tomato salsa. Take a few extra minutes and whip it together. The original recipe for the salsa called for pomegranate arils to be thrown in after the cranberries are done roasting. While I am sure this is delicious, and would have liked to try it, pomegranate season must be over. There was not one to be seen at the grocery store when I was shopping. All I could find was a tiny little jar of arils for something like $5 which just isn't worth it my book! So if you can find them for a reasonable price I'd say go for it, but even without the salsa is still perfectly delicious. 

 
PicMonkey Collage.png


Chipotle Quinoa Sweet Potato Tacos
Adapted from Half Baked Harvest
Ingredients

  • 1-2 tablespoons olive oil
  • 1/2 a small onion
  • 1 clove garlic, minced
  • 1 large sweet potato, chopped
  • salt and pepper
  • 1 1/2 - 2 cups cooked quinoa
  • 1 can diced fire-roasted tomatoes
  • 2 teaspoons chili powder
  • 2 canned chipotle chilies, minced
  • 1 tablespoon adobo sauce (from the chipotle can)
  • 1 teaspoon smoked paprika
  • 1 teaspoon cumin
  • 1 teaspoon brown sugar
  • 1 teaspoon cayenne
  • 1  - 1 1/2 cups cooked black beans
  • 1 lime, juiced
  • 1 small bunch cilantro, chopped
  • Corn tortillas, warmed
  • Diced avocado, for topping
  • Shredded sharp cheddar cheese, for topping

Directions
Heat the olive oil over a large skillet set over medium heat. Add the onions and a pinch of salt and let the onions cook for 5-10 minutes, until beginning to soften. Add the sweet potatoes and toss to coat. Add a little water to the skillet and let cook until the sweet potatoes are fork tender, but not mushy, stirring once or twice, about 15 minutes, adding more water if needed.

Once the sweet potatoes are fork tender, add the garlic and saute 30 seconds. Add the spices and let cook until fragrant, making sure they don't burn. Stir everything together well and then increase the heat to medium-high (adding more oil if needed) and add the quinoa. Let the quinoa cook and get crispy for about 5 minutes, trying not to stir too much.

Next, add 3/4 cup water, tomatoes, the chili powder, chipotle chilies, adobo sauce, smoked paprika, cumin, brown sugar and cayenne, stir to thoroughly combine and bring the mixture to a boil. Cook for 5-10 minutes or until the water has evaporated and the chili is at your desired consistency. If it starts to get too dry you can add more water.

Remove from the heat and stir in the black beans, 1/4 cup chopped cilantro and the lime juice. Taste and season with salt and pepper if desired. Serve with tortillas, avocado, cheddar cheese and roasted cranberry salsa (recipe follows).

Roasted Cranberry Salsa
Adapted from Half Baked Harvest
Ingredients

  • 12 ounces fresh or frozen cranberries
  • 1/4 cup brown sugar
  • 1 canned chipotle chili, chopped
  • 1 lime, zested + juiced
  • 1 clove garlic, minced 
  • 1 jalapeño, chopped, seeds removed if desired for less spicy salsa
  • Pomegranate arils (optional)
  • salt and pepper, to taste

Directions
Preheat oven to 450 degrees and line a baking sheet with aluminum foil. Place the cranberries, brown sugar, chipotle chili, lime zest and juice, garlic, jalapeño and a pinch of salt and pepper in a large bowl. Use your hands or a large spoon to toss everything together until evenly mixed. Transfer to baking sheet. Place in the oven and roast until the cranberries burst and release their juices, 15-20 minutes. Remove from the oven and and let cool. Add in the pomegranate arils if using and taste and season with more salt and pepper if desired. Set aside and keep at room temperature. Can be made in advance, store in the refrigerator until needed. 

Banana Poppy Seed Muffins

I finally did it! I took the plunge and completely reworked my little blog; a new host, a new domain, a whole new look, and I LOVE it!! Welcome to the very first post on delectablymine.com! No more blogspot for me, it's feeling great! It all happened so fast. I hope you all enjoy the new look and the new site. It's nothing fancy, but I usually like to keep things simple so it's perfect for me. There may be a few wrinkles to iron out yet, just bear with me, I'll get to them as quickly as I can! 

For my very first post on this new adventure I have a delicious breakfast muffin to share. I would guess that of all the types of recipes I've posted over the years, I have the most muffins so what better way to start out than with another muffin recipe. Everyone know the classic lemon poppy seed muffin (check out a good one here), but I had never before thought about doing a banana poppy seed muffin. Why not? I love pretty much anything with banana, and with the addition of poppy seeds - amazing! 

These muffins baked up just beautifully, rising nice and tall, crowning perfectly and tasting delicious. The banana flavor certainly shines through. If you're expecting lemon flavor when you first bite into these you will be sorely disappointed, but have no fear, the banana is a fabulous alternative. Not quite as bright and tangy as the lemon obviously, but wonderful in a different way. 

I made a few minor changes in the recipe; first I halved it because it's just me and so it takes me a while to eat through a dozen muffins. Thankfully muffin recipes generally halve very well. I also cut down on the sugar by just a tablespoon and didn't seem to notice, they were plenty sweet for me with the banana in there as well. Finally, I pulled these out of the oven about 5 minutes earlier than the recipe called for and they definitely did not need to go longer. I dislike dry and over cooked muffins so I'm really happy that I pulled them when I did. They were nice and light and plenty moist. Another winner to add to the muffin arsenal. 


Banana Poppy Seed Muffins
Adapted from Macheesmo
Ingredients

  • 1/2 c all purpose flour
  • 1/2 c whole wheat flour
  • 1 1/2 teaspoons baking powder
  • 1/4 teaspoon salt
  • 1/4 teaspoon cinnamon
  • 3 tablespoons (1 1/4 ounces) brown sugar
  • 1 banana (4 ounces), mashed; about 1/2 cup
  • 1 egg, lightly beaten, room temperature
  • 1/4 cup (2 ounces) milk or liquid whey
  • 2 tablespoons butter, melted
  • 1/4 teaspoon vanilla extract
  • 2 tablespoons poppy seeds

Directions
Preheat the oven to 375 degrees. Prepare a muffin pan with butter, or line with paper liners.  In a medium sized bowl combine the flours, baking powder, salt and cinnamon, set aside. 

In a small bowl, combine the brown sugar and banana. Add the egg, milk, butter, vanilla and poppy seeds and mix until well combined. 

Add the banana mixture to the flour mixture and mix until just combined. Transfer the batter to the prepared muffin pan, dividing the mixture evenly. Bake for 12-15 minutes until a toothpick inserted into the center of a muffin comes out with just a few moist crumbs. Cool in pan for about 5 minutes, then transfer to a wire rack to cool completely. 

Yields: 6 muffins

Peanut Butter and Oat Snack Bars

I've been on a search for some time now for my perfect go-to granola/snack bar. I do have a fantastic  already on this site, a recipe that is far and away the most popular recipe I've ever posted. While I love these granola bars, and have made them many, many times, I'm on the hunt for something different. I want a bar I can feel good about eating any time, day or night, one that has a modest amount of sugar and fat, and comes together easily using ingredients I will always have on hand. I also want bars that really hold together well. Something I can just throw into a bag in the morning and take with me that won't fall to pieces, or crumble everywhere, making a mess when I want to eat it. 

Throughout the last few months I've been looking at tons of different recipes and trying some out here and there. Part of my problem is that since I live alone, I find it difficult to eat what I make quickly, so this has been a slow process, but a fun one still. I want to share one of the bars I made recently. While it wasn't exactly what I was looking for, it turned out to be a wonderful recipe that hit almost all my requirements. I started with a fairly healthy cookie recipe and adapted it to bars. They baked up beautifully! The end result was a very sturdy, pretty nutritious, tasty bar that will be wonderful for a quick breakfast or satisfying mid-afternoon snack. 

You may wonder why they were not exactly what I was looking for. Really the only thing I would like to be slightly different is the texture of the bar. Because they do have 1/2 cup of flour in them, they turned out a little cakier than I would like. The flour did help them hold together very well, but it also made them feel a little more cookie-bar-like than granola-bar-like. Regardless, this is a great recipe that I will definitely keep in the rotation.  

The flavor of these bars is very nice. Just enough sweetness to make them delicious without making them feel like dessert, and the peanut flavor really shines through, nice and toasty. Lots of good oaty chew helps create a nice, hearty texture. This is a versatile recipe that you can certainly adapt to your preference. If you don't like or can't have peanut butter, use almond butter or another favorite nut or seed butter, and you can throw in whatever mix-ins you like. Any dried fruit, nut, seed or chocolate would be wonderful. 


Peanut Butter and Oat Snack Bars
Adapted from The Kitchn
Ingredients

  • 1/2 cup (128 grams) natural peanut butter
  • 1/3 cup (112 grams) honey
  • 1/2 teaspoon cinnamon
  • 1/2 teaspoon salt
  • 1 teaspoon vanilla
  • 1 egg
  • 1 1/4 cup (100 grams) old fashioned oats
  • 1/2 cup (64 grams) whole wheat flour
  • 1/2 teaspoon baking powder
  • 1/2 cup mix-ins (I used 10 grams pumpkin seeds, 10 grams sunflower seeds, 20 grams raw walnuts, 20 grams dried cranberries)

Directions
Preheat the oven to 325°F and line a baking 8x12 or similar sized pan with parchment paper that you spray with cooking spray.

In a medium pot over medium heat, melt together the nut butter and honey until smooth. Remove from heat and use a wooden spoon to stir in the cinnamon, salt and vanilla. 

Once the mixture has cooled a little, add in the egg and mix well. 

Add the oats, flour, baking powder and mix-ins to the pot and stir together until combined. The mixture will be quite thick. Transfer dough to prepared pan, spreading evenly all the way to the edges, pressing down to firmly. 

Place pan in oven and bake until golden brown on the edges, 20-25 minutes. Cool completely before removing from pan and cutting into bars. 

Yields: 14 bars
Nutrition: Approximately 150 calories each

Tahini Butter Cookies

I believe I've mentioned it before, but that won't stop me from saying it again, I LOVE tahini. Over the past several years I've begun to use it more and more in all sorts of things. My first real introduction to tahini was when I started making my own hummus. I'm sure a lot of other people have the same experience. While I liked it well enough at that time, it wasn't until I'd been using it for a while that I truly fell in love. Now I could use it in almost anything. It's great in salad dressings (check out this salad for an example), sauces, and granola to name just a very few. One of my favorite uses is as an alternative to peanut butter on a piece of toast. Slather on the tahini and drizzle with a touch of honey, it's a heavenly combination. 

And yes, tahini is definitely a great addition to cookies! I've been wanting to try this for a little while now, so I had a free morning this week and I whipped up a half batch of these wonderful tahini butter cookies. They are simply wonderful, especially for someone who loves tahini as much as I do. They are incredibly tender and buttery (surprisingly very reminiscent of these snowball cookies) and are covered with a sweet coating of powdered sugar and cinnamon that bakes into a moist and tender crust on the outside, almost like a built in icing. And as for the flavor, the tahini really shines through. It's savory nuttiness is a wonderful contrast to these sweet and delicate morsels. If you already love tahini like I do, or even if you've never had tahini in your life, you must make these cookies!

It often happens that I'm just too lazy to get out an extra bowl and pull out a few extra ingredients to make toppings, or icings, or coatings for various things, but I managed to find the energy to pull out the powdered sugar and cinnamon to roll the dough in before baking these cookies and I'm so glad I did. It really added a lot to the cookies, both in texture and flavor, so I highly recommend this additional step. I also thought the almond pressed into the center of the cookie was just too cute to skip, I think it really elevates the look of the cookie, but of course you wouldn't have to add them to the top if you don't want to or don't have any almonds laying around. They will still be wonderful without it.


Tahini Butter Cookies
From Pretty. Simple. Sweet
Ingredients

  • 1 cup (140 g/5 oz) all-purpose flour, sifted
  • ½ teaspoon baking powder
  • ½ teaspoon ground cinnamon
  • Pinch of salt
  • ⅓ cup (75 g/2.6 oz) unsalted butter, at room temperature
  • ⅓ cup plus 1 tablespoon (80 g/2.8 oz) granulated sugar
  • ⅓ cup plus 1 tablespoon (100 g/3.5 oz) tahini
  • 3 tablespoons powdered sugar mixed with 1 teaspoon ground cinnamon, for rolling
  • Whole almonds, for garnish

Directions
In a medium bowl, combine flour, baking powder, cinnamon, and salt. Set aside.

In a mixer bowl fitted with the paddle attachment, beat butter, sugar, and tahini on medium-low speed for 1-2 minutes until creamy. Add flour mixture and beat on low speed just until combined, scraping down the sides and bottom of the bowl as needed. Place dough in the refrigerator for at least 30 minutes to firm up before shaping.

Preheat oven to 350 degrees and line a pan with parchment paper.

Using an ice cream scoop or level tablespoon, drop rounded balls of dough, about 1 inch diameter (15-20 grams each). Roll in powdered sugar-cinnamon mixture and place onto prepared baking sheet. Set an almond in the center of each ball, gently pressing to slightly flatten the cookies (they don't spread a lot during baking so make sure to press them down as well as you can without causing them to crack open.)

Bake for 12-14 minutes, until cookies look cracked and just begin to brown at the edges. Leave to cool for 10 minutes, then transfer gently to a wire rack to cool completely.

Roasted Cauliflower and Lentil Salad with Lemony Tahini Dressing

This is a salad that I actually made a few months ago and am now getting around to posting about. Just because it took me a little while to post it though does not mean that it wasn't a fantastic salad. I had been looking for a hearty winter salad to bring to a family gathering. I wanted something seasonal but not the typical cranberry walnut apple salad or Brussel sprout and butternut squash salad. These are all absolutely delicious, but I was in the mood for something a little different. 

The recipe caught my eye because it used cauliflower, which I love, that is roasted with some of my favorite spices and topped with a creamy and lemony tahini dressing that is simply scrumptious. A few lentils are thrown in to add heartiness, some dried fruit, toasted nuts, and red onion finish the whole thing off. It came together beautifully, the perfect combination of flavors and textures, a perfect winter salad. 

Since I was serving this salad to a group of people that have some food intolerances, including dairy, I didn't worry about adding any cheese, but I have no doubt that a little crumbled feta would really be amazing in this recipe. This recipe was made as a side dish, but it also makes a great complete meal. With the lentils for protein mixed with the vegetables, fruit and nuts and a nice tahini dressing it really has everything you need. 


Roasted Cauliflower and Lentil Salad with Lemony Tahini Dressing
Adapted from Foolproof Living
Ingredients
For the salad:

  • 1 medium-sized head of cauliflower, cut into small florets
  • 3-4 tablespoons olive oil
  • 1/4 teaspoon ground cumin
  • 1/4 teaspoon ground cinnamon
  • 1/4 teaspoon ground ginger
  • 1/4 teaspoon ground cayenne pepper 
  • 1/2 cup uncooked green lentils
  • 3/4 cup sliced almonds
  • 10-12 Medjool or 8-10 prunes, sliced thin
  • 1 small red onion, sliced thinly into half moon slices
  • 2-3 cups of mixed greens or chopped green lettuce, rinsed
  • Flat leaf parsley or cilantro for garnish, optional

For the tahini dressing:

  • 1/4 cup tahini
  • 1 1/2 tablespoons honey
  • juice of a lemon, freshly squeezed
  • 2-4 tablespoons of water thin (or more based on the consistency you prefer)
  • 1/2 teaspoon zat'ar seasoning
  • Salt and pepper

Directions
Preheat the oven to 425 degrees. Line a baking sheet with aluminum foil. Place the cauliflower florets in a large bowl. Whisk together the oil and spices. Pour over the florets. Give it a large stir making sure that most of the florets are covered with the mixture. Distribute them evenly on the baking sheet and roast for 25-30 minutes, stirring halfway through, until tender and beginning to brown. Remove from oven and set aside to cool.

Place lentils in a small pot and cover it with 2 cups of water. Bring it to a boil and let it simmer for 20-25 minutes until tender. Drain and discard the water. Set aside to cool.

Meanwhile, reduce the oven temperature to 350 degrees. Spread the sliced almonds on a baking sheet and toast for 8-10 minutes in the oven, gently tossing them hallway through. Keep an eye on them as they can burn easily. Take them out of the oven and let them cool on the kitchen counter.

In the mean time, make the tahini dressing by whisking all the tahini dressing ingredients in a bowl. To assemble: Place the greens in a large salad bowl. Add in the roasted cauliflower, lentils, almonds, dates, and red onion slices. Drizzle it with the tahini dressing. Gently toss it while making sure that the dressing is distributed evenly within the salad.

Peanut Butter Snack Cake

 If you're a peanut butter fan (and let's be honest, who isn't? If you're allergic to peanuts I am very, very sorry), and you're looking for a fun baking project this week then I have just the recipe for you. This peanut butter snack cake is the perfect combination of tender, buttery cake mixed with the rich deliciousness of creamy peanut butter. The peanut flavor really shines through in this cake without being overwhelming, and the tender crumb of the finished loaf is delicate yet sturdy. 

I left my loaf plain and simple, but a handful of chocolate chips in the batter, or a drizzle of chocolate over the top once cool would no doubt be wonderful. Or if you're into the whole peanut butter and jelly thing, a swirl of homemade jam whirled into the batter right before baking, or a cup of fresh fruit  gently folded in would also be simply scrumptious. Customize to your hearts content!

I decided to halve the original recipe and bake my cake in a loaf shape, but the original recipe yielded a 7-inch double layer cake with chocolate frosting. So if that sounds more like your thing check it out at The Pastry Affair. A small loaf was just the perfect thing for me though. It baked up perfectly. I would say that you need to be certain to not over-bake this cake or it will turn out dry, and dry is never good. I always start out with a little less time on the timer than what the recipe calls for, that way you can be sure to check it out before it goes too long. Everyone's oven is a little different, so it never hurts to play it safe. 


Peanut Butter Snacking Cake
Adapted from The Pastry Affair
Ingredients

  • 1/4 cup (2 ounces) butter, melted
  • 1/4 cup (64 grams) creamy peanut butter
  • scant 1/4 cup (40 grams) granulated sugar
  • scant 1/4 cup (40 grams) brown sugar, packed
  • 1 large egg
  • 1/2 teaspoon vanilla extract
  • 1 cup + 2 tablespoons (280 grams) all-purpose flour
  • 1 teaspoons baking powder
  • 1/2 teaspoon baking soda
  • 3/8 teaspoon salt
  • 1/2 cup milk

Directions
Preheat oven to 350 degrees F (180 degrees C). Grease a loaf pan with cooking spray or butter and set aside.

In a large mixing bowl, beat together the butter, peanut butter, and sugars until uniform. Add the egg, beating well to incorporate. Mix in the vanilla extract. Gradually add in the flour, baking powder, baking soda, and salt. Mix in the milk, stirring until batter is uniform and smooth.

Transfer batter to loaf pan and bake for 30-35 minutes, or until a toothpick inserted into the center comes out with a few moist crumbs. You definitely don't want to over bake this cake or it will be dry. Transfer to a wire rack and allow to cool to room temperature.

Seedy Sourdough Crackers

I love making homemade crackers. Hang on, let me rephrase that; I love having homemade crackers on hand to eat. I have to admit I don't always love making them. But honestly, they're not that big of a pain to make, it just takes a bit of time, especially when you have a big recipe. But the end results are completely worth it and that is why I keep making different versions of homemade crackers again and again. 

This recipe is probably the best that I've made to date. I used a basic recipe for sourdough crackers that I've used in the past, but to add some interest to the crackers I added some seeds and grains, for flavor, texture and looks. Looking at what I had hanging around, I decided on poppy seeds, sunflower seeds and rolled oats. I coarsely ground the sunflower seeds and oats in a food processor for just a second or two before adding them so the pieces wouldn't be too big. The resulting crackers turned out delicious! Crisp and nutty with a slight tang from the sourdough. I highly recommend taking the time if you have it to roll out these addicting homemade crackers. 

You could use whatever seeds or nuts you have on hand to add to these crackers. Just be sure to grind up any bigger pieces so they incorporate better into the dough and make it easier to roll out. I used my pasta making to roll the crackers to an even thickness. I have found that this is by far the best way to roll out crackers, but that doesn't mean you can't roll them by hand with a rolling pin if you don't have a pasta machine. Just do your best to roll them as thin and as evenly as you can. You'll have to watch them a little more closely when baking too, to make sure they don't bake too unevenly.


Seedy Sourdough Crackers
Adapted from King Arthur Flour and Reformation Acres
Ingredients

  • 1 cup (4 ounces) whole wheat flour
  • 3/4 teaspoon salt
  • 1/4 teaspoon baking soda
  • 1/4 teaspoon baking powder
  • 3/4 teaspoon sugar
  • 1 cup (9 ounces) unfed sourdough starter
  • 4 tablespoons (2 ounces) butter, at room temperature
  • 2-4 tablespoons assorted grains and/or seeds (poppy seeds, sesame seeds, coarsely chopped sunflower seeds, coarsely ground oats, etc)

Directions
Place all of the ingredients in the bowl of a stand mixer fitted with the paddle attachment. Mix on medium low until everything is well combined into a nice, cohesive dough. Add a little extra flour if the mixture seems too wet and sticky. 

Assemble pasta maker. Roll small pieces of the dough through the machine until very thin (I went to setting 5 or 6 on my machine). Alternatively, you can use a rolling pin and roll the dough out on a well floured surface, trying as much as possible to roll the dough to an even thickness. Cut the dough out using cookie cutters, or use a pastry scraper to cut freehand. 

Place the cut shapes on a parchment lined baking sheet. Place the baking sheet in the fridge for a few minutes while you preheat the oven to 375 degrees (I find it easier to dock the dough when it has firmed up a little in the fridge, but this is not absolutely necessary). Sprinkle crackers with a little extra kosher salt if desired and use a fork or toothpick to poke a few holes in each cracker. Bake crackers for 12-15 minutes, until nicely golden brown and crisp all the way through. Watch them carefully toward the end as they can over cook quite quickly. Cool completely before storing in an airtight container. 

Polenta Breakfast Squares with Kale and Quinoa

Given the choice between a sweet breakfast or a savory breakfast, I will pick sweet almost every time. There is almost nothing I like better than sitting down in the early morning with a steaming cup of coffee and a delicious, fresh baked pastry. Scones, cinnamon rolls, danishes, muffins, you get the picture, that's my idea of the perfect breakfast. This, however, does not mean that a savory breakfast is never appreciated, on the contrary, some days a perfectly fried sunny-side up egg served over a piece of cheesy toast is ideal. Or a big plate of scrambled eggs, fresh bread and a side of breakfast sausage. I won't discriminate. 

This recipe came from one of those mornings when sweet wasn't at the top of the list. I was feeling like something hearty and savory. I liked the idea of a fancied up polenta bake so I added in a little bit of what I had floating around the fridge; onions, kale and some quickly cooked quinoa for a little extra protein, but you could really add whatever you'd like in the flavor department. It ended up being the perfect fix for my savory breakfast craving. 

I used a recipe I found on The Kitchn as a starting point for these squares, but then adapted it for what I wanted and what I had in the fridge. What I was really hoping for is that these squares would hold together when they were cut and not just fall apart in a crumbly mess. Thankfully they ended up holding together quite well, but I did end up waiting until after they were refrigerated and thoroughly chilled before cutting them up, just to make sure. 

I ended up finding that my favorite way to eat these squares was to broil them in the oven until crisp and hot, then topping each square with a generous piece of cheese and letting the residual heat in the oven melt the cheese to perfection. I nice drizzle of romescu sauce, a poached egg, or even a good spoonful of salsa would also be wonderful. The square reheat well so let your imagination go wild!

Polenta Breakfast Squares with Kale and Quinoa
Adapted from The Kitchn
Ingredients

  • 1/4 small onion, minced
  • 2 handfuls kale, chopped into small pieces
  • 2 eggs
  • 1 cup milk
  • 1 cup (158 grams) cornmeal
  • 90 grams quinoa, cooked according to package directions
  • 2 1/2 tablespoons grated parmesan cheese
  • 1/2 teaspoon salt
  • Pepper
  • 2 cups boiling water

Directions
Preheat the oven to 350°F and lightly grease a 9-inch square baking dish (or something of similar size).

In a skillet, heat olive oil over medium heat, add the onion and cook for 8-10 minutes, until the onion has softened. Stir in the kale and cook for a few more minutes until kale is starting to wilt. Remove the skillet from the heat and add the cooked quinoa, stirring to combine. 

Beat the eggs in a large bowl and whisk in the milk, then whisk in the cornmeal and 1 1/2 tablespoons of the Parmesan cheese. Fold in the cooked onion and kale mixture, along with the salt and a generous quantity of black pepper. Pour into the prepared baking dish.

Pour in the 2 cups of boiling water and whisk to combine in the dish. Bake uncovered for 60-80 minutes total. After the first 20 minutes, whisk thoroughly, moving the polenta from the edges of the pan in to the center, and moving the center of the polenta out, to ensure the polenta is baking evenly. Continue baking until the polenta looks firm and golden-brown on top, and a knife comes out clean. Sprinkle the remaining 1 tablespoons Parmesan over top while the casserole is still hot.

Serve warm, cold, or hot. The polenta will be fairly soft while hot, but will firm up as it cools. If you want nice, even slices, allow to cool and then refrigerate until chilled before cutting. 

Note: square reheat very well under the broiler; broil until nice and crisp on top, then top with a slice of cheese and allow to melt before digging in.