Peaches and Cream Cupcakes

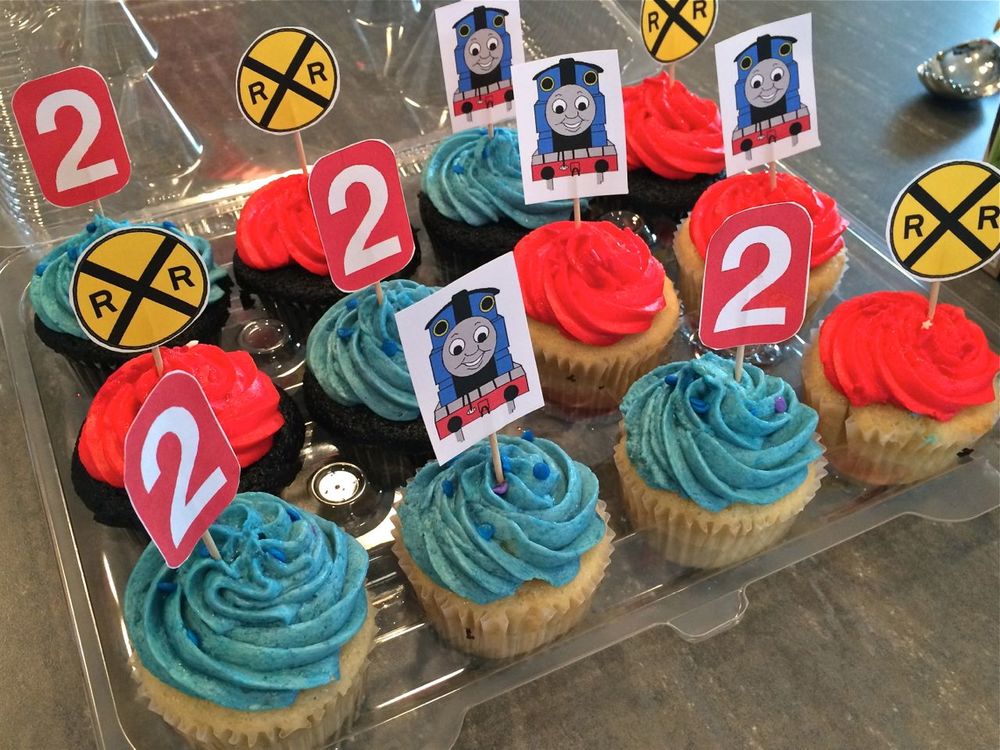
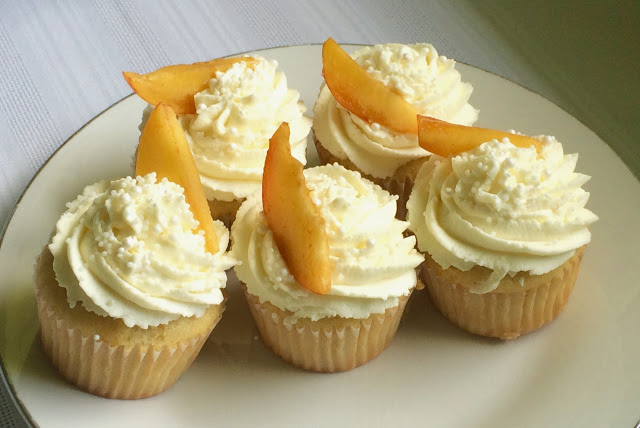
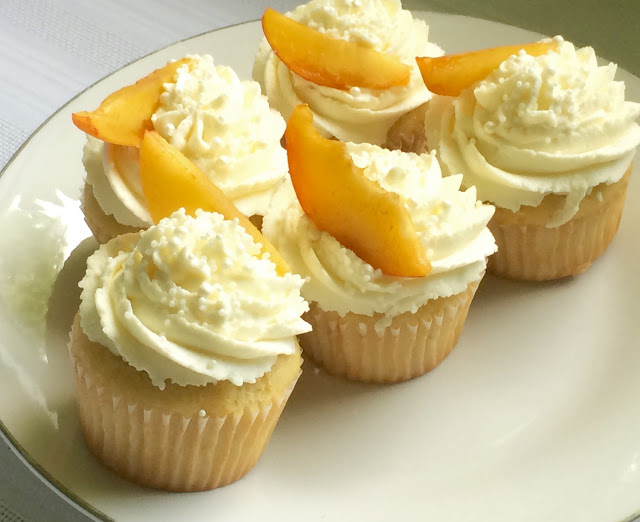
It's an extra special birthday today, my mom turns 60!! I can hardly believe it! In honor of this special occasion, Lara, my dad and I threw a little shindig for her this past Sunday. Family members and friends came over for a salad bar party. It was pretty delicious if I do say so. Today I want to share the best part of the party - the cake of course! Since it's August, and my mom absolutely LOVES peaches, I decided to make a peaches and cream cupcake for her. While I love having the opportunity to make a cake, at a party like this I decided cupcakes would be easier to serve, and would be easier for everyone to eat. 

These cupcakes turned out light and fluffy, filled with sweet and delicious peaches, topped with the perfect frosting, an airy whipped mascarpone and cream frosting. It doesn't get much better than this for an August birthday. I highly recommend both the cake and the frosting. I may never go back to buttercream again!

This cupcake recipe is definitely a keeper. It was simple, and baked up 24 perfect cupcakes. I've been looking for a go-to vanilla cupcake and I think this is it. To turn it into a peach cupcake all I did was dice up a few peaches from the farmers market, let them drain in a colander for a few minutes, tossed them with a little flour and threw them into the batter at the very end. It worked out great. Because peaches have such a gentle flavor, the cupcakes aren't overly "peachy", but they lend a hint of fruitiness to the cake, and you get a sweet surprise every few bites.

I've been wanting to try a mascarpone frosting for some time now and I decided that this was the perfect opportunity. There was no doubt that I would love this frosting, and I was not disappointed! This was the easiest, most delicious frosting I have ever tried. It took all of 2 minutes to whip together, didn't involved any sticky and messy powdered sugar, and tastes absolutely divine! I may never make another white frosting again. The only downside to it is you have to refrigerate it once made, since all that is in it is cream and mascarpone! But that's okay, it's a compromise worth making!

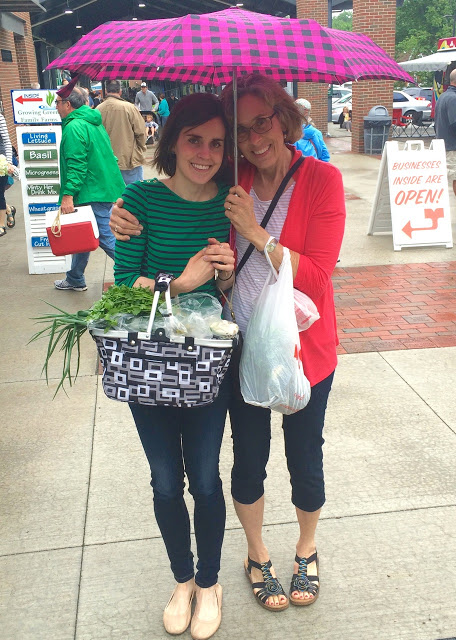
Happy Birthday Mom!! Lookin pretty good! Love you!

Peach Cupcakes
Adapted from Baking A Moment
Ingredients

  • 3 cups (14 ounces) all purpose flour
  • 1¾ cups (12.25 ounces) granulated sugar
  • 2½ teaspoons baking powder
  • 1 teaspoon kosher salt
  • 1 cup (2 sticks) butter, softened, cut into small cubes
  • 4 eggs
  • 1 cup (8 ounces) milk
  • 2 teaspoons vanilla extract
  • Drop or two of almond extract (optional)
  • 2-3 peaches, cut into small pieces and placed in a colander to drain

Directions
Preheat the oven to 350 degrees F. Place the flour, sugar, baking powder, and salt in a mixing bowl and stir to combine.

Add the butter and mix on low speed, until mixture resembles coarse crumbs (2-3 minutes). Add the eggs, one at a time, and scrape the bottom of the bowl to make sure all the ingredients are well-combined.

Combine the milk, vanilla extract and almond extract (if using) in a measuring cup. Beat half this mixture into the flour/butter/eggs. Beat on medium speed for 1½ minutes, scrape the bottom and sides of the bowl, add the remaining milk mixture, and beat for another 30 seconds.

Toss drained peach pieces with a small amount of flour. Gently mix into the batter until well combined.

Fill paper liners ⅔ full with batter, and bake for 18-20 minutes, or until a tester inserted in the center of the cupcake comes out clean.

Cool completely before topping with mascarpone frosting (recipe below). 

Yields: 24 cupcakes

Mascarpone Frosting

From

Epicurious

Ingredients

  • 2 8-ounce containers mascarpone cheese
  • 2 cups chilled heavy whipping cream
  • 4 tablespoons sugar
  • 1 tablespoon vanilla extract

Directions

Beat all ingredients in the bowl of a stand mixer fit with the whisk attachment just to soft peaks. You need to beat it enough so that it is firm enough to pipe onto the cupcakes, but don't overbeat or mixture will curdle. 

Banana Poppy Seed Cake

Simple cakes such as this banana poppy seed cake are good recipes to have in your back pocket just in case you need to whip together a quick dessert sometime. What I like about this cake is that it is a little different than the typical everyday cake. Bananas and poppy seeds are not ingredients I often use in my desserts. Although I do bake with bananas a lot, I usually don't use them in my cakes such as this one which is what initially intrigued me about this recipe. The combination of tender banana scented cake paired with the slightly bitter crunch from the poppy seeds came together in a perfect pairing making this cake a winner. Although this time I opted to pass on the cream cheese frosting that the original recipe called for, I'm sure it would be wonderful atop this cake, making it just that much more special. 

The bananas as well as a nice half cup of sour cream keep this cake moist and tender. A touch of butter is added for flavor and a little more richness and then finish it off with those cute and crunchy poppy seeds. It is a simple combination that works wonderfully to turn out this simple cake that is just unique enough to make things interesting.

Banana Poppy Seed Cake
Adapted from The View From Great Island
Ingredients

  • 2 Tbsp unsalted butter, at room temperature
  • 2/3 cup sugar plus 1 tablespoon
  • 1/2 cup sour cream
  • 1 large egg
  • 2 ripe bananas, mashed
  • 1/3 cup poppy seeds
  • 2 teaspoon vanilla extract 
  • 1 cup flour
  • 1/4 teaspoon salt
  • 1/2 teaspoon baking soda

Directions
Sift together the flour, salt and baking soda. Set aside. Cream the butter, 2/3 cup sugar and sour cream together. Beat in the egg, bananas and vanilla until smooth. 

Sift the flour mixture and poppy seeds into the wet mixture. Mix together just until just combined. Spread the batter into a greased 8-inch round cake pan and sprinkle the top with the remaining tablespoon of sugar. 

Bake the cake for 25-30 minutes at 350 degrees until a toothpick just comes out with just a few moist crumbs. Cool on a wire rack. 

S'mores Cupcakes

April 1 is a special day in my family. We get to celebrate not just one, but two birthdays! My cousin Bailey and my grandpa get to share their special day with each other. In honor of their birthday's, Bailey invited us all over for a "112th birthday party" this past Sunday. Since my favorite part about birthday celebrations is the cake, I offered to make some cupcakes to bring along. In my opinion you cannot have a birthday party without cake, it just isn't right. 

For this occasion I had a few more restraints than normal. Dairy products don't agree well with Bailey so the only cake options I had were dairy free ones. This can be a challenge for me; I am partial to good old butter cakes piled high with sweet and fluffy buttercream, neither of which were an option for this party. I toyed around with a couple of different ideas before having that aha moment. Early on I had decided that a chocolate cupcake made with cocoa powder would work really well for the base. Cocoa is dairy free, and although I know you can find dairy free chocolate out there, I just wasn't going to get around to buying any in time. 

What was really stumping me was the frosting. I am not a fan of using butter substitutes, I just don't think they taste good. Even the really nice brands without trans fats and all that other junk don't taste like butter. I like butter, and there really is no replacement in my book. I toyed with the idea of using coconut cream but I'm not a huge coconut fan and I'd never tried it before so didn't know how it would work. Then I came across a recipe for marshmallow frosting, basically just a meringue, and it all came together. Marshmallow frosting on a chocolate cake, only one thing is missing.... graham crackers! Who can resist a good old s'more, especially in cupcake form? The perfect dairy free cupcake to celebrate a couple of extra special people. 

This cupcake recipe is a cinch to make, all you need is one bowl and you are good to go. The recipe said it would make 1 dozen, but I always like to make a few mini cupcakes too as testers and it worked out great. I managed to get 1 dozen regular cupcakes and 6 minis.

As for the frosting; I'd never made marshmallow frosting before, but I have made marshmallows, and it was pretty much the same thing, just without the gelatin. Pretty easy to whip together, but incredibly sticky! I thought the combination of the dark chocolate cake with the sweet and light marshmallow frosting was a winner; the two complemented each other so well. I finished the whole thing off with some homemade graham crackers (dairy free of course) and some graham cracker crumbs. 

All I have left to say is: Happy Birthday Bailey and Grandpa! Have a wonderful day!

S'mores Cupcakes

Adapted from 

King Arthur Flour

Ingredients

Cake

  • 1 cup (7 ounces) sugar
  • 1 cups (4 1/2 ounces) All-Purpose Flour
  • 1 tablespoon cornstarch
  • 3/8 cup (1 1/8 ounces) Dutch-process cocoa
  • 1 teaspoons baking powder
  • 1/4 teaspoon baking soda
  • 1/2 teaspoon salt
  • 2 large eggs
  • 3/8 cup (2 5/8 ounces) vegetable oil
  • 1 teaspoons vanilla extract
  • 1/2 cup plus 2 tablespoons (5 ounces) coffee

Frosting

  • 2 large egg whites
  • 1 cup sugar
  • 1/4 teaspoon cream of tartar (I actually didn't have any and it worked fine without, cream of tarter just helps stabilize the egg whites, but you can go without if you have to)
  • 1/3 cup water
  • 1/8 teaspoon salt
  • 1 teaspoon vanilla extract

Directions

Preheat the oven to 350°F. Line cupcake or muffin pans with papers.

Prepare the cake batter. Whisk together the sugar, flour, cornstarch, cocoa, baking powder, baking soda and salt. Add the eggs, oil, and vanilla, beating until smooth. Gradually add the coffee, beating until smooth. 

Divide the batter evenly among the cupcake cups; you'll pour a scant 1/4 cup batter (about 58g) into each cup. Bake the cupcakes for about 20-22 minutes, until a cake tester or toothpick inserted into the center of one of the cakes in the middle of the pan comes out clean. Remove the cupcakes from the oven. In about 5 minutes, or as soon as you can handle them, remove them from the pan, and place them on a rack to cool.

When the cupcakes are cool, make the frosting. Place the 2 egg whites in a large mixing bowl or the bowl of your stand mixer. Beat until the egg whites are foamy and thick; they should mound in the bowl, without holding a peak. Set them aside while you prepare the sugar syrup.

Combine the sugar, cream of tartar, water, and salt in a saucepan. Bring to a boil, stirring frequently; the sugar should be dissolved. If the sugar hasn't dissolved, cook and stir a bit more, until it has. Once the sugar has dissolved, boil the syrup, undisturbed, for 2 minutes, or until the syrup registers 240°F on a candy thermometer or instant-read thermometer.

Begin to beat the egg whites, and immediately pour the boiling sugar syrup into the egg whites in a slow stream, beating all the while. As you beat, the mixture will thicken. Once all the syrup is added, stir in the vanilla, and continue to beat until the frosting is thick and will hold a peak.

Spoon the hot frosting atop the cooled cupcakes, swirling it decoratively.

Decorate while the frosting is still warm with graham crackers crumbs. You can also toast the edges of the frosting with a kitchen blow torch, or how I did it, using the flame on your gas stove. Just watch your fingers!

Yield: 1 dozen cupcakes + 6 mini cupcakes

Gramercy Tavern’s Gingerbread

We had our Christmas party for my mom's side of the family yesterday. It was a wonderful time of food, conversation and festivities! I had such a fun time seeing everyone and catching up on what is going on in everyone's lives. Of course I offered to supply a few dishes to the lunch menu along with a few other family members. Everything turned out deliciously from the roasted beef tenderloin provided by my grandma to the salads and desserts brought by everyone else. My contribution to the dessert table this year was a rich and dark gingerbread cake that I had spotted on Smitten Kitchen some time ago. It had intrigued me, but until now I had never had the opportunity to make it. Gingerbread is not really something you can make year round so I was excited to have the opportunity to try it out. 

I ended up loving the cake. It really does pack a punch of flavor thanks to the oatmeal stout, the dark molasses, and the 2 tablespoons of ground ginger. It is an intense cake, definitely not for the faint at heart. A scoop of ice cream or a dollop of freshly whipped cream are the perfect accompaniment. I think a simple lemon glaze or some lemon curd would also be wonderful options. If you're looking for something different from the typical sugar cookies or chocolate cake this Christmas, give this cake a try, it will be difficult to forget. 

Other than needing to go out and buy a few extra ingredients to make this cake (the stout and the dark molasses) there was nothing difficult about this cake. I mixed it all together by hand, didn't even need a mixer thanks to the use of oil. It came together easily and baked up beautifully, perfectly done at 50 minutes, exactly as the recipe said. 

From what I read about this cake, it is very prone to stick to the pan so I heeded all the advice I read and made sure to butter and flour my bundt pan very, very throughly. It seemed to work as I didn't have really any sticking at all. However, my bundt pan is pretty new and releases cakes easily. My old bundt pan was notorious for having cakes stick and come out in two or more pieces, not so pretty. But regardless of how nice your pan is, I'd advise making sure you spend a little extra time greasing and flouring it up before pouring the batter in. It would be so disappointing to have this cake fall apart on it's way out of the pan. 

Gramercy Tavern's Gingerbread

From 

Smitten Kitchen

Ingredients

  • 1 cup oatmeal stout or Guinness Stout
  • 1 cup dark molasses (NOT blackstrap)
  • 1/2 teaspoon baking soda
  • 2 cups all-purpose flour
  • 1 1/2 teaspoons baking powder
  • 2 tablespoons ground ginger
  • 1 teaspoon ground cinnamon
  • 1/4 teaspoon ground cloves
  • 1/4 teaspoon freshly grated nutmeg
  • Pinch of ground cardamom
  • 3 large eggs
  • 1 cup packed dark brown sugar
  • 1 cup granulated sugar
  • 3/4 cup vegetable oil
  • Confectioners sugar for dusting

Directions

Preheat oven to 350°F. Very, very, generously butter a bundt pan and dust with flour, knocking out excess. This cake will stick badly if pan is not thoroughly greased. 

Bring stout and molasses to a boil in a large saucepan and remove from heat. Whisk in baking soda, then cool to room temperature.

Sift together flour, baking powder, and spices in a large bowl. Whisk together eggs and sugars. Whisk in oil, then molasses mixture. Add to flour mixture and whisk until just combined.

Pour batter into bundt pan and rap pan sharply on counter to eliminate air bubbles. Bake in middle of oven until a tester comes out with just a few moist crumbs adhering, about 50 minutes. Cool cake in pan on a rack 5 minutes. Turn out onto rack and cool completely.

Serve cake, dusted with confectioners sugar, with whipped cream or ice cream.

Do ahead: I'm told this gingerbread is even better if made a day ahead. I made mine 2 days ahead and it was fantastic. I didn't try it freshly baked, but it didn't appear to suffer at all in the 2 day wait. 

Thomas Train 2nd Birthday Cupcakes

Just a couple of weeks ago my nephew turned 2 years old. It's amazing how fast he's grown. (Check out his first birthday here). All of a sudden it seems like he is talking nonstop and running around everywhere, it's so much fun, and super cute! My sister-in-law Lindsey once again asked Lara and I if we would be willing to make some cupcakes for his birthday party. Of course I said yes! It's only one of my all time favorite reasons to bake. I love baking cakes and cupcakes for birthdays and other special occasions. They are so fun to make, and can be so festive and celebratory. 

Since the theme of the birthday party was going to be Thomas the Tank Engine she asked that we just make a couple dozen cupcakes of any flavor and frost them simply with red and blue frosting to match the theme. This was simple enough to do of course. I just went to my trusty Martha cookbook,

Martha Stewart's Baking Handbook

 and picked out her yellow and a chocolate cupcake recipes and whipped them together. Simple and delicious! Lara frosted them in the Thomas blue and red and then Linsey finished them off with some super cute Thomas flags. I think they turned out adorable, and at the party Lindsey had them arranged as the cars of a Thomas train, super cute. It was a wonderful party and a great way to celebrate Tyce's second birthday!

Yellow Butter Cupcakes

Ingredients

  • 1 stick butter, at room temperature
  • 3/4 cup all-purpose flour, plus more for dusting pans
  • 3/4 cups cake flour
  • 1 1/2 teaspoon baking powder
  • 1/4 teaspoon salt
  • 3/4 cup + 2 tablespoons sugar
  • 2 large eggs
  • 1 teaspoon vanilla extract
  • 1/2 cup plus 2 tablespoons milk

Directions

Preheat the oven to 350˚ F. Line cupcake pan with paper liners. In a medium bowl, combine the all-purpose flour, cake flour, baking powder, and salt; whisk together to blend well and set aside.

In the bowl of an electric mixer, combine the butter and sugar. Beat on medium-high speed until light and fluffy, about 4 minutes, scraping down the bowl as needed. Mix in the eggs one at a time, beating well after each addition. Blend in the vanilla. With the mixer on low speed, add in the dry ingredients in three additions, alternating with the milk. Beat each addition just until incorporated.

Spoon the batter into lined cupcake pan. Bake, rotating the pans halfway through baking, until the cakes are golden and a toothpick inserted in the center comes out clean, 17-18 minutes. Remove cupcakes from pan and cool on a wire rack. Let the cakes cool completely before frosting. 

Yields: 12-14 cupcakes

One Bowl Chocolate Cupcakes

Ingredients

  • 1 1/4 cups all-purpose flour
  • 1/2 cup plus 2 tablespoons (100g) dutch-process cocoa powder
  • 1 1/4 cups sugar
  • 1 1/4 teaspoons baking soda
  • 1/2 teaspoon plus 1/8 teaspoon baking powder
  • 1/2 teaspoon plus 1/8 teaspoon salt
  • 1 large eggs
  • 1/2 cup plus 2 tablespoons milk
  • 1/4 cup vegetable oil
  • 1/2 teaspoon pure vanilla extract
  • 1/2 cup plus 2 tablespoons warm water

Directions

Preheat oven to 350F and line or spray two standard 12-cup muffin pans. 

Sift into the mixer bowl: flour, cocoa powder, sugar, baking soda, baking powder and salt. Add the eggs, yolk, milk, oil, vanilla and warm water. 

Beat with a paddle attachment on low speed until smooth and combined, about 3 minutes; scrape down the sides of the bowl if needed.

Divide batter evenly among the muffin cups. Fill each muffin cup about 1/2 full. The batter is quite runny and if you overfill them they can make a mess as they rise in the oven. 

Bake, rotating pans halfway through the baking time, until a cake tester inserted in the center of a cupcake comes out clean, 18-20 minutes. Cool in the pan for a little bit and then transfer onto a wire rack or board to cool completely.

Yields: 14-16 cupcakes

Lemon Poppy Seed Cake

I baked this lemon poppyseed cake on a whim one afternoon a few weeks ago, I knew it would be good, but I didn't know just how good. It turned into one of the best things that I have baked this year without a doubt. I'd had the recipe pinned for quite a while now, but it was one of those things that I never did anything about, just looked at the pretty picture and thought, "that looks good." Then, a few weeks ago there was a ton of yogurt in my fridge for whatever reason, and I knew I wouldn't be able to eat it all before it started to go bad. That's when I started brainstorming ideas for using it up, ideas that consisted of mostly baked goods to be honest! This cake originally called for sour cream, not yogurt, but I decided to give it a try anyway. Besides, cutting a few calories sounded like a good idea.

Believe me, I didn't even notice the missing fat. There's plenty of butter in this cake to begin with, so no worries there! Anyway, this cake baked up beautifully and was absolutely delicious, light and moist, packed with poppy seeds and a hint of lemon. The perfect everyday cake to keep on your counter for snacking all week long. It took Lara and I a week to finish it off, and even on the 7th day it was still tasting pretty darn good, definitely not too difficult to force down. I'm still thinking of this cake weeks later, and waiting, not too patiently, for the next time I can find an excuse to make it. Maybe I need to head back to the store and "accidentally" buy a little too much yogurt....

Lemon Poppyseed Cake
Adapted from Gourmeted
Ingredients
For the Cake:

  • 2 large eggs, at room temperature
  • 1 large egg yolk, at room temperature
  • 3/4 cups and 1 tablespoon Greek yogurt (or sour cream)
  • 1 ¾ teaspoons vanilla extract
  • 2 ½ cups (250 grams) cake flour (or all purpose flour)
  • 1 ¼ cups sugar
  • 1 ½ teaspoons baking powder
  • ½ teaspoon baking soda
  • ½ teaspoon salt
  • 2-3 teaspoons loosely packed lemon zest, finely grated (you can use up to 5 teaspoons if you want a stronger lemon flavor)
  • 1/3 cup poppy seeds
  • 1 ¾ sticks (14 tablespoons or 200 grams) unsalted butter at room temperature

For the Syrup:

  • ¼ cup sugar
  • 3 tablespoons water
  • 1/8 teaspoon almond extract

Directions
Butter and flour a metal fluted tube pan and preheat the oven to 350°F 

Whisk together whole eggs, yolk, ¼ cup sour cream, and vanilla in a medium bowl until just combined.

Mix the flour, sugar, baking powder, baking soda, salt, lemon zest and poppy seeds in the bowl of a stand mixer fitted with a flat beater, on low speed for 30 seconds. Add butter and remaining sour cream and continue to mix on low speed until just blended. Increase to medium speed and beat for another 1 ½ minutes. The batter will be light in color.

Scrape down the sides of the bowl and re-start the mixer on low speed. Add half of the egg mixture and beat on medium speed for 30 seconds, do the same for the remainder of the mixture. Transfer the batter into the prepared tube pan and level the surface with a small spatula.

Bake for 45 to 55 minutes, or until a cake tester inserted into the lowest of the tube comes out clean and the cake springs back when pressed lightly.

To make the syrup: While the cake is baking, combine sugar and water in a small microwavable bowl. Heat in the microwave for about 30 seconds and stir until the sugar is dissolved. Add in the almond extract and set aside. 

Once the cake is done, place the pan on a wire rack. Poke the cake all over using a thin skewer and brush it with a third of the syrup. Let the cake cool for 10 minutes before inverting onto a serving plate. Brush the entire surface of the cake with the remaining syrup.

Classic White Cake with Vanilla Buttercream

It was my mom's birthday this past week, and what do birthdays mean?? Cake of course! And the chance for me to make a cake, one of my favorite things to do. I'm lucky that I am on an easy rotation at school right now, so it wasn't a big deal to take some time out of my schedule and bake a nice birthday cake for my mom. She is a fan of white on white cakes, so that's what I made. Classic white cake, with sweet and sugary American buttercream frosting. Simple to be sure, but always a winner. 

While I love cake, a normal double or triple layer 9-inch cake is so big for our family. We can usually finish it off eventually, but it can take a while, and even though I absolutely love cake, I start to feel bad about eating it every night for a week straight! So this time I decided to try something new. I took my favorite white cake recipe, cut it in half, and baked it in a smaller 12x9 inch rimmed baking sheet. Once it was cool, I cut it into three rectangles and stacked those rectangles to make a triple layer cake. It turned out to be the perfect size for us. On the night of my mom's birthday, we had 8 people over for cake and they all got nice sized (but not jumbo) pieces, and there was just enough cake left over to snack on for a day or two, perfect!

I frosted this cake very simply because I was trying to quick get it done before my mom came home from work so didn't have the time for anything fancy, but I think it still turned out pretty cute. Just one color of frosting jazzed up a bit with some colored sprinkles, quick and easy.

Love you mom!

The birthday girl and her cake

You can do it!

Classic White Cake

Adapted from

Martha Stewart's Baking Handbook

Ingredients

  • 1 1/2 cups all purpose flour 
  • 1 teaspoon baking powder
  • 1/2 teaspoon salt
  • 1 1/2 sticks butter, room temperature
  • 1 cup plus 2 tablespoons sugar
  • 1/4 teaspoon vanilla extract
  • 1/2 cup milk
  • 4 large egg whites

Directions

Butter and flour a 12x9-inch rimmed baking sheet. In a medium bowl, sift together flour, baking powder, and salt; set aside.

In the bowl of an electric mixer fitted with the paddle attachment, beat the butter and 1 cup of sugar until light and fluffy, 3-4 minutes, scraping down the sides of the bowl as needed. Beat in the vanilla. With mixer on low speed, add flour mixture in three parts, alternating with the milk and beginning and ending with the flour; beat until just combined. Transfer mixture to a large bowl; set aside.

In the clean bowl of an electric mixer fitted with the whisk attachment, beat egg whites on low speed until foamy. With mixer running, gradually add remaining 2 tablespoons sugar; beat on high speed until stiff, glossy peaks form, about 3-4 minutes. Do not overbeat. Gently fold a third of the egg-white mixture into the butter-flour mixture until combined. Gently fold in the remaining whites.

Transfer batter to prepared baking sheet. Bake, rotating pans halfway through, until a light, golden brown and a cake tester inserted in the center comes out clean, 20-25 minutes. Transfer pans to a wire rack and let them cool completely. 

Frost the cakes with vanilla buttercream, recipe follows. 

Vanilla Buttercream Frosting

Adapted From 

Savory Sweet Life

Ingredients

  • 1 cup unsalted butter (2 sticks), softened
  • 4 cups (16 ounces) powdered sugar, sifted
  • ¼ teaspoon table salt
  • 2 teaspoons vanilla extract
  • 1/4 teaspoon almond extract
  • 2-4 tablespoons milk or heavy cream

Directions

On medium speed, beat the butter in the bowl of a stand mixer fitted with the paddle attachment until creamy, 1-2 minutes. Add the powdered sugar and beat on low until all the sugar has been incorporated (you may want to do this in a couple additions to prevent the powdered sugar from getting everywhere). Increase mixer speed to medium and add vanilla and almond extracts, salt, and 2 tablespoons of milk or cream and beat for 3-5 minutes, until light and creamy. Add remaining milk 1 tablespoons at a time, until you reach desired consistency. 

Almond Paste Cake

I've said it many times, but I'll say it again, I love cake. There is a cake for any and every occasion. It amazes me how many people tell me that they don't really like cake. I think they just haven't been eating the right ones. There are so many different options: a towering triple layered birthday cake, a simple French yogurt cakesbundt cakes, breakfast cakespeach cakessour cherry coffee cakes and  cupcakes, just to name a few! How can you say you don't like cake when there are so many different options to choose from? 

Well, if you're still unconvinced, here is another cake to try and change your mind. This is one of my favorite cakes. Not only is it super rich and buttery, but it is full of delicious almond flavor. Half a pound of almond paste goes directly into this cake, and if that's not enough for you, don't forget to add the almond extract too. I love anything almond flavored and this cake delivers. Sprinkle with powdered sugar for a simple finish, or add a dollop of whipped cream and some berries for a something special. However you eat it you won't be disappointed. 

I think of this cake as an almond pound cake. It has a fine, dense crumb, and is buttery and rich with two sticks of butter and 6 eggs to go along with the half a pound of almond paste. The instructions call for it to be made in a food processor which is always how I've done it. They do say you can use a stand mixer if you don't have a food processor, but I've never tried that. I'm sure it would work just fine though. If anyone tries it, let me know how it goes!

Almond Paste Cake

From 

David Lebovitz

Ingredients

  • 1 1/3 cups (265g) sugar
  • 8 ounces (225g) almond paste
  • 3/4, plus 1/4 cup (140g total) flour
  • 1 cup (8 ounces, 225g) unsalted butter, at room temperature, cubed
  • 1 1/2 teaspoons baking powder
  • 3/4 teaspoon salt
  • 1 teaspoon vanilla extract
  • 1 teaspoon almond extract
  • 6 large eggs, at room temperature

Directions

Preheat the oven to 325ºF (162ºC). Grease a 9x2-inch cake or spring form pan with butter (the cake rises quite a bit, so make sure your pan is tall enough), dust it with flour and tap out any excess. Line the bottom of the pan with a round of parchment paper.

In the bowl of a food processor, grind the sugar, almond paste, and 1/4 cup (35g) of flour until the almond paste is finely ground and the mixture resembles sand.

In a small bowl, whisk together the remaining 3/4 cup (105g) of flour, baking powder, and salt.

Once the almond paste is completely broken up, add the cubes of butter and the vanilla and almond extracts, then process until the batter is very smooth and fluffy.

Add the eggs one at a time, processing a bit before the next addition. (You may wish to open the machine and scrape the sides down to make sure the eggs are getting fully incorporated.)

After you add all the eggs, the mixture may look curdled. Don’t worry; it’ll come back together after the next step.

Add half the flour mixture and pulse the machine a few times, then add the rest, pulsing the machine until the drying ingredients are just incorporated, but do not overmix. (You can also transfer the batter to a bowl and mix the dry ingredients in, which ensures the dry ingredients get incorporated evenly and you don’t overbeat it.)

Scrape the batter into the prepared cake pan and bake the cake for 45-60 minutes, or until the top is deep brown and feels set when you press in the center.

Remove the cake from the oven and run a sharp or serrated knife around the perimeter, loosing the cake from the sides of the pan. Let the cake cool completely in the pan.

Once cool, tap the cake out of the pan, remove the parchment paper, and set on a cake plate until ready to serve.

Note

: This cake is best made in the food processor, but if using a stand mixture, use the paddle attachment and let the mixer run until the almond paste is finely broken up.